本节书摘来自异步社区《Android平板电脑开发秘籍》一书中的第3章,第3.7节技巧:在ActionBar中显示子菜单,作者 【印度】B.M. Harwani,更多章节内容可以访问云栖社区“异步社区”公众号查看
3.7 技巧:在ActionBar中显示子菜单
Android平板电脑开发秘籍
为了能在ActionBar中显示显示子菜单,需要将子菜单项分组后放入一个
代码清单3-6 写入菜单文件activity_action_bar_submenu.xml的代码
<menu
    xmlns:android="http://schemas.android.com/apk/res/android">
    <item android:id="@+id/create"
        android:title="Create"
        android:orderInCategory="0"
        android:showAsAction="ifRoom" >
        <menu>
            <item android:id="@+id/create_invoice"
                android:title="Create Invoice" />
            <item android:id="@+id/create_customer"
                android:title="Create Customer" />
            <item android:id="@+id/create_product"
                android:title="Create Product" />
        </menu>
    </item>
        <item android:id="@+id/update"
        android:title="Update"
        android:showAsAction="always" />
</menu>
可以看到,上述代码包括了android:showAsAction属性,空间足够时将显示ActionBar中的菜单项。Action项Create中的
元素定义了包含三个菜单项的子菜单:Create Invoice、Create Customer和Create Product。为了把点击Action或菜单项之后的反馈信息显示出来,需要在Layout文件activity_ action_bar_submenu.xml中定义一个TextView控件。TextView将会显示文字,标示是哪个Action菜单或Action项被选中了。定义完TextView控件后,Layout文件activity_ action_bar_submenu.xml应该如代码清单3-7所示。
代码清单 3-7 写入Layout 文件activity_action_bar_submenu.xml的代码
<LinearLayout
    xmlns:android="http://schemas.android.com/apk/res/android"
    android:layout_width="match_parent"
    android:layout_height="match_parent"
    android:orientation="vertical" >
    <TextView
        android:layout_width="match_parent"
        android:layout_height="wrap_content"
        android:id="@+id/selectedopt"
        android:textSize="@dimen/text_size"
        android:textStyle="bold" />
</LinearLayout>
为了在Java代码中标识TextView,它的ID被赋为selectedopt。通过TextView控件显示的文字将会以粗体显示、字体大小为18dp。为了把点击菜单或Action项之后的反馈信息显示出来,请修改ActionBarSubmenuActivity.java,如代码清单3-8所示。其中的代码会显示文字信息,标示是哪个菜单或Action项被选中了。
代码清单3-8 写入Java Activity文件ActionBarSubmenuActivity.java的代码
package com.androidtablet.actionbarsubmenu;
import android.os.Bundle;
import android.app.Activity;
import android.view.Menu;
import android.view.MenuInflater;
import android.view.MenuItem;
import android.widget.TextView;
public class ActionBarSubmenuActivity extends Activity {
    private TextView selectedOpt;
    @Override
    public void onCreate(Bundle savedInstanceState) {
        super.onCreate(savedInstanceState);
        setContentView(R.layout.activity_action_bar_submenu);
        selectedOpt=(TextView)findViewById(R.id.selectedopt);
    }
    @Override
    public boolean onCreateOptionsMenu(Menu menu) {
        MenuInflater inflater = getMenuInflater();
        inflater.inflate(R.menu.activity_action_bar_submenu, menu);
        return true;
    }
    @Override
    public boolean onOptionsItemSelected(MenuItem item) {
        switch (item.getItemId()) {
            case R.id.create:
                selectedOpt.setText("You have selected Create
                    option");
                break;
            case R.id.update:
                selectedOpt.setText("You have selected Update option");
                break;
            case R.id.create_invoice:
                selectedOpt.setText("You have selected Create
                    Invoice option");
                break;
            case R.id.create_customer:
                selectedOpt.setText("You have selected Create
                    Customer option");
                break;
            case R.id.create_product:
                selectedOpt.setText("You have selected Create
                    Product option");
                break;
        }
        return true;
    }
}
为了显示ActionBar,把菜单文件activity_action_bar_submenu.xml中定义的菜单装载或整合进来。这样,从Activity类得到了MenuInflater。对象inflater创建自MenuInflater类,它调用inflater的inflate方法来装载或融合在activity_action_ bar_submenu中定义的菜单。onCreateOptionsMenu()方法将会返回布尔值True,以便让Android显示菜单。
所有被点击的菜单或Action项都会通过onOptionsItemSelected()方法进行处理。选中的菜单或Action项将会作为参数MenuItem传入此方法。可以在Activity中重写此方法,写入点击菜单或Action项后需要执行的代码。在此方法中,读取了所选菜单或Action项的ID,然后执行相应的动作。getItemId()方法将帮助你查找所选菜单或Action项的ID。然后,通过switch语句,把标示所选菜单或Action项的文字信息显示在TextView对象selectedOpt中。
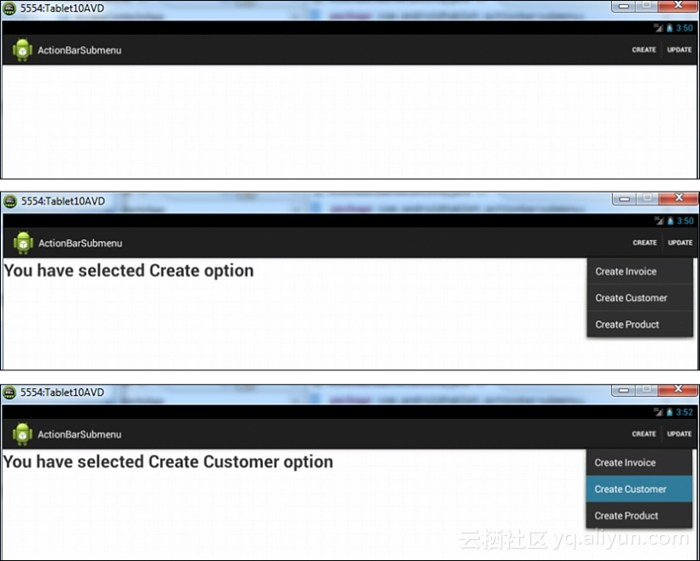
运行此应用程序后,会看到显示在ActionBar 中的Action项Create和Update(见图3-6上)。点击Action项Create后,TextView将会显示信息“You have selected Create option”。点击Action项Create后将会出现一个子菜单,如图3-6中所示。在选择子菜单项后,相应的文字信息将会通过TextView显示出来。例如,选择子菜单项Create Customer后,将会显示文字信息“You have selected Create Customer option”,如图3-6下所示。
要建立可勾选的菜单项,请把android:checkable属性设为布尔值True。比如,要让子菜单项Create Product成为可勾选项(见图3-6中),可以写入以下代码:
<item android:id="@+id/create_product"
    android:title="Create Product"
    android:checkable="true" />
..\jpgs\03fig06.jpg
图3-6 应用程序启动时显示的两个Action项目(上),点击Action项Create后弹
出的子菜单(中),显示哪个子菜单项被选中的TextView控件(下)
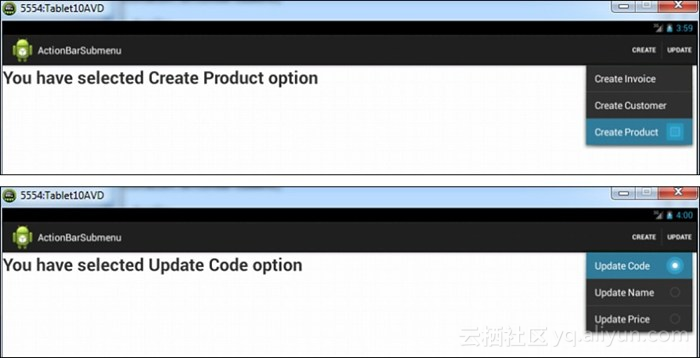
这段代码将会让Create Product显示为可勾选的菜单项(参见图3-7上)。
还可以让菜单项显示为单选按钮。也就是说,可以让用户选择一组菜单项中的某一个。一旦选中了某一个,以前选中的菜单项将自动取消。
为了理解单选按钮的概念,请在Action项Update下添加一组互斥的菜单项。这组菜单项显示为Update Code、Update Name和Update Price。这些菜单项将显示为单选按钮,因此其中只有一个菜单项能被选中。当选中了一个菜单项时,之前所选的菜单项都将会自动取消选中。为了把一组互斥的菜单项加入到Action项Update中,请把菜单文件activity_action_bar_ submenu.xml修改如代码清单3-9所示。
代码清单3-9 写入菜单文件activity_action_bar_submenu.xml的代码
<menu
    xmlns:android="http://schemas.android.com/apk/res/android">
    <item android:id="@+id/create"
        android:title="Create"
        android:orderInCategory="0"
        android:showAsAction="ifRoom|withText" >
        <menu>
            <item android:id="@+id/create_invoice"
                android:title="Create Invoice" />
            <item android:id="@+id/create_customer"
                android:title="Create Customer" />
            <item android:id="@+id/create_product"
                android:title="Create Product"
                android:checkable="true" />
        </menu>
    </item>
    <item android:id="@+id/update"
        android:title="Update"
        android:showAsAction="always" >
        <menu>
            <group android:checkableBehavior="single">
                <item android:id="@+id/update_code"
                    android:title="Update Code"
                    android:checked="true" />
                <item android:id="@+id/update_name"
                    android:title="Update Name" />
                <item android:id="@+id/update_price"
                    android:title="Update Price" />
            </group>
        </menu>
    </item>
</menu>
可以看到,菜单项嵌套在元素中,android:checkableBehavior=single属性与该组关联,确保菜单组中每次只能选中一个菜单项。由此,Update Code、Update Name、Update Price菜单项将会显示为单选按钮。为了知道选中了哪个单选按钮,请把代码清单3-10给出的代码写入ActionBarSubmenuActivity.java文件。只有以粗体显示的代码是新添加的,其余部分与代码清单3-8一致。
代码清单3-10 写入Java Activity 文件ActionBarSubmenuActivity.java的代码
package com.androidtablet.actionbarsubmenu;
import android.os.Bundle;
import android.app.Activity;
import android.view.Menu;
import android.view.MenuInflater;
import android.view.MenuItem;
import android.widget.TextView;
public class ActionBarSubmenuActivity extends Activity {
    private TextView selectedOpt;
    @Override
    public void onCreate(Bundle savedInstanceState) {
        super.onCreate(savedInstanceState);
        setContentView(R.layout.activity_action_bar_submenu);
        selectedOpt=(TextView)findViewById(R.id.selectedopt);
    }
    @Override
    public boolean onCreateOptionsMenu(Menu menu) {
        MenuInflater inflater = getMenuInflater();
        inflater.inflate(R.menu.activity_action_bar_submenu, menu);
        return true;
    }
    @Override
    public boolean onOptionsItemSelected(MenuItem item) {
        switch (item.getItemId()) {
            case R.id.create:
                selectedOpt.setText("You have selected Create
                    option");
                break;
            case R.id.update:
                selectedOpt.setText("You have selected Update
                    option");
                break;
            case R.id.create_invoice:
                selectedOpt.setText("You have selected Create
                    Invoice option");
                break;
            case R.id.create_customer:
                selectedOpt.setText("You have selected Create
                    Customer option");
                break;
            case R.id.create_product:
                selectedOpt.setText("You have selected Create
                    Product option");
                break;
case R.id.update_code:
                selectedOpt.setText("You have selected Update
                    Code option");
                break;
            case R.id.update_name:
                selectedOpt.setText("You have selected Update
                    Name option");
                break;
            case R.id.update_price:
                selectedOpt.setText("You have selected Update
                    Price option");
                break;
        }
        return true;
    }
}
运行此应用程序后,选择Action项Update,将会出现一个子菜单,菜单项Update Code、Update Name和Update Price将以单选按钮方式显示。当选中菜单项时,任何以前选中的菜单项将会取消,对应的文字信息将会由TextView显示出来。例如,当你点击子菜单中的Update Code菜单项时,将会显示文字信息“You have selected Update Code”,如图3-7下所示。