在使用docker search从docker hub 查询images时, 返回的数据包含name, 描述, stars, official, automated的信息.
如 :
[root@db-172-16-3-221 ~]# docker search postgres
NAME                                         DESCRIPTION                                     STARS     OFFICIAL   AUTOMATED
postgres                                     The PostgreSQL object-relational database ...   273       [OK]
paintedfox/postgresql                        A docker image for running Postgresql.          45                   [OK]
helmi03/docker-postgis                       PostGIS 2.1 in PostgreSQL 9.3                   19                   [OK]
....
stars类似github里面的star, 或者点赞的意思. 代表流行率.
OFFICIAL 和 AUTOMATED
Docker Official Images指docker标准库, 由docker 官方建立. 用户建立的image则会有userid的prefix.
automated builds 则是通过代码版本管理网站结合docker hub提供的接口生成的, 例如github, bitbucket,
例如从docker hub pull一个官方image.
The Official and Automated build statuses. Official repositories are built and maintained by the Stackbrew project, and Automated repositories are Automated Builds that allow you to validate the source and content of an image.Docker Official Images指docker标准库, 由docker 官方建立. 用户建立的image则会有userid的prefix.
We've reviewed the images available to use and we decided to use the training/sinatra image. So far we've seen two types of images repositories, images like ubuntu, which are called base or root images. These base images are provided by Docker Inc and are built, validated and supported. These can be identified by their single word names.

We've also seen user images, for example the training/sinatra image we've chosen. A user image belongs to a member of the Docker community and is built and maintained by them. You can identify user images as they are always prefixed with the user name, here training, of the user that created them
automated builds 则是通过代码版本管理网站结合docker hub提供的接口生成的, 例如github, bitbucket,
你需要注册docker hub, 然后使用github或bitbucket的在账户链接到docker hub, 然后就可以选择在github或bitbucket里面的项目自动build docker image, 这样的话只要代码版本管理网站的项目有更新, 就会触发自动创建image.
Automated Builds
Automated Builds automate the building and updating of images from GitHub or BitBucket, directly on Docker Hub. It works by adding a commit hook to your selected GitHub or BitBucket repository, triggering a build and update when you push a commit.

To setup an Automated Build
Create a Docker Hub account and login.
Link your GitHub or BitBucket account through the "Link Accounts" menu.
Configure an Automated Build.
Pick a GitHub or BitBucket project that has a Dockerfile that you want to build.
Pick the branch you want to build (the default is the master branch).
Give the Automated Build a name.
Assign an optional Docker tag to the Build.
Specify where the Dockerfile is located. The default is /.
Once the Automated Build is configured it will automatically trigger a build and, in a few minutes, you should see your new Automated Build on the Docker Hub Registry. It will stay in sync with your GitHub and BitBucket repository until you deactivate the Automated Build.

If you want to see the status of your Automated Builds, you can go to your Automated Builds page on the Docker Hub, and it will show you the status of your builds and their build history.

Once you've created an Automated Build you can deactivate or delete it. You cannot, however, push to an Automated Build with the docker push command. You can only manage it by committing code to your GitHub or BitBucket repository.

You can create multiple Automated Builds per repository and configure them to point to specificDockerfile's or Git branches.

Build Triggers
Automated Builds can also be triggered via a URL on Docker Hub. This allows you to rebuild an Automated build image on demand.
例如从docker hub pull一个官方image.
[root@db-172-16-3-221 lib]# docker pull postgres
下载结束之后, 可以查看到所有的TAG都pull下来了
使用inspect查看image的内容
docker下载的image会放到/var/lib/docker目录中(默认如此, 如果启动docker时使用-g指定其他目录的话, 那么会放到其他目录)
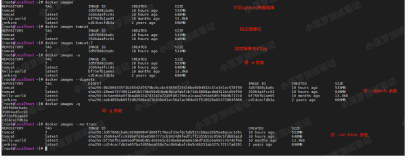
[root@db-172-16-3-221 lib]# docker images
REPOSITORY          TAG                 IMAGE ID            CREATED             VIRTUAL SIZE
postgres            9.4-beta3           68b6ddf9ca08        42 hours ago        213.6 MB
postgres            9.4                 68b6ddf9ca08        42 hours ago        213.6 MB
postgres            9.3                 935836384c52        42 hours ago        212.9 MB
postgres            9                   935836384c52        42 hours ago        212.9 MB
postgres            9.3.5               935836384c52        42 hours ago        212.9 MB
postgres            latest              935836384c52        42 hours ago        212.9 MB
postgres            9.2                 2a9ab0b9fa56        42 hours ago        212.7 MB
postgres            9.2.9               2a9ab0b9fa56        42 hours ago        212.7 MB
postgres            9.1.14              ee60947f6805        42 hours ago        212.1 MB
postgres            9.1                 ee60947f6805        42 hours ago        212.1 MB
postgres            9.0.18              f29be88283f6        42 hours ago        211.5 MB
postgres            9.0                 f29be88283f6        42 hours ago        211.5 MB
postgres            8                   c57c14beb696        42 hours ago        211 MB
postgres            8.4                 c57c14beb696        42 hours ago        211 MB
postgres            8.4.22              c57c14beb696        42 hours ago        211 MB
postgres            9.4-beta2           bf872395e1d4        2 weeks ago         213.6 MB
使用inspect查看image的内容
[root@db-172-16-3-221 lib]# docker inspect postgres:9.3.5
[{
    "Architecture": "amd64",
    "Author": "",
    "Comment": "",
    "Config": {
        "AttachStderr": false,
        "AttachStdin": false,
        "AttachStdout": false,
        "Cmd": [
            "postgres"
        ],
        "CpuShares": 0,
        "Cpuset": "",
        "Domainname": "",
        "Entrypoint": [
            "/docker-entrypoint.sh"
        ],
        "Env": [
            "PATH=/usr/lib/postgresql/9.3/bin:/usr/local/sbin:/usr/local/bin:/usr/sbin:/usr/bin:/sbin:/bin",
            "LANG=en_US.utf8",
            "PG_MAJOR=9.3",
            "PG_VERSION=9.3.5-1.pgdg70+1",
            "PGDATA=/var/lib/postgresql/data"
        ],
        "ExposedPorts": {
            "5432/tcp": {}
        },
        "Hostname": "39d2c877bc4f",
        "Image": "15d042248df39ca896223c9e75f0f4541996f2b52030f1f8e6619cf18f77e395",
        "Memory": 0,
        "MemorySwap": 0,
        "NetworkDisabled": false,
        "OnBuild": [],
        "OpenStdin": false,
        "PortSpecs": null,
        "StdinOnce": false,
        "Tty": false,
        "User": "",
        "Volumes": {
            "/var/lib/postgresql/data": {}
        },
        "WorkingDir": ""
    },
    "Container": "977043cde52cd15e070d71a67fbd8e2ec908af49123f3f773f71cda2061e9f44",
    "ContainerConfig": {
        "AttachStderr": false,
        "AttachStdin": false,
        "AttachStdout": false,
        "Cmd": [
            "/bin/sh",
            "-c",
            "#(nop) CMD [postgres]"
        ],
        "CpuShares": 0,
        "Cpuset": "",
        "Domainname": "",
        "Entrypoint": [
            "/docker-entrypoint.sh"
        ],
        "Env": [
            "PATH=/usr/lib/postgresql/9.3/bin:/usr/local/sbin:/usr/local/bin:/usr/sbin:/usr/bin:/sbin:/bin",
            "LANG=en_US.utf8",
            "PG_MAJOR=9.3",
            "PG_VERSION=9.3.5-1.pgdg70+1",
            "PGDATA=/var/lib/postgresql/data"
        ],
        "ExposedPorts": {
            "5432/tcp": {}
        },
        "Hostname": "39d2c877bc4f",
        "Image": "15d042248df39ca896223c9e75f0f4541996f2b52030f1f8e6619cf18f77e395",
        "Memory": 0,
        "MemorySwap": 0,
        "NetworkDisabled": false,
        "OnBuild": [],
        "OpenStdin": false,
        "PortSpecs": null,
        "StdinOnce": false,
        "Tty": false,
        "User": "",
        "Volumes": {
            "/var/lib/postgresql/data": {}
        },
        "WorkingDir": ""
    },
    "Created": "2014-10-21T05:54:39.659381225Z",
    "DockerVersion": "1.2.0",
    "Id": "935836384c524aafc0ac1c05246002c9c93343f0b4283a34e77a5f92f97f9a7c",
    "Os": "linux",
    "Parent": "15d042248df39ca896223c9e75f0f4541996f2b52030f1f8e6619cf18f77e395",
    "Size": 0
}
docker下载的image会放到/var/lib/docker目录中(默认如此, 如果启动docker时使用-g指定其他目录的话, 那么会放到其他目录)
[root@db-172-16-3-221 docker]# ll
total 44
drwx------   2 root root  4096 Oct 22 10:59 containers
drwx------   5 root root  4096 Oct 22 11:00 devicemapper
drwx------   3 root root  4096 Oct 22 10:59 execdriver
drwx------ 102 root root 12288 Oct 23 07:42 graph
drwx------   2 root root  4096 Oct 22 10:59 init
-rw-r--r--   1 root root  5120 Oct 22 10:59 linkgraph.db
-rw-------   1 root root  1223 Oct 23 07:42 repositories-devicemapper
drwx------   2 root root  4096 Oct 22 10:59 volumes
所以docker主机最好使用额外的分区或存储来加载/var目录.(例如zfs, lv)
或者在第一次启动docker服务前先建好docker, 使用软链接练过去.
mkdir /data01/docker
ln -s /data01/docker /var/lib/
那么在启动docker服务后, 就会使用这个目录了.
service docker start
[参考]