一、创建一个文件夹
mkdir Module二、下载工程脚手架
pod lib create AaronSwiftAaronSwift是你要创建的组件工程的名称。安装过程中会提示你输入要下载工程的配置(如下:),依次输入:iOS、Swift、Yes、Quick、Yes,其中第二步如果想创建OC库,请输入ObjC。(各版本可能有不同,请根据提示输入)
Cloning `https://github.com/CocoaPods/pod-template.git` into `AaronSwift`.

Configuring AaronSwift template.

------------------------------

To get you started we need to ask a few questions, this should only take a minute.

If this is your first time we recommend running through with the guide:

 - https://guides.cocoapods.org/making/using-pod-lib-create.html

 ( hold cmd and double click links to open in a browser. )

What platform do you want to use?? [ iOS / macOS ]

 > iOS

What language do you want to use?? [ Swift / ObjC ]

 > Swift

Would you like to include a demo application with your library? [ Yes / No ]

 > Yes

Which testing frameworks will you use? [ Quick / None ]

 > Quick

Would you like to do view based testing? [ Yes / No ]

 > Yes

Running pod install on your new library.

Analyzing dependencies

Downloading dependencies

Installing AaronSwift (0.1.0)

Installing FBSnapshotTestCase (2.1.4)

Installing Nimble (7.3.4)

Installing Nimble-Snapshots (6.3.0)

Installing Quick (1.2.0)

Generating Pods project

Integrating client project

[!] Please close any current Xcode sessions and use `AaronSwift.xcworkspace` for this project from now on.

Pod installation complete! There are 5 dependencies from the Podfile and 5 total pods installed.

[!] Automatically assigning platform `iOS` with version `9.3` on target `AaronSwift_Example` because no platform was specified. Please specify a platform for this target in your Podfile. See `https://guides.cocoapods.org/syntax/podfile.html#platform`.

 Ace! you're ready to go!

 We will start you off by opening your project in Xcode

 open 'AaronSwift/Example/AaronSwift.xcworkspace'

To learn more about the template see `https://github.com/CocoaPods/pod-template.git`.

To learn more about creating a new pod, see `https://guides.cocoapods.org/making/making-a-cocoapod`.
三、创建Git Hub远程仓库
如果是公司的项目,需要运维同事搭建一个Git Lab仓库并创建项目。这里用Git Hub代替。在Git Hub上创建一个AaronSwift的项目。地址:https://github.com/AaronYin0514/AaronSwift
四、代码提交到远程仓库
进入工程目录
cd AaronSwift/

git init

git add .

git commit -m "first commit"

git remote add origin https://github.com/AaronYin0514/AaronSwift.git

git push -u origin master
五、编写代码
现在我们可以为私有库添加代码,位置是跟目录下的AaronSwift/Classes,我们的代码必须加到这个目录下。创建库时自动生成了ReplaceMe.swift文件,我们添加一些测试代码:
import Foundation

public struct RepleaceMeTest {

 public func test() {

 print("Test!")

 }

}
六、提交代码
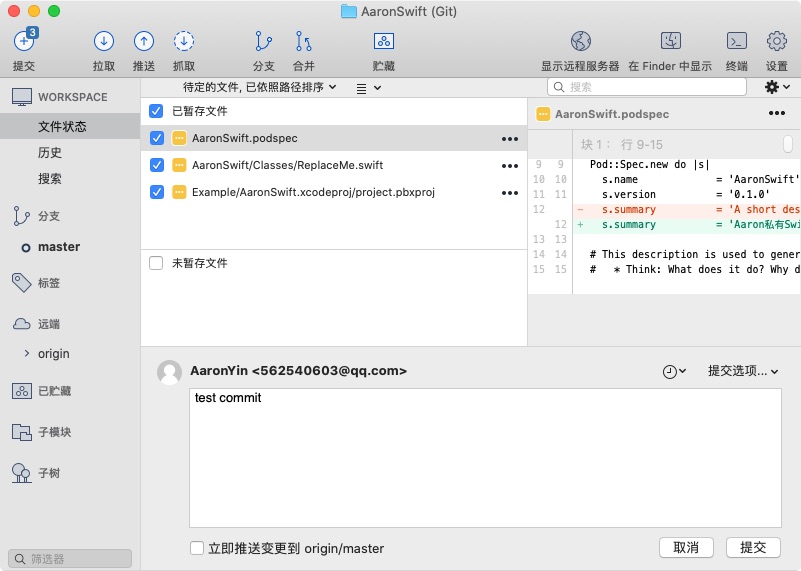
通过Source Tree管理代码,commit代码变动:

七、添加Tag
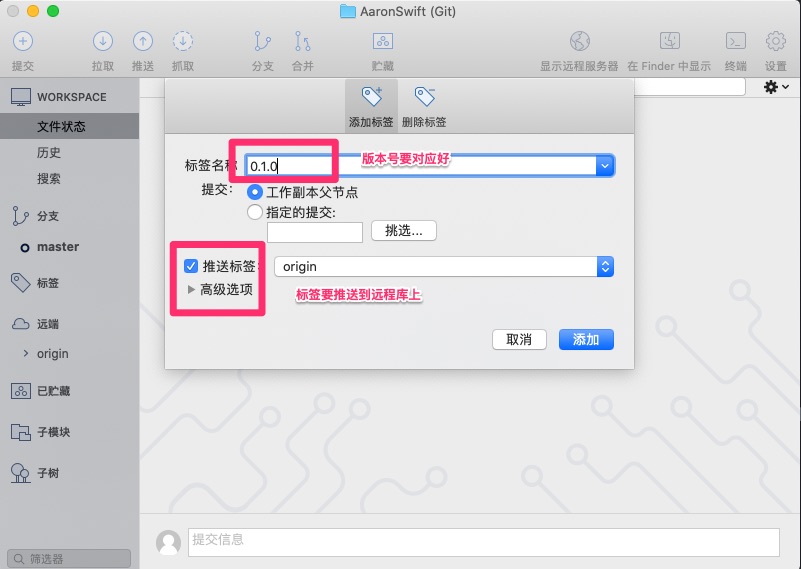
每一个版本我们需要添加一个Tag,如下图

八、检测配置文件是否填写正确
pod spec lint --allow-warnings其中--allow-warnings参数代表忽略警告,如果你的代码在编译时有警告,如果不加这个参数就会报错。结果如下:
 -> AaronSwift (0.1.0)

 - WARN | [iOS] swift: The validator used Swift `4.0` by default because no Swift version was specified. To specify a Swift version during validation, add the `swift_versions` attribute in your podspec. Note that usage of a `.swift-version` file is now deprecated.

 - NOTE | xcodebuild: note: Using new build system

 - NOTE | [iOS] xcodebuild: note: Planning build

 - NOTE | [iOS] xcodebuild: note: Constructing build description

 - NOTE | [iOS] xcodebuild: warning: Skipping code signing because the target does not have an Info.plist file and one is not being generated automatically. (in target 'App' from project 'App')

 - NOTE | [iOS] xcodebuild: note: Execution policy exception registration failed and was skipped: Error Domain=NSPOSIXErrorDomain Code=1 "Operation not permitted" (in target 'AaronSwift' from project 'Pods')

 - NOTE | [iOS] xcodebuild: note: Execution policy exception registration failed and was skipped: Error Domain=NSPOSIXErrorDomain Code=1 "Operation not permitted" (in target 'Pods-App' from project 'Pods')

 - NOTE | [iOS] xcodebuild: note: Execution policy exception registration failed and was skipped: Error Domain=NSPOSIXErrorDomain Code=1 "Operation not permitted" (in target 'App' from project 'App')

Analyzed 1 podspec.

AaronSwift.podspec passed validation.
九、配置文件说明
刚才说的检测配置文件是否配置正确,是哪个文件呢?就是工程跟目录下的后缀为podspec的文件,在我的例子中就是AaronSwift.podspec文件。
打开这个文件,里面是工程的配置。我们在用pod命令安装库时,就是找到这个文件,获取地址下载库,并根据配置下载好依赖库和其它工程的配置。
Pod::Spec.new do |s|

 s.name  = 'AaronSwift'

 s.version = '0.1.0'

 s.summary = 'Aaron私有Swift公共组件库AaronSwift.'

# This description is used to generate tags and improve search results.

#  * Think: What does it do? Why did you write it? What is the focus?

#  * Try to keep it short, snappy and to the point.

#  * Write the description between the DESC delimiters below.

#  * Finally, don't worry about the indent, CocoaPods strips it!

 s.description = <<-DESC

TODO: Add long description of the pod here.

 DESC

 s.homepage  = 'https://github.com/AaronYin0514/AaronSwift'

 # s.screenshots  = 'www.example.com/screenshots_1', 'www.example.com/screenshots_2'

 s.license = { :type => 'MIT', :file => 'LICENSE' }

 s.author  = { 'AaronYin0514' => '562540603@qq.com' }

 s.source  = { :git => 'https://github.com/AaronYin0514/AaronSwift.git', :tag => s.version.to_s }

 # s.social_media_url = 'https://twitter.com/<TWITTER_USERNAME>'

 s.ios.deployment_target = '8.0'

 s.source_files = 'AaronSwift/Classes/**/*'

 # s.resource_bundles = {

 #  'AaronSwift' => ['AaronSwift/Assets/*.png']

 # }

 # s.public_header_files = 'Pod/Classes/**/*.h'

 # s.frameworks = 'UIKit', 'MapKit'

 # s.dependency 'AFNetworking', '~> 2.3'

end- s.name :pod search 搜索的关键词,注意这里一定要和.podspec的名称一样
- s.version :版本号,这个版本号必须与对应的Tag一致。上面例子中我们设置的为0.1.0
- s.summary : 简介,这个简介你需要修改一下,对项目的简短介绍,不修改的话会有警告。
- s.homepage : 项目主页地址,这个地址需要是https地址
- s.license : 许可证
- s.author : 作者
- s.social_media_url : 社交网址
- s.source : 项目的地址
- s.source_files : 需要包含的源文件,“” 表示匹配所有文件,“*” 表示匹配所有子目录。
- s.resources: 资源文件
- s.requires_arc : 是否支持ARC
- s.dependency :依赖库
- s.ios.deployment_target = '8.0' : 支持的pod最低版本
十、发布版本
pod repo add AaronSwift https://github.com/AaronYin0514/AaronSwift.git

pod repo push AaronSwift AaronSwift.podspec --allow-warnings
执行这两步操作,操作过程如下
yinzhongzhengdeMacBook-Pro:AaronSwift yinzhongzheng$ pod repo add AaronSwift https://github.com/AaronYin0514/AaronSwift.git

Cloning spec repo `AaronSwift` from `https://github.com/AaronYin0514/AaronSwift.git`

yinzhongzhengdeMacBook-Pro:AaronSwift yinzhongzheng$ pod repo push AaronSwift AaronSwift.podspec --allow-warnings

Validating spec

 -> AaronSwift (0.1.0)

 - WARN | [iOS] swift: The validator used Swift `4.0` by default because no Swift version was specified. To specify a Swift version during validation, add the `swift_versions` attribute in your podspec. Note that usage of a `.swift-version` file is now deprecated.

 - NOTE | xcodebuild: note: Using new build system

 - NOTE | [iOS] xcodebuild: note: Planning build

 - NOTE | [iOS] xcodebuild: note: Constructing build description

 - NOTE | [iOS] xcodebuild: warning: Skipping code signing because the target does not have an Info.plist file and one is not being generated automatically. (in target 'App' from project 'App')

 - NOTE | [iOS] xcodebuild: note: Execution policy exception registration failed and was skipped: Error Domain=NSPOSIXErrorDomain Code=1 "Operation not permitted" (in target 'AaronSwift' from project 'Pods')

 - NOTE | [iOS] xcodebuild: note: Execution policy exception registration failed and was skipped: Error Domain=NSPOSIXErrorDomain Code=1 "Operation not permitted" (in target 'Pods-App' from project 'Pods')

 - NOTE | [iOS] xcodebuild: note: Execution policy exception registration failed and was skipped: Error Domain=NSPOSIXErrorDomain Code=1 "Operation not permitted" (in target 'App' from project 'App')

Updating the `AaronSwift' repo

Adding the spec to the `AaronSwift' repo

 - [Update] AaronSwift (0.1.0)

Pushing the `AaronSwift' repo
十一、解释pod repo add 库名称 库地址
这一个操作是将原创仓库添加到本地,执行下面命令:
cd ~/.cocoapods/repos/

open .
就能看到Cocopods的所有本地仓库列表了,例子的库是AaronSwift。我们也可以浏览一下其它的目录,就能找到很多后缀为podspec的文件。
pod install命令就是根据要安装的库的名字在这些目录中遍历,找到对应的配置文件后,解析里面的地址和配置进行下载。
Pod update命令是从远程库,把这些配置文件下载到本地的这个目录中,再install。
十二、解释pod repo push 库名 库配置文件(后缀为podspec) --allow-warnings
这个命令就是发布版本的命令,将版本push到远程,我们在~/.cocoapods/repos/AaronSwift/AaronSwift/目录中,可以找到对应版本号的目录,目录里面就是配置文件(后缀为podspec)。
pod install时指定版本或最新版本时,就是根据版本号找到对应的配置文件的。
十三、pod udpate
进入Example,这个目录中是我们测试代码的工程,pod update后,就安装了我们发布的版本,到此,整个过程就完成了。
yinzhongzhengdeMacBook-Pro:AaronSwift yinzhongzheng$ cd Example/

yinzhongzhengdeMacBook-Pro:Example yinzhongzheng$ ls

AaronSwift  Podfile  Tests

AaronSwift.xcodeproj  Podfile.lock

AaronSwift.xcworkspace  Pods

yinzhongzhengdeMacBook-Pro:Example yinzhongzheng$ pod update

Update all pods

Updating local specs repositories

^C[!] Cancelled

yinzhongzhengdeMacBook-Pro:Example yinzhongzheng$ pod update --no-repo-update

Update all pods

Analyzing dependencies

Downloading dependencies

Installing AaronSwift 0.1.0

Generating Pods project

Integrating client project

Pod installation complete! There are 5 dependencies from the Podfile and 5 total pods installed.

[!] Automatically assigning platform `iOS` with version `9.3` on target `AaronSwift_Example` because no platform was specified. Please specify a platform for this target in your Podfile. See `https://guides.cocoapods.org/syntax/podfile.html#platform`.


