本文记录下申请RSA和ECDSA通配符证书的过程。
1. 安装Certbot
签署通配符证书需要Certbot 0.22以上。如果以前安装过certbot,一般是直接yum update即可。如果是全新安装,则如下:
- 先升级:
yum update -y- 查看系统版本:
cat /etc/centos-release
- 安装certbot:
yum install certbot -y- 查看certbot版本:
certbot --version
2. 申请RSA通配符证书的过程
- 用如下命令申请证书
co1dawn.com和*.co1dawn.com换成自己的域名;执行该命令时不依赖nginx。
certbot -d co1dawn.com -d *.co1dawn.com --manual --preferred-challenges dns-01 --server https://acme-v02.api.letsencrypt.org/directory certonly --agree-tos- 输入应急邮箱,证书到期前会有邮件提示:

- 如果想跳过输入邮箱的步骤,可在申请命令后面加上:
--register-unsafely-without-email- 之后出现如下提示:要公开记录申请该证书的IP地址,是否同意?不同意就无法继续。

- 同意之后,出现如下提示,第一个“Press Enter to Continue”处直接回车,第二个“Press Enter to Continue”不要按回车:
-------------------------------------------------------------------------------
Please deploy a DNS TXT record under the name
_acme-challenge.co1dawn.com with the following value:

iLS0NjcdP3RR1KphB6xbbVnKS_NS2uMW-xdDRzz85OM

Before continuing, verify the record is deployed.
-------------------------------------------------------------------------------
Press Enter to Continue             #此处直接回车

-------------------------------------------------------------------------------
Please deploy a DNS TXT record under the name
_acme-challenge.co1dawn.com with the following value:

f3V7aw5GPm5yzNsJFanQQaUFMyVQcqriUe3UjIDUHn0

Before continuing, verify the record is deployed.
-------------------------------------------------------------------------------
Press Enter to Continue             #此处不要按回车
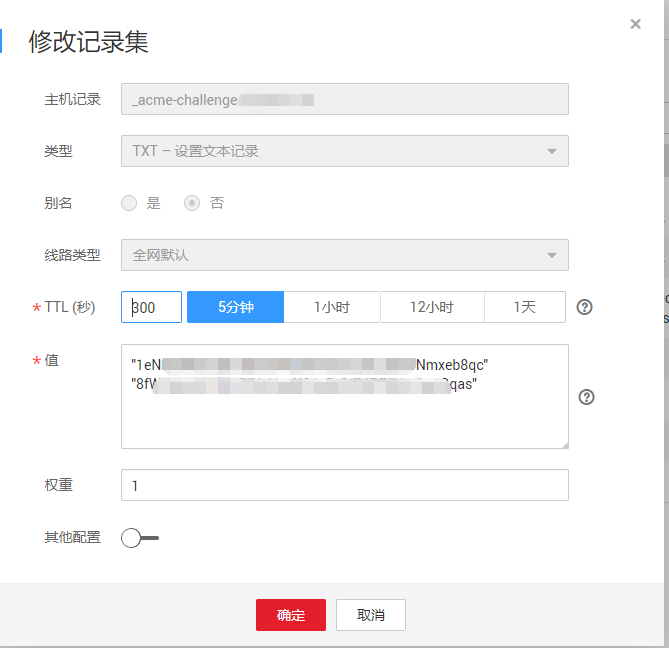
为DNS解析增加TXT记录
进入自己域名的DNS记录管理页面,增加两条TXT记录,多数情况下,仅需在域名(Name)处填入_acme-challenge,在内容(Target)处填入上一步Certbot生成的内容即可(记得填写两个,多个文本记录之间以换行符(Enter键)分隔),不同DNS提供商处可能会略有不同,根据实际情况修改:
稍等片刻,等TXT记录解析生效。查看是否生效的命令和生效后的查询结果如下:
dig -t txt _acme-challenge.alicdn.com @114.114.114.114
或者
host -t txt _acme-challenge.alicdn.com
查询结果如下:(必须是返回两行结果)
[root@localhost ~]# host -t txt _acme-challenge.alicdn.com
_acme-challenge.alicdn.com descriptive text "iLS0NjcdP3RR1KphB6xbbVnKS_NS2uMW-xdDRzz85OM"
_acme-challenge.alicdn.com descriptive text "f3V7aw5GPm5yzNsJFanQQaUFMyVQcqriUe3UjIDUHn0"
如果提示
-bash: host: command not found
执行
yum install bind-utils
继续申请证书
当第查看TXT记录解析成功后,回到申请证书的 Press Enter to Continue 处,直接回车,等待:
Waiting for verification...
Resetting dropped connection: acme-v02.api.letsencrypt.org
Resetting dropped connection: acme-v02.api.letsencrypt.org
Cleaning up challenges

IMPORTANT NOTES:
 - Congratulations! Your certificate and chain have been saved at:
   /etc/letsencrypt/live/alicdn.com/fullchain.pem
   Your key file has been saved at:
   /etc/letsencrypt/live/alicdn.com/privkey.pem
   Your cert will expire on 2019-11-10. To obtain a new or tweaked
   version of this certificate in the future, simply run certbot
   again. To non-interactively renew *all* of your certificates, run
   "certbot renew"
 - If you like Certbot, please consider supporting our work by:

   Donating to ISRG / Let's Encrypt:   https://letsencrypt.org/donate
   Donating to EFF:                    https://eff.org/donate-le

[root@localhost ~]#
到了这一步后,大功告成!!! 证书存放在/etc/letsencrypt/live/alicdn.com/里面
要续期的话
执行certbot-auto renew就可以了
下面是一个nginx应用该证书的一个例子
server {
    server_name xxx.com;
    listen 443 http2 ssl;
    ssl on;
    ssl_certificate /etc/cert/xxx.cn/fullchain.pem;
    ssl_certificate_key /etc/cert/xxx.cn/privkey.pem;
    ssl_trusted_certificate  /etc/cert/xxx.cn/chain.pem;

    location / {
      proxy_pass http://127.0.0.1:6666;
    }
}
申请ECDSA通配符证书
- 首先是生成支持通配符证书的请求文件
步骤请参考这篇文章:使用Let’s Encrypt的Certbot为ngxin生成ECDSA证书,以下内容中的文件名基本和这篇文章相同。
生成ECDSA私钥:
openssl ecparam -genkey -name secp384r1 > ec.key- 生成通配符证书的请求文件的命令需要改为:
openssl req -new -sha384 -key ec.key -subj "/CN=co1dawn.com" -reqexts SAN -config <(cat /usr/local/ssl/openssl.cnf <(printf "[SAN]\nsubjectAltName=DNS:co1dawn.com,DNS:*.co1dawn.com")) -outform der -out ec-der.csrec.key 是自己生成的私钥
co1dawn.com 改成自己的域名
ec-der.csr 支持通配符证书的请求文件,假设放到/usr/local/src下,下面会用到
- 申请通配符证书
步骤和申请默认的RSA通配符证书基本一致,而且TXT记录相同,无需再次添加了。
certbot -d co1dawn.com -d *.co1dawn.com --manual --preferred-challenges dns-01 --server https://acme-v02.api.letsencrypt.org/directory certonly --csr "/usr/local/src/ec-der.csr"之后一路回车即可。
参考博客原址:https://www.coldawn.com/how-to-issue-acmev2-wildcard-certificates-with-certbot-on-centos-7/
