更多附加的可绑定属性
附加的可绑定属性也可以在XAML中设置并使用Style设置。 为了了解它是如何工作的,让我们检查一个名为CartesianLayout的类,它模仿一个二维的,四象限的笛卡尔坐标系。 此布局允许您使用BoxView绘制线条,方法是指定相对X和Y坐标,范围从-1到1,并以设备单位表示特定的线条粗细。
CartesianLayout派生自Layout ,因此它仅限于该类型的子项。 对于其他类型的元素,这种布局没有多大意义。 该类首先定义三个附加的可绑定属性和静态Set和Get方法:
namespace Xamarin.FormsBook.Toolkit
{
    public class CartesianLayout : Layout<BoxView>
    {
        public static readonly BindableProperty Point1Property =
            BindableProperty.CreateAttached("Point1",
                                            typeof(Point),
                                            typeof(CartesianLayout),
                                            new Point());
        public static readonly BindableProperty Point2Property =
            BindableProperty.CreateAttached("Point2",
                                            typeof(Point),
                                            typeof(CartesianLayout),
                                            new Point());
        public static readonly BindableProperty ThicknessProperty =
            BindableProperty.CreateAttached("Thickness",
                                            typeof(Double),
                                            typeof(CartesianLayout),
                                            1.0); // must be explicitly Double!
        public static void SetPoint1(BindableObject bindable, Point point)
        {
            bindable.SetValue(Point1Property, point);
        }
        public static Point GetPoint1(BindableObject bindable)
        {
            return (Point)bindable.GetValue(Point1Property);
        }
        public static void SetPoint2(BindableObject bindable, Point point)
        {
            bindable.SetValue(Point2Property, point);
        }
        public static Point GetPoint2(BindableObject bindable)
        {
            return (Point)bindable.GetValue(Point2Property);
        }
        public static void SetThickness(BindableObject bindable, double thickness)
        {
            bindable.SetValue(ThicknessProperty, thickness);
        }
        public static double GetThickness(BindableObject bindable)
        {
            return (double)bindable.GetValue(ThicknessProperty);
        }
        __
    }
}
与布局中定义的任何附加属性一样,只要附加属性发生更改(可能会影响布局),就应使布局无效。 此PropertyChanged处理程序使用bindable属性的PropertyName属性来避免拼写错误:
namespace Xamarin.FormsBook.Toolkit
{
    public class CartesianLayout : Layout<BoxView>
    {
        __
        // Monitor PropertyChanged events for items in the Children collection.
        protected override void OnAdded(BoxView boxView)
        {
            base.OnAdded(boxView);
            boxView.PropertyChanged += OnChildPropertyChanged;
        }
        protected override void OnRemoved(BoxView boxView)
        {
            base.OnRemoved(boxView);
            boxView.PropertyChanged -= OnChildPropertyChanged;
        }
        void OnChildPropertyChanged(object sender, PropertyChangedEventArgs args)
        {
            if (args.PropertyName == Point1Property.PropertyName ||
            args.PropertyName == Point2Property.PropertyName ||
            args.PropertyName == ThicknessProperty.PropertyName)
            {
                InvalidateLayout();
            }
        }
        __
    }
}
OnSizeRequest覆盖要求至少约束其中一个维度并请求一个正方形的大小:
namespace Xamarin.FormsBook.Toolkit
{
    public class CartesianLayout : Layout<BoxView>
    {
        __
        protected override SizeRequest OnSizeRequest(double widthConstraint,
        double heightConstraint)
        {
            if (Double.IsInfinity(widthConstraint) && Double.IsInfinity(heightConstraint))
                throw new InvalidOperationException(
                "CartesianLayout requires at least one dimension to be constrained.");
            // Make it square!
            double minimum = Math.Min(widthConstraint, heightConstraint);
            return new SizeRequest(new Size(minimum, minimum));
        }
        __
    }
}
但是,如果结果布局具有Fill的默认HorizontalOptions和VerticalOptions设置,则结果布局将不是方形。
LayoutChildren覆盖调用包含数学的方法,将Point1,Point2和Thickness属性转换为适合Layout调用的Rectangle。 布局调用始终将BoxView渲染为位于Point1和Point2之间的水平线。 然后Rotation属性旋转BoxView以与点重合。 数学比替代方案稍微复杂一些(定位BoxView使其从一个点开始,然后旋转BoxView以使其与另一个点相遇),但这种方法不需要设置AnchorX和AnchorY属性:
namespace Xamarin.FormsBook.Toolkit
{
    public class CartesianLayout : Layout<BoxView>
    {

        protected override void LayoutChildren(double x, double y, double width, double height)
        {
            foreach (View child in Children)
            {
                if (!child.IsVisible)
                    continue;
                double angle;
                Rectangle bounds = GetChildBounds(child, x, y, width, height, out angle);
                // Lay out the child.
                child.Layout(bounds);
                // Rotate the child.
                child.Rotation = angle;
            }
        }
        protected Rectangle GetChildBounds(View child,
                                           double x, double y, double width, double height,
                                           out double angle)
        {
            // Get coordinate system information.
            Point coordCenter = new Point(x + width / 2, y + height / 2);
            double unitLength = Math.Min(width, height) / 2;
            // Get child information.
            Point point1 = GetPoint1(child);
            Point point2 = GetPoint2(child);
            double thickness = GetThickness(child);
            double length = unitLength * Math.Sqrt(Math.Pow(point2.X - point1.X, 2) +
                                                   Math.Pow(point2.Y - point1.Y, 2));
            // Calculate child bounds.
            Point centerChild = new Point((point1.X + point2.X) / 2,
                                          (point1.Y + point2.Y) / 2);
            double xChild = coordCenter.X + unitLength * centerChild.X - length / 2;
            double yChild = coordCenter.Y - unitLength * centerChild.Y - thickness / 2;
            Rectangle bounds = new Rectangle(xChild, yChild, length, thickness);
            angle = 180 / Math.PI * Math.Atan2(point1.Y - point2.Y,
                                               point2.X - point1.X);
            return bounds;
        }
    }
}
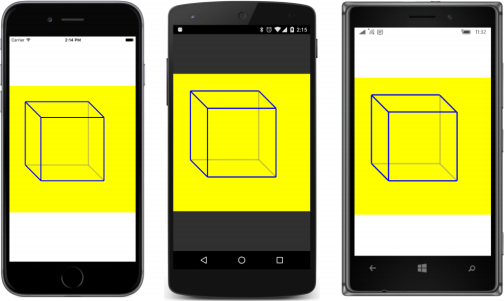
您可以在XAML中甚至在Style中设置附加的可绑定属性,但由于在引用附加的可绑定属性时需要类名,因此属性还需要XML名称空间声明。 UnitCube程序绘制3D立方体的轮廓:
<ContentPage xmlns="http://xamarin.com/schemas/2014/forms"
xmlns:x="http://schemas.microsoft.com/winfx/2009/xaml"
xmlns:toolkit=
"clr-namespace:Xamarin.FormsBook.Toolkit;assembly=Xamarin.FormsBook.Toolkit"
x:Class="UnitCube.UnitCubePage">
<toolkit:CartesianLayout BackgroundColor="Yellow"
HorizontalOptions="Center"
VerticalOptions="Center">
<toolkit:CartesianLayout.Resources>
<ResourceDictionary>
<Style x:Key="baseStyle" TargetType="BoxView">
<Setter Property="Color" Value="Blue" />
<Setter Property="toolkit:CartesianLayout.Thickness" Value="3" />
</Style>
<Style x:Key="hiddenStyle" TargetType="BoxView"
BasedOn="{StaticResource baseStyle}">
<Setter Property="Opacity" Value="0.25" />
</Style>
<!-- Implicit style. -->
<Style TargetType="BoxView"
BasedOn="{StaticResource baseStyle}" />
</ResourceDictionary>
</toolkit:CartesianLayout.Resources>
<!-- Three "hidden" edges first in the background -->
<!-- Rear edges -->
<BoxView toolkit:CartesianLayout.Point1="0.25, 0.75"
toolkit:CartesianLayout.Point2="0.25, -0.25"
Style="{StaticResource hiddenStyle}" />
<BoxView toolkit:CartesianLayout.Point1="0.25, -0.25"
toolkit:CartesianLayout.Point2="-0.75, -0.25"
Style="{StaticResource hiddenStyle}" />
<!-- Front to rear edge -->
<BoxView toolkit:CartesianLayout.Point1="0.5, -0.5"
toolkit:CartesianLayout.Point2="0.25, -0.25"
Style="{StaticResource hiddenStyle}" />
<!-- Front edges -->
<BoxView toolkit:CartesianLayout.Point1="-0.5, 0.5"
toolkit:CartesianLayout.Point2="0.5, 0.5" />
<BoxView toolkit:CartesianLayout.Point1="0.5, 0.5"
toolkit:CartesianLayout.Point2="0.5, -0.5" />
<BoxView toolkit:CartesianLayout.Point1="0.5, -0.5"
toolkit:CartesianLayout.Point2="-0.5, -0.5" />
<BoxView toolkit:CartesianLayout.Point1="-0.5, -0.5"
toolkit:CartesianLayout.Point2="-0.5, 0.5" />
<!-- Rear edges -->
<BoxView toolkit:CartesianLayout.Point1="-0.75, 0.75"
toolkit:CartesianLayout.Point2="0.25, 0.75" />
<BoxView toolkit:CartesianLayout.Point1="-0.75, -0.25"
toolkit:CartesianLayout.Point2="-0.75, 0.75" />
<!-- Front to rear edges -->
<BoxView toolkit:CartesianLayout.Point1="-0.5, 0.5"
toolkit:CartesianLayout.Point2="-0.75, 0.75" />
<BoxView toolkit:CartesianLayout.Point1="0.5, 0.5"
toolkit:CartesianLayout.Point2="0.25, 0.75" />
<BoxView toolkit:CartesianLayout.Point1="-0.5, -0.5"
toolkit:CartesianLayout.Point2="-0.75, -0.25" />
</toolkit:CartesianLayout>
</ContentPage>背景“线条”使用不透明度值绘制,使它们看起来好像是透过半透明的一面观察: