整体结构:
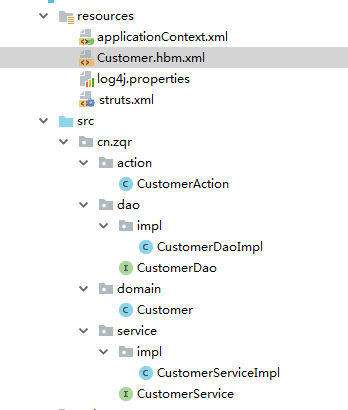
1.引入相关jar包
2.编写实体类和映射文件


package cn.zqr.domain;

public class Customer {

    private Long cust_id;
    private String cust_name;
    private Long cust_user_id;
    private Long cust_create_id;
    private String cust_source;
    private String cust_industry;
    private String cust_level;
    private String cust_linkman;
    private String cust_phone;
    private String cust_mobile;

    public Long getCust_id() {
        return cust_id;
    }
    public void setCust_id(Long cust_id) {
        this.cust_id = cust_id;
    }
    public String getCust_name() {
        return cust_name;
    }
    public void setCust_name(String cust_name) {
        this.cust_name = cust_name;
    }
    public Long getCust_user_id() {
        return cust_user_id;
    }
    public void setCust_user_id(Long cust_user_id) {
        this.cust_user_id = cust_user_id;
    }
    public Long getCust_create_id() {
        return cust_create_id;
    }
    public void setCust_create_id(Long cust_create_id) {
        this.cust_create_id = cust_create_id;
    }
    public String getCust_source() {
        return cust_source;
    }
    public void setCust_source(String cust_source) {
        this.cust_source = cust_source;
    }
    public String getCust_industry() {
        return cust_industry;
    }
    public void setCust_industry(String cust_industry) {
        this.cust_industry = cust_industry;
    }
    public String getCust_level() {
        return cust_level;
    }
    public void setCust_level(String cust_level) {
        this.cust_level = cust_level;
    }
    public String getCust_linkman() {
        return cust_linkman;
    }
    public void setCust_linkman(String cust_linkman) {
        this.cust_linkman = cust_linkman;
    }
    public String getCust_phone() {
        return cust_phone;
    }
    public void setCust_phone(String cust_phone) {
        this.cust_phone = cust_phone;
    }
    public String getCust_mobile() {
        return cust_mobile;
    }
    public void setCust_mobile(String cust_mobile) {
        this.cust_mobile = cust_mobile;
    }
    @Override
    public String toString() {
        return "Customer [cust_id=" + cust_id + ", cust_name=" + cust_name + ", cust_user_id=" + cust_user_id
                + ", cust_create_id=" + cust_create_id + ", cust_source=" + cust_source + ", cust_industry="
                + cust_industry + ", cust_level=" + cust_level + ", cust_linkman=" + cust_linkman + ", cust_phone="
                + cust_phone + ", cust_mobile=" + cust_mobile + "]";
    }

}
<?xml version="1.0" encoding="UTF-8"?>
<!DOCTYPE hibernate-mapping PUBLIC
    "-//Hibernate/Hibernate Mapping DTD 3.0//EN"
    "http://www.hibernate.org/dtd/hibernate-mapping-3.0.dtd">

<hibernate-mapping>

    <class name="cn.zqr.domain.Customer" table="cst_customer">
        <id name="cust_id" column="cust_id">
            <generator class="native"/>
        </id>

        <property name="cust_name" column="cust_name"/>
        <property name="cust_user_id" column="cust_user_id"/>
        <property name="cust_create_id" column="cust_create_id"/>
        <property name="cust_source" column="cust_source"/>
        <property name="cust_industry" column="cust_industry"/>
        <property name="cust_level" column="cust_level"/>
        <property name="cust_linkman" column="cust_linkman"/>
        <property name="cust_phone" column="cust_phone"/>
        <property name="cust_mobile" column="cust_mobile"/>

    </class>

</hibernate-mapping>
3.配置struts核心过滤器,和Spring文件加载的监听器
<?xml version="1.0" encoding="UTF-8"?>
<web-app xmlns="http://xmlns.jcp.org/xml/ns/javaee"
         xmlns:xsi="http://www.w3.org/2001/XMLSchema-instance"
         xsi:schemaLocation="http://xmlns.jcp.org/xml/ns/javaee http://xmlns.jcp.org/xml/ns/javaee/web-app_3_1.xsd"
         version="3.1">
    <!--配置Spring整合web的监听器-->
    <listener>
        <listener-class>org.springframework.web.context.ContextLoaderListener</listener-class>
    </listener>
    <context-param>
        <param-name>contextConfigLocation</param-name>
        <param-value>classpath:applicationContext.xml</param-value>
    </context-param>

    <!--配置struts的过滤器-->
    <filter>
        <filter-name>struts</filter-name>
        <filter-class>org.apache.struts2.dispatcher.ng.filter.StrutsPrepareAndExecuteFilter</filter-class>
    </filter>
    <filter-mapping>
        <filter-name>struts</filter-name>
        <url-pattern>/*</url-pattern>
    </filter-mapping>
</web-app>
4.编写Action并配置,采用模型驱动的方式对表单进行封装,采用Spring注入的方式获取serice实例,并配置Action
/**
 * 客户的控制层
 */
public class CustomerAction extends ActionSupport implements ModelDriven{
    private CustomerService customerService;

    public void setCustomerService(CustomerService customerService) {
        this.customerService = customerService;
    }

    //必须手动new
    private Customer customer=new Customer();
    //模型和属性驱动
    /**
     * 保存客户
     * @return
     */
    public String add(){
        customerService.save(customer);
        return NONE;
    }

    @Override
    public Object getModel() {
        return customer;
    }
}
  <!--配置service-->
    <bean id="customerService" class="cn.zqr.service.impl.CustomerServiceImpl">
        <property name="customerDao" ref="customerDao"/>
    </bean>
使用Spring管理Action
  <!--配置Action必须多例-->
    <bean id="customerAction" class="cn.zqr.action.CustomerAction" scope="prototype">
        <property name="customerService" ref="customerService"/>
    </bean>
在struts中引入Action
<?xml version="1.0" encoding="UTF-8"?>
<!DOCTYPE struts PUBLIC
        "-//Apache Software Foundation//DTD Struts Configuration 2.3//EN"
        "http://struts.apache.org/dtds/struts-2.3.dtd">

<struts>
    <package name="crm" namespace="/" extends="struts-default">
        <!--Action由Spring管理,class值为Spring的id-->
        <action name="customer_*" class="customerAction" method="{1}">
        </action>
    </package>

</struts>
5.配置service
service层代码:
/**
 * 客户业务层
 */
@Transactional
public class CustomerServiceImpl implements CustomerService {
    private CustomerDao customerDao;

    public void setCustomerDao(CustomerDao customerDao) {
        this.customerDao = customerDao;
    }

    /**
     * 保存客户信息
     * @param customer
     */
    @Override
    public void save(Customer customer) {
        customerDao.add(customer);

    }
}
service需要开事务,在Spring中配置事务,开启事务需要使用session,所以首先配置SessionFactory,创建session工厂需要数据源,所以需要优先配置数据源
 <!--配置连接池-->
    <bean class="com.mchange.v2.c3p0.ComboPooledDataSource" id="dataSource">
        <property name="driverClass" value="com.mysql.jdbc.Driver"/>
        <property name="jdbcUrl" value="jdbc:mysql:///ssh"/>
        <property name="user" value="root"/>
        <property name="password" value="admin"/>
    </bean>
   <bean class="org.springframework.orm.hibernate5.LocalSessionFactoryBean" id="sessionFactory">
        <property name="dataSource" ref="dataSource"/>
        <property name="hibernateProperties">
            <props>
                <prop key="hibernate.dialect">org.hibernate.dialect.MySQLDialect</prop>
                <prop key="show_sql">true</prop>
                <prop key="hibernate.format_sql">true</prop>
                <prop key="hibernate.hbm2ddl.auto">update</prop>
            </props>
        </property>
        <property name="mappingResources">
            <list>
                <value>Customer.hbm.xml</value>
            </list>
        </property>

    </bean>
最后配置事务并开启
 <!--配置事务-->
    <bean class="org.springframework.orm.hibernate5.HibernateTransactionManager" id="transactionManager">
        <property name="sessionFactory" ref="sessionFactory"/>

    </bean>
    <!--开始事务的注解-->
    <tx:annotation-driven/>
6.编写dao层,dao层需要使用Hibernate模板(HibernateTemplate),为了简化开发,可以直接继承HibernateDaoSupport,然后向其注入sessionFactory
/**
 * 客户dao层
 */

public class CustomerDaoImpl extends HibernateDaoSupport implements CustomerDao {

    /**
     * 保存客户
     */
    @Override
    public void add(Customer customer) {
        System.out.println("持久层Customer customer"+customer);

        this.getHibernateTemplate().save(customer);

    }
}
   <!--配置dao-->
    <bean id="customerDao" class="cn.zqr.dao.impl.CustomerDaoImpl">
        <property name="sessionFactory" ref="sessionFactory"/>
    </bean>