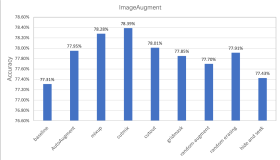
应用场景
由于业务需求,需要对部分不符合检测结果的图像进行过滤,因此需要对之前的检测项目进行优化。常见问题有如下亮点:
- 图像中检测目标是倾斜角度;
- 图像中是通过镜子自拍或者加了滤镜处理后的相片;
这两种情况是由于训练样本中含有这两种情况的少,因此需要增加此类样本数。本文只针对第一种情况进行数据增强,解决办法——旋转。
素材
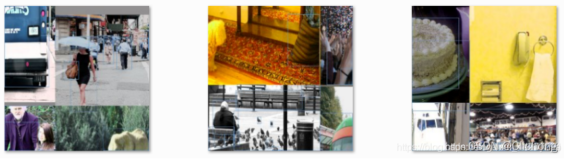
项目是对服装进行检测,样本图(来源于用户晒图):
其对应的xml文件:
<annotation>
    <folder>well</folder>
    <filename>15278480618780.jpg</filename>
    <path>15278480618780.jpg</path>
    <size>
        <width>828</width>
        <height>1104</height>
        <depth>3</depth>
    </size>
    <segmented>0</segmented>
    <object>
        <name>3</name>
        <pose>Unspecified</pose>
        <truncated>1</truncated>
        <difficult>0</difficult>
        <bndbox>
            <xmin>250</xmin>
            <ymin>672</ymin>
            <xmax>531</xmax>
            <ymax>1104</ymax>
        </bndbox>
    </object>
</annotation>
从xml信息中可以看见图像的具体信息,包括图像名称,尺寸以及检测方框的坐标范围。
处理程序
这里介绍处理批量处理文件夹中的情形,单张图像处理类似。
处理思想
- 读取对应的图像,解析对应的xml,根据旋转的角度来变换之前检测到的坐标,以及保存变换后的图像。
处理代码
#!/usr/bin/env python

import cv2
import math
import numpy as np
import os
import pdb
import xml.etree.ElementTree as ET


class ImgAugemention():
    def __init__(self):
        self.angle = 90

    # rotate_img
    def rotate_image(self, src, angle, scale=1.):
        w = src.shape[1]
        h = src.shape[0]
        # convet angle into rad
        rangle = np.deg2rad(angle)  # angle in radians
        # calculate new image width and height
        nw = (abs(np.sin(rangle)*h) + abs(np.cos(rangle)*w))*scale
        nh = (abs(np.cos(rangle)*h) + abs(np.sin(rangle)*w))*scale
        # ask OpenCV for the rotation matrix
        rot_mat = cv2.getRotationMatrix2D((nw*0.5, nh*0.5), angle, scale)
        # calculate the move from the old center to the new center combined
        # with the rotation
        rot_move = np.dot(rot_mat, np.array([(nw-w)*0.5, (nh-h)*0.5, 0]))
        # the move only affects the translation, so update the translation
        # part of the transform
        rot_mat[0, 2] += rot_move[0]
        rot_mat[1, 2] += rot_move[1]
        # map
        return cv2.warpAffine(
            src, rot_mat, (int(math.ceil(nw)), int(math.ceil(nh))),
            flags=cv2.INTER_LANCZOS4)

    def rotate_xml(self, src, xmin, ymin, xmax, ymax, angle, scale=1.):
        w = src.shape[1]
        h = src.shape[0]
        rangle = np.deg2rad(angle)  # angle in radians
        # now calculate new image width and height
        # get width and heigh of changed image
        nw = (abs(np.sin(rangle)*h) + abs(np.cos(rangle)*w))*scale
        nh = (abs(np.cos(rangle)*h) + abs(np.sin(rangle)*w))*scale
        # ask OpenCV for the rotation matrix
        rot_mat = cv2.getRotationMatrix2D((nw*0.5, nh*0.5), angle, scale)
        # calculate the move from the old center to the new center combined
        # with the rotation
        rot_move = np.dot(rot_mat, np.array([(nw-w)*0.5, (nh-h)*0.5, 0]))
        # the move only affects the translation, so update the translation
        # part of the transform
        rot_mat[0, 2] += rot_move[0]
        rot_mat[1, 2] += rot_move[1]
        # rot_mat: the final rot matrix
        # get the four center of edges in the initial martix,and convert the coord
        point1 = np.dot(rot_mat, np.array([(xmin+xmax)/2, ymin, 1]))
        point2 = np.dot(rot_mat, np.array([xmax, (ymin+ymax)/2, 1]))
        point3 = np.dot(rot_mat, np.array([(xmin+xmax)/2, ymax, 1]))
        point4 = np.dot(rot_mat, np.array([xmin, (ymin+ymax)/2, 1]))
        # concat np.array
        concat = np.vstack((point1, point2, point3, point4))
        # change type
        concat = concat.astype(np.int32)
        print(concat)
        rx, ry, rw, rh = cv2.boundingRect(concat)
        return rx, ry, rw, rh

    def process_img(self, imgs_path, xmls_path, img_save_path, xml_save_path, angle_list):
        # assign the rot angles
        for angle in angle_list:
            for img_name in os.listdir(imgs_path):
                # split filename and suffix
                n, s = os.path.splitext(img_name)
                # for the sake of use yolo model, only process '.jpg'
                if s == ".jpg":
                    img_path = os.path.join(imgs_path, img_name)
                    img = cv2.imread(img_path)
                    rotated_img = self.rotate_image(img, angle)
                    save_name = n + "_" + str(angle) + "d.jpg"
                    # 写入图像
                    cv2.imwrite(img_save_path + save_name, rotated_img)
                    print("log: [%sd] %s is processed." % (angle, img))
                    xml_url = img_name.split('.')[0] + '.xml'
                    xml_path = os.path.join(xmls_path, xml_url)
                    tree = ET.parse(xml_path)
                    file_name = tree.find('filename').text  # it is origin name
                    path = tree.find('path').text  # it is origin path
                    # change name and path
                    tree.find('filename').text = save_name  # change file name to rot degree name
                    tree.find('path').text = save_name  #  change file path to rot degree name
                    root = tree.getroot()
                    for box in root.iter('bndbox'):
                        xmin = float(box.find('xmin').text)
                        ymin = float(box.find('ymin').text)
                        xmax = float(box.find('xmax').text)
                        ymax = float(box.find('ymax').text)
                        x, y, w, h = self.rotate_xml(img, xmin, ymin, xmax, ymax, angle)
                        # change the coord
                        box.find('xmin').text = str(x)
                        box.find('ymin').text = str(y)
                        box.find('xmax').text = str(x+w)
                        box.find('ymax').text = str(y+h)
                        box.set('updated', 'yes')
                    # write into new xml
                    tree.write(xml_save_path + n + "_" + str(angle) + "d.xml")
                print("[%s] %s is processed." % (angle, img_name))


if __name__ == '__main__':
    img_aug = ImgAugemention()
    imgs_path = './image/'
    xmls_path = './xml/'
    img_save_path = './rotate/'
    xml_save_path = './xml_rot/'
    angle_list = [60, 90, 120, 150, 210, 240, 300]
    img_aug.process_img(imgs_path, xmls_path, img_save_path, xml_save_path, angle_list)
处理结果
- 旋转60度
<annotation>
    <folder>well</folder>
    <filename>15278480618780_60d.jpg</filename>
    <path>15278480618780_60d.jpg</path>
    <size>
        <width>828</width>
        <height>1104</height>
        <depth>3</depth>
    </size>
    <segmented>0</segmented>
    <object>
        <name>3</name>
        <pose>Unspecified</pose>
        <truncated>1</truncated>
        <difficult>0</difficult>
        <bndbox updated="yes">
            <xmin>777</xmin>
            <ymin>701</ymin>
            <xmax>1152</xmax>
            <ymax>945</ymax>
        </bndbox>
    </object>
</annotation>
- 旋转90度
<annotation>
    <folder>well</folder>
    <filename>15278480618780_90d.jpg</filename>
    <path>15278480618780_90d.jpg</path>
    <source>
        <database>Unknown</database>
    </source>
    <size>
        <width>828</width>
        <height>1104</height>
        <depth>3</depth>
    </size>
    <segmented>0</segmented>
    <object>
        <name>3</name>
        <pose>Unspecified</pose>
        <truncated>1</truncated>
        <difficult>0</difficult>
        <bndbox updated="yes">
            <xmin>672</xmin>
            <ymin>297</ymin>
            <xmax>1105</xmax>
            <ymax>579</ymax>
        </bndbox>
    </object>
</annotation>