咳咳,标题一口气读下来确实有点累,让我先解释一下。另外文章底部有演示程序的下载。
本文介绍利用WPF创建一个含有以下特性的窗口:
有窗口阴影,比如QQ窗口外围只有几像素的阴影;
支持透明且无边框,为了自行美化窗口通常都会想到使用无边框窗口吧;
可正常最大化,WPF无边框窗口直接最大化会直接使窗口全屏即会将任务栏一并盖住;
窗口边缘改变窗口大小,可以拖动窗口边缘改变大小;
支持等同于标题栏的全窗口空白区拖动,这一特性可以参考QQ;
支持多显示器环境。
上述针对无边框窗口的特性均可以独立实现,本文将把这些特性分开叙述。
若本文中代码段无法显示,请换一个浏览器试一下 T T
一、无边框窗口添加窗口阴影
实际上在WPF中添加无边框窗口的窗口阴影十分简单。
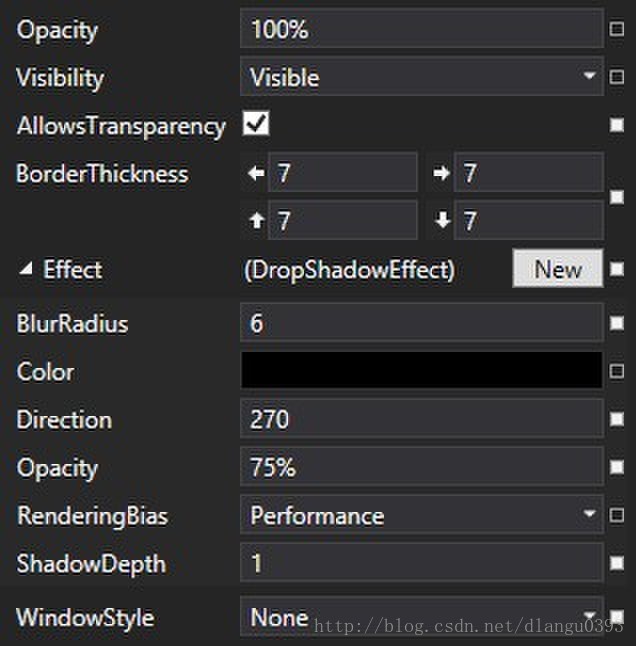
首先,设置WindowStyle="None"以及AllowsTransparency="True"使得窗口无边框。并对Window添加DropShadowEffect效果并设定相关参数,在这里我根据设计师的要求设置ShadowDepth="1" BlurRadius="6" Direction="270" Opacity="0.75" Color="#FF211613"。但仅仅设置这些参数是不够的,此时运行程序后无法在窗口边缘看到窗口阴影,为了让阴影显示出来,我们还需要设置BorderThickness,在这里我设置BorderThickness="7"以为阴影提供足够的空间。
<Window x:Class="WpfApplication1.MainWindow"
        xmlns="http://schemas.microsoft.com/winfx/2006/xaml/presentation"
        xmlns:x="http://schemas.microsoft.com/winfx/2006/xaml"
        Title="MainWindow" Height="350" Width="525" BorderThickness="7" AllowsTransparency="True" WindowStyle="None">
    <Window.Effect>
        <DropShadowEffect ShadowDepth="1" BlurRadius="6" Direction="270" Opacity="0.75" Color="#FF211613"/>
    </Window.Effect>
    <Grid>
    </Grid>
</Window>
显示效果:
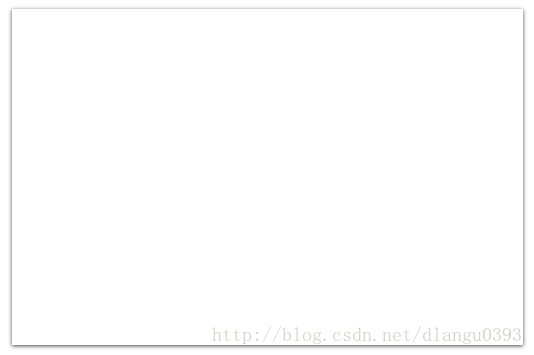
看起来还不错,不是吗?不过,可不要高兴太早了……对于有需要通过拖动窗口边缘改变窗口大小和最大化窗口功能的朋友来说,这可是一个大坑,有这两个需要的朋友请继续向下看。
二、使窗口可以正常最大化
对于无边框窗口的最大化,当然就需要我们自己实现最大化和恢复窗口状态的按钮,这些都十分好实现,本文使用一个Toggle按钮来切换窗口状态。
    <Grid>
        <Button x:Name="ToggleMaximum" Content="Toggle" HorizontalAlignment="Left" Margin="383,39,0,0" VerticalAlignment="Top" Width="75" Click="ToggleMaximum_Click"/>
    </Grid>
        private void ToggleMaximum_Click(object sender, RoutedEventArgs e)
        {
            if (this.WindowState == WindowState.Maximized)
                this.WindowState = WindowState.Normal;
            else
                this.WindowState = WindowState.Maximized;
        }
于是现在瞬间就冒出了两个问题需要解决,解决问题的过程是曲折而艰辛的……而且就我这种文笔相信也没人能看得下去,所以我直接介绍我最后使用的处理方法。
首先我们来解决窗口最大化的问题。基本思路是用Win32API接管WM_GETMINMAXINFO消息的处理,为系统提供窗口的最大化参数。
WM_GETMINMAXINFO消息在窗口的位置或大小将要改变时被发送至窗口,消息的lParam指向了一个MINMAXINFO结构体,此结构体中的ptMaxSize和ptMaxPosition提供了窗口最大化时的大小以及位置参数,ptMinTrackSize提供了窗口的最小尺寸参数。
WM_GETMINMAXINFO的参考见:http://msdn.microsoft.com/en-us/library/windows/desktop/ms632626(v=vs.85).aspx
MINMAXINFO的参考见:http://msdn.microsoft.com/en-us/library/windows/desktop/ms632605(v=vs.85).aspx
接下来要做的事情就是要想办法计算窗口最大化时的大小参数。我们想要的最大化效果是填满工作区,因此我们需要寻找一种获取工作区大小的方法。
谷歌上有很多解决这个问题的方法,不过相当一部分都是通过SystemParameters.WorkArea属性来获取工作区的大小。不过如果我们在MSDN查看这个属性的参考就会发现,使用这种方式获取的工作区大小仅仅是主显示器的工作区大小(Gets the size of the work area on the primary display monitor)。很显然如果使用这种方式,如果窗口在多屏环境下的非主屏上最大化时,显然会得到一个错误的最大化效果。
简单的方法处理不了,我们就只能再次向Win32API求助。以下是涉及到的函数:
HMONITOR MonitorFromWindow(_In_ HWND hwnd, _In_ DWORD dwFlags);
此函数可以获取一个与指定的窗口相关的显示器句柄,通过第二个参数我们可以指定值为MONITOR_DEFAULTTONEAREST来获取距离窗口最近的显示器的句柄。
参考:http://msdn.microsoft.com/en-us/library/windows/desktop/dd145064(v=vs.85).aspx
BOOL GetMonitorInfo(_In_ HMONITOR hMonitor, _Out_ LPMONITORINFO lpmi);
此函数可以获取制定显示器的相关信息,接受信息的为MONITORINFOEX结构体。MONITORINFOEX结构体中的rcWork提供了该显示器上工作区的矩形。
参考:http://msdn.microsoft.com/en-us/library/windows/desktop/dd144901(v=vs.85).aspx
http://msdn.microsoft.com/en-us/library/windows/desktop/dd145066(v=vs.85).aspx
有了这两个函数,好像我们已经能够正确的在多屏环境下获取工作区大小了。不过其实这里还有一个潜在的问题,假如用户设置过系统的DPI参数,通过这种方式获取到的工作区大小与使用DPI换算过后的工作区尺寸并不相同,这就会导致最大化时再次出现错误。为了解决这个问题,我们还得引入一些方法使得这个尺寸DPI无关。
HwndTarget.TransformFromDevice属性提供了一个矩阵,通过这个矩阵可以将设备坐标变换为渲染坐标。
HwndTarget可以通过HwndSource.CompositionTarget属性获取。
将我们获取到的显示器工作区大小用获取到的矩阵进行变换,我们就可以得到一个DPI无关的工作区大小。
至此,我们解决第一个问题的思路就已经走通了,下面是实现代码。
由于涉及到的Win32函数略多,因此我们将所涉及到的Win32API内容放到一个独立的Win32类中。
Win32.cs
using System;
using System.Collections.Generic;
using System.Linq;
using System.Text;
using System.Runtime.InteropServices;

namespace WpfApplication1
{
    class Win32
    {
        // Sent to a window when the size or position of the window is about to change
        public const int WM_GETMINMAXINFO = 0x0024;

        // Retrieves a handle to the display monitor that is nearest to the window
        public const int MONITOR_DEFAULTTONEAREST = 2;

        // Retrieves a handle to the display monitor
        [DllImport("user32.dll")]
        public static extern IntPtr MonitorFromWindow(IntPtr hwnd, int dwFlags);

        // RECT structure, Rectangle used by MONITORINFOEX
        [StructLayout(LayoutKind.Sequential)]
        public struct RECT
        {
            public int Left;
            public int Top;
            public int Right;
            public int Bottom;
        }

        // MONITORINFOEX structure, Monitor information used by GetMonitorInfo function
        [StructLayout(LayoutKind.Sequential)]
        public class MONITORINFOEX
        {
            public int cbSize;
            public RECT rcMonitor; // The display monitor rectangle
            public RECT rcWork; // The working area rectangle
            public int dwFlags;
            [MarshalAs(UnmanagedType.ByValArray, SizeConst = 0x20)]
            public char[] szDevice;
        }

        // Point structure, Point information used by MINMAXINFO structure
        [StructLayout(LayoutKind.Sequential)]
        public struct POINT
        {
            public int x;
            public int y;

            public POINT(int x, int y)
            {
                this.x = x;
                this.y = y;
            }
        }

        // MINMAXINFO structure, Window's maximum size and position information
        [StructLayout(LayoutKind.Sequential)]
        public struct MINMAXINFO
        {
            public POINT ptReserved;
            public POINT ptMaxSize; // The maximized size of the window
            public POINT ptMaxPosition; // The position of the maximized window
            public POINT ptMinTrackSize;
            public POINT ptMaxTrackSize;
        }

        // Get the working area of the specified monitor
        [DllImport("user32.dll")]
        public static extern bool GetMonitorInfo(HandleRef hmonitor, [In, Out] MONITORINFOEX monitorInfo);
    }
}
在窗口的构造器中对SourceInitialized事件增加一个新的处理程序MainWindow_SourceInitialized。并添加后续相关函数,代码见下方,步骤解释请见注释。
        public MainWindow()
        {
            InitializeComponent();

            this.SourceInitialized += MainWindow_SourceInitialized;
        }

        void MainWindow_SourceInitialized(object sender, EventArgs e)
        {
            HwndSource source = HwndSource.FromHwnd(new WindowInteropHelper(this).Handle);
            if (source == null)
                // Should never be null
                throw new Exception("Cannot get HwndSource instance.");

            source.AddHook(new HwndSourceHook(this.WndProc));
        }

        private IntPtr WndProc(IntPtr hwnd, int msg, IntPtr wParam, IntPtr lParam, ref bool handled)
        {

            switch (msg)
            {
                case Win32.WM_GETMINMAXINFO: // WM_GETMINMAXINFO message
                    WmGetMinMaxInfo(hwnd, lParam);
                    handled = true;
                    break;
            }

            return IntPtr.Zero;
        }

        private void WmGetMinMaxInfo(IntPtr hwnd, IntPtr lParam)
        {
            // MINMAXINFO structure
            Win32.MINMAXINFO mmi = (Win32.MINMAXINFO)Marshal.PtrToStructure(lParam, typeof(Win32.MINMAXINFO));

            // Get handle for nearest monitor to this window
            WindowInteropHelper wih = new WindowInteropHelper(this);
            IntPtr hMonitor = Win32.MonitorFromWindow(wih.Handle, Win32.MONITOR_DEFAULTTONEAREST);

            // Get monitor info
            Win32.MONITORINFOEX monitorInfo = new Win32.MONITORINFOEX();
            monitorInfo.cbSize = Marshal.SizeOf(monitorInfo);
            Win32.GetMonitorInfo(new HandleRef(this, hMonitor), monitorInfo);

            // Get HwndSource
            HwndSource source = HwndSource.FromHwnd(wih.Handle);
            if (source == null)
                // Should never be null
                throw new Exception("Cannot get HwndSource instance.");
            if (source.CompositionTarget == null)
                // Should never be null
                throw new Exception("Cannot get HwndTarget instance.");

            // Get transformation matrix
            Matrix matrix = source.CompositionTarget.TransformFromDevice;

            // Convert working area
            Win32.RECT workingArea = monitorInfo.rcWork;
            Point dpiIndependentSize =
                matrix.Transform(new Point(
                        workingArea.Right - workingArea.Left,
                        workingArea.Bottom - workingArea.Top
                        ));

            // Convert minimum size
            Point dpiIndenpendentTrackingSize = matrix.Transform(new Point(
                this.MinWidth,
                this.MinHeight
                ));

            // Set the maximized size of the window
            mmi.ptMaxSize.x = (int)dpiIndependentSize.X;
            mmi.ptMaxSize.y = (int)dpiIndependentSize.Y;

            // Set the position of the maximized window
            mmi.ptMaxPosition.x = 0;
            mmi.ptMaxPosition.y = 0;

            // Set the minimum tracking size
            mmi.ptMinTrackSize.x = (int)dpiIndenpendentTrackingSize.X;
            mmi.ptMinTrackSize.y = (int)dpiIndenpendentTrackingSize.Y;

            Marshal.StructureToPtr(mmi, lParam, true);
        }
此时运行程序,最大化时便会像普通窗口一样最大化,同时使用MainWindow的MinWidth和MinHeight指定了窗口的最小尺寸,即便是在多显示器环境和修改了DPI设定的情况下依旧可以正常工作。
接下来要解决的问题就是最大化时将窗口边缘阴影也算在了窗口大小内,这个问题的解决其实十分简单。基本思路是在全屏时设置BorderThickness为0,当窗口恢复时再将其设置回去。
在窗口类中增加了一个customBorderThickness用来保存我们定义的BorderThickness值。在构造器中创建对StateChanged事件的处理程序,并在其中判断当前窗口状态。代码如下:
        /// <summary>
        /// Border thickness in pixel
        /// </summary>
        private readonly int customBorderThickness = 7;

        public MainWindow()
        {
            InitializeComponent();

            this.SourceInitialized += MainWindow_SourceInitialized;
            this.StateChanged += MainWindow_StateChanged;
        }

        void MainWindow_StateChanged(object sender, EventArgs e)
        {
            if (WindowState == WindowState.Maximized)
            {
                this.BorderThickness = new System.Windows.Thickness(0);
            }
            else
            {
                this.BorderThickness = new System.Windows.Thickness(customBorderThickness);
            }
        }
这样,我们使窗口可以正常最大化的目标就完全达成了~
三、使窗口可以拖动边缘改变大小
无边框窗口没有边框,即便是设置了ResizeMode="CanResize"也是无法通过拖动边缘来改变窗口大小的。至于如何解决这个问题……咳咳,还得请出Win32API……
这次我们想处理的消息是WM_NCHITTEST,这个消息发送至窗口以让窗口决定鼠标当前所在的位置,消息的lParam的低位标记了鼠标的X坐标,高位标记了Y坐标。通过一系列返回值来表示判断结果。
有一点需要注意的是,如果使用简单的掩盖高低位来获取X和Y坐标的话,在多屏环境下会发生错误,因为在多屏环境下的X和Y可能是负数,因此需要GET_X_LPARAM和GET_Y_LPARAM宏来解决问题,下面的代码中直接将这两个宏展开。
首先,在刚才我们创建的Win32类中添加以下代码(感谢MikeMattera写的HitTest枚举):
         // Sent to a window in order to determine what part of the window corresponds to a particular screen coordinate
        public const int WM_NCHITTEST = 0x0084;

        /// <summary>
        /// Indicates the position of the cursor hot spot.
        /// </summary>
        public enum HitTest : int
        {
            /// <summary>
            /// On the screen background or on a dividing line between windows (same as HTNOWHERE, except that the DefWindowProc function produces a system beep to indicate an error).
            /// </summary>
            HTERROR = -2,

            /// <summary>
            /// In a window currently covered by another window in the same thread (the message will be sent to underlying windows in the same thread until one of them returns a code that is not HTTRANSPARENT).
            /// </summary>
            HTTRANSPARENT = -1,

            /// <summary>
            /// On the screen background or on a dividing line between windows.
            /// </summary>
            HTNOWHERE = 0,

            /// <summary>
            /// In a client area.
            /// </summary>
            HTCLIENT = 1,

            /// <summary>
            /// In a title bar.
            /// </summary>
            HTCAPTION = 2,

            /// <summary>
            /// In a window menu or in a Close button in a child window.
            /// </summary>
            HTSYSMENU = 3,

            /// <summary>
            /// In a size box (same as HTSIZE).
            /// </summary>
            HTGROWBOX = 4,

            /// <summary>
            /// In a size box (same as HTGROWBOX).
            /// </summary>
            HTSIZE = 4,

            /// <summary>
            /// In a menu.
            /// </summary>
            HTMENU = 5,

            /// <summary>
            /// In a horizontal scroll bar.
            /// </summary>
            HTHSCROLL = 6,

            /// <summary>
            /// In the vertical scroll bar.
            /// </summary>
            HTVSCROLL = 7,

            /// <summary>
            /// In a Minimize button.
            /// </summary>
            HTMINBUTTON = 8,

            /// <summary>
            /// In a Minimize button.
            /// </summary>
            HTREDUCE = 8,

            /// <summary>
            /// In a Maximize button.
            /// </summary>
            HTMAXBUTTON = 9,

            /// <summary>
            /// In a Maximize button.
            /// </summary>
            HTZOOM = 9,

            /// <summary>
            /// In the left border of a resizable window (the user can click the mouse to resize the window horizontally).
            /// </summary>
            HTLEFT = 10,

            /// <summary>
            /// In the right border of a resizable window (the user can click the mouse to resize the window horizontally).
            /// </summary>
            HTRIGHT = 11,

            /// <summary>
            /// In the upper-horizontal border of a window.
            /// </summary>
            HTTOP = 12,

            /// <summary>
            /// In the upper-left corner of a window border.
            /// </summary>
            HTTOPLEFT = 13,

            /// <summary>
            /// In the upper-right corner of a window border.
            /// </summary>
            HTTOPRIGHT = 14,

            /// <summary>
            /// In the lower-horizontal border of a resizable window (the user can click the mouse to resize the window vertically).
            /// </summary>
            HTBOTTOM = 15,

            /// <summary>
            /// In the lower-left corner of a border of a resizable window (the user can click the mouse to resize the window diagonally).
            /// </summary>
            HTBOTTOMLEFT = 16,

            /// <summary>
            /// In the lower-right corner of a border of a resizable window (the user can click the mouse to resize the window diagonally).
            /// </summary>
            HTBOTTOMRIGHT = 17,

            /// <summary>
            /// In the border of a window that does not have a sizing border.
            /// </summary>
            HTBORDER = 18,

            /// <summary>
            /// In a Close button.
            /// </summary>
            HTCLOSE = 20,

            /// <summary>
            /// In a Help button.
            /// </summary>
            HTHELP = 21,
        };
然后在窗口类的WndProc中添加一个Win32.WM_NCHITTEST的case,并在其中调用判断函数。此外因为HitTest调用频繁,所以我们在类中增加一个保存鼠标坐标的域。还有一点要说明的就是cornerWidth的值,这个值用于四个角的拉伸检测,建议设置为比customBorderThickness略大(比如+1),可以根据体验测试此值。具体代码如下:
        /// <summary>
        /// Corner width used in HitTest
        /// </summary>
        private readonly int cornerWidth = 8;

        /// <summary>
        /// Mouse point used by HitTest
        /// </summary>
        private Point mousePoint = new Point();

        private IntPtr WndProc(IntPtr hwnd, int msg, IntPtr wParam, IntPtr lParam, ref bool handled)
        {

            switch (msg)
            {
                case Win32.WM_GETMINMAXINFO: // WM_GETMINMAXINFO message
                    WmGetMinMaxInfo(hwnd, lParam);
                    handled = true;
                    break;
                case Win32.WM_NCHITTEST: // WM_NCHITTEST message
                    return WmNCHitTest(lParam, ref handled);
            }

            return IntPtr.Zero;
        }

        private IntPtr WmNCHitTest(IntPtr lParam, ref bool handled)
        {
            // Update cursor point
            // The low-order word specifies the x-coordinate of the cursor.
            // #define GET_X_LPARAM(lp) ((int)(short)LOWORD(lp))
            this.mousePoint.X = (int)(short)(lParam.ToInt32() & 0xFFFF);
            // The high-order word specifies the y-coordinate of the cursor.
            // #define GET_Y_LPARAM(lp) ((int)(short)HIWORD(lp))
            this.mousePoint.Y = (int)(short)(lParam.ToInt32() >> 16);

            // Do hit test
            handled = true;
            if (Math.Abs(this.mousePoint.Y - this.Top) <= this.cornerWidth
                && Math.Abs(this.mousePoint.X - this.Left) <= this.cornerWidth)
            { // Top-Left
                return new IntPtr((int)Win32.HitTest.HTTOPLEFT);
            }
            else if (Math.Abs(this.ActualHeight + this.Top - this.mousePoint.Y) <= this.cornerWidth
                && Math.Abs(this.mousePoint.X - this.Left) <= this.cornerWidth)
            { // Bottom-Left
                return new IntPtr((int)Win32.HitTest.HTBOTTOMLEFT);
            }
            else if (Math.Abs(this.mousePoint.Y - this.Top) <= this.cornerWidth
                && Math.Abs(this.ActualWidth + this.Left - this.mousePoint.X) <= this.cornerWidth)
            { // Top-Right
                return new IntPtr((int)Win32.HitTest.HTTOPRIGHT);
            }
            else if (Math.Abs(this.ActualWidth + this.Left - this.mousePoint.X) <= this.cornerWidth
                && Math.Abs(this.ActualHeight + this.Top - this.mousePoint.Y) <= this.cornerWidth)
            { // Bottom-Right
                return new IntPtr((int)Win32.HitTest.HTBOTTOMRIGHT);
            }
            else if (Math.Abs(this.mousePoint.X - this.Left) <= this.customBorderThickness)
            { // Left
                return new IntPtr((int)Win32.HitTest.HTLEFT);
            }
            else if (Math.Abs(this.ActualWidth + this.Left - this.mousePoint.X) <= this.customBorderThickness)
            { // Right
                return new IntPtr((int)Win32.HitTest.HTRIGHT);
            }
            else if (Math.Abs(this.mousePoint.Y - this.Top) <= this.customBorderThickness)
            { // Top
                return new IntPtr((int)Win32.HitTest.HTTOP);
            }
            else if (Math.Abs(this.ActualHeight + this.Top - this.mousePoint.Y) <= this.customBorderThickness)
            { // Bottom
                return new IntPtr((int)Win32.HitTest.HTBOTTOM);
            }
            else
            {
                handled = false;
                return IntPtr.Zero;
            }
        }
四、全窗口空白区域拖动
其实这个拖动,大家通常的思路都是调用DragMove()方法,这个方法不但可以空白区域拖动窗口,还可以触发屏幕边缘的事件(比如拖到顶端最大化),但是它也有很蛋疼的一点,那就是在窗口最大化的时候无法通过拖动来恢复窗口大小(可以在QQ窗口上试验这个功能),因此只能我们自己来实现这个方法。
其实最大化时拖动来恢复这个功能是窗口的标题栏所具有的特性,所以我们的思路就沿着这个走。我们希望所有在空白区域的点击都判断为对标题栏的点击,至于怎么实现……我们再次祭出Win32API。
WM_NCLBUTTONDOWN事件是在鼠标不在Client区域时被Post到窗口的,其wParam为前面所提到的HitTest所测试到的值。
此外我们还需要用到SendMessage函数来发送消息:
LRESULT WINAPI SendMessage(_In_ HWND hWnd, _In_ UINT Msg, _In_ WPARAM wParam, _In_ LPARAM lParam);
参考:http://msdn.microsoft.com/en-us/library/windows/desktop/ms644950(v=vs.85).aspx
我们需要在Win32类中再添加一点东西:
        // Posted when the user presses the left mouse button while the cursor is within the nonclient area of a window
        public const int WM_NCLBUTTONDOWN = 0x00A1;

        // Sends the specified message to a window or windows
        [DllImport("user32.dll", EntryPoint = "SendMessage")]
        public static extern int SendMessage(IntPtr hwnd, int wMsg, int wParam, int lParam);
在窗口类中为MouseLeftButtonDown事件添加一个处理程序,并实现相关代码。处理程序是通过判断事件源的类型来决定是否发送消息,如果你想让更多的元素可以拖动(比如Label),请在判断条件中添加判断内容。代码如下:
        public MainWindow()
        {
            InitializeComponent();

            this.SourceInitialized += MainWindow_SourceInitialized;
            this.StateChanged += MainWindow_StateChanged;
            this.MouseLeftButtonDown += MainWindow_MouseLeftButtonDown;
        }

        void MainWindow_MouseLeftButtonDown(object sender, MouseButtonEventArgs e)
        {
            if (e.OriginalSource is Grid || e.OriginalSource is Border || e.OriginalSource is Window)
            {
                WindowInteropHelper wih = new WindowInteropHelper(this);
                Win32.SendMessage(wih.Handle, Win32.WM_NCLBUTTONDOWN, (int)Win32.HitTest.HTCAPTION, 0);
                return;
            }
        }
至此,我们所有的功能都已经实现。效果图由于不太好截取,暂时先不放啦~
个人水平有限,感谢您能读完我的文章,欢迎各位在此交流。
另附代码下载:http://pan.baidu.com/s/1zLn3R
演示程序(.NET 3.5):http://pan.baidu.com/s/1CC0XA


