前言
最近比较忙,两三周没有更新简书了,公司正好在做蓝牙BLE的项目,本来觉得挺简单的东西从网上找了个框架,就咔咔地开始搞,搞完以后才发现里面还有不少坑呢,故而写一篇蓝牙BLE入门及爬坑指南,旨在帮助刚入蓝牙BLE的小伙伴们少走弯路。
注:本文所有的具体代码实现都在文章最后的github上
经典蓝牙和蓝牙BLE的区别
说起蓝牙,大家一定听过蓝牙1.0 2.0 3.0 4.0,不过现在已经不再用版本号区分蓝牙了,蓝牙1.0~3.0都是经典蓝牙,在塞班系统就已经开始使用了,确实很经典。有些人一直认为蓝牙4.0就是蓝牙BLE,其实是错误的。因为4.0是双模的,既包括经典蓝牙又包括低能耗蓝牙。经典蓝牙和蓝牙BLE虽然都是蓝牙,但其实还是存在很大区别的。蓝牙BLE相比于经典蓝牙的优点是搜索、连接的速度更快,关键就是BLE(Bluetooth Low Energy)低能耗,缺点呢就是传输的速度慢,传输的数据量也很小,每次只有20个字节。但是蓝牙BLE因为其低能耗的优点,在智能穿戴设备和车载系统上的应用越来越广泛,因此,蓝牙BLE开发已经是我们Android开发不得不去掌握的一门技术了。
蓝牙BLE的简介
蓝牙BLE是在Android4.3系统及以上引入的,但是仅作为中央设备,直到5.0以后才可以既作为中央设备又可以作为周边设备。也就是5.0系统以后,可以手机控制手机了,不过绝大多数的场景手机还是作为中央设备去控制其他的周边设备。Android BLE 使用的蓝牙协议是 GATT 协议。关于这个GATT协议,我就不详细给大家介绍了,放上个链接,感兴趣的可以看一下http://blog.chinaunix.net/uid-21411227-id-5750680.html
Service和Characteristic
Service是服务,Characteristic是特征值。蓝牙里面有多个Service,一个Service里面又包括多个Characteristic,具体的关系可以看图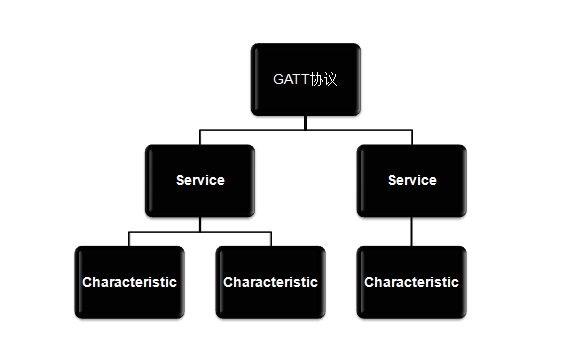
图中画的比较少,实际上一个蓝牙协议里面包含的Service和Characteristic是比较多的 ,这时候你可能会问,这么多的同名属性用什么来区分呢?答案就是UUID,每个Service或者Characteristic都有一个 128 bit 的UUID来标识。Service可以理解为一个功能集合,而Characteristic比较重要,蓝牙设备正是通过Characteristic来进行设备间的交互的(如读、写、订阅等操作)。
小结
经典蓝牙和蓝牙BLE虽然都是蓝牙,但是在连接和数据传递上还是存在很大的区别,而蓝牙BLE依靠着其低能耗的特点,逐渐在智能穿戴设备上占有一席之地。蓝牙BLE基于GATT协议传输数据,提供了Serivice和Characteristic进行设备之间的通讯。以上,就是蓝牙BLE的基本概念,下面开始蓝牙BLE的正式开发!
蓝牙BLE正确开发姿势(本文重点)
第一步:声明蓝牙BLE权限
<!--声明蓝牙权限-->
    <uses-permission android:name="android.permission.BLUETOOTH" />
    <uses-permission android:name="android.permission.BLUETOOTH_ADMIN" />
    <uses-permission android:name="android.permission.BLUETOOTH_PRIVILEGED" />
    <uses-permission android:name="android.permission.ACCESS_COARSE_LOCATION" />
    <uses-permission android:name="android.permission.ACCESS_FINE_LOCATION" />
Android6.0系统以上开启蓝牙还需要定位权限,定位权限属于危险权限,需要动态申请,笔者实现的方法是使用了RxPerssion动态库。
 /**
     * 检查权限
     */
    private void checkPermissions() {
        RxPermissions rxPermissions = new RxPermissions(MainActivity.this);
        rxPermissions.request(android.Manifest.permission.ACCESS_FINE_LOCATION)
                .subscribe(new io.reactivex.functions.Consumer<Boolean>() {
                    @Override
                    public void accept(Boolean aBoolean) throws Exception {
                        if (aBoolean) {
                            // 用户已经同意该权限
                            scanDevice();
                        } else {
                            // 用户拒绝了该权限,并且选中『不再询问』
                            ToastUtils.showLong("用户开启权限后才能使用");
                        }
                    }
                });
    }
第二步:连接蓝牙前需要初始化的工作
mBluetoothManager= (BluetoothManager) getSystemService(BLUETOOTH_SERVICE);
        mBluetoothAdapter=mBluetoothManager.getAdapter();
        if (mBluetoothAdapter==null||!mBluetoothAdapter.isEnabled()){
            Intent intent=new Intent(BluetoothAdapter.ACTION_REQUEST_ENABLE);
            startActivityForResult(intent,0);
        }
拿到BluetoothManager,在通过BluetoothManager.getAdapter()拿到BluetoothAdapter,然后判断一下蓝牙是否打开,没打开的话Intent隐式调用打开系统开启蓝牙界面。
第三步:扫描设备
 /**
     * 开始扫描 10秒后自动停止
     * */
    private void scanDevice(){
        tvSerBindStatus.setText("正在搜索");
        isScaning=true;
        pbSearchBle.setVisibility(View.VISIBLE);
        mBluetoothAdapter.startLeScan(scanCallback);
        new Handler().postDelayed(new Runnable() {
            @Override
            public void run() {
                //结束扫描
                mBluetoothAdapter.stopLeScan(scanCallback);
                runOnUiThread(new Runnable() {
                    @Override
                    public void run() {
                        isScaning=false;
                        pbSearchBle.setVisibility(View.GONE);
                    }
                });
            }
        },10000);
    }
蓝牙扫描如果不停止,会持续扫描,很消耗资源,一般都是开启10秒左右停止
BluetoothAdapter.LeScanCallback scanCallback=new BluetoothAdapter.LeScanCallback() {
        @Override
        public void onLeScan(BluetoothDevice device, int rssi, byte[] scanRecord) {
            Log.e(TAG, "run: scanning...");
            if (!mDatas.contains(device)){
                mDatas.add(device);
                mRssis.add(rssi);
                mAdapter.notifyDataSetChanged();
            }

        }
    };
这里的scanCallback是上一段代码里mBluetoothAdapter.startLeScan(scanCallback)里面的对象,其中onLeScan(BluetoothDevice device, int rssi, byte[] scanRecord)里面的参数都很直观,device是设备对象,rssi扫描到的设备强度,scanRecord是扫面记录,没什么卵用。 扫描过的设备仍然会被再次扫描到,因此要加入设备列表之前可以判断一下,如果已经加入过了就不必再次添加了。
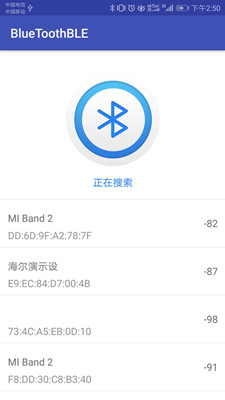
看一下搜索的效果图吧
第三步:连接设备
BluetoothDevice bluetoothDevice= mDatas.get(position);
                    //连接设备
                    tvSerBindStatus.setText("连接中");
                    if (Build.VERSION.SDK_INT >= Build.VERSION_CODES.M) {
                        mBluetoothGatt = bluetoothDevice.connectGatt(MainActivity.this,
                                true, gattCallback, TRANSPORT_LE);
                    } else {
                        mBluetoothGatt = bluetoothDevice.connectGatt(MainActivity.this,
                                true, gattCallback);
                    }
连接这里大家可能已经发现了,判断了一下手机系统,6.0及以上连接设备的方法是bluetoothDevice.connectGatt(MainActivity.this,true, gattCallback, TRANSPORT_LE)。这里就是我遇见的第一个大坑了,我的手机是8.0的系统使用
bluetoothDevice.connectGatt(MainActivity.this, true, gattCallback);总是连接失败,提示status返回133,用了各种方法都不行,后台一查才发现6.0及以上系统的手机要使用bluetoothDevice.connectGatt(MainActivity.this,true, gattCallback, TRANSPORT_LE),其中TRANSPORT_LE参数是设置传输层模式。传输层模式有三种TRANSPORT_AUTO 、TRANSPORT_BREDR 和TRANSPORT_LE。如果不传默认TRANSPORT_AUTO,6.0系统及以上需要使用TRANSPORT_LE这种传输模式,具体为啥,我也不知道,我猜是因为Android6.0及以上系统重新定义了蓝牙BLE的传输模式必须使用TRANSPORT_LE这种方式吧。bluetoothDevice.connectGatt()方法返回的对象BluetoothGatt,这个BluetoothGatt对象非常重要,甚至可以说是最重要的。一般都是单独声明成全局变量来使用的,因为我们设备的读、写和订阅等操作都需要用到这个对象。
 private BluetoothGattCallback gattCallback=new BluetoothGattCallback() {
        /**
         * 断开或连接 状态发生变化时调用
         * */
        @Override
        public void onConnectionStateChange(BluetoothGatt gatt, int status, int newState) {
            super.onConnectionStateChange(gatt, status, newState);
            Log.e(TAG,"onConnectionStateChange()");
            if (status==BluetoothGatt.GATT_SUCCESS){
                //连接成功
                if (newState== BluetoothGatt.STATE_CONNECTED){
                    Log.e(TAG,"连接成功");
                    //发现服务
                    gatt.discoverServices();
                }
            }else{
                //连接失败
                Log.e(TAG,"失败=="+status);
                mBluetoothGatt.close();
                isConnecting=false;
            }
        }
        /**
         * 发现设备(真正建立连接)
         * */
        @Override
        public void onServicesDiscovered(BluetoothGatt gatt, int status) {
            super.onServicesDiscovered(gatt, status);
            //直到这里才是真正建立了可通信的连接
            isConnecting=false;
            Log.e(TAG,"onServicesDiscovered()---建立连接");
            //获取初始化服务和特征值
            initServiceAndChara();
            //订阅通知
            mBluetoothGatt.setCharacteristicNotification(mBluetoothGatt
                    .getService(notify_UUID_service).getCharacteristic(notify_UUID_chara),true);


            runOnUiThread(new Runnable() {
                @Override
                public void run() {
                    bleListView.setVisibility(View.GONE);
                    operaView.setVisibility(View.VISIBLE);
                    tvSerBindStatus.setText("已连接");
                }
            });
        }
        /**
         * 读操作的回调
         * */
        @Override
        public void onCharacteristicRead(BluetoothGatt gatt, BluetoothGattCharacteristic characteristic, int status) {
            super.onCharacteristicRead(gatt, characteristic, status);
            Log.e(TAG,"onCharacteristicRead()");
        }
        /**
         * 写操作的回调
         * */
        @Override
        public void onCharacteristicWrite(BluetoothGatt gatt, BluetoothGattCharacteristic characteristic, int status) {
            super.onCharacteristicWrite(gatt, characteristic, status);

            Log.e(TAG,"onCharacteristicWrite()  status="+status+",value="+HexUtil.encodeHexStr(characteristic.getValue()));
        }
        /**
         * 接收到硬件返回的数据
         * */
        @Override
        public void onCharacteristicChanged(BluetoothGatt gatt, BluetoothGattCharacteristic characteristic) {
            super.onCharacteristicChanged(gatt, characteristic);
            Log.e(TAG,"onCharacteristicChanged()"+characteristic.getValue());
            final byte[] data=characteristic.getValue();
            runOnUiThread(new Runnable() {
                @Override
                public void run() {
                    addText(tvResponse,bytes2hex(data));
                }
            });

        }
    };
这一段是连接的回调 这里我只重写了几个比较重要的方法,每个方法都有具体的注释,需要强调的是有些同学重复连接会报133连接失败,这个调用一下mBluetoothGatt.close()就可以解决,还有要注意的就是回调里面的方法不要做耗时的操作,也不要在回调方法里面更新UI,这样有可能会阻塞线程。
第四步:发现服务
  /**
         * 发现设备(真正建立连接)
         * */
        @Override
        public void onServicesDiscovered(BluetoothGatt gatt, int status) {
            super.onServicesDiscovered(gatt, status);
            //直到这里才是真正建立了可通信的连接
            isConnecting=false;
            Log.e(TAG,"onServicesDiscovered()---建立连接");
            //获取初始化服务和特征值
            initServiceAndChara();
            //订阅通知
            mBluetoothGatt.setCharacteristicNotification(mBluetoothGatt
                    .getService(notify_UUID_service).getCharacteristic(notify_UUID_chara),true);


            runOnUiThread(new Runnable() {
                @Override
                public void run() {
                    bleListView.setVisibility(View.GONE);
                    operaView.setVisibility(View.VISIBLE);
                    tvSerBindStatus.setText("已连接");
                }
            });
        }
直到这里才是建立了真正可通信的连接,下一步就可以进行读写订阅等操作,之前文章中有提到要通过Service和Characteristic特征值来操作,但是如果获取到对应的服务和特征值呢?一般硬件开发工程师会定义好UUID,通知到我们,这个时候我们只需要调用下面的方法就能拿到Service和Characteristic
//write_UUID_service和write_UUID_chara是硬件工程师告诉我们的
 BluetoothGattService service=mBluetoothGatt.getService(write_UUID_service);
 BluetoothGattCharacteristic charaWrite=service.getCharacteristic(write_UUID_chara);
当然也会比较坑爹的,就是硬件工程师居然不知道Service和Characteristic的UUID是啥(没错,我就遇见了),这个时候也不要慌,因为我们可以通过Android拿得到对应UUID.
 private void initServiceAndChara(){
        List<BluetoothGattService> bluetoothGattServices= mBluetoothGatt.getServices();
        for (BluetoothGattService bluetoothGattService:bluetoothGattServices){
            List<BluetoothGattCharacteristic> characteristics=bluetoothGattService.getCharacteristics();
            for (BluetoothGattCharacteristic characteristic:characteristics){
                int charaProp = characteristic.getProperties();
                if ((charaProp & BluetoothGattCharacteristic.PROPERTY_READ) > 0) {
                    read_UUID_chara=characteristic.getUuid();
                    read_UUID_service=bluetoothGattService.getUuid();
                    Log.e(TAG,"read_chara="+read_UUID_chara+"----read_service="+read_UUID_service);
                }
                if ((charaProp & BluetoothGattCharacteristic.PROPERTY_WRITE) > 0) {
                    write_UUID_chara=characteristic.getUuid();
                    write_UUID_service=bluetoothGattService.getUuid();
                    Log.e(TAG,"write_chara="+write_UUID_chara+"----write_service="+write_UUID_service);
                }
                if ((charaProp & BluetoothGattCharacteristic.PROPERTY_WRITE_NO_RESPONSE) > 0) {
                    write_UUID_chara=characteristic.getUuid();
                    write_UUID_service=bluetoothGattService.getUuid();
                    Log.e(TAG,"write_chara="+write_UUID_chara+"----write_service="+write_UUID_service);

                }
                if ((charaProp & BluetoothGattCharacteristic.PROPERTY_NOTIFY) > 0) {
                    notify_UUID_chara=characteristic.getUuid();
                    notify_UUID_service=bluetoothGattService.getUuid();
                    Log.e(TAG,"notify_chara="+notify_UUID_chara+"----notify_service="+notify_UUID_service);
                }
                if ((charaProp & BluetoothGattCharacteristic.PROPERTY_INDICATE) > 0) {
                    indicate_UUID_chara=characteristic.getUuid();
                    indicate_UUID_service=bluetoothGattService.getUuid();
                    Log.e(TAG,"indicate_chara="+indicate_UUID_chara+"----indicate_service="+indicate_UUID_service);

                }
            }
        }
    }
BluetoothGattCharacteristic.PROPERTY_READ:对应的就是读取数据
BluetoothGattCharacteristic.PROPERTY_WRITE和BluetoothGattCharacteristic.PROPERTY_WRITE_NO_RESPONSE:都是写入,区别就是据说PROPERTY_WRITE_NO_RESPONSE写入效率更高,而NO_RESPONSE没有响应,我也没弄懂这个响应指的是什么响应,我用PROPERTY_WRITE_NO_RESPONSE写入,订阅中依然得到了回应,这里有知道的朋友可以告诉一下笔者。
PROPERTY_NOTIFY和PROPERTY_INDICATE:这里都是订阅的方法,区别就是PROPERTY_INDICATE一定能接收到订阅回调,一般用来接收一些比较重要的必须的回调,但是不能太频繁;而PROPERTY_NOTIFY不一定能百分之百接收到回调,可以频繁接收,这个一般也是使用得比较多的订阅方式。
读取数据
private void readData() {
        BluetoothGattCharacteristic characteristic=mBluetoothGatt.getService(read_UUID_service)
                .getCharacteristic(read_UUID_chara);
        mBluetoothGatt.readCharacteristic(characteristic);
    }
读取数据用得比较少,我也就不重点介绍了,一般我们都是先订阅,再写入,在订阅中回调数据进行交互。
写入数据
 private void writeData(){
        BluetoothGattService service=mBluetoothGatt.getService(write_UUID_service);
        BluetoothGattCharacteristic charaWrite=service.getCharacteristic(write_UUID_chara);
        byte[] data=HexUtil.hexStringToBytes(hex);
        if (data.length>20){//数据大于个字节 分批次写入
            Log.e(TAG, "writeData: length="+data.length);
            int num=0;
            if (data.length%20!=0){
                num=data.length/20+1;
            }else{
                num=data.length/20;
            }
            for (int i=0;i<num;i++){
                byte[] tempArr;
                if (i==num-1){
                    tempArr=new byte[data.length-i*20];
                    System.arraycopy(data,i*20,tempArr,0,data.length-i*20);
                }else{
                    tempArr=new byte[20];
                    System.arraycopy(data,i*20,tempArr,0,20);
                }
                charaWrite.setValue(tempArr);
                mBluetoothGatt.writeCharacteristic(charaWrite);
            }
        }else{
            charaWrite.setValue(data);
            mBluetoothGatt.writeCharacteristic(charaWrite);
        }
    }
这里写入数据需要说一下,首先拿到写入的BluetoothGattService和BluetoothGattCharacteristic对象,把要写入的内容转成16进制的字节(蓝牙BLE规定的数据格式),然后要判断一下字节大小,如果大于20个字节就要分批次写入了,因为GATT协议规定蓝牙BLE每次传输的有效字节不能超过20个,最后通过BluetoothGattCharacteristic.setValue(data); mBluetoothGatt.writeCharacteristic(BluetoothGattCharacteristic);就可以完成写入了。写入成功了会回调onCharacteristicWrite方法
/**
         * 写操作的回调
         * */
        @Override
        public void onCharacteristicWrite(BluetoothGatt gatt, BluetoothGattCharacteristic characteristic, int status) {
            super.onCharacteristicWrite(gatt, characteristic, status);

            Log.e(TAG,"onCharacteristicWrite()  status="+status+",value="+HexUtil.encodeHexStr(characteristic.getValue()));
        }
订阅回调
//订阅通知
            mBluetoothGatt.setCharacteristicNotification(mBluetoothGatt
                    .getService(notify_UUID_service).getCharacteristic(notify_UUID_chara),true);
注意一定要写在写入之前,要不然就收不到写入的数据,我一般都是在发现服务之后就订阅。关于订阅收不到这里,需要注意一下,首先你写入的和订阅的Characteristic对象一定要属于同一个Service对象,另外就是保证你写入的数据没问题,否则就可能收不到订阅回调。
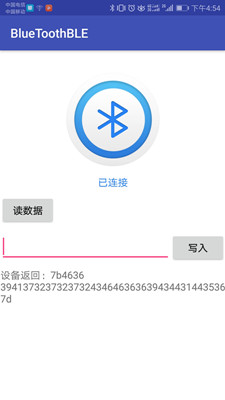
这里在EditText虽然没有显示,但其实我直接点击默认就输入7B46363941373237323532443741397D 这一串数据,实在懒得打了
总结
第一次打这么多字有点小累,总结这个地方就不多说了,这里就说点注意事项,在进行蓝牙操作的时候最好每次都延迟200ms再执行,因为蓝牙是线程安全的,当你同时执行多次操作的时候会出现busy的情况导致执行失败,所以这里建议一般都执行一步操作延时一会,这样可以保证操作的成功率,另外就是如果大家入了门以后想要快速的开发的话,建议网上找好轮子,找一个好用的,可以先自己看看实现的源码,当然最好就是自己封装一个。
最后放上我的github地址:https://github.com/kaka10xiaobang/BlueToothBLE