1. 创建项目,导入jar包
- Spring的jar包
- Mybatis的jar包
- Mybatis-Spring整合包,即mybatis-spring-1.3.2.jar
- MySql的数据库驱动jar包
- 数据库连接池的jar包
- JSTL所需的jar包
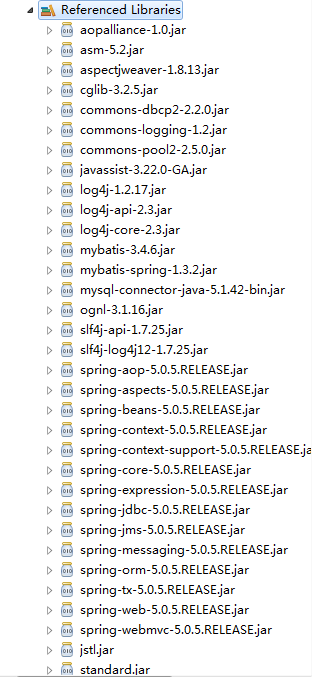 图1.png
2. 整合思路
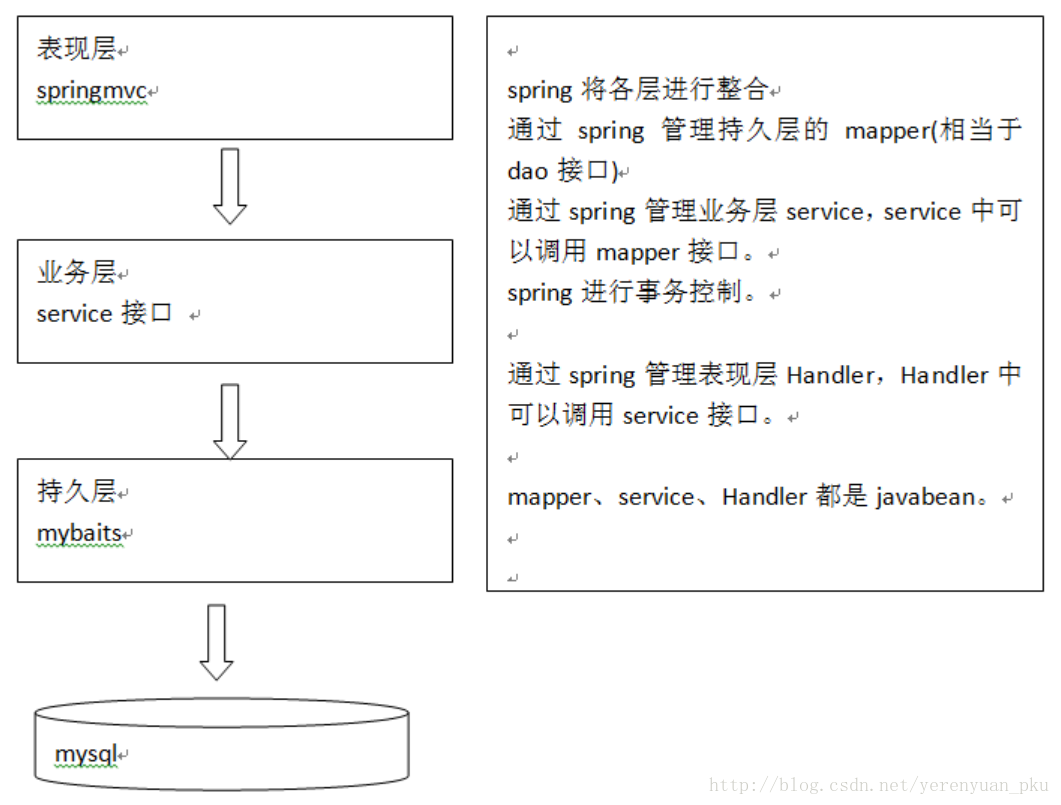
图2.png
Spring在进行管理时,是很有条理的,每个层都由Spring管理,然后不同的层可以调用其它层,Handler调用service,service调用mapper等。
- Dao层
1>. SqlMapConfig.xml,空文件即可。
2>.applicationContext-dao.xml
-- a) 数据库连接池
-- b) SqlSessionFactory对象,需要Spring和MyBatis的整合包。
-- c) 配置mapper文件扫描器。 - Service层
1>. applicationContext-service.xml文件中配置包扫描器,扫描带@service注解的类。
2>. applicationContext-trans.xml文件中配置事务。 - 表现层
1>. 包扫描器,扫描带@Controller注解的类。
2>. 配置注解驱动。
3>. 配置视图解析器 - web.xml
1>. 在web.xml文件中配置前端控制器。
3. 项目使用到的springmvc.sql
SET FOREIGN_KEY_CHECKS=0;

-- ----------------------------
-- Table structure for items
-- ----------------------------
DROP TABLE IF EXISTS `items`;
CREATE TABLE `items` (
  `id` int(11) NOT NULL AUTO_INCREMENT,
  `name` varchar(32) NOT NULL COMMENT '商品名称',
  `price` float(10,1) NOT NULL COMMENT '商品定价',
  `detail` text COMMENT '商品描述',
  `pic` varchar(64) DEFAULT NULL COMMENT '商品图片',
  `createtime` datetime NOT NULL COMMENT '生产日期',
  PRIMARY KEY (`id`)
) ENGINE=InnoDB AUTO_INCREMENT=4 DEFAULT CHARSET=utf8;

-- ----------------------------
-- Records of items
-- ----------------------------
INSERT INTO `items` VALUES ('1', '台式机', '3000.0', '该电脑质量非常好!!!!', null, '2016-02-03 13:22:53');
INSERT INTO `items` VALUES ('2', '笔记本', '6000.0', '笔记本性能好,质量好!!!!!', null, '2015-02-09 13:22:57');
INSERT INTO `items` VALUES ('3', '背包', '200.0', '名牌背包,容量大质量好!!!!', null, '2015-02-06 13:23:02');

-- ----------------------------
-- Table structure for user
-- ----------------------------
DROP TABLE IF EXISTS `user`;
CREATE TABLE `user` (
  `id` int(11) NOT NULL AUTO_INCREMENT,
  `username` varchar(32) NOT NULL COMMENT '用户名称',
  `birthday` date DEFAULT NULL COMMENT '生日',
  `sex` char(1) DEFAULT NULL COMMENT '性别',
  `address` varchar(256) DEFAULT NULL COMMENT '地址',
  PRIMARY KEY (`id`)
) ENGINE=InnoDB AUTO_INCREMENT=27 DEFAULT CHARSET=utf8;

-- ----------------------------
-- Records of user
-- ----------------------------
INSERT INTO `user` VALUES ('1', '王五', null, '2', null);
INSERT INTO `user` VALUES ('10', '张三', '2014-07-10', '1', '北京市');
INSERT INTO `user` VALUES ('16', '张小明', null, '1', '河南郑州');
INSERT INTO `user` VALUES ('22', '陈小明', null, '1', '河南郑州');
INSERT INTO `user` VALUES ('24', '张三丰', null, '1', '河南郑州');
INSERT INTO `user` VALUES ('25', '陈小明', null, '1', '河南郑州');
INSERT INTO `user` VALUES ('26', '王五', null, null, null);
4. Dao层
1). 在Java Resources下创建源码包config
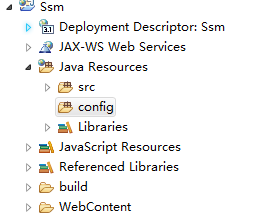
图3.png
2). 在Config源码包下创建mybatis/SqlMapConfig.xml
<?xml version="1.0" encoding="UTF-8"?>
<!DOCTYPE configuration PUBLIC "-//mybatis.org//DTD Config 3.0//EN" "http://mybatis.org/dtd/mybatis-3-config.dtd">
<configuration>
    <!-- 添加别名 -->
    <typeAliases>
        <!-- 所有类均已类名方法,并且不区分大小写 -->
        <package name="com.mazaiting.pojo"/>
    </typeAliases>
</configuration>
3). 在Config源码包下创建Spring配置文件--applicationContext-dao.xml
<?xml version="1.0" encoding="UTF-8"?>
<beans xmlns="http://www.springframework.org/schema/beans"
    xmlns:context="http://www.springframework.org/schema/context"
    xmlns:p="http://www.springframework.org/schema/p"
    xmlns:aop="http://www.springframework.org/schema/aop"
    xmlns:tx="http://www.springframework.org/schema/tx"
    xmlns:xsi="http://www.w3.org/2001/XMLSchema-instance"
    xsi:schemaLocation="http://www.springframework.org/schema/beans
                        http://www.springframework.org/schema/beans/spring-beans-4.0.xsd
                        http://www.springframework.org/schema/context
                        http://www.springframework.org/schema/context/spring-context-4.0.xsd
                        http://www.springframework.org/schema/aop
                        http://www.springframework.org/schema/aop/spring-aop-4.0.xsd
                        http://www.springframework.org/schema/tx
                        http://www.springframework.org/schema/tx/spring-tx-4.0.xsd
                        http://www.springframework.org/schema/util
                        http://www.springframework.org/schema/util/spring-util-4.0.xsd">

    <!-- 加载配置文件 -->
    <context:property-placeholder location="classpath:db.properties"/>
    <!-- 数据库连接池 -->
    <bean id="dataSource" class="org.apache.commons.dbcp2.BasicDataSource" destroy-method="close">
        <!-- 驱动名称 -->
        <property name="driverClassName" value="${jdbc.driver}"/>
        <!-- 数据库地址链接 -->
        <property name="url" value="${jdbc.url}"/>
        <!-- 用户名 -->
        <property name="username" value="${jdbc.username}"/>
        <!-- 密码 -->
        <property name="password" value="${jdbc.password}"/>
        <!-- 最大连接数 -->
        <property name="maxTotal" value="10"/>
        <!-- 设置最大空闲数 -->
        <property name="maxIdle" value="5"/>
    </bean>
    <!-- mapper配置 -->
    <!-- 让Spring管理sqlSessionFactory -->
    <bean id="sqlSessionFactory" class="org.mybatis.spring.SqlSessionFactoryBean">
        <!-- 数据库连接池 -->
        <property name="dataSource" ref="dataSource"/>
        <!-- 加载mybatis的全局配置文件 -->
        <property name="configLocation" value="classpath:mybatis/SqlMapConfig.xml"/>
    </bean>
    <!-- 配置Mapper扫描器 -->
    <bean class="org.mybatis.spring.mapper.MapperScannerConfigurer">
        <!-- 配置扫描包,如果有多个,使用逗号分隔 -->
        <property name="basePackage" value="com.mazaiting.mapper"/>
    </bean>
</beans>
注意:一定记得加载mybatis的全局配置文件,虽然这个全局配置文件是空的,但是这个全局配置文件是必不可少的
db.properties配置文件的内容:
jdbc.driver=com.mysql.jdbc.Driver
jdbc.url=jdbc:mysql://localhost:3306/springmvc?characterEncoding=utf-8
jdbc.username=root
jdbc.password=root
log4j.properties配置文件内容:
# Global logging configuration
log4j.rootLogger=DEBUG, stdout
# Console output...
log4j.appender.stdout=org.apache.log4j.ConsoleAppender
log4j.appender.stdout.layout=org.apache.log4j.PatternLayout
log4j.appender.stdout.layout.ConversionPattern=%5p [%t] - %m%n
5. Service
1). 在Config源码包下创建/spring/applicationContext-service.xml文件,并配置
<beans xmlns="http://www.springframework.org/schema/beans"
    xmlns:context="http://www.springframework.org/schema/context"
    xmlns:p="http://www.springframework.org/schema/p"
    xmlns:aop="http://www.springframework.org/schema/aop"
    xmlns:tx="http://www.springframework.org/schema/tx"
    xmlns:xsi="http://www.w3.org/2001/XMLSchema-instance"
    xsi:schemaLocation="http://www.springframework.org/schema/beans
    http://www.springframework.org/schema/beans/spring-beans-4.0.xsd
    http://www.springframework.org/schema/context
    http://www.springframework.org/schema/context/spring-context-4.0.xsd
    http://www.springframework.org/schema/aop
    http://www.springframework.org/schema/aop/spring-aop-4.0.xsd
    http://www.springframework.org/schema/tx
    http://www.springframework.org/schema/tx/spring-tx-4.0.xsd
    http://www.springframework.org/schema/util
    http://www.springframework.org/schema/util/spring-util-4.0.xsd">

    <!-- 自定义 -->
    <!-- 配置包扫描器,扫描带@Service注解的类 -->
    <context:component-scan base-package="com.mazaiting.service"/>

</beans>
2). 在Config源码包下创建/spring/applicationContext-trans.xml,并配置
<beans xmlns="http://www.springframework.org/schema/beans"
    xmlns:context="http://www.springframework.org/schema/context"
    xmlns:p="http://www.springframework.org/schema/p"
    xmlns:aop="http://www.springframework.org/schema/aop"
    xmlns:tx="http://www.springframework.org/schema/tx"
    xmlns:xsi="http://www.w3.org/2001/XMLSchema-instance"
    xsi:schemaLocation="http://www.springframework.org/schema/beans
    http://www.springframework.org/schema/beans/spring-beans-4.0.xsd
    http://www.springframework.org/schema/context
    http://www.springframework.org/schema/context/spring-context-4.0.xsd
    http://www.springframework.org/schema/aop
    http://www.springframework.org/schema/aop/spring-aop-4.0.xsd
    http://www.springframework.org/schema/tx
    http://www.springframework.org/schema/tx/spring-tx-4.0.xsd
    http://www.springframework.org/schema/util
    http://www.springframework.org/schema/util/spring-util-4.0.xsd">

    <!-- 事务管理器,使用的Spring JDBC的事务管理器 -->
    <bean id="transactionManager" class="org.springframework.jdbc.datasource.DataSourceTransactionManager">
        <!-- 数据源 -->
        <property name="dataSource" ref="dataSource"/>
    </bean>
    <!-- 通知 -->
    <tx:advice id="txAdvice" transaction-manager="transactionManager">
        <tx:attributes>
            <!-- 传播行为,数据库操作的方法尽可能按照下列的名称命名 -->
            <tx:method name="save*" propagation="REQUIRED"/>
            <tx:method name="insert*" propagation="REQUIRED"/>
            <tx:method name="delete*" propagation="REQUIRED"/>
            <tx:method name="update*" propagation="REQUIRED"/>
            <tx:method name="find*" propagation="SUPPORTS" read-only="true"/>
            <tx:method name="get*" propagation="SUPPORTS" read-only="true"/>
        </tx:attributes>
    </tx:advice>

    <!-- 切面 -->
    <aop:config>
        <aop:advisor advice-ref="txAdvice" pointcut="execution(* com.mazaiting.service.*.*(..))"/>
    </aop:config>

</beans>
- propagation=”REQUIRED”:如果当前方法执行的时候,没有事务要开启事务,如果有事务,就在当前事务中执行。也可理解为当前方法被调用的时候没有事务传递进来,就自己开启事务。
- propagation=”SUPPORTS”:如果当前方法执行的时候,如果有事务,就在当前事务中执行,如果没有事务就不开启事务。也可理解为当前方法被调用的时候没有事务传递进来,自己不开启事务。
6. 整合表现层
1). 在Config源码包下创建/spring/springmvc.xml文件
<?xml version="1.0" encoding="UTF-8"?>
<beans xmlns="http://www.springframework.org/schema/beans"
    xmlns:xsi="http://www.w3.org/2001/XMLSchema-instance"
    xmlns:p="http://www.springframework.org/schema/p"
    xmlns:context="http://www.springframework.org/schema/context"
    xmlns:mvc="http://www.springframework.org/schema/mvc"
    xsi:schemaLocation="
        http://www.springframework.org/schema/beans
        http://www.springframework.org/schema/beans/spring-beans-4.0.xsd
        http://www.springframework.org/schema/mvc
        http://www.springframework.org/schema/mvc/spring-mvc-4.0.xsd
        http://www.springframework.org/schema/context
        http://www.springframework.org/schema/context/spring-context-4.0.xsd">

    <!-- 配置扫描组件包 -->
    <context:component-scan base-package="com.mazaiting.controller"/>

    <!-- 配置注解驱动,如果配置此标签,则不用配置处理器映射器和处理器适配器 -->
    <mvc:annotation-driven />

    <!-- 配置视图解析器 -->
    <bean class="org.springframework.web.servlet.view.InternalResourceViewResolver">
        <!-- 前缀 -->
        <property name="prefix" value="/WEB-INF/jsp/"/>
        <!-- 后缀 -->
        <property name="suffix" value=".jsp"/>
    </bean>

</beans>
2). 配置前端控制器,在/WEB-INF/目录下创建web.xml文件
<?xml version="1.0" encoding="UTF-8"?>
<web-app xmlns:xsi="http://www.w3.org/2001/XMLSchema-instance"
    xmlns="http://java.sun.com/xml/ns/javaee"
    xsi:schemaLocation="http://java.sun.com/xml/ns/javaee http://java.sun.com/xml/ns/javaee/web-app_3_0.xsd"
    id="WebApp_ID" version="3.0">
    <display-name>Spring+SpringMVC+Mybatis</display-name>
    <!-- 配置欢迎页 -->
    <welcome-file-list>
        <welcome-file>index.html</welcome-file>
        <welcome-file>index.htm</welcome-file>
        <welcome-file>index.jsp</welcome-file>
        <welcome-file>default.html</welcome-file>
        <welcome-file>default.htm</welcome-file>
        <welcome-file>default.jsp</welcome-file>
    </welcome-file-list>

    <filter>
        <filter-name>charsetEncoding</filter-name>
        <filter-class>org.springframework.web.filter.CharacterEncodingFilter</filter-class>
        <init-param>
            <param-name>encoding</param-name>
            <param-value>UTF-8</param-value>
        </init-param>
        <init-param>
            <param-name>forceEncoding</param-name>
            <param-value>true</param-value>
        </init-param>
    </filter>
    <filter-mapping>
        <filter-name>charsetEncoding</filter-name>
        <url-pattern>/*</url-pattern>
    </filter-mapping>
    <!-- 初始化Spring容器 -->
    <context-param>
        <param-name>contextConfigLocation</param-name>
        <param-value>classpath:spring/applicationContext-*.xml</param-value>
    </context-param>
    <listener>
        <listener-class>org.springframework.web.context.ContextLoaderListener</listener-class>
    </listener>
    <!-- 配置前端控制器 -->
    <servlet>
        <servlet-name>springmvc</servlet-name>
        <servlet-class>org.springframework.web.servlet.DispatcherServlet</servlet-class>
        <init-param>
            <!-- 指定springmvc配置文件的路径。如果不指定,默认为:/WEB-INF/${servlet-name}-servlet.xml -->
            <param-name>contextConfigLocation</param-name>
            <param-value>classpath:spring/springmvc.xml</param-value>
        </init-param>
        <!-- 设置首页启动 -->
        <!-- <load-on-startup>1</load-on-startup> -->
    </servlet>
    <servlet-mapping>
        <servlet-name>springmvc</servlet-name>
        <url-pattern>*.action</url-pattern>
    </servlet-mapping>

</web-app>
3). 至此,基本框架即已搭好
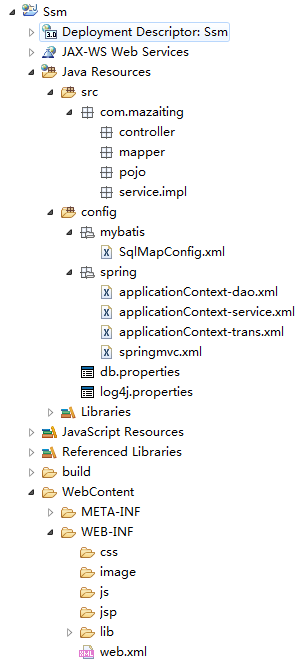
图4.png
代码下载--a6635b76c
6. 使用
1). 在/WebContent/jsp/目录下创建itemList.jsp文件
<%@ page language="java" contentType="text/html; charset=UTF-8"
    pageEncoding="UTF-8"%>
<%@ taglib uri="http://java.sun.com/jsp/jstl/core" prefix="c"%>
<%@ taglib uri="http://java.sun.com/jsp/jstl/fmt" prefix="fmt"%>
<!DOCTYPE html PUBLIC "-//W3C//DTD HTML 4.01 Transitional//EN" "http://www.w3.org/TR/html4/loose.dtd">
<html>
    <head>
        <meta http-equiv="Content-Type" content="text/html; charset=UTF-8">
        <title>查询商品列表</title>
    </head>
    <body>
        <form action="${pageContext.request.contextPath }/item/queryitem.action" method="post">
            查询条件:
            <table width="100%" border="1">
                <tr>
                    <td><input type="submit" value="查询"/></td>
                </tr>
            </table>
            商品列表:
            <table width="100%" border="1">
                <tr>
                    <td>商品名称</td>
                    <td>商品价格</td>
                    <td>生产日期</td>
                    <td>商品描述</td>
                    <td>操作</td>
                </tr>
                <c:forEach items="${itemList }" var="item">
                    <tr>
                        <td>${item.name }</td>
                        <td>${item.price }</td>
                        <td><fmt:formatDate value="${item.createtime }" pattern="yyyy-MM-dd HH:mm:ss"/></td>
                        <td>${item.pic }</td>
                        <td><a href="${pageContext.request.contextPath }/itemEdit.action?id=${item.id}">修改</a></td>
                    </tr>
                </c:forEach>
            </table>
        </form>
    </body>
</html>
2). 在com.mazaiting.pojo包下创建Item.java文件,此类为实体类
public class Item {
    // 编号
    private Integer id;
    // 商品名称
    private String name;
    // 价格
    private Float price;
    // 图片
    private String pic;
    // 时间戳
    private Timestamp createtime;

    public Integer getId() {
        return id;
    }

    public void setId(Integer id) {
        this.id = id;
    }

    public String getName() {
        return name;
    }

    public void setName(String name) {
        this.name = name;
    }

    public Float getPrice() {
        return price;
    }

    public void setPrice(Float price) {
        this.price = price;
    }

    public String getPic() {
        return pic;
    }

    public void setPic(String pic) {
        this.pic = pic;
    }

    public Timestamp getCreatetime() {
        return createtime;
    }

    public void setCreatetime(Timestamp createtime) {
        this.createtime = createtime;
    }

    @Override
    public String toString() {
        return "Item [id=" + id + ", name=" + name + ", price=" + price + ", pic=" + pic + ", createtime=" + createtime
                + "]";
    }

}
3). 创建ItemMapper接口和ItemMapper.xml文件
ItemMapper.java
public interface ItemMapper {
    List<Item> getItemList();
}
ItemMapper.xml
<?xml version="1.0" encoding="UTF-8"?>
<!DOCTYPE mapper PUBLIC "-//mybatis.org//DTD Mapper 3.0//EN" "http://mybatis.org/dtd/mybatis-3-mapper.dtd">
<mapper namespace="com.mazaiting.mapper.ItemMapper">
    <select id="getItemList" resultType="Item">
        select * from items
    </select>
</mapper>
4). 在com.mazaiting.service包下创建ItemService接口文件
public interface ItemService {
    List<Item> getItemList();
}
5). 在com.mazaiting.service.impl包下创建ItemService接口实现类
// 标记为Service
@Service
public class ItemServiceImpl implements ItemService {

    // 注入ItemMapper
    @Autowired
    ItemMapper mapper;

    @Override
    public List<Item> getItemList() {
        return mapper.getItemList();
    }

}
6). 创建ItemController
// 标记为控制器
@Controller
public class ItemController {

    // 注入Service
    @Autowired
    ItemService service;

    // 设置网络访问路径/itemList.action
    @RequestMapping("/itemList")
    public ModelAndView itemList() {
        List<Item> list = service.getItemList();
        ModelAndView modelAndView = new ModelAndView();
        // 设置数据
        modelAndView.addObject("itemList", list);
        // 设置视图名称
        modelAndView.setViewName("itemList");
        return modelAndView;
    }
}
7). 运行项目,http://localhost:8080/Ssm/itemList.action即可看到效果
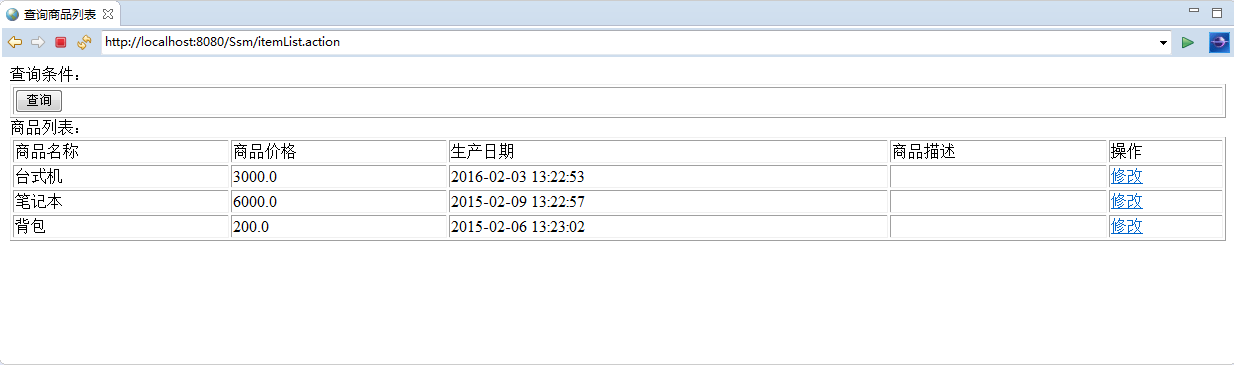
图5.png
8). 项目结构图

图6.png
7. 测试
1). ItemMapper测试
在Java Resourcecs下创建源码包test,然后创建与测试文件相同的包名,类名以要测试的类名+Test命名
public class ItemMapperTest {
    ApplicationContext context;
    @Before
    public void init(){
        context = new ClassPathXmlApplicationContext(Constant.PATHS);
    }

    @Test
    public void testGetItemList() {
        ItemMapper mapper = context.getBean(ItemMapper.class);
        List<Item> list = mapper.getItemList();
        for (Item item : list) {
            System.out.println(item.toString());
        }
    }
}
其中Constants类内容:
public class Constant {
    // 对应的配置文件
    public static final String[] PATHS = {"spring/springmvc.xml","spring/applicationContext-*.xml"};
}
2). Service测试--ItemServiceTest
public class ItemServcieTest {
    ApplicationContext context;
    @Before
    public void init() {
        context = new ClassPathXmlApplicationContext(Constant.PATHS);
    }

    @Test
    public void testGetItemList() {
        ItemService service = context.getBean(ItemService.class);
        List<Item> list = service.getItemList();
        for (Item item : list) {
            System.out.println(item);
        }
    }
}