开始重新学习一下自定义View的相关知识,借鉴了一些网上的文章,目前在跟这位博主学习,大家可以关注一下
作者:红橙Darren
链接:https://www.jianshu.com/p/0a32e81c3c89
來源:简书
ArcView
实现效果
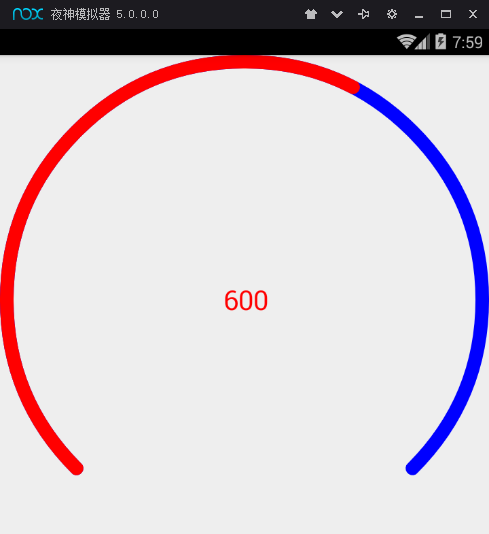
QQ截图20180323075921.png
package com.example.mylibrary.view;

import android.content.Context;
import android.content.res.TypedArray;
import android.graphics.Canvas;
import android.graphics.Color;
import android.graphics.Paint;
import android.graphics.Rect;
import android.graphics.RectF;
import android.support.annotation.Nullable;
import android.util.AttributeSet;
import android.view.View;

import com.example.mylibrary.R;

/**
 * Created by renzhenming on 2018/3/22.
 * 圆弧形的进度条
 */

public class ArcView extends View{

    private final Paint mBackgroundPaint;
    private final Paint mForegroundPaint;
    private final Paint mTextPaint;

    //中间字体颜色
    private int mCenterTextColor = Color.RED;

    //中间字体大小
    private int mCenterTextSize = 40;

    //进度条宽度
    private float mBorderWidth = 20;

    //进度条已完成部分颜色
    private int mForegroundColor = Color.RED;

    //进度条进行中部分颜色
    private int mBackgroundColor = Color.BLUE;

    //总量和当前量
    private float mTotalPercent = 0f;
    private float mCurrentPercent = 0f;

    public ArcView(Context context) {
        this(context,null);
    }

    public ArcView(Context context, @Nullable AttributeSet attrs) {
        this(context, attrs,-1);
    }

    public ArcView(Context context, @Nullable AttributeSet attrs, int defStyleAttr) {
        super(context, attrs, defStyleAttr);
        TypedArray typedArray = context.obtainStyledAttributes(attrs, R.styleable.ArcView);
        mBackgroundColor = typedArray.getColor(R.styleable.ArcView_backgroundColor, mBackgroundColor);
        mForegroundColor = typedArray.getColor(R.styleable.ArcView_foregroundColor, mForegroundColor);
        mBorderWidth = typedArray.getDimension(R.styleable.ArcView_borderWidth,mBorderWidth);
        mCenterTextSize = typedArray.getDimensionPixelSize(R.styleable.ArcView_centerTextSize,mCenterTextSize);
        mCenterTextColor = typedArray.getColor(R.styleable.ArcView_centerTextColor,mCenterTextColor);
        typedArray.recycle();

        mBackgroundPaint = new Paint();
        mBackgroundPaint.setAntiAlias(true);
        mBackgroundPaint.setStrokeWidth(mBorderWidth);
        mBackgroundPaint.setColor(mBackgroundColor);
        //STROKE 画出来的圆弧不是封闭的,FILL是封闭的
        mBackgroundPaint.setStyle(Paint.Style.STROKE);
        mBackgroundPaint.setDither(true);
        //Paint.Cap.ROUND设置圆弧首尾位置是ROUND的,不是直角
        //Paint.Cap.SQUARE默认的是直角
        mBackgroundPaint.setStrokeCap(Paint.Cap.ROUND);

        mForegroundPaint = new Paint();
        mForegroundPaint.setAntiAlias(true);
        mForegroundPaint.setStrokeWidth(mBorderWidth);
        mForegroundPaint.setDither(true);
        mForegroundPaint.setColor(mForegroundColor);
        //STROKE 画出来的圆弧不是封闭的,FILL是封闭的
        mForegroundPaint.setStyle(Paint.Style.STROKE);
        //Paint.Cap.ROUND设置圆弧首尾位置是ROUND的,不是直角
        //Paint.Cap.SQUARE默认的是直角
        mForegroundPaint.setStrokeCap(Paint.Cap.ROUND);

        mTextPaint = new Paint();
        mTextPaint.setAntiAlias(true);
        mTextPaint.setDither(true);
        mTextPaint.setColor(mCenterTextColor);
        mTextPaint.setTextSize(mCenterTextSize);
    }

    @Override
    protected void onMeasure(int widthMeasureSpec, int heightMeasureSpec) {
        super.onMeasure(widthMeasureSpec, heightMeasureSpec);
        //如果宽度和高度不一样,取最小值,确保是个正方形
        int width = MeasureSpec.getSize(widthMeasureSpec);
        int height = MeasureSpec.getSize(heightMeasureSpec);
        setMeasuredDimension(width>height?height:width,width>height?height:width);
    }

    @Override
    protected void onDraw(Canvas canvas) {
        super.onDraw(canvas);
        //画背景,
        RectF rectF = new RectF(mBorderWidth / 2, mBorderWidth / 2, getWidth() - mBorderWidth / 2, getHeight() - mBorderWidth / 2);
        //false表示圆弧不闭合,绘制的宽度也要占空间,所以RectF的设置上下左右要考虑去掉宽度的一般,猜测,
        //绘制的时候是从边缘宽度的中心开始计算的
        canvas.drawArc(rectF, 135, 270, false, mBackgroundPaint);

        //画进行中的进度
        if (mTotalPercent ==0 )return;
        if ( mCurrentPercent > mTotalPercent){
            mCurrentPercent = mTotalPercent;
        }
        float sweepAngle = mCurrentPercent/mTotalPercent;
        canvas.drawArc(rectF,135,sweepAngle*270,false,mForegroundPaint);

        //画文字
        String s = ((int)mCurrentPercent) + "";
        Rect bounds = new Rect();
        mTextPaint.getTextBounds(s,0,s.length(),bounds);

        //获取文字的起始位置,文字位于控件中间,所以起始位置等于控件宽度的
        //一半减去文字宽度的一半
        int start = getWidth()/2-bounds.width()/2;


        Paint.FontMetrics metrics = mTextPaint.getFontMetrics();

        //文字高度
        //文字中心点距离底部的距离
        int dy = (int) ((metrics.bottom-metrics.top)/2-metrics.bottom);

        //获取基线baseline
        int baseLine = getHeight()/2+dy;
        canvas.drawText(s,start,baseLine,mTextPaint);
    }

    /**
     * 设置总量
     * @param totalProgress
     */
    public synchronized void setTotalProgress(int totalProgress){
        this.mTotalPercent = totalProgress;
    }

    /**
     * 设置当前量
     * @param currentProgress
     */
    public synchronized void setCurrentProgress(int currentProgress){
        this.mCurrentPercent = currentProgress;
        invalidate();
    }
}
attrs
<!--半圆弧进度条-->
    <declare-styleable name="ArcView">
        <attr name="backgroundColor" format="color"/>
        <attr name="foregroundColor" format="color"/>
        <attr name="borderWidth" format="dimension"/>
        <attr name="centerTextSize" format="dimension"/>
        <attr name="centerTextColor" format="color"/>
    </declare-styleable>
<LinearLayout xmlns:android="http://schemas.android.com/apk/res/android"
    xmlns:tools="http://schemas.android.com/tools"
    android:layout_width="match_parent"
    android:layout_height="match_parent"
    tools:context="com.app.rzm.test.TextCustomeViewActivity">
    <com.example.mylibrary.view.ArcView
        android:id="@+id/arcView"
        android:layout_width="match_parent"
        android:layout_height="match_parent" />
</LinearLayout>
测试
public class TextCustomeViewActivity extends AppCompatActivity {

    @Override
    protected void onCreate(Bundle savedInstanceState) {
        super.onCreate(savedInstanceState);
        setContentView(R.layout.activity_text_custormer_view);
        final ArcView mArcView = (ArcView) findViewById(R.id.arcView);
        mArcView.setTotalProgress(1000);
        ValueAnimator animator = ValueAnimator.ofFloat(0,2000);
        animator.setDuration(2000);
        animator.start();
        animator.addUpdateListener(new ValueAnimator.AnimatorUpdateListener() {
            @Override
            public void onAnimationUpdate(ValueAnimator animation) {
                float currentProgress = (float) animation.getAnimatedValue();
                mArcView.setCurrentProgress((int) currentProgress);
            }
        });
    }
}