之前的文章简单介绍了Kaggle平台以及如何用支撑向量(SVM)的机器学习算法识别手写数字图片。可见即使不用神经网络,传统的机器学习算法在图像识别的领域也能取得不错的成绩(我跑出来了97.2% 的正确率), 但是要将正确率再往上提升就会遇到瓶颈了。
此时,神经网络以及深度学习,尤其是卷积神经网路(CNN)就派上用场了。
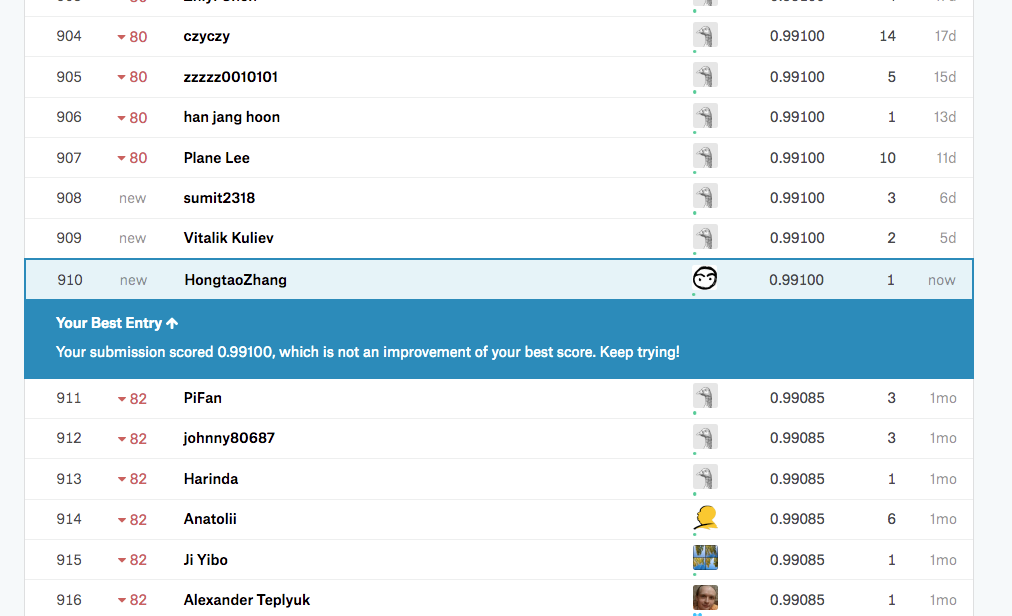
用CNN的网络,在同样的平台上,目前我将手写图片识别的正确率提高到了99.1%,排名全球900多名左右。
1、导入库文件
使用深度学习的方法当然就要用到大名鼎鼎的TensorFlow。
import pandas as pd
import math
import numpy as np
import matplotlib.pyplot as plt, matplotlib.image as mpimg
from sklearn.model_selection import train_test_split
import tensorflow as tf

%matplotlib inline
2、准备数据
与之前一样,需要对数据进行分成Train 和 Test 两个组。
labeled_images = pd.read_csv('train.csv')
images = labeled_images.iloc[:,1:]
labels = labeled_images.iloc[:,:1]
train_images, test_images,train_labels, test_labels = train_test_split(images, labels, test_size=0.02)
3、创建帮助函数
这是本问最难的部分,作用实际上就是对数据进行处理,转换成TensorFlow 读得懂的数据。
One Hot Encode
我们知道,这些图片的标签(识别结果)就是是0到9的10个数字,结果就是一个nx1的矩阵,n是训练样本的个数。为了让模型更加方便地处理数据(计算机是二进制的,最好给它0,1的数据),需要将数据转换成nx10的矩阵。比如果其中一个样板的标记是3,那么这一行的数列就应该是[0,0,0,1,0,0,0,0,0,0], 如果是9的话[0,0,0,0,0,0,0,0,0,1]。所有的样本叠起来就是一个nx10的矩阵。
def one_hot_encode(vec, vals=10):
    '''
    For use to one-hot encode the 10- possible labels
    '''
    n = len(vec)
    out = np.zeros((n, vals))
    out[range(n), vec] = 1
    return out
帮助类
从AI学习笔记——卷积神经网络(CNN)的文章中我们知道,一张图片有三个维度——长,宽,颜色通道。对于本文中的黑色图片,第三个维度为1。在加上样本的个数(n),整个训练样本应该是一个(nx28x28x1)的四维Tensor(张量)。set_up_images(self)函数就是将图片转换成这样的Tensor。next_batch()函数则是n个训练样本分成若干个batch, 一个一个地送给模型(这个叫mini batch)。
class CifarHelper():

    def __init__(self):
        self.i = 0

        # Intialize some empty variables for later on
        self.training_images = None
        self.training_labels = None

        self.test_images = None
        self.test_labels = None

    def set_up_images(self):

        print("Setting Up Training Images and Labels")

        # Vertically stacks the training images
        self.training_images = train_images.as_matrix()
        train_len = self.training_images.shape[0]

        # Reshapes and normalizes training images
        self.training_images = self.training_images.reshape(train_len,28,28,1)/255
        # One hot Encodes the training labels (e.g. [0,0,0,1,0,0,0,0,0,0])
        self.training_labels = one_hot_encode(train_labels.as_matrix().reshape(-1), 10)

        print("Setting Up Test Images and Labels")

        # Vertically stacks the test images
        self.test_images = test_images.as_matrix()
        test_len = self.test_images.shape[0]

        # Reshapes and normalizes test images
        self.test_images = self.test_images.reshape(test_len,28,28,1)/255
        # One hot Encodes the test labels (e.g. [0,0,0,1,0,0,0,0,0,0])
        self.test_labels = one_hot_encode(test_labels.as_matrix().reshape(-1), 10)


    def next_batch(self, batch_size):
        # Note that the 100 dimension in the reshape call is set by an assumed batch size of 100
        x = self.training_images[self.i:self.i+batch_size]
        y = self.training_labels[self.i:self.i+batch_size]
        self.i = (self.i + batch_size) % len(self.training_images)
        return x, y
最后这两行代码就完成了数据的初始化。
# Before Your tf.Session run these two lines
ch = CifarHelper()
ch.set_up_images()

# During your session to grab the next batch use this line
# (Just like we did for mnist.train.next_batch)
# batch = ch.next_batch(100)
4、创建模型
这里用到了TensorFlow, 也许会之后在单独的文章中介绍如何使用,这里简单介绍一下。
使用TensorFlow 首先是要创建一个 computation graph(计算图谱),也就是先告诉计算机模型是怎样的,包括神经网络有多少层,每层多少个神经元,输入输出数据的格式是怎的。此时还没有开始计算。
Placeholder
x 输入,y输出,hold_prob用于dropout(不多解释,主要用于随机丢弃神经元的一种正则化的方法)
x = tf.placeholder(tf.float32, shape=[None,28,28,1])
y_true = tf.placeholder(tf.float32, shape=[None,10])
hold_prob = tf.placeholder(tf.float32)
Help functions
这些函数是为了简化Tensorflow 创建神经网络的方法,根据从之前文章对CNN的介绍,我们需要卷积层,Pooling(池化)层,以及全连接层等等。
def init_weights(shape):
    init_random_dist = tf.truncated_normal(shape, stddev=0.1)
    return tf.Variable(init_random_dist)

def init_bias(shape):
    init_bias_vals = tf.constant(0.1, shape=shape)
    return tf.Variable(init_bias_vals)

def conv2d(x, W):
    return tf.nn.conv2d(x, W, strides=[1, 1, 1, 1], padding='SAME')

# x -->[batch, in_height, in_width, in_channels]
# W --> [filter_height, filter_width, in_channels, out_channels]

def max_pool_2by2(x):
    return tf.nn.max_pool(x, ksize=[1, 2, 2, 1],
                          strides=[1, 2, 2, 1], padding='SAME')
def convolutional_layer(input_x, shape):
    W = init_weights(shape)
    b = init_bias([shape[3]])
    return tf.nn.relu(conv2d(input_x, W) + b)

def normal_full_layer(input_layer, size):
    input_size = int(input_layer.get_shape()[1])
    W = init_weights([input_size, size])
    b = init_bias([size])
    return tf.matmul(input_layer, W) + b
搭建神经网络
第一层,卷积+Pooling
convo_1 = convolutional_layer(x,shape=[6,6,1,32])
convo_1_pooling = max_pool_2by2(convo_1)
第二层
convo_2 = convolutional_layer(convo_1_pooling,shape=[6,6,32,64])
convo_2_pooling = max_pool_2by2(convo_2)
第三层, 全连接
convo_2_flat = tf.reshape(convo_2_pooling,[-1,7*7*64])
full_layer_one = tf.nn.relu(normal_full_layer(convo_2_flat,1024))
Dropout 和 输出
full_one_dropout = tf.nn.dropout(full_layer_one,keep_prob=hold_prob)
y_pred = normal_full_layer(full_one_dropout,10)
定义损失函数,和优化函数,初始化
Loss Function
cross_entropy = tf.reduce_mean(tf.nn.softmax_cross_entropy_with_logits(labels=y_true,logits=y_pred))
Optimizer
optimizer = tf.train.AdamOptimizer(learning_rate=0.00002)
train = optimizer.minimize(cross_entropy)
Intialize Variables
init = tf.global_variables_initializer()
5、训练模型
之前的准备工作妥当之后,实际上训练模型的代码就很短了。用Tensorflow训练模型,都必须在一个Session 之内并且初始化(都是套路)。
with tf.Session() as sess:
    sess.run(tf.global_variables_initializer())
真正的代码就这两行, 实际上就是将之前帮助函数中定义的mini batch 送到模型中进行训练。
 for i in range(50000):
        batch = ch.next_batch(100)
        sess.run(train, feed_dict={x: batch[0], y_true: batch[1], hold_prob: 0.5})
模型要进行50000次的迭代,我们需要将每100此迭代的结果打印出来。完整代码如下
with tf.Session() as sess:
    sess.run(tf.global_variables_initializer())

    for i in range(50000):
        batch = ch.next_batch(100)
        sess.run(train, feed_dict={x: batch[0], y_true: batch[1], hold_prob: 0.5})

        # PRINT OUT A MESSAGE EVERY 100 STEPS
        if i%100 == 0:

            print('Currently on step {}'.format(i))
            print('Accuracy is:')
            # Test the Train Model
            matches = tf.equal(tf.argmax(y_pred,1),tf.argmax(y_true,1))

            acc = tf.reduce_mean(tf.cast(matches,tf.float32))

            print(sess.run(acc,feed_dict={x:ch.test_images,y_true:ch.test_labels,hold_prob:1.0}))
            print('\n')

    saver.save(sess,'models_saving/my_model.ckpt')
最后得到了98%的准确率
Currently on step 0
Accuracy is:
0.179762


Currently on step 100
Accuracy is:
0.584524

....
....
....

Currently on step 49900
Accuracy is:
0.983333
至此,一个完整的用Tensorflow 训练CNN的过程就介绍完了,当然要最后还需要保存模型,用模型对新的数据进行预测,关于这部分的内容就留给读者自己吧。
————
相关文章
AI学习笔记——神经网络和深度学习
AI学习笔记——卷积神经网络1(CNN)
————
文章首发steemit.com 为了方便墙内阅读,搬运至此,欢迎留言或者访问我的Steemit主页


