实际比较filter2D和imfilter之间的关系
卷积运算是图像处理和增强中经常遇到的一种算法。由于很多优秀的开源算法都是采用matlab编写的,在我改写为c语言的时候就必然会遇到改写卷积算法的问题。在matlab中,卷积可以由imfilter来实现,在opencv中则是由filter2D来实现。它们之间的具体转化过程是什么?我通过一系列实验来研究。
一、实验准备
为了方便观察,仍然是采用分开来研究的方法。1)是输入数字作为卷积内容,直接观察结果;2)是采用小块图片作为卷积内容,仍然是比较结果;3)是采用真实的图片和真实的卷积核作为输入,对比最后处理图片的效果。
那么,首先需要了解的就是在matlab中和opencv中如何将矩阵的内容进行比对?
在matlab中可以直接打印到矩阵变量中去,而
在opencv中可以这样直接打印到屏幕上面。然后将两者在matlab中做减法,直观地比较最后的结果。
二、过程
1)是输入数字作为卷积内容
int
_tmain(
int
argc, _TCHAR
*
argv[])
{
//filter2d的卷积方法
printf( "filter2d的卷积方法\n");
Mat srcMat( 10, 10,CV_32F);
Mat dstMat( 10, 10,CV_32F);
Mat srcH( 3, 3,CV_32F);
srcH.at < float >( 0, 0) = - 2;
srcH.at < float >( 0, 1) = - 1;
srcH.at < float >( 0, 2) = 4;
srcH.at < float >( 1, 0) = 3;
srcH.at < float >( 1, 1) = 3;
srcH.at < float >( 1, 2) = 3;
srcH.at < float >( 2, 0) = 3;
srcH.at < float >( 2, 1) = 2;
srcH.at < float >( 2, 2) = 1;
printf( "卷积核\n");
for ( int i = 0;i <srcH.rows;i ++){
for ( int j = 0;j <srcH.cols;j ++){
printf( "%f ",srcH.at < float >(i,j) );
}
printf( "\n");
}
printf( "输入\n");
for ( int i = 0; i < 10; i ++){
for ( int j = 0; j < 10; j ++)
srcMat.at < float >(i,j) = i + 1;
}
for ( int i = 0; i < 10; i ++){
for ( int j = 0; j < 10; j ++){
printf( "%.1f ",srcMat.at < float >(i,j));
}
printf( "\n");
}
printf( "输出\n");
filter2D(srcMat,dstMat,srcMat.depth(),srcH);
printf( "\n"); printf( "\n");
for ( int i = 0; i < 10; i ++){
for ( int j = 0; j < 10; j ++){
printf( "%.1f ",dstMat.at < float >(i,j));
}
printf( "\n");
}
waitKey( 100);
return 0;
}

而在matlab中也有相关输入
>> clear
>> H = [-2.000000 -1.000000 4.000000
3.000000 3.000000 3.000000
3.000000 2.000000 1.000000]
H =
-2 -1 4
3 3 3
3 2 1
>> I=[1.0 1.0 1.0 1.0 1.0 1.0 1.0 1.0 1.0 1.0
2.0 2.0 2.0 2.0 2.0 2.0 2.0 2.0 2.0 2.0
3.0 3.0 3.0 3.0 3.0 3.0 3.0 3.0 3.0 3.0
4.0 4.0 4.0 4.0 4.0 4.0 4.0 4.0 4.0 4.0
5.0 5.0 5.0 5.0 5.0 5.0 5.0 5.0 5.0 5.0
6.0 6.0 6.0 6.0 6.0 6.0 6.0 6.0 6.0 6.0
7.0 7.0 7.0 7.0 7.0 7.0 7.0 7.0 7.0 7.0
8.0 8.0 8.0 8.0 8.0 8.0 8.0 8.0 8.0 8.0
9.0 9.0 9.0 9.0 9.0 9.0 9.0 9.0 9.0 9.0
10.0 10.0 10.0 10.0 10.0 10.0 10.0 10.0 10.0 10.0]
I =
1 1 1 1 1 1 1 1 1 1
2 2 2 2 2 2 2 2 2 2
3 3 3 3 3 3 3 3 3 3
4 4 4 4 4 4 4 4 4 4
5 5 5 5 5 5 5 5 5 5
6 6 6 6 6 6 6 6 6 6
7 7 7 7 7 7 7 7 7 7
8 8 8 8 8 8 8 8 8 8
9 9 9 9 9 9 9 9 9 9
10 10 10 10 10 10 10 10 10 10
>> rst = imfilter(I,H)
rst =
12 21 21 21 21 21 21 21 21 16
24 37 37 37 37 37 37 37 37 24
36 53 53 53 53 53 53 53 53 32
48 69 69 69 69 69 69 69 69 40
60 85 85 85 85 85 85 85 85 48
72 101 101 101 101 101 101 101 101 56
84 117 117 117 117 117 117 117 117 64
96 133 133 133 133 133 133 133 133 72
108 149 149 149 149 149 149 149 149 80
87 99 99 99 99 99 99 99 99 33
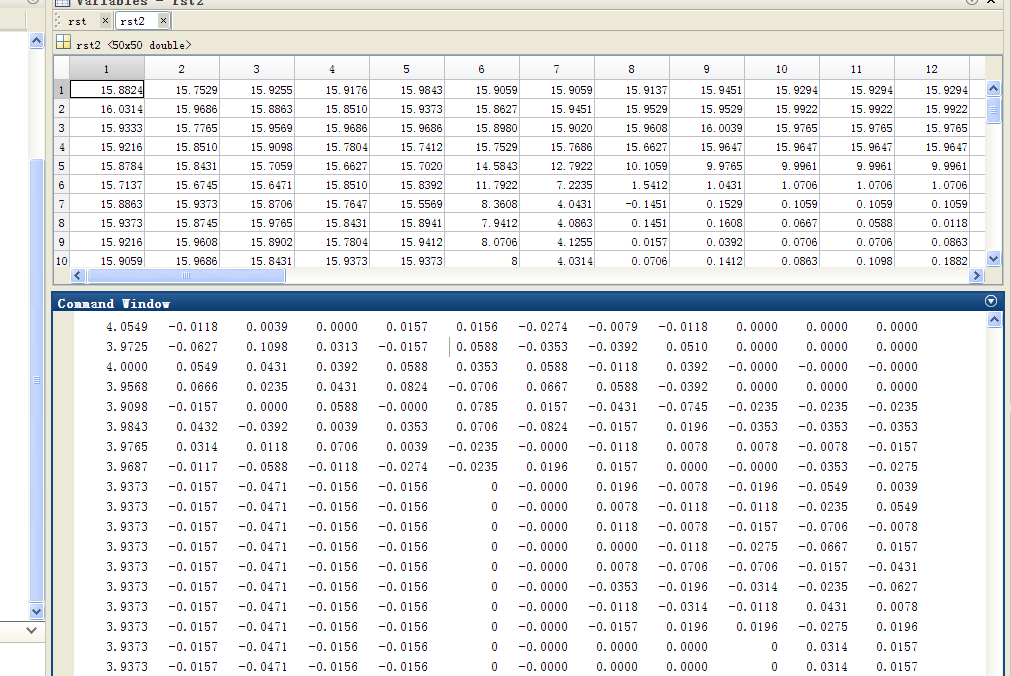
则计算两者之差
rst3 =
-11 -2 -2 -2 -2 -2 -2 -2 -2 -7
-13 0 0 0 0 0 0 0 0 -13
-17 0 0 0 0 0 0 0 0 -21
-21 0 0 0 0 0 0 0 0 -29
-25 0 0 0 0 0 0 0 0 -37
-29 0 0 0 0 0 0 0 0 -45
-33 0 0 0 0 0 0 0 0 -53
-37 0 0 0 0 0 0 0 0 -61
-41 0 0 0 0 0 0 0 0 -69
-66 -54 -54 -54 -54 -54 -54 -54 -54 -120
结论是在边界会有所不同,这个应该是不同算法对于边界的处理不同而已。那么主体成分是完全一样的。
2)
是采用小块图片作为卷积内容
那么准备了小块的灰度图片作为卷积内容

//读取图片的处理的方法
Mat gray
= imread(
"test.jpg",
0);
imwrite( "gray.jpg",gray);
gray.convertTo(gray,CV_32F);
Mat dst;
filter2D(gray,dst,gray.depth(),srcH);
for ( int i = 0; i < gray.rows; i ++){
for ( int j = 0; j < gray.cols; j ++){
printf( "%f ",dst.at < float >(i,j));
}
printf( "\n");
}
imwrite( "gray.jpg",gray);
gray.convertTo(gray,CV_32F);
Mat dst;
filter2D(gray,dst,gray.depth(),srcH);
for ( int i = 0; i < gray.rows; i ++){
for ( int j = 0; j < gray.cols; j ++){
printf( "%f ",dst.at < float >(i,j));
}
printf( "\n");
}

同样matlab
I = im2double(imread('gray.jpg'))
H =
-2 -1 4
3 3 3
3 2 1
>> rst = imfilter(I,H)
对比相关结果,这里可以发现,在matlab中图像是归一化存储的。
在输入之前归一化,这样就会得到比较好的结果。
 结果比较像
结果比较像
#
include
"stdafx.h"
# include <iostream >
# include <fstream >
# include "opencv2/core/core.hpp"
# include "opencv2/highgui/highgui.hpp"
# include "opencv2/imgproc/imgproc.hpp"
using namespace std;
using namespace cv;
int _tmain( int argc, _TCHAR * argv[])
{
////filter2d的卷积方法
printf( "filter2d的卷积方法\n");
//Mat srcMat(10,10,CV_32F);
//Mat dstMat(10,10,CV_32F);
Mat srcH( 3, 3,CV_32F);
srcH.at < float >( 0, 0) = - 2;
srcH.at < float >( 0, 1) = - 1;
srcH.at < float >( 0, 2) = 4;
srcH.at < float >( 1, 0) = 3;
srcH.at < float >( 1, 1) = 3;
srcH.at < float >( 1, 2) = 3;
srcH.at < float >( 2, 0) = 3;
srcH.at < float >( 2, 1) = 2;
srcH.at < float >( 2, 2) = 1;
printf( "卷积核\n");
for ( int i = 0;i <srcH.rows;i ++){
for ( int j = 0;j <srcH.cols;j ++){
printf( "%f ",srcH.at < float >(i,j) );
}
printf( "\n");
}
//读取图片的处理的方法
Mat gray = imread( "test.jpg", 0);
imwrite( "gray.jpg",gray);
gray.convertTo(gray,CV_32F);
gray = gray / 255; //归一化处理
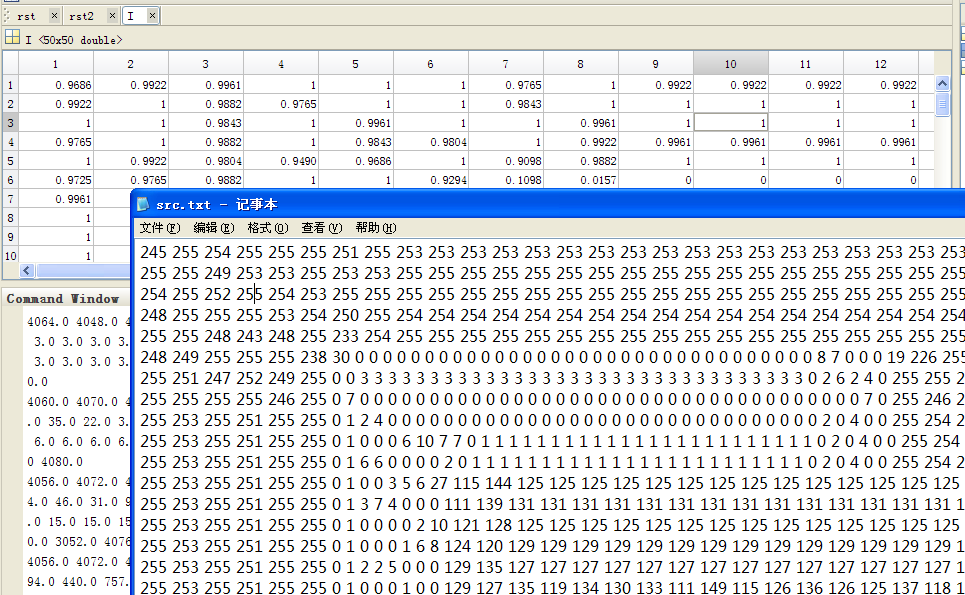
fstream ftxt;
ftxt.open( "src.txt",ios : :out); //写入的方式,同时是append模式的就不会覆盖掉前面的东西了。
for ( int i = 0; i < gray.rows; i ++){
for ( int j = 0; j < gray.cols; j ++){
ftxt <<gray.at < float >(i,j) << " ";
}
ftxt <<endl;
}
ftxt.close();
Mat dst;
filter2D(gray,dst,gray.depth(),srcH);
ftxt.open( "rst.txt",ios : :out); //写入的方式,同时是append模式的就不会覆盖掉前面的东西了。
for ( int i = 0; i < gray.rows; i ++){
for ( int j = 0; j < gray.cols; j ++){
ftxt <<dst.at < float >(i,j) << " ";
}
ftxt <<endl;
}
ftxt.close();
imshow( "dst",dst);
waitKey();
return 0;
}
# include <iostream >
# include <fstream >
# include "opencv2/core/core.hpp"
# include "opencv2/highgui/highgui.hpp"
# include "opencv2/imgproc/imgproc.hpp"
using namespace std;
using namespace cv;
int _tmain( int argc, _TCHAR * argv[])
{
////filter2d的卷积方法
printf( "filter2d的卷积方法\n");
//Mat srcMat(10,10,CV_32F);
//Mat dstMat(10,10,CV_32F);
Mat srcH( 3, 3,CV_32F);
srcH.at < float >( 0, 0) = - 2;
srcH.at < float >( 0, 1) = - 1;
srcH.at < float >( 0, 2) = 4;
srcH.at < float >( 1, 0) = 3;
srcH.at < float >( 1, 1) = 3;
srcH.at < float >( 1, 2) = 3;
srcH.at < float >( 2, 0) = 3;
srcH.at < float >( 2, 1) = 2;
srcH.at < float >( 2, 2) = 1;
printf( "卷积核\n");
for ( int i = 0;i <srcH.rows;i ++){
for ( int j = 0;j <srcH.cols;j ++){
printf( "%f ",srcH.at < float >(i,j) );
}
printf( "\n");
}
//读取图片的处理的方法
Mat gray = imread( "test.jpg", 0);
imwrite( "gray.jpg",gray);
gray.convertTo(gray,CV_32F);
gray = gray / 255; //归一化处理
fstream ftxt;
ftxt.open( "src.txt",ios : :out); //写入的方式,同时是append模式的就不会覆盖掉前面的东西了。
for ( int i = 0; i < gray.rows; i ++){
for ( int j = 0; j < gray.cols; j ++){
ftxt <<gray.at < float >(i,j) << " ";
}
ftxt <<endl;
}
ftxt.close();
Mat dst;
filter2D(gray,dst,gray.depth(),srcH);
ftxt.open( "rst.txt",ios : :out); //写入的方式,同时是append模式的就不会覆盖掉前面的东西了。
for ( int i = 0; i < gray.rows; i ++){
for ( int j = 0; j < gray.cols; j ++){
ftxt <<dst.at < float >(i,j) << " ";
}
ftxt <<endl;
}
ftxt.close();
imshow( "dst",dst);
waitKey();
return 0;
}
结果令人满意
3
)
是采用真实的图片和真实的卷积核作为输入
结论除了在图片的边界有差异外,在其他的地方,这个差异在小数点后4位,应该说是非常相似的,可以用于实际生成。
三、小结和反思
最后的结论是可以正常使用,但是在输入之前,需要将图片归一化处理。那么,通过这个实验,除了获得面上的这个知识之外,更多的应该是一种实验的方法。很多时候,无论是做改写还是其他的事情之前,将相关可能发生的情况设计好;力图获得稳定准确的结果。这些对于最终获得设计之中的结论是非常重要和有价值的。
感谢阅读到此,希望能够有所帮助。
#include "stdafx.h"
#include <iostream>
#include <fstream>
#include "opencv2/core/core.hpp"
#include "opencv2/highgui/highgui.hpp"
#include "opencv2/imgproc/imgproc.hpp"
using namespace std;
using namespace cv;

int _tmain(int argc, _TCHAR* argv[])
{
	////filter2d的卷积方法
	printf(	"filter2d的卷积方法\n");
	//Mat srcMat(10,10,CV_32F);
	//Mat dstMat(10,10,CV_32F);
	Mat srcH(3,3,CV_32F);
	srcH.at<float>(0,0) = -2;
	srcH.at<float>(0,1) = -1;
	srcH.at<float>(0,2) = 4;
	srcH.at<float>(1,0) = 3;
	srcH.at<float>(1,1) = 3;
	srcH.at<float>(1,2) = 3;
	srcH.at<float>(2,0) = 3;
	srcH.at<float>(2,1) = 2;
	srcH.at<float>(2,2) = 1;
	printf(	"卷积核\n");
	for (int i=0;i<srcH.rows;i++){
		for (int j=0;j<srcH.cols;j++){
			printf("%f ",srcH.at<float>(i,j) );
		}
		printf("\n");
	}
	//printf(	"输入\n");
	//for (int i = 0; i < 10; i++){
	//	for (int j = 0; j < 10; j++)
	//	  srcMat.at<float>(i,j) = i+1;
	//}
	//for (int i = 0; i < 10; i++){
	//	for (int j = 0; j < 10; j++){
	//		printf("%.1f ",srcMat.at<float>(i,j));
	//	}
	//	printf("\n");
	//}
	//printf(	"输出\n");
	//filter2D(srcMat,dstMat,srcMat.depth(),srcH);
	//printf("\n"); printf("\n");
	//for (int i = 0; i < 10; i++){
	//	for (int j = 0; j < 10; j++){
	//		printf("%.1f ",dstMat.at<float>(i,j));
	//	}
	//	printf("\n");
	//}
	//读取图片的处理的方法
	Mat gray = imread("test.jpg",0);
	imwrite("gray.jpg",gray);
	gray.convertTo(gray,CV_32F);
	gray = gray/255; //归一化处理
	fstream ftxt;
	ftxt.open("src.txt",ios::out); //写入的方式,同时是append模式的就不会覆盖掉前面的东西了。
	for (int i = 0; i < gray.rows; i++){
		for (int j = 0; j < gray.cols; j++){
			ftxt<<gray.at<float>(i,j)<<" ";
			//printf("%.1f ",dst.at<float>(i,j));
		}
		ftxt<<endl;
		//printf("\n");
	}
	ftxt.close();
	Mat dst;
	filter2D(gray,dst,gray.depth(),srcH);

	ftxt.open("rst.txt",ios::out); //写入的方式,同时是append模式的就不会覆盖掉前面的东西了。
	for (int i = 0; i < gray.rows; i++){
		for (int j = 0; j < gray.cols; j++){
			 ftxt<<dst.at<float>(i,j)<<" ";
			//printf("%.1f ",dst.at<float>(i,j));
		}
		 ftxt<<endl;
		//printf("\n");
	}
	ftxt.close();
	imshow("dst",dst);

	waitKey();
	return 0;
}
p.s 转一篇有用博文,时间久了原始链接已经丢失,抱歉
Overview:
imfill是matlab的一个函数,在http://www.mathworks.cn/cn/help/images/ref/imfill.html 中有详细的讲解。这个函数有好几种不同的签名。在这里我的侧重点是imfill(m, 'holes'),以及如何用openCV来实现imfill一样的功能。本文有三部分组成。
1. 使用Matlab 的imfill 进行填充图像
在Matlab中简单的几行代码就能实现:
|
1
2 3 4 5 6 7 8 |
clc;
clear; BW = im2bw( imread('imfilltest.tif')); imshow(BW); holes = imfill(BW, 'holes'); BW(~holes) = 1; figure,imshow(holes); |
左图为填充前的图像,右图是填充后的图像:
2. 用opencv来实现imfill(bw, 'holes')
opencv 在这里不像matlab那么好用了,matlab调用下。
C++ Code
|
1
2 3 4 5 6 7 8 9 10 11 12 13 14 15 16 17 18 19 20 21 22 23 24 25 26 27 28 29 30 31 32 33 34 35 36 37 38 39 40 41 42 43 44 |
#include
#include #include using namespace std; using namespace cv; void my_imfillholes(Mat &src) { // detect external contours // vector > contours; vector hierarchy; findContours(src, contours, hierarchy, CV_RETR_EXTERNAL, CV_CHAIN_APPROX_SIMPLE); // // fill external contours // if( !contours.empty() && !hierarchy.empty() ) { for (int idx=0;idx < contours.size();idx++) { drawContours(src,contours,idx,Scalar::all(255),CV_FILLED,8); } } } void test_my_imfillholes() { Mat m = imread(filltestName,IMREAD_GRAYSCALE); //threshold, (i,j)>100 -->255 Mat th_m; threshold(m, th_m, 100, 255, THRESH_BINARY); my_imfillholes(th_m); namedWindow(WinName, CV_WINDOW_AUTOSIZE); imshow(WinName, th_m); waitKey(0); } void main() { test_my_imfillholes(); system("pause"); } |
3. imfill 和opencv实现的imfill 对矩阵进行操作的对比
我仍有点不放心,觉得尽管2幅图看起来差不多,但是是不是完全一样呢,然后我觉得用个矩阵试一下。
m = [1, 1, 1, 0, 0, 0, 0, 0;
1, 0, 1, 0, 1, 1, 0, 0;
1, 0, 1, 0, 1, 1, 0, 0;
1, 1, 1, 0, 1, 0, 1, 0;
1, 0, 1, 0, 1, 0, 1, 0;
1, 1, 1, 0, 1, 0, 1, 0;
1, 0, 1, 0, 0, 1, 1, 0;
1, 1, 1, 0, 0, 0, 0, 0];
without_holes = imfill(m, 'holes')
得到结果:
without_holes =
1 1 1 0 0 0 0 0
1 1 1 0 1 1 0 0
1 1 1 0 1 1 0 0
1 1 1 0 1 1 1 0
1 1 1 0 1 1 1 0
1 1 1 0 1 1 1 0
1 1 1 0 0 1 1 0
1 1 1 0 0 0 0 0
1 1 1 0 0 0 0 0
1 1 1 0 1 1 0 0
1 1 1 0 1 1 0 0
1 1 1 0 1 1 1 0
1 1 1 0 1 1 1 0
1 1 1 0 1 1 1 0
1 1 1 0 0 1 1 0
1 1 1 0 0 0 0 0
然后用第2部分所说的opencv的方法也试一下,结果发现是这样的:
without_holes =
0 0 0 0 0 0 0 0
0 1 1 0 1 1 0 0
0 1 1 0 1 1 0 0
0 1 1 0 1 1 1 0
0 1 1 0 1 1 1 0
0 1 1 0 1 1 1 0
0 1 1 0 0 1 1 0
0 0 0 0 0 0 0 0
0 0 0 0 0 0 0 0
0 1 1 0 1 1 0 0
0 1 1 0 1 1 0 0
0 1 1 0 1 1 1 0
0 1 1 0 1 1 1 0
0 1 1 0 1 1 1 0
0 1 1 0 0 1 1 0
0 0 0 0 0 0 0 0
是不一样的。这个问题折腾了我一个晚上,终于,我在
中的 findContours找到了这样的一个note:
Note:
Source image is modified by this function. Also, the function does not take into account 1-pixel border of the image (it’s filled with 0’s and used for neighbor analysis in the algorithm), therefore the contours touching the image border will be clipped.
它的意思是,findCountours 是不会包含1-pixel的边界的。所以这就是为啥opencv计算的结果中边界的1都消失的原因。我想,既然边界不被包含,那么我给它上下左右加一个1-pixel的框,这样边界点就变成了内部点,就能成功的用findCountours了。于是乎:我写了下面的code:
C++ Code
|
1
2 3 4 5 6 7 8 9 10 11 12 13 14 15 16 17 18 19 20 21 22 23 24 25 26 27 28 29 30 31 32 33 34 35 36 37 38 39 40 41 42 43 |
#include
#include #include using namespace std; using namespace cv; void my_imfillholes_v2() { //step 1: make a border Mat m(8, 8, CV_8UC1, data); Mat m_with_border; copyMakeBorder(m, m_with_border, 1, 1, 1, 1, BORDER_CONSTANT, Scalar()); cout<<m_with_border<<endl; //setp 2: find the contour fill holes vector > contours; vector hierarchy; findContours(m_with_border, contours, hierarchy, CV_RETR_CCOMP, CV_CHAIN_APPROX_NONE); // // fill external contours // if( !contours.empty() && !hierarchy.empty() ) { for (int idx=0;idx < contours.size();idx++) { drawContours(m_with_border,contours,idx,Scalar::all(1),CV_FILLED,8); } } //cout<<m_with_border<<endl; //step 3: remove the border m_with_border = m_with_border.rowRange(Range(1, m_with_border.rows-1)); //cout<<m_with_border<<endl; m_with_border = m_with_border.colRange(Range(1, m_with_border.cols-1)); cout<<m_with_border<<endl; } void main() { my_imfillholes_v2(); system("pause"); } |
先加一个全0的1-pixel的框,然后在findCountours填充,最后把框给去了。这样结果就完全和matlab中的imfill一致了。
result =
1 1 1 0 0 0 0 0
1 1 1 0 1 1 0 0
1 1 1 0 1 1 0 0
1 1 1 0 1 1 1 0
1 1 1 0 1 1 1 0
1 1 1 0 1 1 1 0
1 1 1 0 0 1 1 0
1 1 1 0 0 0 0 0