1.整体架构
基于阿里云的Serverless架构
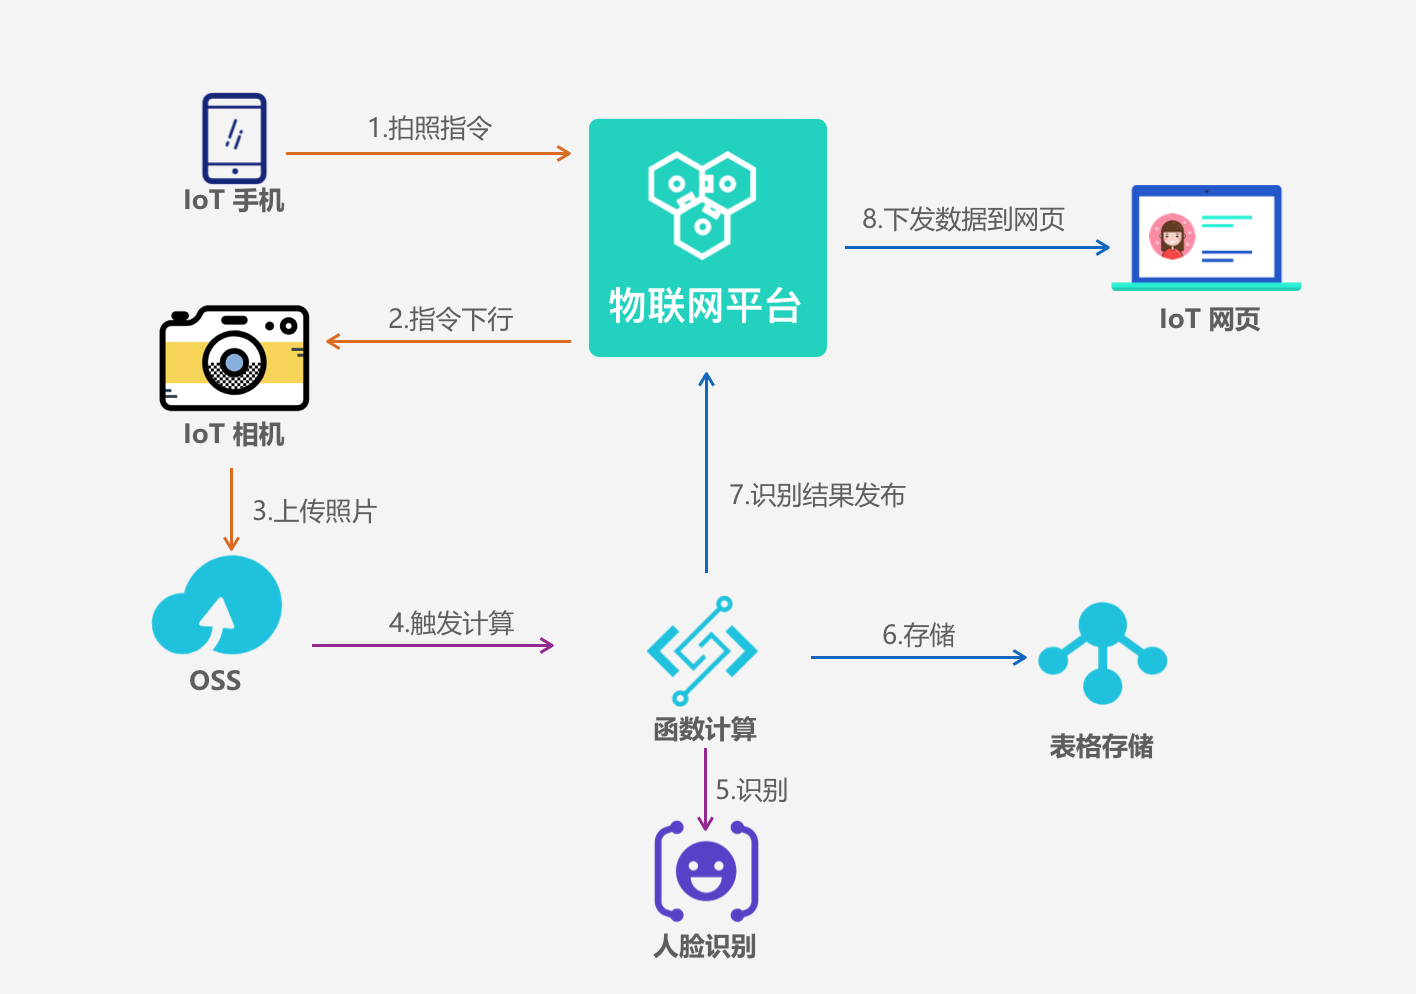
2.阿里云产品
IoT平台:https://www.aliyun.com/product/iot
函数计算:https://www.aliyun.com/product/fc
表格存储:https://www.aliyun.com/product/ots
OSS存储:https://www.aliyun.com/product/oss
人脸识别:https://data.aliyun.com/product/face
3.设备采购
| 名称 | 图片 | 购买 |
|---|---|---|
| 摄像头 | 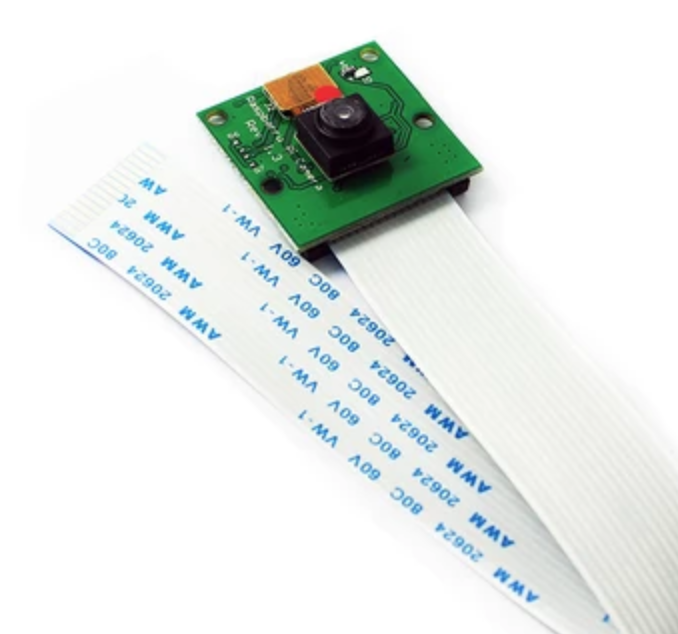 |
淘宝 |
| 树莓派 | 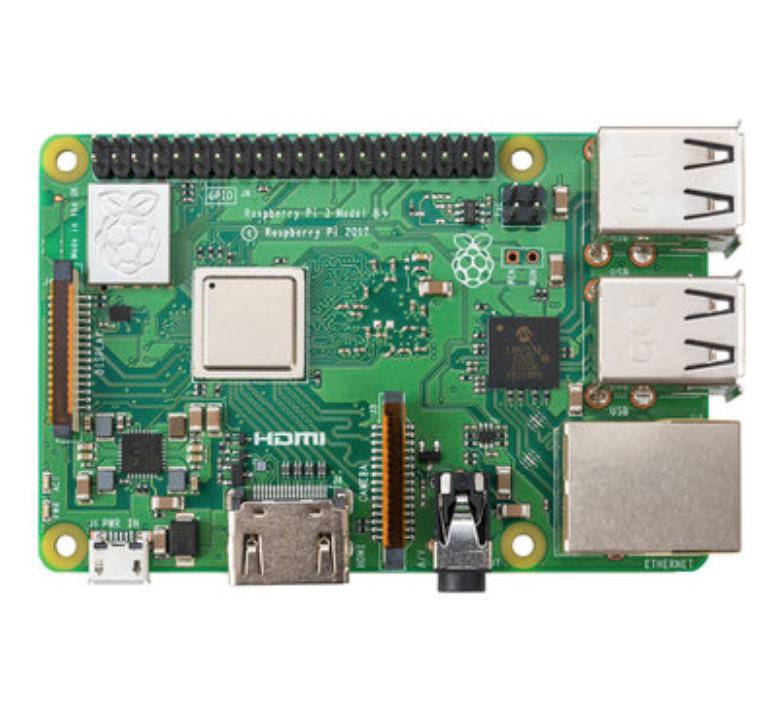 |
淘宝 |
4.树莓派设备端开发
4.1 Enable Camera

4.2 目录结构
- 在/home/pi目录下创建 iot文件夹,
- 在/home/pi/iot创建 photos文件夹,iot.cfg配置文件,iot.py文件

4.3 Python3程序
4.3.1 安装依赖
pip3 install oss2
pip3 install picamera
pip3 install aliyun-python-sdk-iot-client
4.3.2 iot.cfg配置文件
[IOT]
productKey = xxx
deviceName = xxx
deviceSecret = xxx

[OSS]
ossAccessKey = xxx
ossAccessKeySecret = xxx
ossEndpoint = xxx
ossBucketId = xxx
4.3.3 iot.py应用程序
#!/usr/bin/python3
# -*- coding: utf-8 -*-
import oss2
from picamera import PiCamera
import time
import aliyunsdkiotclient.AliyunIotMqttClient as AliyunIot
import configparser

config = configparser.ConfigParser()
config.read('iot.cfg')

# IoT
PRODUCE_KEY = config['IOT']['productKey']
DEVICE_NAME = config['IOT']['deviceName']
DEVICE_SECRET = config['IOT']['deviceSecret']

HOST = PRODUCE_KEY + '.iot-as-mqtt.cn-shanghai.aliyuncs.com'
SUBSCRIBE_TOPIC = "/" + PRODUCE_KEY + "/" + DEVICE_NAME + "/control";
# oss
OSS_AK = config['OSS']['ossAccessKey']
OSS_AK_SECRET = config['OSS']['ossAccessKeySecret']
OSS_ENDPOINT = config['OSS']['ossEndpoint']
OSS_BUCKET_ID = config['OSS']['ossBucketId']

auth = oss2.Auth(OSS_AK, OSS_AK_SECRET)
bucket = oss2.Bucket(auth, OSS_ENDPOINT, OSS_BUCKET_ID)

camera = PiCamera()
camera.resolution = (720,480)

# Take a photo first, then upload photo to oss
def take_photo():
    ticks = int(time.time())
    fileName = 'raspi%s.jpg' % ticks
    filePath = '/home/pi/iot/photos/%s' % fileName
    # take a photo
    camera.capture(filePath)
    # upload to oss
    bucket.put_object_from_file('piPhotos/'+fileName, filePath)


def on_connect(client, userdata, flags, rc):
    print('subscribe '+SUBSCRIBE_TOPIC)
    client.subscribe(topic=SUBSCRIBE_TOPIC)


def on_message(client, userdata, msg):
    print('receive message topic :'+ msg.topic)
    print(str(msg.payload))
    take_photo()


if __name__ == '__main__':
    client = AliyunIot.getAliyunIotMqttClient(PRODUCE_KEY,DEVICE_NAME, DEVICE_SECRET, secure_mode=3)
    client.on_connect = on_connect
    client.on_message = on_message
    client.connect(host=HOST, port=1883, keepalive=60)
    # loop
    client.loop_forever()
5.函数计算开发
5.1 index.js应用程序
const request = require('request');
const url = require('url');
const crypto = require('crypto');
const TableStore = require('tablestore');
const co = require('co');
const RPCClient = require('@alicloud/pop-core').RPCClient;

const config = require("./config");

//iot client
const iotClient = new RPCClient({
    accessKeyId: config.accessKeyId,
    secretAccessKey: config.secretAccessKey,
    endpoint: config.iotEndpoint,
    apiVersion: config.iotApiVersion
});
//ots client
const otsClient = new TableStore.Client({
    accessKeyId: config.accessKeyId,
    secretAccessKey: config.secretAccessKey,
    endpoint: config.otsEndpoint,
    instancename: config.otsInstance,
    maxRetries: 20
});

const options = {
    url: config.dtplusUrl,
    method: 'POST',
    headers: {
        'Accept': 'application/json',
        'Content-type': 'application/json'
    }
};

module.exports.handler = function(event, context, callback) {

    var eventJson = JSON.parse(event.toString());

    try {
        var imgUrl = config.ossEndpoint + eventJson.events[0].oss.object.key;

        options.body = JSON.stringify({ type: 0, image_url: imgUrl });
        options.headers.Date = new Date().toUTCString();
        options.headers.Authorization = makeDataplusSignature(options);

        request.post(options, function(error, response, body) {

            console.log('face/attribute response body' + body)
            const msg = parseBody(imgUrl, body)
            //
            saveToOTS(msg, callback);

        });
    } catch (err) {
        callback(null, err);
    }
};

parseBody = function(imgUrl, body) {

    body = JSON.parse(body);
    //face_rect [left, top, width, height],
    const idx = parseInt(10 * Math.random() % 4);
    const age = (parseInt(body.age[0])) + "岁";
    const expression = (body.expression[0] == "1") ? config.happy[idx] : config.normal[idx];
    const gender = (body.gender[0] == "1") ? "帅哥" : "靓女";
    const glass = (body.glass[0] == "1") ? "戴眼镜" : "火眼金睛";

    return {
        'imgUrl': imgUrl,
        'gender': gender,
        'faceRect': body.face_rect.join(','),
        'glass': glass,
        'age': age,
        'expression': expression
    };
}

//pub msg to WebApp by IoT
iotPubToWeb = function(payload, cb) {
    co(function*() {
        try {
            //创建设备
            var iotResponse = yield iotClient.request('Pub', {
                ProductKey: config.productKey,
                TopicFullName: config.topicFullName,
                MessageContent: new Buffer(JSON.stringify(payload)).toString('base64'),
                Qos: 0
            });
        } catch (err) {
            console.log('iotPubToWeb err' + JSON.stringify(err))
        }

        cb(null, payload);
    });
}

saveToOTS = function(msg, cb) {

    var ots_data = {
        tableName: config.tableName,
        condition: new TableStore.Condition(TableStore.RowExistenceExpectation.IGNORE, null),

        primaryKey: [{ deviceId: "androidPhoto" }, { id: TableStore.PK_AUTO_INCR }],

        attributeColumns: [
            { 'imgUrl': msg.imgUrl },
            { 'gender': msg.gender },
            { 'faceRect': msg.faceRect },
            { 'glass': msg.glass },
            { 'age': msg.age },
            { 'expression': msg.expression }
        ],

        returnContent: { returnType: TableStore.ReturnType.Primarykey }
    }

    otsClient.putRow(ots_data, function(err, data) {

        iotPubToWeb(msg, cb);
    });
}

makeDataplusSignature = function(options) {

    const md5Body = crypto.createHash('md5').update(new Buffer(options.body)).digest('base64');

    const stringToSign = "POST\napplication/json\n" + md5Body + "\napplication/json\n" + options.headers.Date + "\n/face/attribute"
    // step2: 加密 [Signature = Base64( HMAC-SHA1( AccessSecret, UTF-8-Encoding-Of(StringToSign) ) )]
    const signature = crypto.createHmac('sha1', config.secretAccessKey).update(stringToSign).digest('base64');

    return "Dataplus " + config.accessKeyId + ":" + signature;
}
5.2 config.js配置文件
module.exports = {
    accessKeyId: '账号ak',
    secretAccessKey: '账号ak secret',
    iotEndpoint: 'https://iot.cn-shanghai.aliyuncs.com',
    iotApiVersion: '2018-01-20',
    productKey: 'web大屏产品pk',
    topicFullName: 'web大屏订阅识别结果的topic',

//可选,如果不保存结果,不需要ots
    otsEndpoint: 'ots接入点',
    otsInstance: 'ots实例',
    tableName: 'ots结果存储表',
}
6. Web端App开发
<!DOCTYPE html>
<html>

<head>
    <meta charset="UTF-8">
    <title>阿里云IoT</title>
    <style type="text/css">
    body {
        line-height: 1.6;
        font-family: Arial, Helvetica, sans-serif;
        margin: 0;
        padding: 0;
        background: url(http://iot-face.oss-cn-shanghai.aliyuncs.com/iot-face-yq.png) no-repeat;
        background-color: #202124;
    }

    .face-msg {
        display: inline;
        font-size: 32px;
        color: #5FFFF8;
        padding: 30px 160px 0px 60px;
    }
    </style>
</head>

<body>
    <div style="padding: 190px 10px 0px 360px;">
        <div class="face-msg" id='glass' style="color: #5FFFF8"></div>
        <div class="face-msg" id='gender' style="color: #FF5FE5"></div>
        <div class="face-msg" id='age' style="color: #FFDD5F"></div>
        <div class="face-msg" id='expression' style="color: #FC4D4D"></div>
    </div>
    <!-- -->
    <div style="position: relative;padding: 145px 10px 0px 165px;">
        <div style="position: absolute;">
            <canvas id="myCanvas" width="720px" height="480px"></canvas>
        </div>
        <img id='imageUrl' src="" width="720px" height="480px" />
    </div>
    <script type="text/javascript" src="http://iot-face.oss-cn-shanghai.aliyuncs.com/zepto.min.js"></script>
    <script src="http://iot-face.oss-cn-shanghai.aliyuncs.com/mqttws31.min.js" type="text/javascript"></script>
    <script type="text/javascript">

    $(document).ready(function() {

        initMqtt();
    });

    var client;

    function initMqtt() {
        //模拟设备参数
        var mqttClientId = Math.random().toString(36).substr(2);
        client = new Paho.MQTT.Client("public.iot-as-mqtt.cn-shanghai.aliyuncs.com", 443, mqttClientId);

        // set callback handlers
        var options = {
            useSSL: false,
            userName: '替换iotId',
            password: '替换iot token',
            keepAliveInterval: 60,
            onSuccess: onConnect,
            onFailure: function(e) {
                console.log(e);
            }
        };

        client.onConnectionLost = onConnectionLost;
        client.onMessageDelivered = onMessageDelivered;
        client.onMessageArrived = onMessageArrived;

        // connect the client
        client.connect(options);
    }

    // called when the client connects
    function onConnect() {
        // Once a connection has been made, make a subscription
        client.subscribe("替换订阅数据更新topic");
    }

    // called when the client loses its connection
    function onConnectionLost(responseObject) {
        if (responseObject.errorCode !== 0) {
            console.error("onConnectionLost:", responseObject);
        }
    }

    function onMessageArrived(message) {
        fillData(JSON.parse(message.payloadString))
    }

    function onMessageDelivered(message) {
        console.log("onMessageDelivered: [" + message.destinationName + "] --- " + message.payloadString);
    }

    function fillData(data) {

        $("#age").html(data.age);
        $("#expression").html(data.expression);
        $("#gender").html(data.gender);
        $("#glass").html(data.glass);

        $("#imageUrl").attr("src", data.imgUrl);

        var rect = data.faceRect.split(","); //"270,22,202,287"

        var canvas = document.getElementById("myCanvas");
        var ctx = canvas.getContext("2d");
        ctx.clearRect(0, 0, canvas.width, canvas.height);
        ctx.strokeStyle = '#03A9F4';
        ctx.lineWidth = 2;

        ctx.beginPath();
        ctx.rect(rect[0], rect[1], rect[2], rect[3]);
        ctx.stroke();
    };
    </script>
</body>

</html>
7. 拍照指令触发器
/**
 * package.json 添加依赖:"@alicloud/pop-core": "1.5.2"
 */
const co = require('co');
const RPCClient = require('@alicloud/pop-core').RPCClient;

const options = {
    accessKey: "替换ak",
    accessKeySecret: "替换ak Secret",
};

//1.初始化client
const client = new RPCClient({
    accessKeyId: options.accessKey,
    secretAccessKey: options.accessKeySecret,
    endpoint: 'https://iot.cn-shanghai.aliyuncs.com',
    apiVersion: '2018-01-20'
});

const params = {
    ProductKey: "a1p35XsaOS7",
    TopicFullName: "相机指令topic",
    MessageContent: new Buffer('{"action":"takephoto"}').toString('base64'),
    Qos: "0"
};

co(function*() {
    try {
        //3.发起API调用
        const response = yield client.request('Pub', params);
        console.log(JSON.stringify(response));
    } catch (err) {
        console.log(err);
    }
});
IoT物联网技术 公共账号