猫狗识别概述
之前写过几篇关于tensorflow object detection API使用的相关文章分享,收到不少关注与鼓励,所以决定再写一篇感谢大家肯定与支持。在具体介绍与解释之前,首先简单说一下本人测试与运行的系统与软件环境与版本
-
Windows 10 64位
-
Python3.6
-
Tensorflow 1.10
-
Object detection api
-
CUDA9.0+cuDNN7.0
下面就说说我是一步一步怎么做的,这个其中CPU训练与GPU训练速度相差很大,另外就是GPU训练时候经常遇到OOM问题,导致训练会停下来。
第一步
下载与安装tensorflow与object detection API模块tensorflow安装与配置执行下面的命令即可
Python –m pip install –upgrade tensorflow-gpu
Object Detection API下载首先执行
git clone https://github.com/tensorflow/models.git D:/tensorflow/models
然后安装protoc-3.4.0-win32执行一个命令行如下:

第二步:
下载Oxford-IIIT Pet数据制作tfrecord数据,首先从这里下载数据
http://www.robots.ox.ac.uk/~vgg/data/pets/
记得Dataset与Groundtruth data都需要下载。
然后执行下面的命令即可生成tfrecord

第三步:
使用预训练迁移学习进行训练,这里我使用的是SSD mobilenet的预训练模型,需要修改pipeline config文件与提供的分类描述文件分别为
- ssd_mobilenet_v1_pets.config
- pet_label_map.pbtxt
需要注意的是
ssd_mobilenet_v1_pets.config
文件中PATH_TO_BE_CONFIGURED修改为实际文件所在路径即可。
第四步
执行训练,这个是只需要执行下面命令就可以训练
python object_detection/model_main.py --model_dir=D:\tensorflow\my_train\models\train --pipeline_config_path=D:\tensorflow\my_train\models\ssd_mobilenet_v1_pets.config --num_train_steps=1000 --num_eval_steps=200 --logalsotostderr
但是这个只会在CPU上正常工作,当使用GPU执行训练此数据集的时候,你就会得到一个很让你崩溃的错误
ERROR:tensorflow:Model diverged with loss = NaN

…..

tensorflow.python.training.basic_session_run_hooks.NanLossDuringTrainingError: NaN loss during training
刚开始的我是在CPU上训练的执行这个命令一切正常,但是训练速度很慢,然后有人向我反馈说GPU上无法训练有这个问题,我尝试以后遇到上面的这个错误,于是我就开始了我漫长的查错,最终在github上发现了这个帖子:
https://github.com/tensorflow/models/issues/4881
官方open的issue,暂时大家还没有好办法解决,使用pet的数据集在GPU训练时候发生。帖子里面给出解决方案是使用legacy的train解决,于是我尝试了下面的命令:

python object_detection/legacy/train.py --pipeline_config_path=D:/tensorflow/my_train/models/ssd_mobilenet_v1_pets.config --train_dir=D:/tensorflow/my_train/models/train –alsologtostderr
发现GPU上的训练可以正常跑啦,有图为证:
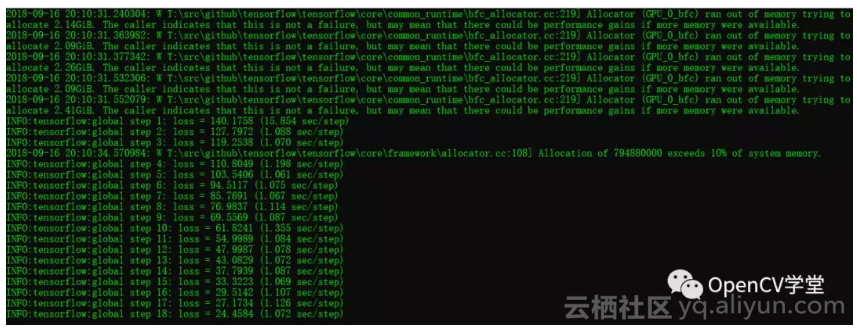
但是千万别高兴的太早,以为GPU训练对显存与内存使用是基于贪心算法,它会一直尝试获取更多内存,大概训练了100左右step就会爆出如下的错误:
tensorflow.python.framework.errors_impl.InternalError: Dst tensor is not initialized.
网络使用GPU训练时,一般当GPU显存被占满的时候会出现这个错误
解决的方法,就是在训练命令执行之前,首先执行下面的命令行:
Windows SET CUDA_VISIBLE_DEVICES=0

Linux export CUDA_VISIBLE_DEVICES=0
然后训练就会很顺利的执行下去
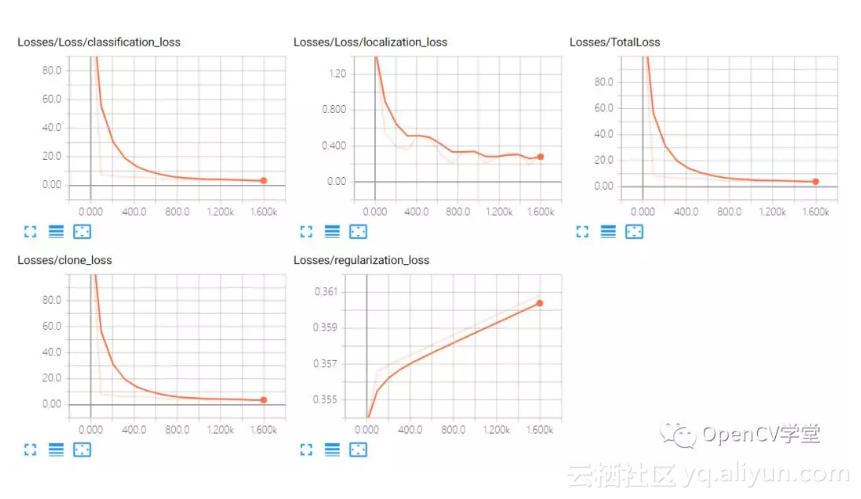
这个时候你就可以启动tensorboard查看训练过程啦,我的训练时候损失如下:
差不多啦,Ctrl+C停止训练,使用下面的命令行导出模型:

导出之后,就可以使用测试图像进行测试啦!
第五步
模型使用,网络上随便找一张猫狗在一起的图像作为测试图像,通过下面的代码实现加载模型,调用tensorflow与opencv相关API函数读取模型与图像,运行代码测试结果如下:

完整测试程序代码如下:
import os
import sys
import tarfile

import cv2
import numpy as np
import tensorflow as tf


sys.path.append("..")
from utils import label_map_util
from utils import visualization_utils as vis_util

##################################################
# 作者:贾志刚
# 微信:gloomy_fish
# tensorflow object detection tutorial
##################################################

# Path to frozen detection graph

PATH_TO_CKPT = 'D:/tensorflow/pet_model/frozen_inference_graph.pb'

# List of the strings that is used to add correct label for each box.

PATH_TO_LABELS = os.path.join('D:/tensorflow/my_train/data', 'pet_label_map.pbtxt')


NUM_CLASSES = 37

detection_graph = tf.Graph()

with detection_graph.as_default():

    od_graph_def = tf.GraphDef()

    with tf.gfile.GFile(PATH_TO_CKPT, 'rb') as fid:

        serialized_graph = fid.read()

        od_graph_def.ParseFromString(serialized_graph)

        tf.import_graph_def(od_graph_def, name='')


label_map = label_map_util.load_labelmap(PATH_TO_LABELS)

categories = label_map_util.convert_label_map_to_categories(label_map, max_num_classes=NUM_CLASSES, use_display_name=True)

category_index = label_map_util.create_category_index(categories)


def load_image_into_numpy_array(image):

    (im_width, im_height) = image.size

    return np.array(image.getdata()).reshape(

      (im_height, im_width, 3)).astype(np.uint8)


with detection_graph.as_default():

    with tf.Session(graph=detection_graph) as sess:

        image_np = cv2.imread("D:/images/test.jpg")

        cv2.imshow("input=QQ+57558865", image_np)

        print(image_np.shape)

        # image_np == [1, None, None, 3]

        image_np_expanded = np.expand_dims(image_np, axis=0)

        image_tensor = detection_graph.get_tensor_by_name('image_tensor:0')

        boxes = detection_graph.get_tensor_by_name('detection_boxes:0')

        scores = detection_graph.get_tensor_by_name('detection_scores:0')

        classes = detection_graph.get_tensor_by_name('detection_classes:0')

        num_detections = detection_graph.get_tensor_by_name('num_detections:0')

        # Actual detection.

        (boxes, scores, classes, num_detections) = sess.run(

            [boxes, scores, classes, num_detections],

            feed_dict={image_tensor: image_np_expanded})

        # Visualization of the results of a detection.

        vis_util.visualize_boxes_and_labels_on_image_array(

              image_np,

              np.squeeze(boxes),

              np.squeeze(classes).astype(np.int32),

              np.squeeze(scores),

              category_index,

              use_normalized_coordinates=True,

              min_score_thresh=0.2,

              line_thickness=8)

        cv2.imshow('object detection', image_np)

        cv2.imwrite("D:/run_result.png", image_np)

        cv2.waitKey(0)

        cv2.destroyAllWindows()


sess.close()