ByteBuf
网络传输的基本单位是字节,在Java NIO中提供了ByteBuffer作为字节缓冲区容器,但该类的API使用起来不太方便,所以Netty实现了ByteBuf作为其替代品,下面是使用ByteBuf的优点:
-
相比ByteBuffer使用起来更加简单。
-
通过内置的复合缓冲区类型实现了透明的zero-copy。
-
容量可以按需增长。
-
读和写使用了不同的索引指针。
-
支持链式调用。
-
支持引用计数与池化。
-
可以被用户自定义的缓冲区类型扩展。
在讨论ByteBuf之前,我们先需要了解一下ByteBuffer的实现,这样才能比较深刻地明白它们之间的区别。
ByteBuffer继承于abstract class Buffer(所以还有LongBuffer、IntBuffer等其他类型的实现),本质上它只是一个有限的线性的元素序列,包含了三个重要的属性。
-
Capacity:缓冲区中元素的容量大小,你只能将capacity个数量的元素写入缓冲区,一旦缓冲区已满就需要清理缓冲区才能继续写数据。
-
Position:指向下一个写入数据位置的索引指针,初始位置为0,最大为capacity-1。当写模式转换为读模式时,position需要被重置为0。
-
Limit:在写模式中,limit是可以写入缓冲区的最大索引,也就是说它在写模式中等价于缓冲区的容量。在读模式中,limit表示可以读取数据的最大索引。
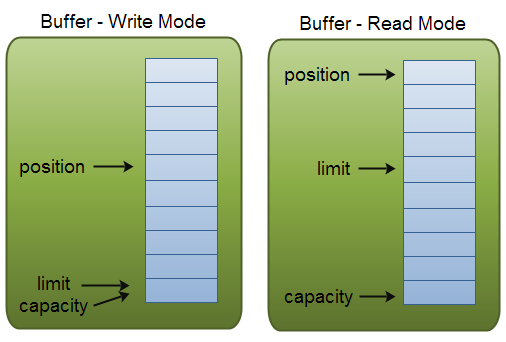
由于Buffer中只维护了position一个索引指针,所以它在读写模式之间的切换需要调用一个flip()方法来重置指针。使用Buffer的流程一般如下:
-
写入数据到缓冲区。
-
调用flip()方法。
-
从缓冲区中读取数据
-
调用buffer.clear()或者buffer.compact()清理缓冲区,以便下次写入数据。
|
1
2
3
4
5
6
7
8
9
10
11
12
13
14
15
16
17
18
19
|
RandomAccessFile aFile =
new RandomAccessFile(
"data/nio-data.txt",
"rw");
FileChannel inChannel = aFile.getChannel();
// 分配一个48字节大小的缓冲区
ByteBuffer buf = ByteBuffer.allocate(
48);
int bytesRead = inChannel.read(buf);
// 读取数据到缓冲区
while (bytesRead != -
1) {
buf.flip();
// 将position重置为0
while(buf.hasRemaining()){
System.out.print((
char) buf.get());
// 读取数据并输出到控制台
}
buf.clear();
// 清理缓冲区
bytesRead = inChannel.read(buf);
}
aFile.close();
|
Buffer中核心方法的实现也非常简单,主要就是在操作指针position。
|
1
2
3
4
5
6
7
8
9
10
11
12
13
14
15
16
17
18
19
20
21
22
23
24
25
26
27
28
29
30
31
32
33
34
35
36
37
38
39
40
|
/**
* Sets this buffer's mark at its position.
*
*
@return This buffer
*/
public final Buffer mark() {
mark = position;
// mark属性是用来标记当前索引位置的
return
this;
}
// 将当前索引位置重置为mark所标记的位置
public final Buffer reset() {
int m = mark;
if (m <
0)
throw
new InvalidMarkException();
position = m;
return
this;
}
// 翻转这个Buffer,将limit设置为当前索引位置,然后再把position重置为0
public final Buffer flip() {
limit = position;
position =
0;
mark = -
1;
return
this;
}
// 清理缓冲区
// 说是清理,也只是把postion与limit进行重置,之后再写入数据就会覆盖之前的数据了
public final Buffer clear() {
position =
0;
limit = capacity;
mark = -
1;
return
this;
}
// 返回剩余空间
public final int remaining() {
return limit - position;
}
|
Java NIO中的Buffer API操作的麻烦之处就在于读写转换需要手动重置指针。而ByteBuf没有这种繁琐性,它维护了两个不同的索引,一个用于读取,一个用于写入。当你从ByteBuf读取数据时,它的readerIndex将会被递增已经被读取的字节数,同样的,当你写入数据时,writerIndex则会递增。readerIndex的最大范围在writerIndex的所在位置,如果试图移动readerIndex超过该值则会触发异常。
ByteBuf中名称以read或write开头的方法将会递增它们其对应的索引,而名称以get或set开头的方法则不会。ByteBuf同样可以指定一个最大容量,试图移动writerIndex超过该值则会触发异常。
|
1
2
3
4
5
6
7
8
9
10
11
12
13
14
15
16
17
18
19
20
21
22
23
24
25
26
27
28
29
30
31
32
33
34
35
36
37
38
39
40
41
42
43
44
|
public byte readByte() {
this.checkReadableBytes0(
1);
// 检查readerIndex是否已越界
int i =
this.readerIndex;
byte b =
this._getByte(i);
this.readerIndex = i +
1;
// 递增readerIndex
return b;
}
private void checkReadableBytes0(int minimumReadableBytes) {
this.ensureAccessible();
if(
this.readerIndex >
this.writerIndex - minimumReadableBytes) {
throw
new IndexOutOfBoundsException(String.format(
"readerIndex(%d) + length(%d) exceeds writerIndex(%d): %s",
new Object[]{Integer.valueOf(
this.readerIndex), Integer.valueOf(minimumReadableBytes), Integer.valueOf(
this.writerIndex),
this}));
}
}
public ByteBuf writeByte(int value) {
this.ensureAccessible();
this.ensureWritable0(
1);
// 检查writerIndex是否会越过capacity
this._setByte(
this.writerIndex++, value);
return
this;
}
private void ensureWritable0(int minWritableBytes) {
if(minWritableBytes >
this.writableBytes()) {
if(minWritableBytes >
this.maxCapacity -
this.writerIndex) {
throw
new IndexOutOfBoundsException(String.format(
"writerIndex(%d) + minWritableBytes(%d) exceeds maxCapacity(%d): %s",
new Object[]{Integer.valueOf(
this.writerIndex), Integer.valueOf(minWritableBytes), Integer.valueOf(
this.maxCapacity),
this}));
}
else {
int newCapacity =
this.alloc().calculateNewCapacity(
this.writerIndex + minWritableBytes,
this.maxCapacity);
this.capacity(newCapacity);
}
}
}
// get与set只对传入的索引进行了检查,然后对其位置进行get或set
public byte getByte(int index) {
this.checkIndex(index);
return
this._getByte(index);
}
public ByteBuf setByte(int index, int value) {
this.checkIndex(index);
this._setByte(index, value);
return
this;
}
|
ByteBuf同样支持在堆内和堆外进行分配。在堆内分配也被称为支撑数组模式,它能在没有使用池化的情况下提供快速的分配和释放。
|
1
2
3
4
5
6
7
8
|
ByteBuf heapBuf = Unpooled.copiedBuffer(bytes);
if (heapBuf.hasArray()) {
// 判断是否有一个支撑数组
byte[] array = heapBuf.array();
// 计算第一个字节的偏移量
int offset = heapBuf.arrayOffset() + heapBuf.readerIndex();
int length = heapBuf.readableBytes();
// 获得可读字节
handleArray(array,offset,length);
// 调用你的处理方法
}
|
另一种模式为堆外分配,Java NIO ByteBuffer类在JDK1.4时就已经允许JVM实现通过JNI调用来在堆外分配内存(调用malloc()函数在JVM堆外分配内存),这主要是为了避免额外的缓冲区复制操作。
|
1
2
3
4
5
6
7
8
|
ByteBuf directBuf = Unpooled.directBuffer(capacity);
if (!directBuf.hasArray()) {
int length = directBuf.readableBytes();
byte[] array =
new
byte[length];
// 将字节复制到数组中
directBuf.getBytes(directBuf.readerIndex(),array);
handleArray(array,
0,length);
}
|
ByteBuf还支持第三种模式,它被称为复合缓冲区,为多个ByteBuf提供了一个聚合视图。在这个视图中,你可以根据需要添加或者删除ByteBuf实例,ByteBuf的子类CompositeByteBuf实现了该模式。
一个适合使用复合缓冲区的场景是HTTP协议,通过HTTP协议传输的消息都会被分成两部分——头部和主体,如果这两部分由应用程序的不同模块产生,将在消息发送时进行组装,并且该应用程序还会为多个消息复用相同的消息主体,这样对于每个消息都将会创建一个新的头部,产生了很多不必要的内存操作。使用CompositeByteBuf是一个很好的选择,它消除了这些额外的复制,以帮助你复用这些消息。
|
1
2
3
4
5
6
7
|
CompositeByteBuf messageBuf = Unpooled.compositeBuffer();
ByteBuf headerBuf = ....;
ByteBuf bodyBuf = ....;
messageBuf.addComponents(headerBuf,bodyBuf);
for (ByteBuf buf : messageBuf) {
System.out.println(buf.toString());
}
|
CompositeByteBuf透明的实现了zero-copy,zero-copy其实就是避免数据在两个内存区域中来回的复制。从操作系统层面上来讲,zero-copy指的是避免在内核态与用户态之间的数据缓冲区复制(通过mmap避免),而Netty中的zero-copy更偏向于在用户态中的数据操作的优化,就像使用CompositeByteBuf来复用多个ByteBuf以避免额外的复制,也可以使用wrap()方法来将一个字节数组包装成ByteBuf,又或者使用ByteBuf的slice()方法把它分割为多个共享同一内存区域的ByteBuf,这些都是为了优化内存的使用率。
那么如何创建ByteBuf呢?在上面的代码中使用到了Unpooled,它是Netty提供的一个用于创建与分配ByteBuf的工具类,建议都使用这个工具类来创建你的缓冲区,不要自己去调用构造函数。经常使用的是wrappedBuffer()与copiedBuffer(),它们一个是用于将一个字节数组或ByteBuffer包装为一个ByteBuf,一个是根据传入的字节数组与ByteBuffer/ByteBuf来复制出一个新的ByteBuf。
|
1
2
3
4
5
6
7
8
9
10
11
12
13
14
15
16
|
// 通过array.clone()来复制一个数组进行包装
public static ByteBuf copiedBuffer(byte[] array) {
return array.length ==
0?EMPTY_BUFFER:wrappedBuffer((
byte[])array.clone());
}
// 默认是堆内分配
public static ByteBuf wrappedBuffer(byte[] array) {
return (ByteBuf)(array.length ==
0?EMPTY_BUFFER:
new UnpooledHeapByteBuf(ALLOC, array, array.length));
}
// 也提供了堆外分配的方法
private
static
final ByteBufAllocator ALLOC;
public static ByteBuf directBuffer(int initialCapacity) {
return ALLOC.directBuffer(initialCapacity);
}
|
相对底层的分配方法是使用ByteBufAllocator,Netty实现了PooledByteBufAllocator和UnpooledByteBufAllocator,前者使用了jemalloc(一种malloc()的实现)来分配内存,并且实现了对ByteBuf的池化以提高性能。后者分配的是未池化的ByteBuf,其分配方式与之前讲的一致。
|
1
2
3
4
|
Channel channel = ...;
ByteBufAllocator allocator = channel.alloc();
ByteBuf buffer = allocator.directBuffer();
do something.......
|
为了优化内存使用率,Netty提供了一套手动的方式来追踪不活跃对象,像UnpooledHeapByteBuf这种分配在堆内的对象得益于JVM的GC管理,无需额外操心,而UnpooledDirectByteBuf是在堆外分配的,它的内部基于DirectByteBuffer,DirectByteBuffer会先向Bits类申请一个额度(Bits还拥有一个全局变量totalCapacity,记录了所有DirectByteBuffer总大小),每次申请前都会查看是否已经超过-XX:MaxDirectMemorySize所设置的上限,如果超限就会尝试调用Sytem.gc(),以试图回收一部分内存,然后休眠100毫秒,如果内存还是不足,则只能抛出OOM异常。堆外内存的回收虽然有了这么一层保障,但为了提高性能与使用率,主动回收也是很有必要的。由于Netty还实现了ByteBuf的池化,像PooledHeapByteBuf和PooledDirectByteBuf就必须依赖于手动的方式来进行回收(放回池中)。
Netty使用了引用计数器的方式来追踪那些不活跃的对象。引用计数的接口为ReferenceCounted,它的思想很简单,只要ByteBuf对象的引用计数大于0,就保证该对象不会被释放回收,可以通过手动调用release()与retain()方法来操作该对象的引用计数值递减或递增。用户也可以通过自定义一个ReferenceCounted的实现类,以满足自定义的规则。
|
1
2
3
4
5
6
7
8
9
10
11
12
13
14
15
16
17
18
19
20
21
22
23
24
25
26
27
28
29
30
31
32
33
34
35
36
37
38
39
40
41
42
43
44
45
46
47
48
49
50
51
52
53
54
55
56
57
58
59
60
61
62
63
64
65
66
67
68
69
70
71
72
73
74
75
|
package io.netty.buffer;
public
abstract
class AbstractReferenceCountedByteBuf extends AbstractByteBuf {
// 由于ByteBuf的实例对象会非常多,所以这里没有将refCnt包装为AtomicInteger
// 而是使用一个全局的AtomicIntegerFieldUpdater来负责操作refCnt
private
static
final AtomicIntegerFieldUpdater<AbstractReferenceCountedByteBuf> refCntUpdater = AtomicIntegerFieldUpdater.newUpdater(AbstractReferenceCountedByteBuf.class,
"refCnt");
// 每个ByteBuf的初始引用值都为1
private
volatile
int refCnt =
1;
public int refCnt() {
return
this.refCnt;
}
protected final void setRefCnt(int refCnt) {
this.refCnt = refCnt;
}
public ByteBuf retain() {
return
this.retain0(
1);
}
// 引用计数值递增increment,increment必须大于0
public ByteBuf retain(int increment) {
return
this.retain0(ObjectUtil.checkPositive(increment,
"increment"));
}
public static int checkPositive(int i, String name) {
if(i <=
0) {
throw
new IllegalArgumentException(name +
": " + i +
" (expected: > 0)");
}
else {
return i;
}
}
// 使用CAS操作不断尝试更新值
private ByteBuf retain0(int increment) {
int refCnt;
int nextCnt;
do {
refCnt =
this.refCnt;
nextCnt = refCnt + increment;
if(nextCnt <= increment) {
throw
new IllegalReferenceCountException(refCnt, increment);
}
}
while(!refCntUpdater.compareAndSet(
this, refCnt, nextCnt));
return
this;
}
public boolean release() {
return
this.release0(
1);
}
public boolean release(int decrement) {
return
this.release0(ObjectUtil.checkPositive(decrement,
"decrement"));
}
private boolean release0(int decrement) {
int refCnt;
do {
refCnt =
this.refCnt;
if(refCnt < decrement) {
throw
new IllegalReferenceCountException(refCnt, -decrement);
}
}
while(!refCntUpdater.compareAndSet(
this, refCnt, refCnt - decrement));
if(refCnt == decrement) {
this.deallocate();
return
true;
}
else {
return
false;
}
}
protected abstract void deallocate();
}
|
Channel
Netty中的Channel与Java NIO的概念一样,都是对一个实体或连接的抽象,但Netty提供了一套更加通用的API。就以网络套接字为例,在Java中OIO与NIO是截然不同的两套API,假设你之前使用的是OIO而又想更改为NIO实现,那么几乎需要重写所有代码。而在Netty中,只需要更改短短几行代码(更改Channel与EventLoop的实现类,如把OioServerSocketChannel替换为NioServerSocketChannel),就可以完成OIO与NIO(或其他)之间的转换。

每个Channel最终都会被分配一个ChannelPipeline和ChannelConfig,前者持有所有负责处理入站与出站数据以及事件的ChannelHandler,后者包含了该Channel的所有配置设置,并且支持热更新,由于不同的传输类型可能具有其特别的配置,所以该类可能会实现为ChannelConfig的不同子类。
Channel是线程安全的(与之后要讲的线程模型有关),因此你完全可以在多个线程中复用同一个Channel,就像如下代码所示。
|
1
2
3
4
5
6
7
8
9
10
11
12
13
|
final Channel channel = ...
final ByteBuf buffer = Unpooled.copiedBuffer(
"Hello,World!", CharsetUtil.UTF_8).retain();
Runnable writer =
new Runnable() {
public void run() {
channel.writeAndFlush(buffer.duplicate());
}
};
Executor executor = Executors.newCachedThreadPool();
executor.execute(writer);
executor.execute(writer);
.......
|
Netty除了支持常见的NIO与OIO,还内置了其他的传输类型。
| Nmae | Package | Description |
|---|---|---|
| NIO | io.netty.channel.socket.nio | 以Java NIO为基础实现 |
| OIO | io.netty.channel.socket.oio | 以java.net为基础实现,使用阻塞I/O模型 |
| Epoll | io.netty.channel.epoll | 由JNI驱动epoll()实现的更高性能的非阻塞I/O,它只能使用在Linux |
| Local | io.netty.channel.local | 本地传输,在JVM内部通过管道进行通信 |
| Embedded | io.netty.channel.embedded | 允许在不需要真实网络传输的环境下使用ChannelHandler,主要用于对ChannelHandler进行测试 |
NIO、OIO、Epoll我们应该已经很熟悉了,下面主要说说Local与Embedded。
Local传输用于在同一个JVM中运行的客户端和服务器程序之间的异步通信,与服务器Channel相关联的SocketAddress并没有绑定真正的物理网络地址,它会被存储在注册表中,并在Channel关闭时注销。因此Local传输不会接受真正的网络流量,也就是说它不能与其他传输实现进行互操作。
Embedded传输主要用于对ChannelHandler进行单元测试,ChannelHandler是用于处理消息的逻辑组件,Netty通过将入站消息与出站消息都写入到EmbeddedChannel中的方式(提供了write/readInbound()与write/readOutbound()来读写入站与出站消息)来实现对ChannelHandler的单元测试。
ChannelHandler
ChannelHandler充当了处理入站和出站数据的应用程序逻辑的容器,该类是基于事件驱动的,它会响应相关的事件然后去调用其关联的回调函数,例如当一个新的连接被建立时,ChannelHandler的channelActive()方法将会被调用。
关于入站消息和出站消息的数据流向定义,如果以客户端为主视角来说的话,那么从客户端流向服务器的数据被称为出站,反之为入站。
入站事件是可能被入站数据或者相关的状态更改而触发的事件,包括:连接已被激活、连接失活、读取入站数据、用户事件、发生异常等。
出站事件是未来将会触发的某个动作的结果的事件,这些动作包括:打开或关闭远程节点的连接、将数据写(或冲刷)到套接字。
ChannelHandler的主要用途包括:
-
对入站与出站数据的业务逻辑处理
-
记录日志
-
将数据从一种格式转换为另一种格式,实现编解码器。以一次HTTP协议(或者其他应用层协议)的流程为例,数据在网络传输时的单位为字节,当客户端发送请求到服务器时,服务器需要通过解码器(处理入站消息)将字节解码为协议的消息内容,服务器在发送响应的时候(处理出站消息),还需要通过编码器将消息内容编码为字节。
-
捕获异常
-
提供Channel生命周期内的通知,如Channel活动时与非活动时
Netty中到处都充满了异步与事件驱动,而回调函数正是用于响应事件之后的操作。由于异步会直接返回一个结果,所以Netty提供了ChannelFuture(实现了java.util.concurrent.Future)来作为异步调用返回的占位符,真正的结果会在未来的某个时刻完成,到时候就可以通过ChannelFuture对其进行访问,每个Netty的出站I/O操作都将会返回一个ChannelFuture。
Netty还提供了ChannelFutureListener接口来监听ChannelFuture是否成功,并采取对应的操作。
|
1
2
3
4
5
6
7
8
9
10
11
12
13
14
15
16
|
Channel channel = ...
ChannelFuture future = channel.connect(
new InetSocketAddress(
"192.168.0.1",
6666));
// 注册一个监听器
future.addListener(
new ChannelFutureListener() {
public void operationComplete(ChannelFuture future) {
if (future.isSuccess()) {
// do something....
}
else {
// 输出错误信息
Throwable cause = future.cause();
cause.printStackTrace();
// do something....
}
}
});
|
ChannelFutureListener接口中还提供了几个简单的默认实现,方便我们使用。
|
1
2
3
4
5
6
7
8
9
10
11
12
13
14
15
16
17
18
19
20
21
22
23
24
25
26
27
28
29
30
31
|
package io.netty.channel;
import io.netty.channel.ChannelFuture;
import io.netty.util.concurrent.GenericFutureListener;
public
interface ChannelFutureListener extends GenericFutureListener<ChannelFuture> {
// 在Future完成时关闭
ChannelFutureListener CLOSE =
new ChannelFutureListener() {
public void operationComplete(ChannelFuture future) {
future.channel().close();
}
};
// 如果失败则关闭
ChannelFutureListener CLOSE_ON_FAILURE =
new ChannelFutureListener() {
public void operationComplete(ChannelFuture future) {
if(!future.isSuccess()) {
future.channel().close();
}
}
};
// 将异常信息传递给下一个ChannelHandler
ChannelFutureListener FIRE_EXCEPTION_ON_FAILURE =
new ChannelFutureListener() {
public void operationComplete(ChannelFuture future) {
if(!future.isSuccess()) {
future.channel().pipeline().fireExceptionCaught(future.cause());
}
}
};
}
|
ChannelHandler接口定义了对它生命周期进行监听的回调函数,在ChannelHandler被添加到ChannelPipeline或者被移除时都会调用这些函数。
|
1
2
3
4
5
6
7
8
9
10
11
12
13
14
15
16
17
18
19
|
package io.netty.channel;
public
interface ChannelHandler {
void handlerAdded(ChannelHandlerContext var1) throws Exception;
void handlerRemoved(ChannelHandlerContext var1) throws Exception;
/** @deprecated */
void exceptionCaught(ChannelHandlerContext var1, Throwable var2) throws Exception;
// 该注解表明这个ChannelHandler可被其他线程复用
({ElementType.TYPE})
(RetentionPolicy.RUNTIME)
public
Sharable {
}
}
|
入站消息与出站消息由其对应的接口ChannelInboundHandler与ChannelOutboundHandler负责,这两个接口定义了监听Channel的生命周期的状态改变事件的回调函数。
|
1
2
3
4
5
6
7
8
9
10
11
12
13
14
15
16
17
18
19
20
21
22
23
24
25
26
27
28
29
30
31
32
33
34
35
36
37
38
39
40
41
42
43
44
45
46
47
48
49
50
51
52
53
54
55
56
57
58
59
60
61
62
63
64
65
66
67
68
|
package io.netty.channel;
import io.netty.channel.ChannelHandler;
import io.netty.channel.ChannelHandlerContext;
public
interface ChannelInboundHandler extends ChannelHandler {
// 当channel被注册到EventLoop时被调用
void channelRegistered(ChannelHandlerContext var1) throws Exception;
// 当channel已经被创建,但还未注册到EventLoop(或者从EventLoop中注销)被调用
void channelUnregistered(ChannelHandlerContext var1) throws Exception;
// 当channel处于活动状态(连接到远程节点)被调用
void channelActive(ChannelHandlerContext var1) throws Exception;
// 当channel处于非活动状态(没有连接到远程节点)被调用
void channelInactive(ChannelHandlerContext var1) throws Exception;
// 当从channel读取数据时被调用
void channelRead(ChannelHandlerContext var1, Object var2) throws Exception;
// 当channel的上一个读操作完成时被调用
void channelReadComplete(ChannelHandlerContext var1) throws Exception;
// 当ChannelInboundHandler.fireUserEventTriggered()方法被调用时被调用
void userEventTriggered(ChannelHandlerContext var1, Object var2) throws Exception;
// 当channel的可写状态发生改变时被调用
void channelWritabilityChanged(ChannelHandlerContext var1) throws Exception;
// 当处理过程中发生异常时被调用
void exceptionCaught(ChannelHandlerContext var1, Throwable var2) throws Exception;
}
package io.netty.channel;
import io.netty.channel.ChannelHandler;
import io.netty.channel.ChannelHandlerContext;
import io.netty.channel.ChannelPromise;
import java.net.SocketAddress;
public
interface ChannelOutboundHandler extends ChannelHandler {
// 当请求将Channel绑定到一个地址时被调用
// ChannelPromise是ChannelFuture的一个子接口,定义了如setSuccess(),setFailure()等方法
void bind(ChannelHandlerContext var1, SocketAddress var2, ChannelPromise var3) throws Exception;
// 当请求将Channel连接到远程节点时被调用
void connect(ChannelHandlerContext var1, SocketAddress var2, SocketAddress var3, ChannelPromise var4) throws Exception;
// 当请求将Channel从远程节点断开时被调用
void disconnect(ChannelHandlerContext var1, ChannelPromise var2) throws Exception;
// 当请求关闭Channel时被调用
void close(ChannelHandlerContext var1, ChannelPromise var2) throws Exception;
// 当请求将Channel从它的EventLoop中注销时被调用
void deregister(ChannelHandlerContext var1, ChannelPromise var2) throws Exception;
// 当请求从Channel读取数据时被调用
void read(ChannelHandlerContext var1) throws Exception;
// 当请求通过Channel将数据写到远程节点时被调用
void write(ChannelHandlerContext var1, Object var2, ChannelPromise var3) throws Exception;
// 当请求通过Channel将缓冲中的数据冲刷到远程节点时被调用
void flush(ChannelHandlerContext var1) throws Exception;
}
|
通过实现ChannelInboundHandler或者ChannelOutboundHandler就可以完成用户自定义的应用逻辑处理程序,不过Netty已经帮你实现了一些基本操作,用户只需要继承并扩展ChannelInboundHandlerAdapter或ChannelOutboundHandlerAdapter来作为自定义实现的起始点。
ChannelInboundHandlerAdapter与ChannelOutboundHandlerAdapter都继承于ChannelHandlerAdapter,该抽象类简单实现了ChannelHandler接口。
|
1
2
3
4
5
6
7
8
9
10
11
12
13
14
15
16
17
18
19
20
21
22
23
24
25
26
27
28
29
30
31
32
33
34
35
36
|
public
abstract
class ChannelHandlerAdapter implements ChannelHandler {
boolean added;
public ChannelHandlerAdapter() {
}
// 该方法不允许将此ChannelHandler共享复用
protected void ensureNotSharable() {
if(
this.isSharable()) {
throw
new IllegalStateException(
"ChannelHandler " +
this.getClass().getName() +
" is not allowed to be shared");
}
}
// 使用反射判断实现类有没有@Sharable注解,以确认该类是否为可共享复用的
public boolean isSharable() {
Class clazz =
this.getClass();
Map cache = InternalThreadLocalMap.get().handlerSharableCache();
Boolean sharable = (Boolean)cache.get(clazz);
if(sharable ==
null) {
sharable = Boolean.valueOf(clazz.isAnnotationPresent(Sharable.class));
cache.put(clazz, sharable);
}
return sharable.booleanValue();
}
public void handlerAdded(ChannelHandlerContext ctx) throws Exception {
}
public void handlerRemoved(ChannelHandlerContext ctx) throws Exception {
}
public void exceptionCaught(ChannelHandlerContext ctx, Throwable cause) throws Exception {
ctx.fireExceptionCaught(cause);
}
}
|
ChannelInboundHandlerAdapter与ChannelOutboundHandlerAdapter默认只是简单地将请求传递给ChannelPipeline中的下一个ChannelHandler,源码如下:
|
1
2
3
4
5
6
7
8
9
10
11
12
13
14
15
16
17
18
19
20
21
22
23
24
25
26
27
28
29
30
31
32
33
34
35
36
37
38
39
40
41
42
43
44
45
46
47
48
49
50
51
52
53
54
55
56
57
58
59
60
61
62
63
64
65
66
67
68
69
70
71
72
73
74
75
76
77
|
public
class ChannelInboundHandlerAdapter extends ChannelHandlerAdapter implements ChannelInboundHandler {
public ChannelInboundHandlerAdapter() {
}
public void channelRegistered(ChannelHandlerContext ctx) throws Exception {
ctx.fireChannelRegistered();
}
public void channelUnregistered(ChannelHandlerContext ctx) throws Exception {
ctx.fireChannelUnregistered();
}
public void channelActive(ChannelHandlerContext ctx) throws Exception {
ctx.fireChannelActive();
}
public void channelInactive(ChannelHandlerContext ctx) throws Exception {
ctx.fireChannelInactive();
}
public void channelRead(ChannelHandlerContext ctx, Object msg) throws Exception {
ctx.fireChannelRead(msg);
}
public void channelReadComplete(ChannelHandlerContext ctx) throws Exception {
ctx.fireChannelReadComplete();
}
public void userEventTriggered(ChannelHandlerContext ctx, Object evt) throws Exception {
ctx.fireUserEventTriggered(evt);
}
public void channelWritabilityChanged(ChannelHandlerContext ctx) throws Exception {
ctx.fireChannelWritabilityChanged();
}
public void exceptionCaught(ChannelHandlerContext ctx, Throwable cause) throws Exception {
ctx.fireExceptionCaught(cause);
}
}
public
class ChannelOutboundHandlerAdapter extends ChannelHandlerAdapter implements ChannelOutboundHandler {
public ChannelOutboundHandlerAdapter() {
}
public void bind(ChannelHandlerContext ctx, SocketAddress localAddress, ChannelPromise promise) throws Exception {
ctx.bind(localAddress, promise);
}
public void connect(ChannelHandlerContext ctx, SocketAddress remoteAddress, SocketAddress localAddress, ChannelPromise promise) throws Exception {
ctx.connect(remoteAddress, localAddress, promise);
}
public void disconnect(ChannelHandlerContext ctx, ChannelPromise promise) throws Exception {
ctx.disconnect(promise);
}
public void close(ChannelHandlerContext ctx, ChannelPromise promise) throws Exception {
ctx.close(promise);
}
public void deregister(ChannelHandlerContext ctx, ChannelPromise promise) throws Exception {
ctx.deregister(promise);
}
public void read(ChannelHandlerContext ctx) throws Exception {
ctx.read();
}
public void write(ChannelHandlerContext ctx, Object msg, ChannelPromise promise) throws Exception {
ctx.write(msg, promise);
}
public void flush(ChannelHandlerContext ctx) throws Exception {
ctx.flush();
}
}
|
对于处理入站消息,另外一种选择是继承SimpleChannelInboundHandler,它是Netty的一个继承于ChannelInboundHandlerAdapter的抽象类,并在其之上实现了自动释放资源的功能。
我们在了解ByteBuf时就已经知道了Netty使用了一套自己实现的引用计数算法来主动释放资源,假设你的ChannelHandler继承于ChannelInboundHandlerAdapter或ChannelOutboundHandlerAdapter,那么你就有责任去管理你所分配的ByteBuf,一般来说,一个消息对象(ByteBuf)已经被消费(或丢弃)了,并且不会传递给ChannelHandler链中的下一个处理器(如果该消息到达了实际的传输层,那么当它被写入或Channel关闭时,都会被自动释放),那么你就需要去手动释放它。通过一个简单的工具类ReferenceCountUtil的release方法,就可以做到这一点。
|
1
2
3
4
5
6
7
8
9
10
11
12
13
14
15
16
17
18
19
20
21
22
23
24
25
26
27
28
29
30
31
32
33
34
35
36
37
38
39
40
41
42
43
44
45
46
47
48
49
50
51
52
53
54
|
// 这个泛型为消息对象的类型
public
abstract
class SimpleChannelInboundHandler<I> extends ChannelInboundHandlerAdapter {
private
final TypeParameterMatcher matcher;
private
final
boolean autoRelease;
protected SimpleChannelInboundHandler() {
this(
true);
}
protected SimpleChannelInboundHandler(boolean autoRelease) {
this.matcher = TypeParameterMatcher.find(
this, SimpleChannelInboundHandler.class,
"I");
this.autoRelease = autoRelease;
}
protected SimpleChannelInboundHandler(Class<? extends I> inboundMessageType) {
this(inboundMessageType,
true);
}
protected SimpleChannelInboundHandler(Class<? extends I> inboundMessageType, boolean autoRelease) {
this.matcher = TypeParameterMatcher.get(inboundMessageType);
this.autoRelease = autoRelease;
}
public boolean acceptInboundMessage(Object msg) throws Exception {
return
this.matcher.match(msg);
}
// SimpleChannelInboundHandler只是替你做了ReferenceCountUtil.release()
public void channelRead(ChannelHandlerContext ctx, Object msg) throws Exception {
boolean release =
true;
try {
if(
this.acceptInboundMessage(msg)) {
this.channelRead0(ctx, msg);
}
else {
release =
false;
ctx.fireChannelRead(msg);
}
}
finally {
if(
this.autoRelease && release) {
ReferenceCountUtil.release(msg);
}
}
}
// 这个方法才是我们需要实现的方法
protected abstract void channelRead0(ChannelHandlerContext var1, I var2) throws Exception;
}
// ReferenceCountUtil中的源码,release方法对消息对象的类型进行判断然后调用它的release()方法
public static boolean release(Object msg) {
return msg
instanceof ReferenceCounted?((ReferenceCounted)msg).release():
false;
}
|
ChannelPipeline
为了模块化与解耦合,不可能由一个ChannelHandler来完成所有应用逻辑,所以Netty采用了拦截器链的设计。ChannelPipeline就是用来管理ChannelHandler实例链的容器,它的职责就是保证实例链的流动。
每一个新创建的Channel都将会被分配一个新的ChannelPipeline,这种关联关系是永久性的,一个Channel一生只能对应一个ChannelPipeline。

一个入站事件被触发时,它会先从ChannelPipeline的最左端(头部)开始一直传播到ChannelPipeline的最右端(尾部),而出站事件正好与入站事件顺序相反(从最右端一直传播到最左端)。这个顺序是定死的,Netty总是将ChannelPipeline的入站口作为头部,而将出站口作为尾部。在事件传播的过程中,ChannelPipeline会判断下一个ChannelHandler的类型是否和事件的运动方向相匹配,如果不匹配,就跳过该ChannelHandler并继续检查下一个(保证入站事件只会被ChannelInboundHandler处理),一个ChannelHandler也可以同时实现ChannelInboundHandler与ChannelOutboundHandler,它在入站事件与出站事件中都会被调用。
在阅读ChannelHandler的源码时,发现很多方法需要一个ChannelHandlerContext类型的参数,该接口是ChannelPipeline与ChannelHandler之间相关联的关键。ChannelHandlerContext可以通知ChannelPipeline中的当前ChannelHandler的下一个ChannelHandler,还可以动态地改变当前ChannelHandler在ChannelPipeline中的位置(通过调用ChannelPipeline中的各种方法来修改)。
ChannelHandlerContext负责了在同一个ChannelPipeline中的ChannelHandler与其他ChannelHandler之间的交互,每个ChannelHandlerContext都对应了一个ChannelHandler。在DefaultChannelPipeline的源码中,已经表现的很明显了。
|
1
2
3
4
5
6
7
8
9
10
11
12
13
14
15
16
17
18
19
20
21
22
23
24
25
26
27
28
29
30
31
32
33
34
35
36
37
38
39
40
41
42
43
44
45
46
47
48
49
50
51
52
53
54
55
56
|
public
class DefaultChannelPipeline implements ChannelPipeline {
.........
// 头部节点和尾部节点的引用变量
// ChannelHandlerContext在ChannelPipeline中是以链表的形式组织的
final AbstractChannelHandlerContext head;
final AbstractChannelHandlerContext tail;
.........
// 添加一个ChannelHandler到链表尾部
public final ChannelPipeline addLast(String name, ChannelHandler handler) {
return
this.addLast((EventExecutorGroup)
null, name, handler);
}
public final ChannelPipeline addLast(EventExecutorGroup group, String name, ChannelHandler handler) {
final AbstractChannelHandlerContext newCtx;
synchronized(
this) {
// 检查ChannelHandler是否为一个共享对象(@Sharable)
// 如果该ChannelHandler没有@Sharable注解,并且是已被添加过的那么就抛出异常
checkMultiplicity(handler);
// 返回一个DefaultChannelHandlerContext,注意该对象持有了传入的ChannelHandler
newCtx =
this.newContext(group,
this.filterName(name, handler), handler);
this.addLast0(newCtx);
// 如果当前ChannelPipeline没有被注册,那么就先加到未决链表中
if(!
this.registered) {
newCtx.setAddPending();
this.callHandlerCallbackLater(newCtx,
true);
return
this;
}
// 否则就调用ChannelHandler中的handlerAdded()
EventExecutor executor = newCtx.executor();
if(!executor.inEventLoop()) {
newCtx.setAddPending();
executor.execute(
new Runnable() {
public void run() {
DefaultChannelPipeline.
this.callHandlerAdded0(newCtx);
}
});
return
this;
}
}
this.callHandlerAdded0(newCtx);
return
this;
}
// 将新的ChannelHandlerContext插入到尾部与尾部之前的节点之间
private void addLast0(AbstractChannelHandlerContext newCtx) {
AbstractChannelHandlerContext prev =
this.tail.prev;
newCtx.prev = prev;
newCtx.next =
this.tail;
prev.next = newCtx;
this.tail.prev = newCtx;
}
.....
}
|
ChannelHandlerContext还定义了许多与Channel和ChannelPipeline重合的方法(像read()、write()、connect()这些用于出站的方法或者如fireChannelXXXX()这样用于入站的方法),不同之处在于调用Channel或者ChannelPipeline上的这些方法,它们将会从头沿着整个ChannelHandler实例链进行传播,而调用位于ChannelHandlerContext上的相同方法,则会从当前所关联的ChannelHandler开始,且只会传播给实例链中的下一个ChannelHandler。而且,事件之间的移动(从一个ChannelHandler到下一个ChannelHandler)也是通过ChannelHandlerContext中的方法调用完成的。
|
1
2
3
4
5
6
7
8
9
10
11
12
13
14
15
16
17
18
19
20
21
22
23
24
25
26
27
28
29
30
31
32
33
34
35
36
37
38
39
40
41
42
43
44
45
46
47
48
49
50
51
52
53
54
55
56
57
|
public
class DefaultChannelPipeline implements ChannelPipeline {
public final ChannelPipeline fireChannelRead(Object msg) {
// 注意这里将头节点传入了进去
AbstractChannelHandlerContext.invokeChannelRead(
this.head, msg);
return
this;
}
}
abstract
class AbstractChannelHandlerContext extends DefaultAttributeMap implements ChannelHandlerContext, ResourceLeakHint {
static void invokeChannelRead(final AbstractChannelHandlerContext next, Object msg) {
final Object m = next.pipeline.touch(ObjectUtil.checkNotNull(msg,
"msg"), next);
EventExecutor executor = next.executor();
if(executor.inEventLoop()) {
next.invokeChannelRead(m);
}
else {
executor.execute(
new Runnable() {
public void run() {
next.invokeChannelRead(m);
}
});
}
}
private void invokeChannelRead(Object msg) {
if(
this.invokeHandler()) {
try {
((ChannelInboundHandler)
this.handler()).channelRead(
this, msg);
}
catch (Throwable var3) {
this.notifyHandlerException(var3);
}
}
else {
// 寻找下一个ChannelHandler
this.fireChannelRead(msg);
}
}
public ChannelHandlerContext fireChannelRead(Object msg) {
invokeChannelRead(
this.findContextInbound(), msg);
return
this;
}
private AbstractChannelHandlerContext findContextInbound() {
AbstractChannelHandlerContext ctx =
this;
do {
ctx = ctx.next;
}
while(!ctx.inbound);
// 直到找到一个ChannelInboundHandler
return ctx;
}
}
|
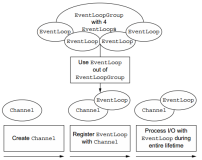
EventLoop
为了最大限度地提供高性能和可维护性,Netty设计了一套强大又易用的线程模型。在一个网络框架中,最重要的能力是能够快速高效地处理在连接的生命周期内发生的各种事件,与之相匹配的程序构造被称为事件循环,Netty定义了接口EventLoop来负责这项工作。
如果是经常用Java进行多线程开发的童鞋想必经常会使用到线程池,也就是Executor这套API。Netty就是从Executor(java.util.concurrent)之上扩展了自己的EventExecutorGroup(io.netty.util.concurrent),同时为了与Channel的事件进行交互,还扩展了EventLoopGroup接口(io.netty.channel)。在io.netty.util.concurrent包下的EventExecutorXXX负责实现线程并发相关的工作,而在io.netty.channel包下的EventLoopXXX负责实现网络编程相关的工作(处理Channel中的事件)。

在Netty的线程模型中,一个EventLoop将由一个永远不会改变的Thread驱动,而一个Channel一生只会使用一个EventLoop(但是一个EventLoop可能会被指派用于服务多个Channel),在Channel中的所有I/O操作和事件都由EventLoop中的线程处理,也就是说一个Channel的一生之中都只会使用到一个线程。不过在Netty3,只有入站事件会被EventLoop处理,所有出站事件都会由调用线程处理,这种设计导致了ChannelHandler的线程安全问题。Netty4简化了线程模型,通过在同一个线程处理所有事件,既解决了这个问题,还提供了一个更加简单的架构。
|
1
2
3
4
5
6
7
8
9
10
11
12
13
14
15
16
17
18
19
20
21
22
23
24
25
26
27
28
29
30
31
32
33
34
35
36
37
38
39
40
41
42
43
44
45
46
47
48
49
50
51
52
53
54
55
56
57
58
59
60
61
62
63
64
65
66
67
68
69
70
71
72
73
74
75
76
77
78
79
80
81
82
83
84
|
package io.netty.channel;
public
abstract
class SingleThreadEventLoop extends SingleThreadEventExecutor implements EventLoop {
protected
static
final
int DEFAULT_MAX_PENDING_TASKS = Math.max(
16, SystemPropertyUtil.getInt(
"io.netty.eventLoop.maxPendingTasks",
2147483647));
private
final Queue<Runnable> tailTasks;
protected SingleThreadEventLoop(EventLoopGroup parent, ThreadFactory threadFactory, boolean addTaskWakesUp) {
this(parent, threadFactory, addTaskWakesUp, DEFAULT_MAX_PENDING_TASKS, RejectedExecutionHandlers.reject());
}
protected SingleThreadEventLoop(EventLoopGroup parent, Executor executor, boolean addTaskWakesUp) {
this(parent, executor, addTaskWakesUp, DEFAULT_MAX_PENDING_TASKS, RejectedExecutionHandlers.reject());
}
protected SingleThreadEventLoop(EventLoopGroup parent, ThreadFactory threadFactory, boolean addTaskWakesUp, int maxPendingTasks, RejectedExecutionHandler rejectedExecutionHandler) {
super(parent, threadFactory, addTaskWakesUp, maxPendingTasks, rejectedExecutionHandler);
this.tailTasks =
this.newTaskQueue(maxPendingTasks);
}
protected SingleThreadEventLoop(EventLoopGroup parent, Executor executor, boolean addTaskWakesUp, int maxPendingTasks, RejectedExecutionHandler rejectedExecutionHandler) {
super(parent, executor, addTaskWakesUp, maxPendingTasks, rejectedExecutionHandler);
this.tailTasks =
this.newTaskQueue(maxPendingTasks);
}
// 返回它所在的EventLoopGroup
public EventLoopGroup parent() {
return (EventLoopGroup)
super.parent();
}
public EventLoop next() {
return (EventLoop)
super.next();
}
// 注册Channel,这里ChannelPromise和Channel关联到了一起
public ChannelFuture register(Channel channel) {
return
this.register((ChannelPromise)(
new DefaultChannelPromise(channel,
this)));
}
public ChannelFuture register(ChannelPromise promise) {
ObjectUtil.checkNotNull(promise,
"promise");
promise.channel().unsafe().register(
this, promise);
return promise;
}
// 剩下这些函数都是用于调度任务
public final void executeAfterEventLoopIteration(Runnable task) {
ObjectUtil.checkNotNull(task,
"task");
if(
this.isShutdown()) {
reject();
}
if(!
this.tailTasks.offer(task)) {
this.reject(task);
}
if(
this.wakesUpForTask(task)) {
this.wakeup(
this.inEventLoop());
}
}
final boolean removeAfterEventLoopIterationTask(Runnable task) {
return
this.tailTasks.remove(ObjectUtil.checkNotNull(task,
"task"));
}
protected boolean wakesUpForTask(Runnable task) {
return !(task
instanceof SingleThreadEventLoop.NonWakeupRunnable);
}
protected void afterRunningAllTasks() {
this.runAllTasksFrom(
this.tailTasks);
}
protected boolean hasTasks() {
return
super.hasTasks() || !
this.tailTasks.isEmpty();
}
public int pendingTasks() {
return
super.pendingTasks() +
this.tailTasks.size();
}
interface NonWakeupRunnable extends Runnable {
}
}
|
为了确保一个Channel的整个生命周期中的I/O事件会被一个EventLoop负责,Netty通过inEventLoop()方法来判断当前执行的线程的身份,确定它是否是分配给当前Channel以及它的EventLoop的那一个线程。如果当前(调用)线程正是EventLoop中的线程,那么所提交的任务将会被直接执行,否则,EventLoop将调度该任务以便稍后执行,并将它放入内部的任务队列(每个EventLoop都有它自己的任务队列,从SingleThreadEventLoop的源码就能发现很多用于调度内部任务队列的方法),在下次处理它的事件时,将会执行队列中的那些任务。这种设计可以让任何线程与Channel直接交互,而无需在ChannelHandler中进行额外的同步。
从性能上来考虑,千万不要将一个需要长时间来运行的任务放入到任务队列中,它会影响到该队列中的其他任务的执行。解决方案是使用一个专门的EventExecutor来执行它(ChannelPipeline提供了带有EventExecutorGroup参数的addXXX()方法,该方法可以将传入的ChannelHandler绑定到你传入的EventExecutor之中),这样它就会在另一条线程中执行,与其他任务隔离。
|
1
2
3
4
5
6
7
8
9
10
11
12
13
14
15
16
17
18
19
20
21
22
23
24
25
26
27
28
29
30
31
|
public
abstract
class SingleThreadEventExecutor extends AbstractScheduledEventExecutor implements OrderedEventExecutor {
.....
public void execute(Runnable task) {
if(task ==
null) {
throw
new NullPointerException(
"task");
}
else {
boolean inEventLoop =
this.inEventLoop();
if(inEventLoop) {
this.addTask(task);
}
else {
this.startThread();
this.addTask(task);
if(
this.isShutdown() &&
this.removeTask(task)) {
reject();
}
}
if(!
this.addTaskWakesUp &&
this.wakesUpForTask(task)) {
this.wakeup(inEventLoop);
}
}
}
public boolean inEventLoop(Thread thread) {
return thread ==
this.thread;
}
.....
}
|
EventLoopGroup负责管理和分配EventLoop(创建EventLoop和为每个新创建的Channel分配EventLoop),根据不同的传输类型,EventLoop的创建和分配方式也不同。例如,使用NIO传输类型,EventLoopGroup就会只使用较少的EventLoop(一个EventLoop服务于多个Channel),这是因为NIO基于I/O多路复用,一个线程可以处理多个连接,而如果使用的是OIO,那么新创建一个Channel(连接)就需要分配一个EventLoop(线程)。
Bootstrap
在深入了解地Netty的核心组件之后,发现它们的设计都很模块化,如果想要实现你自己的应用程序,就需要将这些组件组装到一起。Netty通过Bootstrap类,以对一个Netty应用程序进行配置(组装各个组件),并最终使它运行起来。对于客户端程序和服务器程序所使用到的Bootstrap类是不同的,后者需要使用ServerBootstrap,这样设计是因为,在如TCP这样有连接的协议中,服务器程序往往需要一个以上的Channel,通过父Channel来接受来自客户端的连接,然后创建子Channel用于它们之间的通信,而像UDP这样无连接的协议,它不需要每个连接都创建子Channel,只需要一个Channel即可。
一个比较明显的差异就是Bootstrap与ServerBootstrap的group()方法,后者提供了一个接收2个EventLoopGroup的版本。
|
1
2
3
4
5
6
7
8
9
10
11
12
13
14
15
16
17
18
19
20
21
22
23
24
25
26
27
28
|
// 该方法在Bootstrap的父类AbstractBootstrap中,泛型B为它当前子类的类型(为了链式调用)
public B group(EventLoopGroup group) {
if(group ==
null) {
throw
new NullPointerException(
"group");
}
else
if(
this.group !=
null) {
throw
new IllegalStateException(
"group set already");
}
else {
this.group = group;
return
this;
}
}
// ServerBootstrap中的实现,它也支持只用一个EventLoopGroup
public ServerBootstrap group(EventLoopGroup group) {
return
this.group(group, group);
}
public ServerBootstrap group(EventLoopGroup parentGroup, EventLoopGroup childGroup) {
super.group(parentGroup);
if(childGroup ==
null) {
throw
new NullPointerException(
"childGroup");
}
else
if(
this.childGroup !=
null) {
throw
new IllegalStateException(
"childGroup set already");
}
else {
this.childGroup = childGroup;
return
this;
}
}
|
Bootstrap其实没有什么可以好说的,它就只是一个装配工,将各个组件拼装组合到一起,然后进行一些配置,有关它的详细API请参考Netty JavaDoc。下面我们将通过一个经典的Echo客户端与服务器的例子,来梳理一遍创建Netty应用的流程。
首先实现的是服务器,我们先实现一个EchoServerInboundHandler,处理入站消息。
|
1
2
3
4
5
6
7
8
9
10
11
12
13
14
15
16
17
18
19
20
21
22
23
24
25
26
|
public
class EchoServerInboundHandler extends ChannelInboundHandlerAdapter {
public void channelRead(ChannelHandlerContext ctx, Object msg) throws Exception {
ByteBuf in = (ByteBuf) msg;
System.out.printf(
"Server received: %s \n", in.toString(CharsetUtil.UTF_8));
// 由于读事件不是一次性就能把完整消息发送过来的,这里并没有调用writeAndFlush
ctx.write(in);
// 直接把消息写回给客户端(会被出站消息处理器处理,不过我们的应用没有实现任何出站消息处理器)
}
public void channelReadComplete(ChannelHandlerContext ctx) throws Exception {
// 等读事件已经完成时,冲刷之前写数据的缓冲区
// 然后添加了一个监听器,它会在Future完成时进行关闭该Channel.
ctx.writeAndFlush(Unpooled.EMPTY_BUFFER)
.addListener(ChannelFutureListener.CLOSE);
}
// 处理异常,输出异常信息,然后关闭Channel
public void exceptionCaught(ChannelHandlerContext ctx, Throwable cause) throws Exception {
cause.printStackTrace();
ctx.close();
}
}
|
服务器的应用逻辑只有这么多,剩下就是用ServerBootstrap进行配置了。
|
1
2
3
4
5
6
7
8
9
10
11
12
13
14
15
16
17
18
19
20
21
22
23
24
25
26
27
28
29
30
31
32
33
34
35
36
37
38
39
40
41
42
43
44
45
46
|
public
class EchoServer {
private
final
int port;
public EchoServer(int port) {
this.port = port;
}
public void start() throws Exception {
final EchoServerInboundHandler serverHandler =
new EchoServerInboundHandler();
EventLoopGroup group =
new NioEventLoopGroup();
// 传输类型使用NIO
try {
ServerBootstrap b =
new ServerBootstrap();
b.group(group)
// 配置EventLoopGroup
.channel(NioServerSocketChannel.class)
// 配置Channel的类型
.localAddress(
new InetSocketAddress(port))
// 配置端口号
.childHandler(
new ChannelInitializer<SocketChannel>() {
// 实现一个ChannelInitializer,它可以方便地添加多个ChannelHandler
protected void initChannel(SocketChannel socketChannel) throws Exception {
socketChannel.pipeline().addLast(serverHandler);
}
});
// i绑定地址,同步等待它完成
ChannelFuture f = b.bind().sync();
// 关闭这个Future
f.channel().closeFuture().sync();
}
finally {
// 关闭应用程序,一般来说Netty应用只需要调用这个方法就够了
group.shutdownGracefully().sync();
}
}
public static void main(String[] args) throws Exception {
if (args.length !=
1) {
System.err.printf(
"Usage: %s <port> \n",
EchoServer.class.getSimpleName()
);
return;
}
int port = Integer.parseInt(args[
0]);
new EchoServer(port).start();
}
}
|
接下来实现客户端,同样需要先实现一个入站消息处理器。
|
1
2
3
4
5
6
7
8
9
10
11
12
13
14
15
16
17
18
19
20
21
22
23
|
public
class EchoClientInboundHandler extends SimpleChannelInboundHandler<ByteBuf> {
/**
* 我们在Channel连接到远程节点直接发送一条消息给服务器
*/
public void channelActive(ChannelHandlerContext ctx) throws Exception {
ctx.writeAndFlush(Unpooled.copiedBuffer(
"Hello, Netty!", CharsetUtil.UTF_8));
}
protected void channelRead0(ChannelHandlerContext channelHandlerContext, ByteBuf byteBuf) throws Exception {
// 输出从服务器Echo的消息
System.out.printf(
"Client received: %s \n", byteBuf.toString(CharsetUtil.UTF_8));
}
public void exceptionCaught(ChannelHandlerContext ctx, Throwable cause) throws Exception {
cause.printStackTrace();
ctx.close();
}
}
|
然后配置客户端。
|
1
2
3
4
5
6
7
8
9
10
11
12
13
14
15
16
17
18
19
20
21
22
23
24
25
26
27
28
29
30
31
32
33
34
35
36
37
38
39
40
41
42
|
public
class EchoClient {
private
final String host;
private
final
int port;
public EchoClient(String host, int port) {
this.host = host;
this.port = port;
}
public void start() throws Exception {
EventLoopGroup group =
new NioEventLoopGroup();
try {
Bootstrap b =
new Bootstrap();
b.group(group)
.channel(NioSocketChannel.class)
.remoteAddress(
new InetSocketAddress(host, port))
// 服务器的地址
.handler(
new ChannelInitializer<SocketChannel>() {
protected void initChannel(SocketChannel socketChannel) throws Exception {
socketChannel.pipeline().addLast(
new EchoClientInboundHandler());
}
});
ChannelFuture f = b.connect().sync();
// 连接到服务器
f.channel().closeFuture().sync();
}
finally {
group.shutdownGracefully().sync();
}
}
public static void main(String[] args) throws Exception {
if (args.length !=
2) {
System.err.printf(
"Usage: %s <host> <port> \n", EchoClient.class.getSimpleName());
return;
}
String host = args[
0];
int port = Integer.parseInt(args[
1]);
new EchoClient(host, port).start();
}
}
|
实现一个Netty应用程序就是如此简单,用户大多数都是在编写各种应用逻辑的ChannelHandler(或者使用Netty内置的各种实用ChannelHandler),然后只需要将它们全部添加到ChannelPipeline即可。
参考文献
-
微信公众号【Java技术江湖】一位阿里 Java 工程师的技术小站。(关注公众号后回复”Java“即可领取 Java基础、进阶、项目和架构师等免费学习资料,更有数据库、分布式、微服务等热门技术学习视频,内容丰富,兼顾原理和实践,另外也将赠送作者原创的Java学习指南、Java程序员面试指南等干货资源)