实现一个智能聊天机器人(图灵机器人,Android,recyclerView)
推荐一部关于Ai的系列漫画,叫做代码的深渊
相关代码已经上传到Github的仓库Robot文件夹内
apk体验地址:https://www.pgyer.com/nVme
文章思路参考自刘桂林前辈的带领新手快速开发APP ,聊天界面代码参考于郭神的第一行代码第二版第三章3.7节,由衷感谢,文中不足之处,希望能得到您的指正,十分感谢
布局文件
创建项目,在build.gradle下填入依赖
implementation 'com.android.support:design:26.1.0'
然后我们进去res-values-styles下,把主题修改成没有标题的样式
<!-- Base application theme. -->
<style name="AppTheme" parent="Theme.AppCompat.Light.NoActionBar">
    <!-- Customize your theme here. -->
    <item name="colorPrimary">@color/colorPrimary</item>
    <item name="colorPrimaryDark">@color/colorPrimaryDark</item>
    <item name="colorAccent">@color/colorAccent</item>
</style>
然后在activity_main布局里面写一个recyclerView,用来显示对话聊天消息,以及一个EditText输入框,和一个发送数据的button按钮
<?xml version="1.0" encoding="utf-8"?>
<LinearLayout xmlns:android="http://schemas.android.com/apk/res/android"
    xmlns:app="http://schemas.android.com/apk/res-auto"
    xmlns:tools="http://schemas.android.com/tools"
    android:layout_width="match_parent"
    android:layout_height="match_parent"
    android:orientation="vertical"
    tools:context="com.example.administrator.robot.MainActivity">

    <android.support.v7.widget.RecyclerView
        android:id="@+id/recycler"
        android:layout_width="match_parent"
        android:layout_height="0dp"
        android:layout_weight="1" />

    <LinearLayout
        android:layout_width="match_parent"
        android:layout_height="wrap_content"
        android:layout_gravity="center_vertical"
        android:gravity="center_vertical"
        android:orientation="horizontal">

        <EditText
            android:id="@+id/et_text"
            android:layout_width="match_parent"
            android:layout_height="wrap_content"
            android:layout_weight="1"
            android:hint="输入" />

        <Button
            android:id="@+id/btn_send"
            android:layout_width="66dp"
            android:layout_height="36dp"
            android:layout_margin="5dp"
            android:background="#444444"
            android:text="发送"
            android:textColor="#FFFFFF" />
    </LinearLayout>

</LinearLayout>
回到Activity声明控件,并且给按钮设置点击事件,在按钮的点击事件里面进行输入框的处理,依次是:
1,获取输入框的内容
2,判断是否为空
3,发送后清空当前的输入框
public class MainActivity extends AppCompatActivity implements View.OnClickListener {

    //  聊天消息列表
    private RecyclerView recyclerView;

    //  输入框
    private EditText editText;

    //  发送按钮
    private Button btn_send;

    @Override
    protected void onCreate(Bundle savedInstanceState) {
        super.onCreate(savedInstanceState);
        setContentView(R.layout.activity_main);
        initView();
    }

    private void initView() {
        recyclerView = findViewById(R.id.recycler);
        editText = findViewById(R.id.et_text);
        btn_send = findViewById(R.id.btn_send);
        btn_send.setOnClickListener(this);
    }

    @Override
    public void onClick(View view) {
        switch (view.getId()) {
            case R.id.btn_send:
                /**
                 * 1,获取输入框的内容
                 * 2,判断是否为空
                 * 3,发送后清空当前的输入框
                 */
//              1,获取输入框的内容
                String text = editText.getText().toString();
//              2,判断是否为空
                if (!TextUtils.isEmpty(text)) {
//              3,这里假装已经发送了数据,清空输入框
                    editText.setText("");
                }
                break;
        }
    }
}
后端接口的调试:
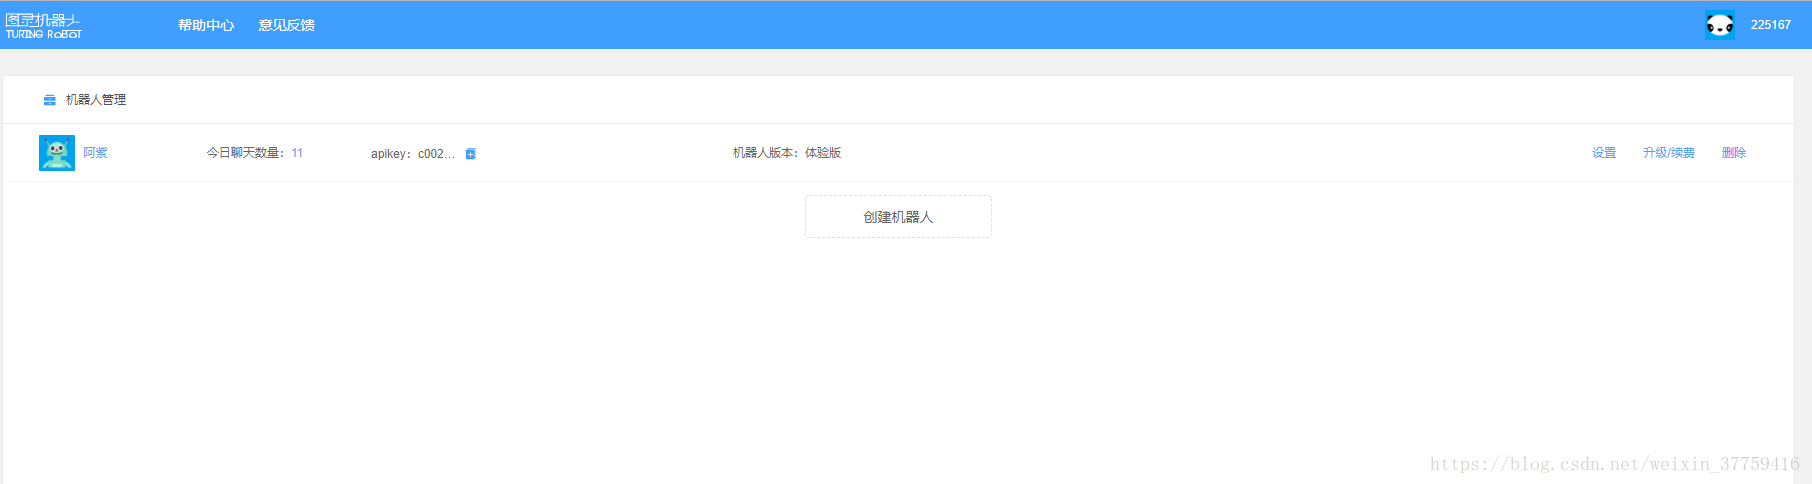
后端的接口我们使用图灵机器人,打开网站,注册好账号,创建一个机器人,我把机器人命名为阿紫,然后我们先用调试工具进行接口的调试,这里我用的调试工具是PostMan,参照图灵机器人官方文档
- Post请求
- 接口地址:http://openapi.tuling123.com/openapi/api/v2
格式是发送Json数据的Post请求,在Json数据中带着两个参数:
{
    "reqType":0,
    "perception": {
        "inputText": {
            "text": "你叫什么"
        }
    },
    "userInfo": {
        "apiKey": "c00282de107144fb940adab994d9ff98",
        "userId": "225167"
    }
}
1,apikey(在机器人管理页),比如这里我的是:c00282de107144fb940adab994d9ff98,
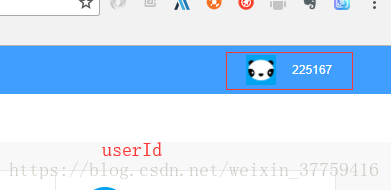
2,userId(右上角用户头像右边的数字),这里我的是:225167
3,text就是表示我们想要和机器人聊天的具体文字
进行调试
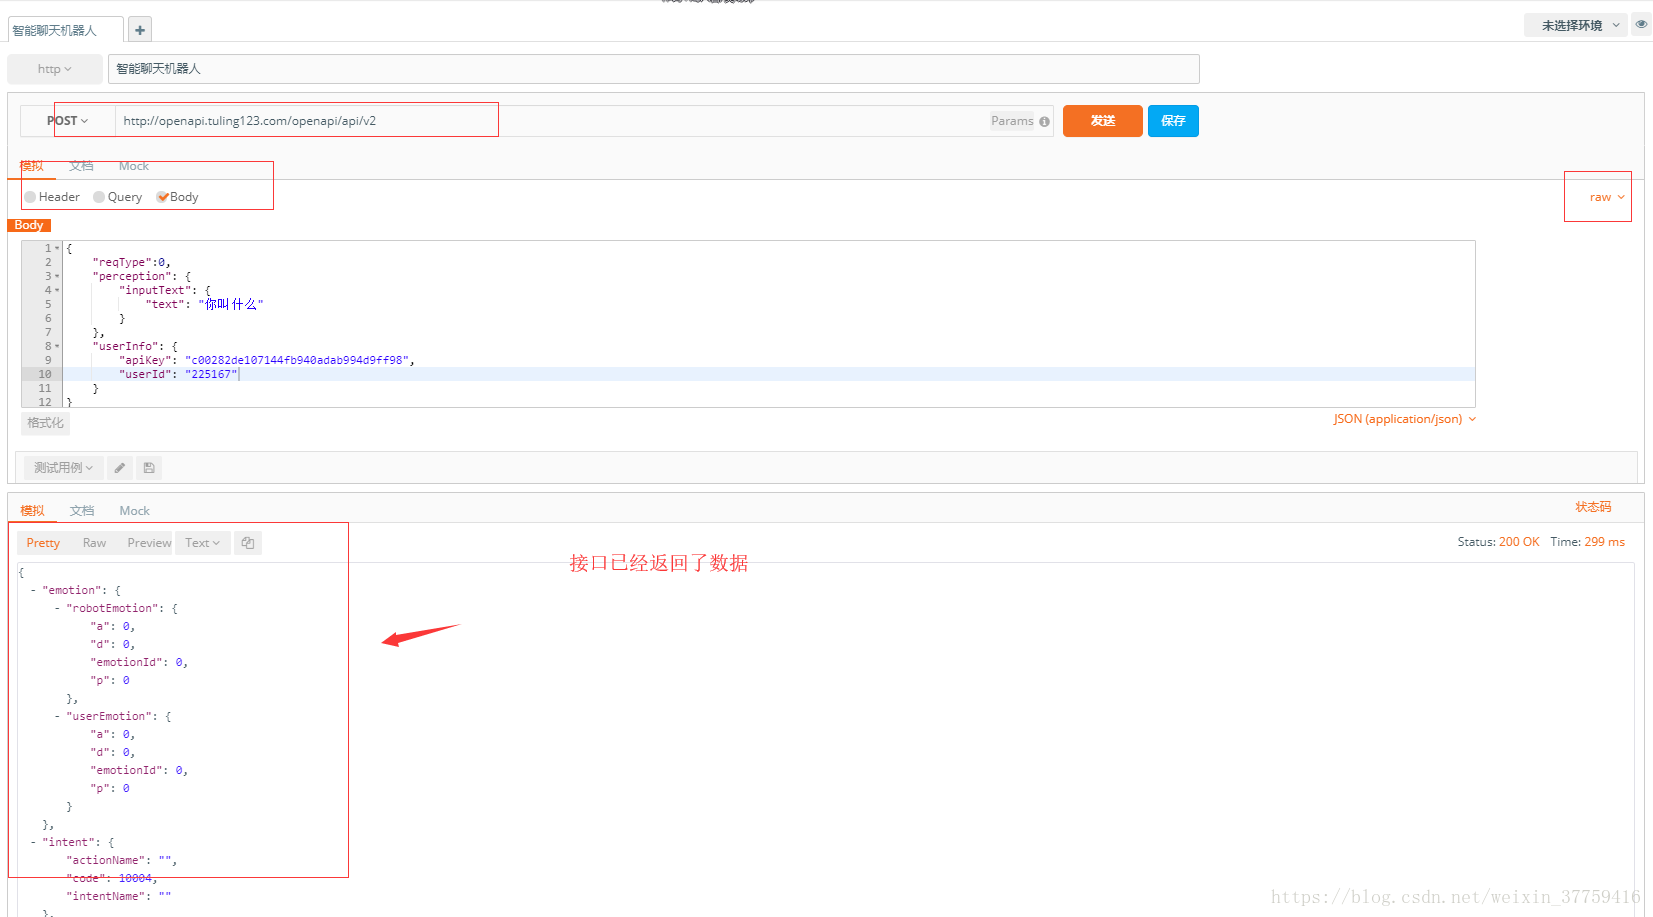
不得已截了大图,缩略图又有点模糊,点击图片就可以放大查看了
 {
    "emotion": {
        "robotEmotion": {
            "a": 0,
            "d": 0,
            "emotionId": 0,
            "p": 0
        },
        "userEmotion": {
            "a": 0,
            "d": 0,
            "emotionId": 0,
            "p": 0
        }
    },
    "intent": {
        "actionName": "",
        "code": 10004,
        "intentName": ""
    },
    "results": [{
        "groupType": 0,
        "resultType": "text",
        "values": {
            "text": "叫我阿紫就可以了"
        }
    }]
}
数据比较多,但是我们关心得的,仅仅只是Json数组result里面的test:我叫阿紫,不要被我的名字所迷倒哦而已,我们可以试试发送不同的文本,看看机器人会怎么回答,比如:
什么是Android? -- Android是一种基于Linux的自由及开放源代码的操作系统,主要使用于移...
你喜欢我吗? -- 你喜欢我,我就喜欢你。
至此,我们确定接口调试成功了
聊天界面的书写
思路是我们把消息加载到RecyclerViews的时候要去区分什么时候去显示左边的布局(机器人的对话),右边的布局(我们的对话),如果对RecyclerView还不会使用的看看这位前辈(随风飘扬的微笑)关于recyclerView的文章,或者查看第一行代码,相关图片素材已经上传到Github。
我们创建bean文件夹,然后创建聊天消息实体类chat,实体类有两个属性,用来标识是左边接受消息布局(TYPE_RECEIVED)还是右边布局的的type属性(TYPE_SENT),
/**
 * Created by 舍长 on 2018/5/10.
 * 描述: 聊天消息实体类
 */

public class Chat {
    public static final int TYPE_RECEIVED = 0;
    public static final int TYPE_SENT = 1;
    //    对话文本
    private String text;
    //    标示
    private int type;

    public Chat(String text, int type) {
        this.text = text;
        this.type = type;
    }

    public String getText() {
        return text;
    }

    public void setText(String text) {
        this.text = text;
    }

    public int getType() {
        return type;
    }

    public void setType(int type) {
        this.type = type;
    }

    @Override
    public String toString() {
        return "ChatLiatData{" +
                "text='" + text + '\'' +
                ", type=" + type +
                '}';
    }
}
让我们先再build.gradle下添加圆形化图片的框架CircleImageView,用来对头像的处理
//CircleImageView
compile 'de.hdodenhof:circleimageview:2.1.0'
然后开始写我们的RecyclerView的item布局,命名为chat_item。我们先把左右的消息都写出来,在后面的消息加载item的时候我们再判断是要显示左边的接受消息布局还是右边的发送消息布局
<?xml version="1.0" encoding="utf-8"?>
<LinearLayout xmlns:android="http://schemas.android.com/apk/res/android"
    android:layout_width="match_parent"
    android:layout_height="wrap_content"
    android:orientation="vertical"
    android:padding="10dp">

    <LinearLayout
        android:id="@+id/left_layout"
        android:layout_width="wrap_content"
        android:layout_height="wrap_content"
        android:layout_gravity="left">

        <de.hdodenhof.circleimageview.CircleImageView
            android:layout_width="50dp"
            android:layout_height="50dp"
            android:layout_marginLeft="10dp"
            android:src="@drawable/robot_logo" />

        <TextView
            android:id="@+id/tv_left_text"
            android:layout_width="wrap_content"
            android:layout_height="wrap_content"
            android:layout_marginLeft="10dp"
            android:background="@drawable/chat_bg_cloud"
            android:gravity="center_vertical"
            android:padding="20dp"
            android:text="你好,我叫阿紫"
            android:textColor="@android:color/black" />
    </LinearLayout>

    <LinearLayout
        android:id="@+id/right_layout"
        android:layout_width="wrap_content"
        android:layout_height="wrap_content"
        android:layout_gravity="right">

        <TextView
            android:id="@+id/tv_right_text"
            android:layout_width="wrap_content"
            android:layout_height="wrap_content"
            android:layout_marginRight="10dp"
            android:background="@drawable/chat_bg_user"
            android:gravity="center_vertical"
            android:padding="20sp"
            android:text="你好,你会些什么啊"
          android:textColor="@android:color/white" />

        <de.hdodenhof.circleimageview.CircleImageView
            android:layout_width="50dp"
            android:layout_height="50dp"
            android:layout_marginRight="10dp"
            android:src="@drawable/user_logo" />
    </LinearLayout>

</LinearLayout>
接下来就开始写RecyclerView的Adapter
/**
 * Created by 舍长 on 2018/5/7.
 * 描述: 聊天布局适配器
 */

public class RecyclerViewAdapter extends RecyclerView.Adapter<RecyclerViewAdapter.ViewHolder> {


    //    上下文
    private Context context;

    //    对话列表
    private List<Chat> mlist;

    public RecyclerViewAdapter() {

    }

    public RecyclerViewAdapter(Context context, List<Chat> list) {
        this.context = context;
        this.mlist = list;
    }

    @Override
    public ViewHolder onCreateViewHolder(ViewGroup parent, int viewType) {
        View view = LayoutInflater.from(parent.getContext()).inflate(R.layout.chat_item, parent, false);
        return new ViewHolder(view);
    }

    @Override
    public void onBindViewHolder(ViewHolder holder, int position) {
        Chat chat = mlist.get(position);
        if (chat.getType() == Chat.TYPE_RECEIVED) {
//           如果收的的数据是左边,就显示左边的消息布局,将右边的消息布局隐藏
            holder.leftLayout.setVisibility(View.VISIBLE);
            holder.rightLayout.setVisibility(View.GONE);
            holder.leftChat.setText(chat.getText());
//
        } else if (chat.getType() == chat.TYPE_SENT) {
//           如果发出的消息是右边,就显示右边的消息布局,将左边的消息布局隐藏
            holder.rightLayout.setVisibility(View.VISIBLE);
            holder.leftLayout.setVisibility(View.GONE);
            holder.rightChat.setText(chat.getText());
        }
    }

    @Override
    public int getItemCount() {
        return mlist.size();
    }

    /**
     * 声明控件
     */
    class ViewHolder extends RecyclerView.ViewHolder {
        LinearLayout leftLayout;
        LinearLayout rightLayout;
        TextView leftChat;
        TextView rightChat;

        public ViewHolder(View itemView) {
            super(itemView);
            leftLayout = itemView.findViewById(R.id.left_layout);
            rightLayout = itemView.findViewById(R.id.right_layout);
            leftChat = itemView.findViewById(R.id.tv_left_text);
            rightChat = itemView.findViewById(R.id.tv_right_text);
        }
    }
}
布局和平常的RecyclerView的适配器的区别在于在onBindViewHolder()方法中进行了判断。我们创建了集合mList,用来存储聊天数据
实体类Chat中有个属性type,type有两个值
public static final int TYPE_RECEIVED = 0;(接收的数据)
public static final int TYPE_SENT = 1;(发送的数据)
我们根据传入来的实体类的这个值来判断数据是左边的接收数据(TYPE_RECEIVED ),还是右边的发送数据(TYPE_SENT ),判断过后决定是要隐藏哪边的布局
Adapter写好之后我们在Activtiy进行数据的填充,RecyclerView布局管理器的代码书写
public class MainActivity extends AppCompatActivity implements View.OnClickListener {

    //  聊天消息列表
    private RecyclerView recyclerView;

    //  输入框
    private EditText editText;

    //  发送按钮
    private Button mButton;

    //    对话信息集合
    private List<Chat> list = new ArrayList<>();

    //    适配器
    private RecyclerViewAdapter recyclerViewAdapter;

    @Override
    protected void onCreate(Bundle savedInstanceState) {
        super.onCreate(savedInstanceState);
        setContentView(R.layout.activity_main);
//      初始化数据
        initView();
//       加载数据
        initData();
//      设置布局管理
        LinearLayoutManager linearLayoutManager = new LinearLayoutManager(this);
        recyclerView.setLayoutManager(linearLayoutManager);
        recyclerViewAdapter = new RecyclerViewAdapter(this, list);
        recyclerView.setAdapter(recyclerViewAdapter);
    }

    /**
     * 加载列表布局数据
     */
    private void initData() {
        Chat c1 = new Chat("你好,我叫阿紫", Chat.TYPE_RECEIVED);
        list.add(c1);
        Chat c2 = new Chat("你好,你现在会些什么呢?", Chat.TYPE_SENT);
        list.add(c2);
        Chat c3 = new Chat("我还在成长中,很多东西还不懂,但是你可以考考我", Chat.TYPE_RECEIVED);
        list.add(c3);
        Chat c4 = new Chat("1+1等于几?", Chat.TYPE_RECEIVED);
        list.add(c4);
    }

    /**
     * 初始化控件
     */
    private void initView() {
        recyclerView = findViewById(R.id.recycler);
        editText = findViewById(R.id.et_text);
        mButton = findViewById(R.id.btn_send);
        mButton.setOnClickListener(this);
    }

    @Override
    public void onClick(View view) {
        switch (view.getId()) {
            case R.id.btn_send:
                /**
                 * 1,获取输入框的内容
                 * 2,判断是否为空
                 * 3,发送后清空当前的输入框
                 */
//              1,获取输入框的内容
                String text = editText.getText().toString();
//              2,判断是否为空
                if (!TextUtils.isEmpty(text)) {
//                  把要发送的数据添加到addData方法中,并把数据类型也填入,这里我们的类型是TYPE_SENT,发送数据类型
                    addData(text, Chat.TYPE_SENT);
//                  清空输入框
                    editText.setText("");
//              3,清空发送输入框
                    editText.setText("");

                }
                break;
        }
    }
        /**
     * 通过传递进来的test和type创建数据实体类,添加到聊天数据集合list中
     * @param text
     * @param type
     */
    private void addData(String text, int type) {
        Chat c = new Chat(text, type);
        list.add(c);
        //当有新消息时,刷新显示
        recyclerViewAdapter.notifyItemInserted(list.size() - 1);
        //定位的最后一行
        recyclerView.scrollToPosition(list.size() - 1);
    }

}
我们声明了一个集合list来存储我们的聊天数据,在initData()方法中加载数据,然后设置RecyclerView的布局管理器,并将集合数据填充到适配器中。我们在发送按钮的点击事件里面设置获取数据框的输入内容,设置为接受类型的数据,填充到list集合中,刷新适配器把显示的地方定位到最后一行,清空输入框。
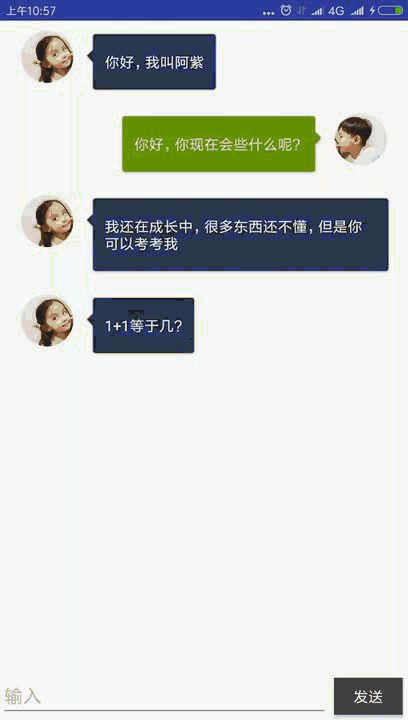
至此,我们的聊天界面就写好了,让我们来看看目前的效果
对接网络接口:
我们采用Retrofit网络框架,还没接触过Retrofit的伙伴可以查看这篇文章。
添加依赖:
//    retrofit
    compile 'com.squareup.okhttp3:okhttp:3.1.2'
    compile 'com.squareup.retrofit2:retrofit:2.0.1'
    compile 'com.squareup.retrofit2:converter-gson:2.0.1'
别忘了在AndroidManifest.xml文件中添加网络权限
<uses-permission android:name="android.permission.INTERNET"/>
现在让我们来看看发送的Json数据格式:
{

    "reqType":0,

    "perception": {

        "inputText": {

            "text": "你叫什么"

        }

    },

    "userInfo": {

        "apiKey": "c00282de107144fb940adab994d9ff98",

        "userId": "225167"

    }

}
我们在bean文件夹创建实体类Ask,使用GsonFormat工具生成请求数据实体类Ask(请求体)
/**
 * Created by 舍长 on 2018/5/10.
 * 描述: 发送数据实体类
 */

public class Ask {
    /**
     * reqType : 0
     * perception : {"inputText":{"text":"你叫什么"}}
     * userInfo : {"apiKey":"c00282de107144fb940adab994d9ff98","userId":"225167"}
     */

    private int reqType;
    private PerceptionBean perception;
    private UserInfoBean userInfo;

    public int getReqType() {
        return reqType;
    }

    public void setReqType(int reqType) {
        this.reqType = reqType;
    }

    public PerceptionBean getPerception() {
        return perception;
    }

    public void setPerception(PerceptionBean perception) {
        this.perception = perception;
    }

    public UserInfoBean getUserInfo() {
        return userInfo;
    }

    public void setUserInfo(UserInfoBean userInfo) {
        this.userInfo = userInfo;
    }

    public static class PerceptionBean {
        /**
         * inputText : {"text":"你叫什么"}
         */

        private InputTextBean inputText;

        public InputTextBean getInputText() {
            return inputText;
        }

        public void setInputText(InputTextBean inputText) {
            this.inputText = inputText;
        }

        public static class InputTextBean {
            /**
             * text : 你叫什么
             */

            private String text;

            public String getText() {
                return text;
            }

            public void setText(String text) {
                this.text = text;
            }
        }
    }

    public static class UserInfoBean {
        /**
         * apiKey : c00282de107144fb940adab994d9ff98
         * userId : 225167
         */

        private String apiKey;
        private String userId;

        public String getApiKey() {
            return apiKey;
        }

        public void setApiKey(String apiKey) {
            this.apiKey = apiKey;
        }

        public String getUserId() {
            return userId;
        }

        public void setUserId(String userId) {
            this.userId = userId;
        }
    }
}
再看看接受的Json数据
   {
    "emotion": {
        "robotEmotion": {
            "a": 0,
            "d": 0,
            "emotionId": 0,
            "p": 0
        },
        "userEmotion": {
            "a": 0,
            "d": 0,
            "emotionId": 0,
            "p": 0
        }
    },
    "intent": {
        "actionName": "",
        "code": 10004,
        "intentName": ""
    },
    "results": [{
        "groupType": 0,
        "resultType": "text",
        "values": {
            "text": "叫我阿紫就可以了"
        }
    }]
}
在bean文件夹类创建接受数据实体类Take(响应体)
/**
 * Created by 舍长 on 2018/5/10.
 * 描述: 接受的Json数据实体类
 */

public class Take {
    /**
     * emotion : {"robotEmotion":{"a":0,"d":0,"emotionId":0,"p":0},"userEmotion":{"a":0,"d":0,"emotionId":0,"p":0}}
     * intent : {"actionName":"","code":10004,"intentName":""}
     * results : [{"groupType":0,"resultType":"text","values":{"text":"叫我阿紫就可以了"}}]
     */

    private EmotionBean emotion;
    private IntentBean intent;
    private List<ResultsBean> results;

    public EmotionBean getEmotion() {
        return emotion;
    }

    public void setEmotion(EmotionBean emotion) {
        this.emotion = emotion;
    }

    public IntentBean getIntent() {
        return intent;
    }

    public void setIntent(IntentBean intent) {
        this.intent = intent;
    }

    public List<ResultsBean> getResults() {
        return results;
    }

    public void setResults(List<ResultsBean> results) {
        this.results = results;
    }

    public static class EmotionBean {
        /**
         * robotEmotion : {"a":0,"d":0,"emotionId":0,"p":0}
         * userEmotion : {"a":0,"d":0,"emotionId":0,"p":0}
         */

        private RobotEmotionBean robotEmotion;
        private UserEmotionBean userEmotion;

        public RobotEmotionBean getRobotEmotion() {
            return robotEmotion;
        }

        public void setRobotEmotion(RobotEmotionBean robotEmotion) {
            this.robotEmotion = robotEmotion;
        }

        public UserEmotionBean getUserEmotion() {
            return userEmotion;
        }

        public void setUserEmotion(UserEmotionBean userEmotion) {
            this.userEmotion = userEmotion;
        }

        public static class RobotEmotionBean {
            /**
             * a : 0
             * d : 0
             * emotionId : 0
             * p : 0
             */

            private int a;
            private int d;
            private int emotionId;
            private int p;

            public int getA() {
                return a;
            }

            public void setA(int a) {
                this.a = a;
            }

            public int getD() {
                return d;
            }

            public void setD(int d) {
                this.d = d;
            }

            public int getEmotionId() {
                return emotionId;
            }

            public void setEmotionId(int emotionId) {
                this.emotionId = emotionId;
            }

            public int getP() {
                return p;
            }

            public void setP(int p) {
                this.p = p;
            }
        }

        public static class UserEmotionBean {
            /**
             * a : 0
             * d : 0
             * emotionId : 0
             * p : 0
             */

            private int a;
            private int d;
            private int emotionId;
            private int p;

            public int getA() {
                return a;
            }

            public void setA(int a) {
                this.a = a;
            }

            public int getD() {
                return d;
            }

            public void setD(int d) {
                this.d = d;
            }

            public int getEmotionId() {
                return emotionId;
            }

            public void setEmotionId(int emotionId) {
                this.emotionId = emotionId;
            }

            public int getP() {
                return p;
            }

            public void setP(int p) {
                this.p = p;
            }
        }
    }

    public static class IntentBean {
        /**
         * actionName :
         * code : 10004
         * intentName :
         */

        private String actionName;
        private int code;
        private String intentName;

        public String getActionName() {
            return actionName;
        }

        public void setActionName(String actionName) {
            this.actionName = actionName;
        }

        public int getCode() {
            return code;
        }

        public void setCode(int code) {
            this.code = code;
        }

        public String getIntentName() {
            return intentName;
        }

        public void setIntentName(String intentName) {
            this.intentName = intentName;
        }
    }

    public static class ResultsBean {
        /**
         * groupType : 0
         * resultType : text
         * values : {"text":"叫我阿紫就可以了"}
         */

        private int groupType;
        private String resultType;
        private ValuesBean values;

        public int getGroupType() {
            return groupType;
        }

        public void setGroupType(int groupType) {
            this.groupType = groupType;
        }

        public String getResultType() {
            return resultType;
        }

        public void setResultType(String resultType) {
            this.resultType = resultType;
        }

        public ValuesBean getValues() {
            return values;
        }

        public void setValues(ValuesBean values) {
            this.values = values;
        }

        public static class ValuesBean {
            /**
             * text : 叫我阿紫就可以了
             */

            private String text;

            public String getText() {
                return text;
            }

            public void setText(String text) {
                this.text = text;
            }
        }
    }
}
两个实体类看起来有点复杂,但其实我们这个小例子只是需要其中的一个文本数据而已。然后我们创建net文件夹,在net文件夹类创建Api接口来写Retrofit的实现接口
/**
 * Created by 舍长 on 2018/5/10.
 * 描述: Retrofit接口
 */

public interface Api {
    //发送json数据形式的post请求,把网络请求接口的后半部分openapi/api/v写在里面
    //Ask是请求数据实体类,Take接受数据实体类
    @POST("openapi/api/v2")
    Call<Ask> saveUser(@Body Take take);
}
然后写我们的数据请求方法
/**
     * 请求数据
     *
     * @param text 输入框的发送数据
     */
    private void request(String text) {
//      把输入的文本数据存储在请求实体类中
        Ask ask = new Ask();
        Ask.UserInfoBean info = new Ask.UserInfoBean();
        info.setApiKey("c00282de107144fb940adab994d9ff98");//将机器人的key值填入
        info.setUserId("225167");//将用户id填入
        ask.setUserInfo(info);
        Ask.PerceptionBean.InputTextBean pre = new Ask.PerceptionBean.InputTextBean(text);//将要发送给机器人书文本天趣
        ask.setPerception(new Ask.PerceptionBean(pre));

//       创建Retrofit对象
        Retrofit retrofit = new Retrofit.Builder()
                .baseUrl("http://openapi.tuling123.com/")//设置网络请求url,后面一段写在网络请求接口里面
                .addConverterFactory(GsonConverterFactory.create())//Gson解析
                .build();
//       创建网络请求接口的实例
        Api api = retrofit.create(Api.class);
//      Take为响应实体类,用来接受机器人返回的回复数据
        Call<Take> call = api.request(ask);
//
        call.enqueue(new Callback<Take>() {
//          请求成功
            @Override
            public void onResponse(Call<Take> call, Response<Take> response) {
//              接受到的机器人回复的数据
                String mText= response.body().getResults().get(0).getValues().getText();
//              把接受到的数据传入addData方法中,类型是TYPE_RECEIVED接受数据
                addData(mText, Chat.TYPE_RECEIVED);
                L.d("接受到的机器人回复的数据: "+mText);
            }
//            请求失败
            @Override
            public void onFailure(Call<Take> call, Throwable t) {
                L.d("请求失败: "+t.toString());
            }
        });
    }
代码有点多,但逻辑比不复杂,首先我们创建一个请求实体类,并把我们的机器人key,userId以及要发送的文本数据传入,最后使用Retrofit进行网络请求,接受到返回的数据,把返回的数据和数据类型传入到我们的addData方法中,显示到RecyclerView界面上,当然,这个方法是要在按钮的点击事件中调用的,接下来看看Activity的完整代码
public class MainActivity extends AppCompatActivity implements View.OnClickListener {

    //  聊天消息列表
    private RecyclerView recyclerView;

    //  输入框
    private EditText editText;

    //  发送按钮
    private Button mButton;

    //    对话信息集合
    private List<Chat> list = new ArrayList<>();

    //    适配器
    private RecyclerViewAdapter recyclerViewAdapter;

    @Override
    protected void onCreate(Bundle savedInstanceState) {
        super.onCreate(savedInstanceState);
        setContentView(R.layout.activity_main);
//      初始化数据
        initView();
//       加载数据
        initData();
//      设置布局管理
        LinearLayoutManager linearLayoutManager = new LinearLayoutManager(this);
        recyclerView.setLayoutManager(linearLayoutManager);
        recyclerViewAdapter = new RecyclerViewAdapter(this, list);
        recyclerView.setAdapter(recyclerViewAdapter);
    }

    /**
     * 加载列表布局数据
     */
    private void initData() {
        Chat c1 = new Chat("你好,我叫阿紫", Chat.TYPE_RECEIVED);
        list.add(c1);
        Chat c2 = new Chat("你好,你现在会些什么呢?", Chat.TYPE_SENT);
        list.add(c2);
        Chat c3 = new Chat("我还在成长中,很多东西还不懂,但是你可以考考我", Chat.TYPE_RECEIVED);
        list.add(c3);
        Chat c4 = new Chat("1+1等于几?", Chat.TYPE_RECEIVED);
        list.add(c4);
    }

    /**
     * 初始化控件
     */
    private void initView() {
        recyclerView = findViewById(R.id.recycler);
        editText = findViewById(R.id.et_text);
        mButton = findViewById(R.id.btn_send);
        mButton.setOnClickListener(this);
    }

    @Override
    public void onClick(View view) {
        switch (view.getId()) {
            case R.id.btn_send:
                /**
                 * 1,获取输入框的内容
                 * 2,判断是否为空
                 * 3,发送后清空当前的输入框
                 */
//              1,获取输入框的内容
                String text = editText.getText().toString();
//              2,判断是否为空
                if (!TextUtils.isEmpty(text)) {
//                  把要发送的数据添加到addData方法中,并把数据类型也填入,这里我们的类型是TYPE_SENT,发送数据类型
                    addData(text, Chat.TYPE_SENT);
//                  清空输入框
                    editText.setText("");
//                  把发送的文本数据传递到request方法中,请求数据
                    request(text);
                }
                break;
        }
    }

    /**
     * 通过传递进来的test和type创建数据实体类,添加到聊天数据集合list中
     * @param text
     * @param type
     */
    private void addData(String text, int type) {
        Chat c = new Chat(text, type);
        list.add(c);
        //当有新消息时,刷新显示
        recyclerViewAdapter.notifyItemInserted(list.size() - 1);
        //定位的最后一行
        recyclerView.scrollToPosition(list.size() - 1);
    }

    /**
     * 请求数据
     *
     * @param text 输入框的发送数据
     */
    private void request(String text) {
//      把输入的文本数据存储在请求实体类中
        Ask ask = new Ask();
        Ask.UserInfoBean info = new Ask.UserInfoBean();
        info.setApiKey("c00282de107144fb940adab994d9ff98");//将机器人的key值填入
        info.setUserId("225167");//将用户id填入
        ask.setUserInfo(info);
        Ask.PerceptionBean.InputTextBean pre = new Ask.PerceptionBean.InputTextBean(text);//将要发送给机器人书文本天趣
        ask.setPerception(new Ask.PerceptionBean(pre));

//       创建Retrofit对象
        Retrofit retrofit = new Retrofit.Builder()
                .baseUrl("http://openapi.tuling123.com/")//设置网络请求url,后面一段写在网络请求接口里面
                .addConverterFactory(GsonConverterFactory.create())//Gson解析
                .build();
//       创建网络请求接口的实例
        Api api = retrofit.create(Api.class);
//      Take为响应实体类,用来接受机器人返回的回复数据
        Call<Take> call = api.request(ask);
//
        call.enqueue(new Callback<Take>() {
//          请求成功
            @Override
            public void onResponse(Call<Take> call, Response<Take> response) {
//              接受到的机器人回复的数据
                String mText= response.body().getResults().get(0).getValues().getText();
//              把接受到的数据传入addData方法中,类型是TYPE_RECEIVED接受数据
                addData(mText, Chat.TYPE_RECEIVED);
                L.d("接受到的机器人回复的数据: "+mText);
            }
//            请求失败
            @Override
            public void onFailure(Call<Take> call, Throwable t) {
                L.d("请求失败: "+t.toString());
            }
        });
    }
}