参考资料
Groovy
Gradle
- 书籍《Gradle in action》
- Gradle官方文档
- Gradle中文文档
- Groovy&Gradle总结
从移动应用到微服务,从小型创业公司到大企业,Gradle帮助团队更快地构建,自动化并交付更好的软件。
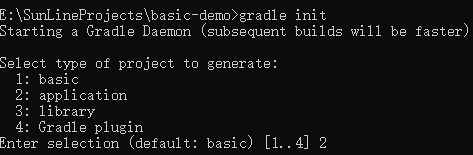
例子1:一个简单的Gradle项目
本例子将创建一个简单的Gradle项目,仅通过命令行调用一些基本的Gradle命令,主要目的是了解Gradle如何管理项目
准备环境
注:我的电脑系统是win10系统,所以相关命令行用的是cmd
Java环境
java version "1.8.0_171"
Java(TM) SE Runtime Environment (build 1.8.0_171-b11)
Java HotSpot(TM) 64-Bit Server VM (build 25.171-b11, mixed mode)
gradle环境
------------------------------------------------------------
Gradle 4.4
------------------------------------------------------------

Build time:   2017-12-06 09:05:06 UTC
Revision:     cf7821a6f79f8e2a598df21780e3ff7ce8db2b82

Groovy:       2.4.12
Ant:          Apache Ant(TM) version 1.9.9 compiled on February 2 2017
JVM:          1.8.0_171 (Oracle Corporation 25.171-b11)
OS:           Windows 10 10.0 amd64
初始化工程BasicDemo
新建BasicDemo文件,进入BasicDemo目录
E:\Java>md BasicDemo
E:\Java>cd BasicDemo

E:\Java\BasicDemo>
执行 init 任务(Task)
E:\Java\BasicDemo>gradle init

BUILD SUCCESSFUL in 1s
2 actionable tasks: 2 executed
任务执行后,查看初始化后默认的工程结构
E:\Java\BasicDemo>tree/F
卷 project 的文件夹 PATH 列表
卷序列号为 AF21-D274
E:.
│  build.gradle
│  gradlew
│  gradlew.bat
│  settings.gradle
│
├─.gradle
│  ├─4.4
│  │  ├─fileChanges
│  │  │      last-build.bin
│  │  │
│  │  ├─fileHashes
│  │  │      fileHashes.bin
│  │  │      fileHashes.lock
│  │  │
│  │  └─taskHistory
│  │          taskHistory.bin
│  │          taskHistory.lock
│  │
│  └─buildOutputCleanup
│          buildOutputCleanup.lock
│          cache.properties
│          outputFiles.bin
│
└─gradle
    └─wrapper
            gradle-wrapper.jar
            gradle-wrapper.properties
简单介绍下:
1.build.gradle:项目配置脚本,用于配置当前项目中的任务
2.gradle-wrapper.jar:Gradle Wrapper可执行文件JAR
3.gradle-wrapper.properties:Gradle Wrapper配置属性
4.gradlew:用于基于Unix的系统的Gradle Wrapper脚本
5.gradlew.bat:适用于Windows的Gradle Wrapper脚本
6.settings.gradle:用于配置哪些项目参与构建的设置配置脚本
查看脚本
build.gradle
/*
 * This build file was generated by the Gradle 'init' task.
 *
 * This generated file contains a commented-out sample Java project to get you started.
 * For more details take a look at the Java Quickstart chapter in the Gradle
 * user guide available at https://docs.gradle.org/4.4/userguide/tutorial_java_projects.html
 */

/*
// Apply the java plugin to add support for Java
apply plugin: 'java'

// In this section you declare where to find the dependencies of your project
repositories {
    // Use 'jcenter' for resolving your dependencies.
    // You can declare any Maven/Ivy/file repository here.
    jcenter()
}

// In this section you declare the dependencies for your production and test code
dependencies {
    // The production code uses the SLF4J logging API at compile time
    compile 'org.slf4j:slf4j-api:1.7.25'

    // Declare the dependency for your favourite test framework you want to use in your tests.
    // TestNG is also supported by the Gradle Test task. Just change the
    // testCompile dependency to testCompile 'org.testng:testng:6.8.1' and add
    // 'test.useTestNG()' to your build script.
    testCompile 'junit:junit:4.12'
}
*/
当前build.gradle没有任何可执行的脚本,只有一个应用java插件的模板脚本,脚本是被注释了的
setting.gradle
/*
 * This settings file was generated by the Gradle 'init' task.
 *
 * The settings file is used to specify which projects to include in your build.
 * In a single project build this file can be empty or even removed.
 *
 * Detailed information about configuring a multi-project build in Gradle can be found
 * in the user guide at https://docs.gradle.org/4.4/userguide/multi_project_builds.html
 */

/*
// To declare projects as part of a multi-project build use the 'include' method
include 'shared'
include 'api'
include 'services:webservice'
*/

rootProject.name = 'BasicDemo'
只有一句rootProject.name是设置项目名字的
查看默认的所有的Tasks
E:\Java\BasicDemo>gradlew tasks
Starting a Gradle Daemon (subsequent builds will be faster)

> Task :tasks

------------------------------------------------------------
All tasks runnable from root project
------------------------------------------------------------

Build Setup tasks
-----------------
init - Initializes a new Gradle build.
wrapper - Generates Gradle wrapper files.

Help tasks
----------
buildEnvironment - Displays all buildscript dependencies declared in root project 'BasicDemo'.
components - Displays the components produced by root project 'BasicDemo'. [incubating]
dependencies - Displays all dependencies declared in root project 'BasicDemo'.
dependencyInsight - Displays the insight into a specific dependency in root project 'BasicDemo'.
dependentComponents - Displays the dependent components of components in root project 'BasicDemo'. [incubating]
help - Displays a help message.
model - Displays the configuration model of root project 'BasicDemo'. [incubating]
projects - Displays the sub-projects of root project 'BasicDemo'.
properties - Displays the properties of root project 'BasicDemo'.
tasks - Displays the tasks runnable from root project 'BasicDemo'.

To see all tasks and more detail, run gradlew tasks --all

To see more detail about a task, run gradlew help --task <task>


BUILD SUCCESSFUL in 8s
1 actionable task: 1 executed
gradlew tasks相当于让gradle执行本项目的tasks任务,该任务会列出所有的task,有上面的内容可以知道:
在Build Setup 任务组里面有init,wrapper两个task,Help任务组里面有buildEnvironment,components等任务,每项任务后面有介绍。
所以这些任务是通用的,不管是什么项目都会有这些基本的Task
创建一个Task
Gradle提供了用于通过基于Groovy或Kotlin的DSL创建和配置任务的API。一个项目通常包括多个任务组,每个任务组里的每个任务都执行一些基本操作。通过这些任务的组合,依赖构成了一个项目的比如说编译,打包,调式等过程,实际上IDEA那些按钮最终执行的也是这些任务
Gradle附带一个可以在自己的项目中配置的任务库,所以我们可以利用这些任务库来定义自己想实现的任务
例子:复制文件,将src文件夹里的文件复制到dest文件夹中
步骤:
- 创建一个src文件夹
E:\Java\BasicDemo>md src
2.在src目录下放一个文件,比如myfile.txt
E:\Java\BasicDemo>cd src

E:\Java\BasicDemo\src>type nul>myfile.txt
3.在build.gradle定义copy这个任务
task copy(type: Copy, group: "Custom", description: "Copies sources to the dest directory"){
    from "src"
    into "dest"
}
4.在看看现在该项目有没有我定义的copy任务
E:\Java\BasicDemo>gradlew tasks

> Task :tasks

------------------------------------------------------------
All tasks runnable from root project
------------------------------------------------------------

Build Setup tasks
-----------------
init - Initializes a new Gradle build.
wrapper - Generates Gradle wrapper files.

Custom tasks
------------
copy - Copies sources to the dest directory

Help tasks
----------
buildEnvironment - Displays all buildscript dependencies declared in root project 'BasicDemo'.
components - Displays the components produced by root project 'BasicDemo'. [incubating]
dependencies - Displays all dependencies declared in root project 'BasicDemo'.
dependencyInsight - Displays the insight into a specific dependency in root project 'BasicDemo'.
dependentComponents - Displays the dependent components of components in root project 'BasicDemo'. [incubating]
help - Displays a help message.
model - Displays the configuration model of root project 'BasicDemo'. [incubating]
projects - Displays the sub-projects of root project 'BasicDemo'.
properties - Displays the properties of root project 'BasicDemo'.
tasks - Displays the tasks runnable from root project 'BasicDemo'.

To see all tasks and more detail, run gradlew tasks --all

To see more detail about a task, run gradlew help --task <task>


BUILD SUCCESSFUL in 1s
1 actionable task: 1 executed
可以看到在Custom tasks已经有copy这个任务了
5.最后执行copy任务,看是不是真的有效果
E:\Java\BasicDemo>gradlew copy

BUILD SUCCESSFUL in 1s
1 actionable task: 1 executed
E:\Java\BasicDemo>tree/F
卷 project 的文件夹 PATH 列表
卷序列号为 AF21-D274
E:.
│  build.gradle
│  gradlew
│  gradlew.bat
│  settings.gradle
│
├─.gradle
│  ├─4.4
│  │  ├─fileChanges
│  │  │      last-build.bin
│  │  │
│  │  ├─fileHashes
│  │  │      fileHashes.bin
│  │  │      fileHashes.lock
│  │  │
│  │  └─taskHistory
│  │          taskHistory.bin
│  │          taskHistory.lock
│  │
│  └─buildOutputCleanup
│          buildOutputCleanup.lock
│          cache.properties
│          outputFiles.bin
│
├─dest
│      myfile.txt
│
├─gradle
│  └─wrapper
│          gradle-wrapper.jar
│          gradle-wrapper.properties
│
└─src
        myfile.txt
可以看到,src目录下的文件已经复制到dest文件夹里了,证明自定义的copy任务是可行的
应用一个Gradle插件
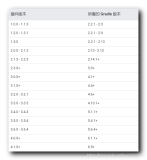
成千上万的任务怎么管理,不可能都放在一起吧,所以gradle用插件来集成一些具有特定功能的任务集合,比如要构建Android应用程序就要用com.android.application这个插件,构建java应用要用java这个插件,目前gradle里面已经有很多现成的插件了,可以https://plugins.gradle.org了解一下。其实很多开源框架附带有配套的gradle插件,你要是觉得不够自定义,自己也可以造一个
应用base插件
base插件里有一个Zip核心类型,我们可以用它来做一些文件压缩操作
1.在builde.gradle添加应用插件的脚本
...
plugins {
    id "base"
}
...
2.定义zip任务,将src文件压缩为basic-demo-1.0.zip
task zip(type: Zip, group: "Archive", description: "Archives sources in a zip file") {
    from "src"
    setArchiveName "basic-demo-1.0.zip"
}
3.执行zip任务
E:\Java\BasicDemo>gradlew zip

BUILD SUCCESSFUL in 1s
1 actionable task: 1 up-to-date
E:\Java\BasicDemo>tree/F
卷 project 的文件夹 PATH 列表
卷序列号为 AF21-D274
E:.
│  build.gradle
│  gradlew
│  gradlew.bat
│  settings.gradle
│
├─.gradle
│  ├─4.4
│  │  ├─fileChanges
│  │  │      last-build.bin
│  │  │
│  │  ├─fileHashes
│  │  │      fileHashes.bin
│  │  │      fileHashes.lock
│  │  │
│  │  └─taskHistory
│  │          taskHistory.bin
│  │          taskHistory.lock
│  │
│  └─buildOutputCleanup
│          buildOutputCleanup.lock
│          cache.properties
│          outputFiles.bin
│
├─build
│  └─distributions
│          basic-demo-1.0.zip
│
├─dest
│      myfile.txt
│
├─gradle
│  └─wrapper
│          gradle-wrapper.jar
│          gradle-wrapper.properties
│
└─src
        myfile.txt
可以看到build/distributions目录下有basic-demo-1.0.zip这个压缩文件,证明插件应用成功
探索和分析构建
查看可用的Task
执行gradlew tasks这句命令,可以查看当前项目可用的Task,包括基本插件添加的和你自己定义添加的
使用 build scan
Gradle还为您的构建提供了一个丰富的,基于Web的视图,称为构建扫描。
例子:在刚才的zip任务后面加上--scan
E:\Java\BasicDemo>gradlew zip --scan

BUILD SUCCESSFUL in 1s
1 actionable task: 1 up-to-date

Publishing a build scan to scans.gradle.com requires accepting the Terms of Service defined at https://scans.gradle.com/terms-of-service. Do you accept these terms? [yes, no]
yes
Gradle Cloud Services license agreement accepted.

Publishing build scan...
https://gradle.com/s/gfdgkrh3xihcu
然后进https://gradle.com/s/gfdgkrh3xihcu这个网址,填入你的邮箱,然后会发一封邮件给你,邮件里就有构建分析链接,界面如下图:
很有档次,那些大厂,有自己成熟的自动化流程才用这个功能吧
例子2 构建一个简单的Java应用程序
1.初始化项目BasicJava
新建BasicJava文件夹,使用gradle init命令
2.build.gradle添加java和application插件
apply plugin: 'java'
apply plugin: 'application'

repositories {
    jcenter()
}

//main函数所在路径
mainClassName = 'com.newtrekwang.basicjava.App'

dependencies {
    compile 'org.slf4j:slf4j-api:1.7.25'
    testCompile 'junit:junit:4.12'
}
java插件里有很多与java程序相关的构建任务;application插件有运行程序的任务;repositories设置依赖仓库来源,常见的就是jcenter();dependencies设置程序依赖的第三方库,构建的时候会从依赖仓库去下载,比如上面就依赖了slf4f和junit
3.执行gradlew tasks,看看有哪些任务
E:\Java\BasicJava>gradlew tasks

> Task :tasks

------------------------------------------------------------
All tasks runnable from root project
------------------------------------------------------------

Application tasks
-----------------
run - Runs this project as a JVM application

Build tasks
-----------
assemble - Assembles the outputs of this project.
build - Assembles and tests this project.
buildDependents - Assembles and tests this project and all projects that depend on it.
buildNeeded - Assembles and tests this project and all projects it depends on.
classes - Assembles main classes.
clean - Deletes the build directory.
jar - Assembles a jar archive containing the main classes.
testClasses - Assembles test classes.

Build Setup tasks
-----------------
init - Initializes a new Gradle build.
wrapper - Generates Gradle wrapper files.

Distribution tasks
------------------
assembleDist - Assembles the main distributions
distTar - Bundles the project as a distribution.
distZip - Bundles the project as a distribution.
installDist - Installs the project as a distribution as-is.

Documentation tasks
-------------------
javadoc - Generates Javadoc API documentation for the main source code.

Help tasks
----------
buildEnvironment - Displays all buildscript dependencies declared in root project 'BasicJava'.
components - Displays the components produced by root project 'BasicJava'. [incubating]
dependencies - Displays all dependencies declared in root project 'BasicJava'.
dependencyInsight - Displays the insight into a specific dependency in root project 'BasicJava'.
dependentComponents - Displays the dependent components of components in root project 'BasicJava'. [incubating]
help - Displays a help message.
model - Displays the configuration model of root project 'BasicJava'. [incubating]
projects - Displays the sub-projects of root project 'BasicJava'.
properties - Displays the properties of root project 'BasicJava'.
tasks - Displays the tasks runnable from root project 'BasicJava'.

Verification tasks
------------------
check - Runs all checks.
test - Runs the unit tests.

Rules
-----
Pattern: clean<TaskName>: Cleans the output files of a task.
Pattern: build<ConfigurationName>: Assembles the artifacts of a configuration.
Pattern: upload<ConfigurationName>: Assembles and uploads the artifacts belonging to a configuration.

To see all tasks and more detail, run gradlew tasks --all

To see more detail about a task, run gradlew help --task <task>


BUILD SUCCESSFUL in 1s
1 actionable task: 1 executed
4.新建Java源码包和编写Java源码
│
└─src
    └─main
        └─java
            └─com
                └─newtrekwang
                    └─basicjava
                            App.java
java插件默认以src/main/java目录下作为源码存放路径,你也可以在build.gradle里设置源码路径
App.java
package com.newtrekwang.basicjava;
public class App{
    public static void main(String[] args){
        System.out.println("hello world");
    }
}
记得在build.gradle里设置好入口函数的位置,我这里就是mainClassName = 'com.newtrekwang.basicjava.App'
5.执行gradle run 运行Java程序
E:\Java\BasicJava>gradlew run

> Task :run
hello world


BUILD SUCCESSFUL in 1s
2 actionable tasks: 1 executed, 1 up-to-date
- 打包为可执行的jar文件
在build.gradle里添加jar设置,java插件自带jar任务,必须要配置manifest,否则打出来的jar包没有入口函数不能执行。
jar{
      baseName = 'BasicJava'
      version   =  '2.0'
      manifest {
        attributes 'Main-Class': 'com.newtrekwang.basicjava.App'
      }
}
执行gradlew jar ,然后就可以在build/libs目录下看到生成的jar文件了
执行jar文件
E:\Java\BasicJava\build\libs>java -jar BasicJava-2.0.jar
hello world
例子3 构建Android应用程序(多模块)
构建Android应用程序主要是要用com.android.tools.build:gradle这个库里的com.android.application插件
因为Android Studio在创建项目的时候已经为我们生成了相关的文件夹和基本的脚本文件,所以我们直接用AS创建一个Android工程
比如我创建了个Test工程:
实际上这个目录结构与前面的BasicDemo很类似,可以看作就是在BasicDemo上扩展的,只不过用到的Gradle插件不同,所以文件夹结构也就有所不同。
根目录的build.gradle
因为Android项目一般是多模块的,就是一个项目可以有多个应用模块或者依赖模块,所以根目录的build.gradle里的内容一般与多模块的公共配置有关
// Top-level build file where you can add configuration options common to all sub-projects/modules.

buildscript {

    repositories {
        google()
        jcenter()
    }
    dependencies {
        classpath 'com.android.tools.build:gradle:3.1.2'


        // NOTE: Do not place your application dependencies here; they belong
        // in the individual module build.gradle files
    }
}

allprojects {
    repositories {
        google()
        jcenter()
    }
}

task clean(type: Delete) {
    delete rootProject.buildDir
}
包含buildscript和allproject两个块,还有个clean任务,buildscript配置脚本的来源和脚本类路径,repositories设置脚本仓库地址,dependencies设置依赖那个库,比如这里用的是com.android.tools.build:gradle:3.1.2,因为子模块要用application这个插件,不设置的话会获取不到这个插件。allprojects设置整个工程和子模块的依赖仓库来源,常见的就是google()和jcenter()
gradle脚本大量用到了groovy的闭包语法,闭包可以当方法参数,而且调用方法可以不用加点,不用加圆括号,不熟悉的同学可以先去练下groovy闭包
比如
allprojects {
    repositories {
        google()
        jcenter()
    }
}
实际上是执行了project对象的allprojects方法,传入了
{
    repositories {
        google()
        jcenter()
    }
}
这个闭包,然后闭包里又调用了project对象的repositories方法,传入了
{
        google()
        jcenter()
}
这个闭包,然后这个闭包里调用了RepositoryHandler对象的google()和jcenter()这两个方法(闭包是可以改代理的,所以repositories方法的实现肯定是改了闭包的代理的,因为默认的project对象没有google(),jcenter()这两个方法)
根目录的setting.gradle
include ':app'
配置项目包含哪些模块,比如这里有个app模块,那就把app这个文件夹添加上去
app目录下的build.gradle
apply plugin: 'com.android.application'

android {
    compileSdkVersion 28
    defaultConfig {
        applicationId "com.newtrekwang.test"
        minSdkVersion 18
        targetSdkVersion 28
        versionCode 1
        versionName "1.0"
        testInstrumentationRunner "android.support.test.runner.AndroidJUnitRunner"
    }
    buildTypes {
        release {
            minifyEnabled false
            proguardFiles getDefaultProguardFile('proguard-android.txt'), 'proguard-rules.pro'
        }
    }
}

dependencies {
    implementation fileTree(dir: 'libs', include: ['*.jar'])
    implementation 'com.android.support:appcompat-v7:28.0.0-alpha3'
    implementation 'com.android.support.constraint:constraint-layout:1.1.2'
    testImplementation 'junit:junit:4.12'
    androidTestImplementation 'com.android.support.test:runner:1.0.2'
    androidTestImplementation 'com.android.support.test.espresso:espresso-core:3.0.2'
}
首先应用了com.android.application这个插件,然后在相应的android,dependencies方法中通过闭包设置各种配置,依赖,具体指的是啥,这里暂时不展开叙述。
用AS查看Task
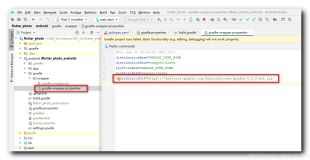
AS有个gradle工具窗口,从中可以查看所有的任务,这里是两个分组,一个总工程Test的,一个app模块的,再展开就能看到具体的task了,并且点击可以执行任务
例子4 模仿Android插件,定义一个简单的gradle插件
模仿结果:定义一个com.newtrekwang.application插件,可以配置类似如下的脚本,然后脚本运行后打印出所有的配置信息。主要目的是了解Android插件的执行流程,为什么可以这样配置
android {
    compileSdkVersion 28
    defaultConfig {
        applicationId "com.newtrekwang.test"
        minSdkVersion 18
        targetSdkVersion 28
        versionCode 1
        versionName "1.0"
        testInstrumentationRunner "android.support.test.runner.AndroidJUnitRunner"
    }
    buildTypes {
        release {
            minifyEnabled false
            proguardFiles getDefaultProguardFile('proguard-android.txt'), 'proguard-rules.pro'
        }
    }
}
1.为了快速构建,用IDEA新建一个gradle工程,build.gradle应用groovy和maven插件。
build.gradle
apply plugin: 'groovy'
apply plugin: 'maven'

group 'com.newtrekwang.androidtools'
version '1.0.0'

repositories {
    mavenCentral()
}

dependencies {
    compile gradleApi()
    compile localGroovy()
}

uploadArchives {
    repositories {
        mavenDeployer {
            //本地的Maven地址设置为D:\\ProgramData\\repository
            repository(url: 'file:D:\\ProgramData\\repository')
        }
    }
}
setting.gradle
rootProject.name = 'androidtools'
工程目录:
1.在/src/main/groovy里面编写插件源码,结构类似Java工程
因为android块里有defaultConfig块和buildTypes块,defaultConfig块里都是字段,所以定义一个Config类,buildTypes块里是数组,所以定义一个BuildType放单元素里的字段
Config.groovy
package com.newtrekwang.androidtools

class Config {
    String applicationId
    int minSdkVersion
    int targetSdkVersion
    int versionCode
    String versionName
    String testInstrumentationRunner

    @Override
    public String toString() {
        return "Config{" +
                "applicationId='" + applicationId + '\'' +
                ", minSdkVersion=" + minSdkVersion +
                ", targetSdkVersion=" + targetSdkVersion +
                ", versionCode=" + versionCode +
                ", versionName='" + versionName + '\'' +
                ", testInstrumentationRunner='" + testInstrumentationRunner + '\'' +
                '}';
    }
}
BuildType.groovy
class BuildType {
    String name
    Boolean minifyEnabled
    String fileName1
    String fileName2

    def proguardFiles(fileName1,fileName2){
       this.fileName1 = fileName1
        this.fileName2 = fileName2
    }
    def minifyEnabled(minifyEnabled){
        this.minifyEnabled = minifyEnabled
    }

    def  getDefaultProguardFile(s){
        return s
    }

    BuildType(name){
        this.name = name
    }


    @Override
    public String toString() {
        return "BuildType{" +
                "name='" + name + '\'' +
                ", minifyEnabled=" + minifyEnabled +
                ", fileName1='" + fileName1 + '\'' +
                ", fileName2='" + fileName2 + '\'' +
                '}';
    }
}
Androrid.groovy
package com.newtrekwang.androidtools

import org.gradle.api.NamedDomainObjectContainer
import org.gradle.api.model.ObjectFactory

class Android {
    Integer compileSdkVersion
    NamedDomainObjectContainer<BuildType> buildTypes
    Config config
    // 使闭包能够给compileSdkVersion赋值
    def compileSdkVersion(compileSdkVersion) {
        this.compileSdkVersion = compileSdkVersion
    }
    // 嵌套集合对象容器
    Android(NamedDomainObjectContainer<BuildType> buildTypes) {
        this.buildTypes = buildTypes
    }
    // 注入对象工厂
    def setConfig(ObjectFactory objectFactory) {
        config = objectFactory.newInstance(Config.class)
    }
    // 使闭包配置生效,给config设置配置值
    def defaultConfig(Closure closure) {
        closure.delegate = config
        closure()
    }
    // 固定用法,使buildTypes闭包配置生效
    def buildTypes(Closure closure) {
        buildTypes.configure closure
    }

    @Override
    public String toString() {
        return "Android{" +
                "compileSdkVersion=" + compileSdkVersion +
                ", buildTypes=" + buildTypes +
                ", config=" + config +
                '}';
    }
}
2.再resources/META-INF/gradle-plugins里面添加插件配置文件,我的插件名叫myapplication.所以文件名为myapplication.properties
implementation-class=com.newtrekwang.androidtools.MyAndroidPlugin
里面的内容是设置插件类的位置的
3.执行uploadArchives,打包插件为jar包并发布再指定路径
4.验证插件
为了区分开来,我新建了另一个项目TestPlugin,专门用来测试插件,目录结构如下
build.gradle
buildscript{
    repositories{
        mavenCentral()
        maven {
            // 插件jar所在仓库位置
            url  'file:D:\\ProgramData\\repository'
        }
    }
    dependencies {
        // 依赖路径
        classpath 'com.newtrekwang.androidtools:androidtools:1.0.0'
    }
}
app/build.gradle
apply plugin :'myapplication'

android {
    compileSdkVersion 28
    defaultConfig {
        applicationId  "com.newtrekwang.test"
        minSdkVersion   18
        targetSdkVersion   28
        versionCode   1
        versionName   "1.0"
        testInstrumentationRunner   "android.support.test.runner.AndroidJUnitRunner"
    }
    buildTypes {
        release {
            minifyEnabled  true
            proguardFiles getDefaultProguardFile("proguard-android.txt"), 'proguard-rules.pro'
        }
        debug {
            minifyEnabled  false
            proguardFiles getDefaultProguardFile("proguard-android.txt"), 'proguard-rules.pro'
        }
    }
}
app里的build.gradle完全模仿Android插件的配置样子,插件名改为我的myapplication
配置完毕,同步下工程,会发现有printConfig任务
最后执行printConfig任务
可以看到控制台打印了所有配置信息,验证完毕,达到模仿效果