目标
- 了解ApacheShiro是什么,能做什么;
- 通过QuickStart 代码领会 Shiro的关键概念;
- 能基于SpringBoot 整合Shiro 实现URL安全访问;
- 掌握基于注解的方法,以实现灵活定制。
一、Apache Shiro是什么
Apache Shiro 是一个强大且易用的Java安全框架,用于实现身份认证、鉴权、会话管理及加密功能。
框架提供了非常简单且易于上手的API,可以支持快速为web应用程序实现安全控制能力。
官网地址
github 地址
Shiro 能做什么
Apache Shiro 的设计初衷是让安全管理变得易于上手和容易理解,它可以实现:
- 鉴别用户身份,是否本系统注册的A用户;
- 管理用户权限,是否有某个角色,或某些权限;
- 即使没有web或EJB容器,也可以使用Session API
- 可以聚合一个或多个用户权限数据源并且以用户视图的形式统一表现出来
- 实现单点登录功能(SSO)
- 无需登录便可实现记住我这一功能
有什么特性
官网-Features
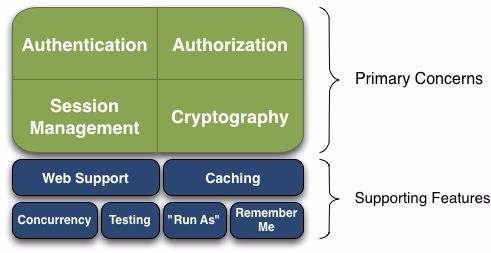
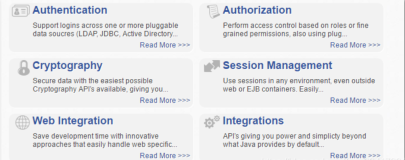
主要概念 包括了
Authentication(身份鉴别)、Authorization(权限管理)、Session Management(会话管理)、Cryptography(加密)
这号称软件安全的四大基石.. 关于几个概念,用下面的表格说明:
| 名称 | 解释 |
|---|---|
| Authentication(身份鉴别) | 指鉴别登录用户的身份 |
| Authorization(权限认证) | 决定用户是否有权访问某物 |
| Session Management(会话管理) | 支持独立的会话管理 |
| Cryptography(加密) | 利用加密算法保证数据安全 |
其他特性非核心,但是非常有用
-
web应用支持
如JavaEE、Spring的整合支持 -
缓存
用于提升安全管理的效率 -
并发
可支持多线程应用 -
测试
可以通过单元测试和集成测试验证程序的安全性 -
Run As
允许用户将某一身份赋予另一用户(在一些行政管理软件中常用) -
Remember Mes
在Session(会话)期间记住用户身份,当只有强制要求登录是才需要用户登录
架构说明
看看下面的图:

图中涉及了若干个模块,关于每个模块的大致作用如下:
Subject
交互实体,对应于当前用户。
SecurityManager
安全管理器,Shiro最核心的模块,管理各安全模块的工作;
Authenticator
身份鉴别组件,执行和反馈用户的认证(登录),
该组件从Realm中获取用户信息。
Authentication Strategy
如果配置了多个Realm,该怎么协调?这就用到策略
Authorizer
权限认证,顾名思义,就是用于负责用户访问控制的模块。
SessionManager
会话管理器,在Web环境中Shiro一般会沿用Servlet容器的会话。
但脱离了Web环境就会使用独立的会话管理。
SessionDAO
执行会话持久化的工具
CacheManager
一个缓存管理器,可为 Shiro 的其他组件提供缓存能力。
Cryptography
加密组件,提供了大量简单易用的安全加密API
到这里,不需要为这么多的模块而苦恼,在使用Shiro时,只需要牢牢记住下面的实体关系,便不会产生理解上的困难。
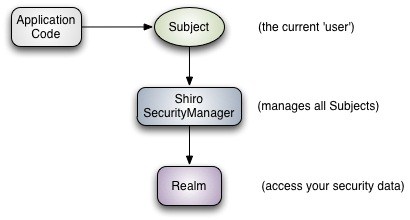
简而言之
应用程序依赖于 Subject 实体来标识当前的用户,而SecurityManager 则通过Realm接口读取数据,进而实现 Subject 的关联管理。
二、快速入门
为了帮助读者更快速理解Shiro,下面上一段QuickStart的代码
// 加载 shiro.ini并构造 SecurityManager
Factory<org.apache.shiro.mgt.SecurityManager> factory = new IniSecurityManagerFactory("classpath:shiro.ini");
org.apache.shiro.mgt.SecurityManager securityManager = factory.getInstance();

// 设置当前的 SecurityManager对象
SecurityUtils.setSecurityManager(securityManager);

// 获取当前用户
Subject currentUser = SecurityUtils.getSubject();

// 操作会话
Session session = currentUser.getSession();
session.setAttribute("someKey", "aValue");
String value = (String) session.getAttribute("someKey");
if (value.equals("aValue")) {
    log.info("Retrieved the correct value! [" + value + "]");
}

// 执行登录
if (!currentUser.isAuthenticated()) {
    UsernamePasswordToken token = new UsernamePasswordToken("lonestarr", "vespa");
    token.setRememberMe(true);
    try {
        currentUser.login(token);
    } catch (UnknownAccountException uae) {
        log.info("There is no user with username of " + token.getPrincipal());
    } catch (IncorrectCredentialsException ice) {
        log.info("Password for account " + token.getPrincipal() + " was incorrect!");
    } catch (LockedAccountException lae) {
        log.info("The account for username " + token.getPrincipal() + " is locked. "
                + "Please contact your administrator to unlock it.");
    } catch (AuthenticationException ae) {
        // unexpected condition? error?
    }
}

// 输出用户信息
log.info("User [" + currentUser.getPrincipal() + "] logged in successfully.");

// 检查角色
if (currentUser.hasRole("schwartz")) {
    log.info("May the Schwartz be with you!");
} else {
    log.info("Hello, mere mortal.");
}

// 检查权限
if (currentUser.isPermitted("lightsaber:weild")) {
    log.info("You may use a lightsaber ring. Use it wisely.");
} else {
    log.info("Sorry, lightsaber rings are for schwartz masters only.");
}

// 结束,执行注销
currentUser.logout();

System.exit(0);
上面这段代码来自 shiro-sample/QuickStart.java,
关于代码的解释.. 老司机认为看下注释是一定能懂的了。
三、SpringBoot 整合 Shiro
我们尝试将 Shiro 整合到 SpringBoot 项目,翻了下官网并没有太多介绍,
猜想这可能与 SpringBoot 框架还比较新有关系,Shiro是个老框架(2010年出的第一个版本)..
但最终老司机还是成功找到了 胶合组件:shiro-spring-boot-starter
接下来,为项目引入依赖:
<dependency>
    <groupId>org.apache.shiro</groupId>
    <artifactId>shiro-spring-boot-starter</artifactId>
    <version>1.4.0</version>
</dependency>
接下来,我们将完成一个 URL访问安全控制 的示例,通过这个案例
读者可以了解到如何根据业务定制必要的功能模块。
系统设计
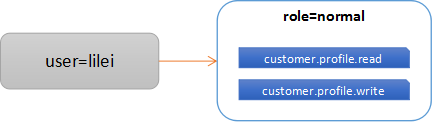
图示中,名为lilei 的用户拥有 normal (普通用户)的角色,而相应的具备customer.profile的读写权限。
以上是基于RBAC(基于角色的权限控制) 的设计,RBAC 目前的应用非常广泛
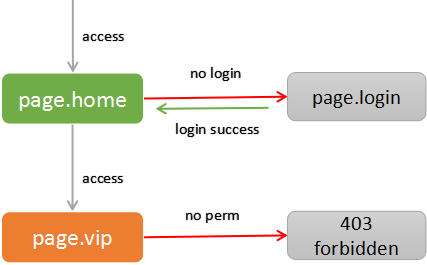
在 web应用访问中,某些页面是允许任何人访问的,某些需要登录用户,比如个人中心
而某些页面需要具备一些特权,比如vip资料.. 如下图所示:
用户模块
通常,在设计用户权限时都会考虑用户信息、角色信息以及对应的权限
用户实体
public static class UserInfo {
    private String username;
    private String passwordHash;
    private String salt;
需要注意到 salt是用于密码存储的加盐值(用于防止暴力破解)
passwordHash 是原始密码经过加盐哈希计算后的值(16进制形式)
角色实体
public static class RoleInfo {
    private String roleName;
    private List<String> perms;
为了简化,我们直接将权限用字符串形式表示,一个角色RoleInfo包含了一组权限perm。
用户管理器
在我们的样例中,需要实现一个UserManager类,用于做用户信息、权限信息的管理。
public class ShiroUserManager {

    // 用户表
    private final Map<String, UserInfo> users = new HashMap<String, UserInfo>();
    // 角色权限表
    private final Map<String, List<RoleInfo>> userRoles = new HashMap<String, List<RoleInfo>>();

    private static final Logger logger = LoggerFactory.getLogger(ShiroUserManager.class);

    // 密钥匹配类
    private ShiroHashMatcher matcher;

    public ShiroUserManager(ShiroHashMatcher matcher) {
        this.matcher = matcher;
    }

    public ShiroHashMatcher getMatcher() {
        return this.matcher;
    }

    @PostConstruct
    private void init() {

        // 预置信息
        register("lilei", "111111", "123");
        grant("normal", new RoleInfo("customer", "customer.profile.read"));
        grant("normal", new RoleInfo("customer", "customer.profile.write"));
    }

    /**
     * 获取用户信息
     *
     * @param username
     * @return
     */
    public UserInfo getUser(String username) {
        if (StringUtils.isEmpty(username)) {
            return null;
        }
        return users.get(username);
    }

    /**
     * 获取权限信息
     *
     * @param username
     * @return
     */
    public List<RoleInfo> getRoles(String username) {
        if (StringUtils.isEmpty(username)) {
            return Collections.emptyList();
        }
        return userRoles.get(username);
    }

    /**
     * 添加用户
     *
     * @param username
     * @param password
     * @param salt
     * @return
     */
    public UserInfo register(String username, String password, String salt) {
        if (StringUtils.isEmpty(username) || StringUtils.isEmpty(password) || StringUtils.isEmpty(salt)) {
            return null;
        }

        // 生成加盐密码Hash值
        String passwordHash = matcher.getCredentialHash(password, salt);

        logger.info("user {} register with passHash :{}", username, passwordHash);
        UserInfo user = new UserInfo(username, passwordHash, salt);
        users.put(username, user);

        return user;
    }

    /**
     * 授权操作
     *
     * @param username
     * @param role
     */
    public void grant(String username, RoleInfo role) {
        if (userRoles.containsKey(username)) {

            userRoles.get(username).add(role);
        } else {
            List<RoleInfo> roleList = new ArrayList<RoleInfo>();
            roleList.add(role);
            userRoles.put(username, roleList);
        }
}在上面的实现中,我们仅仅将用户、角色信息放在内存中管理,并内置了名为lilei的用户角色。
在真实应用中,用户权限需要通过持久层(DB)实现
密钥算法
我们基于Shiro的基础类HashedCredentialsMatcher进行了扩展。
选用SHA-256哈希算法,设置迭代次数为1024。
public class ShiroHashMatcher extends HashedCredentialsMatcher {

    public ShiroHashMatcher() {
        setHashAlgorithmName(Sha256Hash.ALGORITHM_NAME);
        setHashIterations(1024);
        setStoredCredentialsHexEncoded(true);
    }

    public String getCredentialHash(Object credentials, Object salt) {
        return new SimpleHash(this.getHashAlgorithmName(), credentials, salt, this.getHashIterations()).toHex();
    }
Realm实现
在Shiro 框架中, Realm 是用作用户权限信息查询的接口,我们的实现如下:
public class ShiroRealm extends AuthorizingRealm {

    private static final Logger logger = LoggerFactory.getLogger(ShiroRealm.class);

    private ShiroUserManager userManager;

    public ShiroRealm(ShiroUserManager userManager) {
        this.setCredentialsMatcher(userManager.getMatcher());
        this.userManager = userManager;
    }

    @Override
    protected AuthorizationInfo doGetAuthorizationInfo(PrincipalCollection principals) {
        logger.info("check authorization info");

        SimpleAuthorizationInfo authInfo = new SimpleAuthorizationInfo();

        // 获取当前用户
        UserInfo userInfo = (UserInfo) principals.getPrimaryPrincipal();

        // 查询角色信息
        List<RoleInfo> roleInfos = userManager.getRoles(userInfo.getUsername());

        if (roleInfos != null) {
            for (RoleInfo roleInfo : roleInfos) {

                authInfo.addRole(roleInfo.getRoleName());

                if (roleInfo.getPerms() != null) {
                    for (String perm : roleInfo.getPerms()) {
                        authInfo.addStringPermission(perm);
                    }
                }
            }
        }

        return authInfo;
    }

    @Override
    protected AuthenticationInfo doGetAuthenticationInfo(AuthenticationToken token) throws AuthenticationException {
        logger.info("check authentication info");

        String username = (String) token.getPrincipal();

        // 获取用户信息
        UserInfo user = userManager.getUser(username);

        if (user == null) {
            return null;
        }

        SimpleAuthenticationInfo authenticationInfo = new SimpleAuthenticationInfo(user, user.getPasswordHash(),
                ByteSource.Util.bytes(user.getSalt()), getName());
        return authenticationInfo;
    }
Bean 注册
将实现好的 ShiroRealm 注册为Bean,并初始化 WebSecurityManager
    @Bean
    public DefaultWebSecurityManager securityManager() {
        DefaultWebSecurityManager securityManager = new DefaultWebSecurityManager();
        securityManager.setRealm(realm());
        return securityManager;
    }


    @Bean
    public ShiroRealm realm() {
        ShiroRealm realm = new ShiroRealm(userManager());
        return realm;
    }


    @Bean
    public ShiroUserManager userManager() {
        return new ShiroUserManager(matcher());
    }


    @Bean
    public ShiroHashMatcher matcher() {
        return new ShiroHashMatcher();
    }
定义拦截链
拦截器链通过 ShiroFilterFactoryBean实现定制,实现如下:
    @Bean
    public ShiroFilterFactoryBean filter(org.apache.shiro.mgt.SecurityManager securityManager) {
        logger.info("config shiro filter");
        ShiroFilterFactoryBean shiroFilterFactoryBean = new ShiroFilterFactoryBean();
        shiroFilterFactoryBean.setSecurityManager(securityManager);

        // 定义URL拦截链
        Map<String, String> filterChainDefinitionMap = new LinkedHashMap<String, String>();
        // 允许匿名用户访问首页
        filterChainDefinitionMap.put("/shiro/index", "anon");
        // 定义注销路径
        filterChainDefinitionMap.put("/shiro/logout", "logout");
        // 所有用户界面都需要身份验证,否则会跳转到loginurl,由FormAuthenticationFilter处理
        filterChainDefinitionMap.put("/shiro/user/**", "authc");
        // 为login路径定义拦截,由FormAuthenticationFilter处理
        filterChainDefinitionMap.put("/shiro/login", "authc");
        // 所有vip路径要求具备vip角色权限
        filterChainDefinitionMap.put("/shiro/vip/**", "roles[vip]");
        // 指定loginurl 路径
        shiroFilterFactoryBean.setLoginUrl("/shiro/login");
        // 登录成功后跳转路径
        shiroFilterFactoryBean.setSuccessUrl("/shiro/user/");
        // for un authenticated
        shiroFilterFactoryBean.setUnauthorizedUrl("/shiro/unauth");
        shiroFilterFactoryBean.setFilterChainDefinitionMap(filterChainDefinitionMap);

        // 自定义filters,可覆盖默认的Filter列表,参考 DefaultFilter
        Map<String, Filter> filters = new LinkedHashMap<String, Filter>();

        // 定制logout 过滤,指定注销后跳转到登录页(默认为根路径)
        LogoutFilter logoutFilter = new LogoutFilter();
        logoutFilter.setRedirectUrl("/shiro/login");
        filters.put("logout", logoutFilter);

        // 定制authc 过滤,指定登录表单参数
        FormAuthenticationFilter authFilter = new FormAuthenticationFilter();
        authFilter.setUsernameParam("username");
        authFilter.setPasswordParam("password");
        filters.put("authc", authFilter);

        shiroFilterFactoryBean.setFilters(filters);
        return shiroFilterFactoryBean;
    }
跟着老司机的注释,上面代码应该不难理解(尽管有点冗长),filterChainDefinitionMap的定义中,
key对应于url路径,而value则对应了过滤器的缩写,Shiro内置的过滤器可参考DefaultFilter枚举
| 配置 | 过滤器 | 功能 |
|---|---|---|
| anon | AnonymousFilter | 可匿名访问 |
| authc | FormAuthenticationFilter | form表单登录拦截 |
| authcBasic | BasicHttpAuthenticationFilter | basic登录拦截 |
| logout | LogoutFilter | 注销处理 |
| noSessionCreation | NoSessionCreationFilter | 禁止创建会话 |
| perms | PermissionsAuthorizationFilter | 指定权限 |
| port | PortFilter | 指定端口 |
| rest | HttpMethodPermissionFilter | HttpMethod转换 |
| roles | RolesAuthorizationFilter | 指定角色 |
| ssl | SslFilter | 需要https |
| user | UserFilter | 已登录或Rememberme |
深入一点
FormAuthenticationFilter 实现了表单登录的拦截逻辑:
- 如果当前没有登录,则跳转到 loginUrl;
- 如果是登录请求,则执行登录操作,成功后跳转到 loginSuccessUrl
- 如果登录失败,将当前的异常信息写入请求上下文,由业务处理。
扒一扒源码,可以看到相应的逻辑实现:
protected boolean onAccessDenied(ServletRequest request, ServletResponse response) throws Exception {
        if (isLoginRequest(request, response)) {
            if (isLoginSubmission(request, response)) {
                if (log.isTraceEnabled()) {
                    log.trace("Login submission detected.  Attempting to execute login.");
                }
                return executeLogin(request, response);
            } else {
                if (log.isTraceEnabled()) {
                    log.trace("Login page view.");
                }
                //allow them to see the login page ;)
                return true;
            }
        } else {
            if (log.isTraceEnabled()) {
                log.trace("Attempting to access a path which requires authentication.  Forwarding to the " +
                        "Authentication url [" + getLoginUrl() + "]");
            }
            saveRequestAndRedirectToLogin(request, response);
            return false;
        }
    }
isLoginSubmission 方法的判断中,认为来自 loginUrl 的 POST 请求就是登录操作。
protected boolean isLoginSubmission(ServletRequest request, ServletResponse response) {
        return (request instanceof HttpServletRequest) && WebUtils.toHttp(request).getMethod().equalsIgnoreCase(POST_METHOD);
    }
在登录失败后,写入上下文信息,这里使用的是异常类的名称
    protected boolean onLoginFailure(AuthenticationToken token, AuthenticationException e,
                                     ServletRequest request, ServletResponse response) {
        if (log.isDebugEnabled()) {
            log.debug( "Authentication exception", e );
        }
        setFailureAttribute(request, e);
        //login failed, let request continue back to the login page:
        return true;
    }

    protected void setFailureAttribute(ServletRequest request, AuthenticationException ae) {
        String className = ae.getClass().getName();
        request.setAttribute(getFailureKeyAttribute(), className);
    }
看到这里,你应该能理解为什么在过滤链定义中,loginUrl 也需要被拦截了。
filterChainDefinitionMap.put("/shiro/login", "authc");Controller 类
基于上面的分析后,我们便可以轻松的完成Controller的编写,如下:
@Controller
@RequestMapping("/shiro")
public class ShiroController {
/**
* 登录界面,展示登录表单
*
* @return
*/
@GetMapping("/login")
public String login() {
return "shiro/login";
}
/**
* 登录表单处理
*
* @return
*/
@PostMapping("/login")
public String doLogin(HttpServletRequest servletRequest, final RedirectAttributes redirectAttrs) {
// FormAuthenticationFilter已经做了登录校验处理,
// 若登录成功会跳转到loginSuccessUrl,这里只做异常处理
String errorException = (String) servletRequest
.getAttribute(FormAuthenticationFilter.DEFAULT_ERROR_KEY_ATTRIBUTE_NAME);
// 登录失败,errorException 非空
if (!StringUtils.isEmpty(errorException)) {
// 设置错误消息,执行跳转
redirectAttrs.addFlashAttribute("loginErrorMsg", "LoginFailed:" + errorException);
return "redirect:/shiro/login";
}
return "OK";
}
/**
* 用户信息界面
*
* @return
*/
@GetMapping("/user")
@ResponseBody
public String user() {
Subject subject = SecurityUtils.getSubject();
UserInfo user = (UserInfo) subject.getPrincipals().getPrimaryPrincipal();
return "Welcome back, " + user.getUsername();
}
/**
* VIP 用户信息界面
*
* @return
*/
@GetMapping("/vip")
@ResponseBody
public String userVip() {
Subject subject = SecurityUtils.getSubject();
UserInfo user = (UserInfo) subject.getPrincipals().getPrimaryPrincipal();
return "Hi, " + user.getUsername() + ", This is for the vip";
}
/**
* 匿名访问界面
*
* @return
*/
@GetMapping("/annon/*")
@ResponseBody
public String annon() {
return "this is the content anyone can access";
}
/**
* 无权限界面
*
* @return
*/
@GetMapping("/unauth")
@ResponseBody
public String unauth() {
return "you are no allow to access";
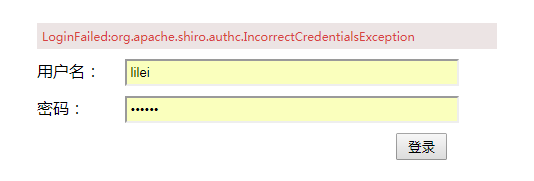
}登录页面
登录页面为一个简单的HTML界面,包含一个POST表单,使用username/password作为请求参数。
在登录失败时由Controller跳转回登录页,并显示出错信息,效果如下:
四、注解的使用
前面的例子演示了 Shiro的经典用法,然而,老司机认为注解会更好用。
Shiro 的注解是基于AOP实现的,在方法上声明所需要的权限,相比URL拦截要更加灵活。
shiro-spring-boot-starter 为我们自动注入了AOP 代理配置,可直接使用注解。
如果使用了注解,我们可以对url 启用匿名访问,这样访问控制则通过注解和异常处理来实现。
        // 对于所有shiroan路径一律不拦截
        filterChainDefinitionMap.put("/shiroan/**", "anon");
权限注解
    /**
     * vip 界面,需要vip角色
     *
     * @return
     */
    @RequiresRoles("vip")
    @GetMapping("/vip")
    @ResponseBody
    public String vip() {
        return "this is the vip info";
    }

    /**
     * home 界面,需要登录
     *
     * @return
     */
    @RequiresAuthentication
    @GetMapping("/home")
    @ResponseBody
    public String home() {
        return "this is the home page";
    }

    /**
     * 资料界面,需要资料权限
     *
     * @return
     */
    @RequiresPermissions("customer.profile.read")
    @GetMapping("/profile")
    @ResponseBody
    public String profile() {
        return "this is the profile info";
    }

    /**
     * 读取相册界面,需要详情权限
     *
     * @return
     */
    @RequiresPermissions("customer.album.read")
    @GetMapping("/album")
    @ResponseBody
    public String album() {
        return "this is the album info";
    }
@RequiredRoles、@RequiredPermissions、@RequiredAuthentication 定义了方法执行所需的权限。
除此之外,Shiro还内置了其他注解,如下:
| 名称 | 功能 |
|---|---|
| @RequiresRoles | 指定的角色可以访问 |
| @RequiresPermissions | 指定的权限可以访问 |
| @RequiresAuthentication | 登录用户可以访问 |
| @RequiresGuest | 仅游客可以访问 |
| @RequiresUser | 已登录或 "记住我"的用户 |
在访问方法未通过权限检查时,会抛出AuthorizationException,我们需要定义一个拦截器进行处理
拦截器
    /**
     * 自定义拦截,处理鉴权异常
     *
     * @author atp
     *
     */
    @ControllerAdvice(assignableTypes = ShiroAnnotateController.class)
    public static class AuthExceptionHandler {

        @ExceptionHandler(value = { AuthorizationException.class })
        public ResponseEntity<String> handle(AuthorizationException e, HandlerMethod m) {

            logger.info("Authorization Failed {} -- {}", e.getClass(), e.getMessage());

            String msg = "not allow to access";
            if (e instanceof UnauthorizedException) {

                // 没有权限
                msg = "you have no permissions";
            } else if (e instanceof UnauthenticatedException) {

                // 未登录
                msg = "you must login first";
            }
            return ResponseEntity.status(HttpStatus.FORBIDDEN).body(msg);
        }

    }
登录逻辑
同样,由于没有了过滤链,我们需要自行实现 login 逻辑,代码非常简单:
    /**
     * 模拟登录接口
     *
     * @param username
     * @param password
     * @return
     */
    @RequestMapping("/login")
    @ResponseBody
    public String login(@RequestParam("username") String username, @RequestParam("password") String password) {

        Subject subject = SecurityUtils.getSubject();
        AuthenticationToken token = new UsernamePasswordToken(username, password.toCharArray());

        try {
            // 执行登录
            subject.login(token);

        } catch (UnknownAccountException e) {

            // 未知用户
            logger.warn("the account {}  is not found", username);

            return "account not found";
        } catch (IncorrectCredentialsException e) {

            // 用户或密码不正确
            logger.warn("the account or password is not correct");
            return "account or password not correct";

        }
        return "login success";
}一些常见的登录异常如下表,可按业务需要使用:
| 异常 | 描述 |
|---|---|
| UnknownAccountException | 找不到用户 |
| IncorrectCredentialsException | 用户名密码不正确 |
| LockedAccountException | 用户被锁定 |
| ExcessiveAttemptsException | 密码重试超过次数 |
| ExpiredCredentialsException | 密钥已经过期 |
登出的代码:
    @RequestMapping("/logout")
    @ResponseBody
    public String logout() {

        Subject subject = SecurityUtils.getSubject();

        // 执行注销
        if (subject.isAuthenticated()) {
            subject.logout();
        }
        return "OK";
    }
深入一点
shiro-spring-boot-starter 为我们实现了大量的自动装配功能,如以下代码片段:
@SuppressWarnings("SpringFacetCodeInspection")
@Configuration
@ConditionalOnProperty(name = "shiro.annotations.enabled", matchIfMissing = true)
public class ShiroAnnotationProcessorAutoConfiguration extends AbstractShiroAnnotationProcessorConfiguration {

    @Bean
    @DependsOn("lifecycleBeanPostProcessor")
    @ConditionalOnMissingBean
    @Override
    public DefaultAdvisorAutoProxyCreator defaultAdvisorAutoProxyCreator() {
        return super.defaultAdvisorAutoProxyCreator();
    }

    @Bean
    @ConditionalOnMissingBean
    @Override
    public AuthorizationAttributeSourceAdvisor authorizationAttributeSourceAdvisor(SecurityManager securityManager) {
        return super.authorizationAttributeSourceAdvisor(securityManager);
    }
}其中,DefaultAdvisorAutoProxyCreator 是AOP实现的关键类,有兴趣可以继续深入了解
进一步扩展
Shiro 的功能非常灵活,本文中的样例仅供参考,如果要在生产环境中使用,你需要思考更多方面的东西:
- 用户信息、权限的存储需要数据库支持;
- 为了加速权限校验的性能,你可以使用Cache模块;
- 更安全的检查,比如动态校验码,密码失败重试次数检查;
- 更通用的方案,比如JWT/OAUTH2.0 ,非常适用于微服务架构。
参考文档
Shiro-integrating-with-spring
Shiro-integrating-with-springboot
Shiro-1.2.x-refence-waylau
Shirot-SprintBoot优雅整合
小结
Apache Shiro 是一个强大易用的安全框架,其本身也提供了非常多的特性模块。
本文旨在介绍如何将Shiro与当前流行的SpringBoot 框架结合使用,并提供了极简单的案例。
笔者在问题求证过程中通过阅读部分源码,更深入理解了其框架原理。目前认为,Shiro强大之处
还在于框架保持了简单易用、灵活扩展的特点,相信这也是许多人青睐它的原因吧。
最后,欢迎继续关注"美码师的补习系列-springboot篇" ,如果觉得老司机的文章还不赖,请多多分享转发^-^