为入门者准备! (适用于 DotNetNuke Version 4.3.1 or higher) 使用 VB.NET 或 C#
这个教程向你演示如何创建一个使用DAL+“ExecuteSQL”方法的DotNetNuke模块,DAL+是DotNetNuke数据存取层(Data Access Layer, DAL)的一个扩展。
步骤
1. 安装Visual Studio Express (点击下载) 
2. 安装SQL Server Express (点击下载)
3. 使用下面两种方法中的一种安装DotNetNuke并创建一个DotNetNuke网站
l Setting-up the Development Environment (using IIS)
l Setting-up the Development Environment (without IIS)
4. 在Visual Studio,选择“Build”下的“Build Solution”,如果顺利通过编译,我们就可以进入下一步。
 是否已经具备开发的环境了?

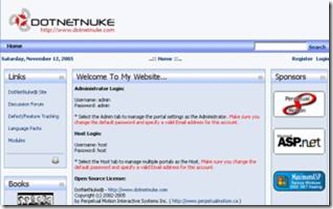
你必须有一个已经架好并能运行的DotNetNuke 4 网站才可以进行下一步,如果你没做到这一点,可以使用这个链接 和 这个链接 寻求帮助。
DotNetNuke不断的在更新,所以DotNetNuke的论坛 是寻找最新的帮助和信息最好的地方。
非常抱歉我没法为网站架设提供单独的技术支持,不过我会对跟本篇教程有关的问题提供帮助。
创建模块
创建模块的分为两步:
- 创建view控件
- 在DotNetNuke中注册这个模块
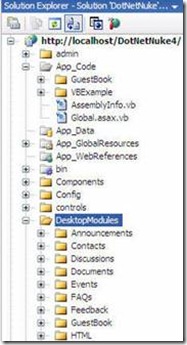 创建模块目录

在Visual Studio中打开你的DotNetNuke网站
 创建View控件

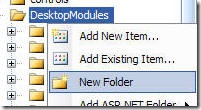
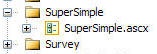
在"DesktopModules" 目录上右键,选择"New Folder"
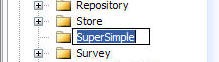 新建的目录命名为"SuperSimple"
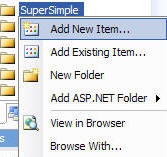 然后在"SuperSimple"目录上右键,选择 "Add New Item..."
点击"Add New Item"后出现一个对话框: 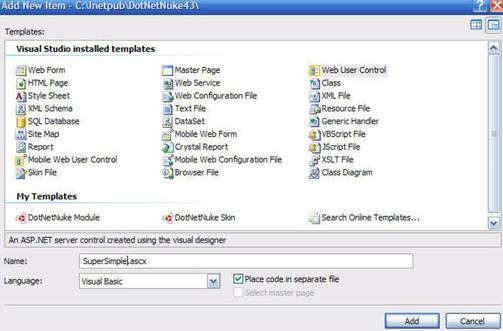
点击"Visual Studio Installed Templates"下的"Web User Control"
- 在"Name"后面输入"SuperSimple.ascx"
- 确保"Place code in a separate file"已经选中
- 点击"Add"按键
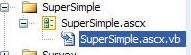
 一个"SuperSimple.ascx"文件会在"DesktopModules"目录下的"SuperSimple"目录内创建。
 点击文件旁边的“加号”就会显示现关联的code behind文件"SuperSimple.ascx.vb" (或者 "SuperSimple.ascx.cs").
 双击"SuperSimple.ascx"文件,主编辑窗口就会打开它,这个时候页面还只是一片空白。
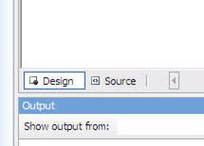
点击页面左下角的"Source"按键,转换到源代码视图。
输入如下的代码:
VB:
<%@ Control Language="VB" AutoEventWireup="false" CodeFile="SuperSimple.ascx.vb"
Inherits="DesktopModules_SuperSimple_SuperSimple" %>
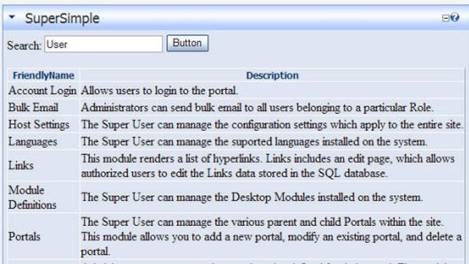
Search:
<asp:TextBox ID="txtSearch" runat="server"></asp:TextBox>
<asp:Button ID="btnSearch" runat="server" Text="Button" /><br />
<br />
<asp:GridView ID="GridView1" runat="server">
</asp:GridView>
C#:
<%@ Control Language="C#" AutoEventWireup="true" CodeFile="SuperSimple.ascx.cs"
Inherits="DesktopModules_SuperSimple_SuperSimple" %>
Search:
<asp:TextBox ID="txtSearch" runat="server"></asp:TextBox>
<asp:Button ID="btnSearch" runat="server" Text="Button" OnClick="btnSearch_Click" /><br />
<br />
<asp:GridView ID="GridView1" runat="server">
</asp:GridView>
 点击页面左下角的"Design"按键转换到设计视图
 双击"SuperSimple.ascx.vb" (或 "SuperSimple.ascx.cs")
把里面的代码用下面的代码完全替换:
VB:
Imports DotNetNuke

Imports System.Web.UI

Imports System.Collections.Generic

Imports System.Reflection

Imports DotNetNuke.Security.PortalSecurity

Partial Class DesktopModules_SuperSimple_SuperSimple

Inherits Entities.Modules.PortalModuleBase

Protected Sub Page_Load(ByVal sender As System.Object, ByVal e As System.EventArgs) Handles MyBase.Load

If Not Page.IsPostBack Then


ShowData("")

End If

End Sub

Protected Sub btnSearch_Click(ByVal sender As Object, ByVal e As System.EventArgs) Handles btnSearch.Click


ShowData(txtSearch.Text)

End Sub

Private Sub ShowData(ByVal SearchString As String)

Dim mySqlString As New StringBuilder()


mySqlString.Append("SELECT FriendlyName, Description ")


mySqlString.Append("FROM {databaseOwner}{objectQualifier}DesktopModules ")


mySqlString.Append("WHERE Description like '%' + @SearchString + '%' ")


mySqlString.Append("ORDER BY FriendlyName")

Dim myParam As SqlParameter = New SqlParameter("@SearchString", SqlDbType.VarChar, 150)


myParam.Value = SearchString

Me.GridView1.DataSource = CType(DataProvider.Instance().ExecuteSQL(mySqlString.ToString(), myParam), IDataReader)

Me.GridView1.DataBind()

End Sub

End Class
C#:
using DotNetNuke;

using System.Web.UI;

using System.Text;

using System.Collections.Generic;

using System.Reflection;

using DotNetNuke.Security;

using System.Data.SqlClient;

using System.Data;

using DotNetNuke.Data;


partial class DesktopModules_SuperSimple_SuperSimple : DotNetNuke.Entities.Modules.PortalModuleBase


{

protected void Page_Load(object sender, System.EventArgs e) {

if (!Page.IsPostBack)


{


ShowData("");


}


}

protected void btnSearch_Click(object sender, System.EventArgs e) {


ShowData(txtSearch.Text);


}

private void ShowData(string SearchString) {


StringBuilder mySqlString = new StringBuilder();


mySqlString.Append("SELECT FriendlyName, Description ");


mySqlString.Append("FROM {databaseOwner}{objectQualifier}DesktopModules ");


mySqlString.Append("WHERE Description like \'%\' + @SearchString + \'%\' ");


mySqlString.Append("ORDER BY FriendlyName");


SqlParameter myParam = new SqlParameter("@SearchString", SqlDbType.VarChar, 150);


myParam.Value = SearchString;

this.GridView1.DataSource = ((IDataReader)(DataProvider.Instance().ExecuteSQL(mySqlString.ToString(), myParam)));

this.GridView1.DataBind();


}


}
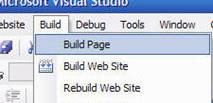
从BUILD 菜单下选择"Build Page".
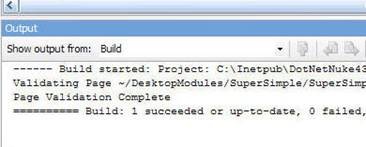 页面应该能通过编译
在 DotNetNuke中注册模块
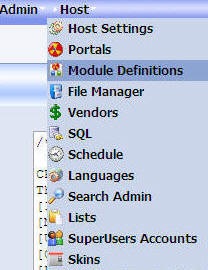 使用"host"登录到你的DotNetNuke站点,在菜单中选择"Host"然后选择 "Module Definitions"。
 点击左上角向下的小黑箭头,在出现的菜单中选择"Create New Module"。
在 Edit Module Definitions菜单里: 
- 在MODULE NAME处输入"SuperSimple"
- 在FOLDER TITLE处输入"SuperSimple"
- 在FRIENDLY TITLE处输入"SuperSimple"
- 在DESCRIPTION处输入"SuperSimple"
- 在VERSION处输入"1.0"
然后点击UPDATE
 在 NEW DEFINITION 输入 "SuperSimple"
然后点击 "Add"

然后点击 "Add Control"
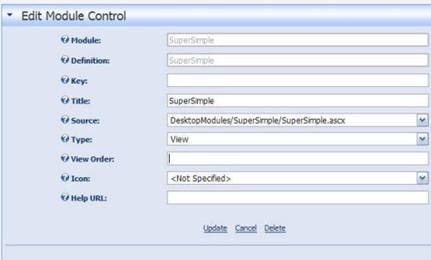
在 Edit Module Control 菜单里:
- 在TITLE处 输入 "SuperSimple"
- 在SOURCE处从下拉列表中选择 "DesktopModule/SuperSimple/SuperSimple.ascx"
- 在TYPE 处从下拉列表中选择"View"
然后点击 UPDATE
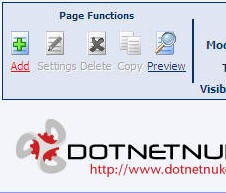
在网站的左上角的PAGE FUNCTIONS菜单里点击ADD。
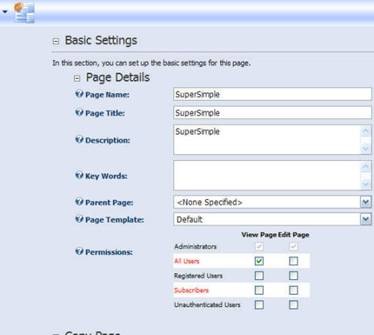 在PAGE MANAGEMENT 菜单的 PAGE DETAILS里:
- 在PAGE NAME 处输入"SuperSimple"
- 在 PAGE TITLE处输入"SuperSimple"
- 在DESCRIPTION处输入"SuperSimple"
- 在 VIEW PAGE 下面选中 ALL USERS
点击“UPDATE”
在 MODULE 的下拉列表中选择 "SuperSimple". 
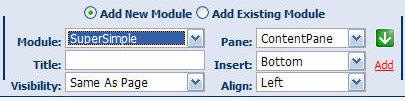
然后点击 ADD.
模块将在页面上显示
原为地址:http://www.adefwebserver.com/DotNetNukeHELP/DNN_ShowMeThePages/
本文译者m2land,转载请注明出处,作者博客地址:http://m2land.cnblogs.com