一、目标
- 了解 Restful 是什么,基本概念及风格;
- 能使用SpringBoot 实现一套基础的 Restful 风格接口;
- 利用Swagger 生成清晰的接口文档。
二、Restful 入门
什么是REST
摘自百科的定义:REST即表述性状态转移(英文:Representational State Transfer,简称REST)
是Roy Fielding博士(HTTP规范主要贡献者)在2000年的论文中提出来的一种软件架构风格。
是一种针对网络应用的设计和开发方式,可以降低开发的复杂性,提高系统的可伸缩性。
通俗点说,REST就是一组架构约束准则;在这些准则中,有不少是利用了现有的WEB标准能力。
而最终的目的则是简化当前业务层的设计及开发工作。
Restful API 则是指符合REST架构约束的API,关于这个词在早年前其实已经非常流行,但大多数开发者对其仍然
处于观望状态,并不一定会立即采用。这个相信与当时技术社区的成熟度及氛围是密切相关。
无论如何,在微服务架构如此流行的今天,Restful API已经成为了一种必备的的标准设计风格。
关键要点
理解 Restful 风格需要理解以下几点:
- 资源
资源指的就是一个抽象的信息实体,可以是一个用户、一首歌曲、一篇文章,只要是可作为引用的对象就是资源。
每个资源通常会被映射到一个URI,通过访问这个URI可以获取到信息。
- 资源的表述
资源表述(Representation)指的则是资源的外在表现形式
比如一个帖子,可以通过HTML格式展现,也可以通过XML、JSON等格式输出到客户端。
在前面的文章(SpringBoot-Scope详解)中提到,HTTP协议通过MIME来统一定义数据信息的格式标准。
通常,Accept、Content-Type可以用来指定客户端及服务端可接受的信息格式,而这个就是资源的表述
- 状态转移
在HTTP访问过程中,资源的状态发生变化。这里会涉及到以下的几个动词:
| 名称 | 语义 |
|---|---|
| GET | 获取资源 |
| POST | 新建资源 |
| PUT | 更新资源 |
| DELETE | 删除资源 |
对于不同的访问方法,服务器会产生对应的行为并促使资源状态产生转换。
关于无状态
Restful 是无状态的设计,这点意味着交互过程中的请求应该能包含所有需要的信息,
而不需要依赖于已有的上下文。
然而 JavaEE中存在一些违背的做法,比如Cookie中设置JSESSIONID,
在多次请求间传递该值作为会话唯一标识,这标识着服务端必须保存着这些会话状态数据。
PlayFramework框架实现了**无状态的Session,其将会话数据经过加密编码并置入Cookie中,
这样客户端的请求将直接携带上全部的信息,是无状态的请求,这点非常有利于服务端的可扩展性。
三、SpringBoot 实现 Restful
接下来,我们利用 SpringBoot 来实现一个Restful 风格的样例。
说明
基于 PetStore(宠物店) 的案例,实现对某顾客(Customer)名下的宠物(Pet)的增删改查。
1. 实体定义
Customer
public class Customer {

    private String name;

    public Customer() {
        super();
    }

    public Customer(String name) {
        super();
        this.name = name;
    }

    public String getName() {
        return name;
    }

    public void setName(String name) {
        this.name = name;
    }

}
Customer 只包含一个name属性,我们假定这是唯一的标志。
Pet
public class Pet {

    private String petId;
    private String name;
    private String type;
    private String description;

    public String getPetId() {
        return petId;
    }

    public void setPetId(String petId) {
        this.petId = petId;
    }

    public String getName() {
        return name;
    }

    public void setName(String name) {
        this.name = name;
    }

    public String getType() {
        return type;
    }

    public void setType(String type) {
        this.type = type;
    }

    public String getDescription() {
        return description;
    }

    public void setDescription(String description) {
        this.description = description;
    }

}
Pet 包含了以下几个属性
| 属性名 | 描述 |
|---|---|
| petId | 宠物ID编号 |
| name | 宠物名称 |
| type | 宠物类型 |
| description | 宠物的描述 |
2. URL资源
基于Restful 的原则,我们定义了以下的一组URL:
| 接口 | 方法 | URL |
|---|---|---|
| 添加宠物 | POST | /rest/pets/{customer} |
| 获取宠物列表 | GET | /rest/pets/{customer} |
| 获取宠物信息 | GET | /rest/pets/{customer}/{petId} |
| 更新宠物信息 | PUT | /rest/pets/{customer}/{petId} |
| 删除宠物 | DELETE | /rest/pets/{customer}/{petId} |
3. 数据管理
接下来实现一个PetManager 类,用于模拟在内存中对Pet数据进行增删改查
代码如下:
@Component
public class PetManager {

    private static Map<String, Customer> customers = new ConcurrentHashMap<String, Customer>();
    private static Map<String, Map<String, Pet>> pets = new ConcurrentHashMap<String, Map<String, Pet>>();

    @PostConstruct
    public void init() {
        String[] customerNames = new String[] { "Lilei", "Hanmeimei", "Jim Green" };

        for (String customerName : customerNames) {
            customers.put(customerName, new Customer(customerName));
        }
    }

    /**
     * 获取customer
     *
     * @param customer
     * @return
     */
    public Customer getCustomer(String customer) {
        if (StringUtils.isEmpty(customer)) {
            return null;
        }
        return customers.get(customer);
    }

    /**
     * 获取customer名下的 pet 列表
     *
     * @param customer
     * @return
     */
    public List<Pet> getPets(String customer) {
        if (StringUtils.isEmpty(customer)) {
            return Collections.emptyList();
        }

        if (!pets.containsKey(customer)) {
            return Collections.emptyList();
        }

        return pets.get(customer).values().stream().collect(Collectors.toList());
    }

    /**
     * 获取某个pet
     *
     * @param customer
     * @param petId
     * @return
     */
    public Pet getPet(String customer, String petId) {
        if (StringUtils.isEmpty(customer) || StringUtils.isEmpty(petId)) {
            return null;
        }

        if (!pets.containsKey(customer)) {
            return null;
        }
        return pets.get(customer).get(petId);
    }

    /**
     * 删除pet
     *
     * @param customer
     * @param petId
     * @return
     */
    public boolean removePet(String customer, String petId) {
        if (StringUtils.isEmpty(customer) || StringUtils.isEmpty(petId)) {
            return false;
        }

        if (!pets.containsKey(customer)) {
            return false;
        }
        return pets.get(customer).remove(petId) != null;
    }

    /**
     * 添加pet
     *
     * @param customer
     * @param pet
     * @return
     */
    public Pet addPet(String customer, Pet pet) {
        if (StringUtils.isEmpty(customer) || pet == null) {
            return null;
        }

        Map<String, Pet> customerPets = null;
        if (!pets.containsKey(customer)) {

            customerPets = new LinkedHashMap<String, Pet>();
            Map<String, Pet> previous = pets.putIfAbsent(customer, customerPets);

            // 已经存在
            if (previous != null) {
                customerPets = previous;
            }
        } else {
            customerPets = pets.get(customer);
        }

        if (pet.getPetId() == null) {
            pet.setPetId(UUID.randomUUID().toString());
        }

        customerPets.put(pet.getPetId(), pet);
        return pet;
    }

    /**
     * 更新某个pet
     *
     * @param customer
     * @param petPojo
     * @return
     */
    public Pet updatePet(String customer, Pet petPojo) {
        if (StringUtils.isEmpty(customer) || petPojo == null) {
            return null;
        }

        if (petPojo.getPetId() == null) {
            return null;
        }

        Pet pet = getPet(customer, petPojo.getPetId());
        pet.setType(petPojo.getType());
        pet.setName(petPojo.getName());
        pet.setDescription(petPojo.getDescription());

        return pet;
    }

}
4. 控制层实现
SpringBoot 提供了 @RestController,用于快速定义一个Restful 风格的Controller类
@RestController=@ResponseBody + @Controller
@RestController
@RequestMapping("/rest/pets/{customer}")
public class RestApiController {

    @Autowired
    private PetManager dataManager;

    /**
     * 添加宠物
     *
     * @param customer
     * @param pet
     * @return
     */
    @PostMapping
    public ResponseEntity<Object> addPet(@PathVariable String customer, @RequestBody Pet pet) {
        validateCustomer(customer);

        Pet newPet = dataManager.addPet(customer, pet);

        // 返回 201.created
        if (newPet != null) {
            URI location = ServletUriComponentsBuilder.fromCurrentRequest().path("/{petId}")
                    .buildAndExpand(newPet.getPetId()).toUri();

            return ResponseEntity.created(location).build();
        }

        // 返回 204.noContent
        return ResponseEntity.noContent().build();
    }

    /**
     * 获取宠物列表
     *
     * @param customer
     * @return
     */
    @GetMapping
    @ResponseBody
    public List<Pet> listPets(@PathVariable String customer) {
        validateCustomer(customer);

        List<Pet> pets = dataManager.getPets(customer);
        return pets;
    }

    /**
     * 获取某个宠物
     *
     * @param customer
     * @param petId
     */
    @GetMapping("/{petId}")
    @ResponseBody
    public Pet getPet(@PathVariable String customer, @PathVariable String petId) {
        validateCustomer(customer);
        validatePet(customer, petId);

        Pet pet = dataManager.getPet(customer, petId);
        return pet;
    }

    /**
     * 更新宠物信息
     *
     * @param customer
     * @param petId
     * @param pet
     */
    @PutMapping("/{petId}")
    public ResponseEntity<Object> updatePet(@PathVariable String customer, @PathVariable String petId, @RequestBody Pet pet) {
        validateCustomer(customer);
        validatePet(customer, petId);

        pet.setPetId(petId);
        Pet petObject = dataManager.updatePet(customer, pet);
        if (petObject != null) {
            return ResponseEntity.ok(petObject);
        }

        return ResponseEntity.noContent().build();

    }

    /**
     * 删除某个宠物
     *
     * @param customer
     * @param petId
     * @return
     */
    @DeleteMapping("/{petId}")
    public ResponseEntity<Object> removePet(@PathVariable String customer, @PathVariable String petId) {
        validateCustomer(customer);
        validatePet(customer, petId);

        dataManager.removePet(customer, petId);
        return ResponseEntity.ok().build();
    }
上述代码中已经实现了完整的增删改查语义。
在Restful 风格的API 接口定义中,往往会引用 HTTP 状态码用于表示不同的结果,比如一些错误的状态类型。
这里我们Customer、Pet 进行存在性校验,若资源不存在返回404_NotFound。
    /**
     * 校验customer是否存在
     *
     * @param customer
     */
    private void validateCustomer(String customer) {
        if (dataManager.getCustomer(customer) == null) {
            throw new ObjectNotFoundException(String.format("the customer['%s'] is not found", customer));
        }
    }

    /**
     * 校验pet是否存在
     *
     * @param customer
     */
    private void validatePet(String customer, String petId) {
        if (dataManager.getPet(customer, petId) == null) {
            throw new ObjectNotFoundException(String.format("the pet['%s/%s'] is not found", customer, petId));
        }
    }
自定义异常拦截
    /**
     * 自定义异常,及拦截逻辑
     *
     * @author atp
     *
     */
    @SuppressWarnings("serial")
    public static class ObjectNotFoundException extends RuntimeException {

        public ObjectNotFoundException(String msg) {
            super(msg);
        }
    }

    @ResponseBody
    @ExceptionHandler(ObjectNotFoundException.class)
    @ResponseStatus(HttpStatus.NOT_FOUND)
    public String objectNotFoundExceptionHandler(ObjectNotFoundException ex) {
        return ex.getMessage();
    }
5. 接口验证
1. 添加宠物
URL
POST http://{{server}}/rest/pets/LiLei
请求内容
{
 "name": "Smart Baby",
 "description": "very small and smart also.",
 "type": "Dog"
}
返回示例
201 created
Content-Length →0
Date →Mon, 09 Jul 2018 05:15:01 GMT
Location →http://localhost:8090/rest/pets/LiLei/b5400334-e7b3-42f1-b192-f5e7c3193543
2. 获取宠物列表
URL
GET http://{{server}}/rest/pets/LiLei
请求内容
<Empty>返回示例
200 OK
Content-Type →application/json;charset=UTF-8
Date →Mon, 09 Jul 2018 05:23:27 GMT
Transfer-Encoding →chunked
[
    {
        "petId": "b5400334-e7b3-42f1-b192-f5e7c3193543",
        "name": "Smart Baby",
        "type": "Dog",
        "description": "very small and smart also."
    },
    {
        "petId": "610780af-94f1-4011-a175-7a0f3895163d",
        "name": "Big Cat",
        "type": "Cat",
        "description": "very old but I like it."
    }
]
3. 查询宠物信息
URL
GET http://{{server}}/rest/pets/LiLei/b5400334-e7b3-42f1-b192-f5e7c3193543
请求内容
<Empty>返回示例
200 OK
Content-Type →application/json;charset=UTF-8
Date →Mon, 09 Jul 2018 05:25:24 GMT
Transfer-Encoding →chunked
{
    "petId": "b5400334-e7b3-42f1-b192-f5e7c3193543",
    "name": "Smart Baby",
    "type": "Dog",
    "description": "very small and smart also."
}
4. 更新宠物信息
URL
PUT http://{{server}}/rest/pets/LiLei/b5400334-e7b3-42f1-b192-f5e7c3193543
请求内容
{
 "name": "Big Cat V2",
 "description": "I don't like it any more",
 "type": "Cat"
}
返回示例
200 OK
Content-Type →application/json;charset=UTF-8
Date →Mon, 09 Jul 2018 05:31:28 GMT
Transfer-Encoding →chunked
{
    "petId": "a98e4478-e754-4969-851b-bcaccd67263e",
    "name": "Big Cat V2",
    "type": "Cat",
    "description": "I don't like it any more"
}
5. 删除宠物
URL
DELETE http://{{server}}/rest/pets/LiLei/b5400334-e7b3-42f1-b192-f5e7c3193543
请求内容
<empty>返回示例
200 OK
Content-Length →0
Date →Mon, 09 Jul 2018 05:32:51 GMT
相关出错
- 客户不存在:404 the customer['test'] is not found
- 宠物不存在:404 the pet['LiLei/b5400334-e7b3-42f1-b192-f5e7c31935431'] is not found
四、Swagger 的使用
关于Swagger
Swagger是目前非常流行的一个API设计开发框架(基于OpenApi),
可用于API的设计、管理、代码生成以及Mock测试等。
目前Swagger的应用非常广,其涵盖的开源模块也比较多,这里将使用swagger-ui实现API在线DOC的生成。
引入依赖
        <dependency>
            <groupId>io.springfox</groupId>
            <artifactId>springfox-swagger2</artifactId>
            <version>2.7.0</version>
        </dependency>


        <dependency>
            <groupId>io.springfox</groupId>
            <artifactId>springfox-swagger-ui</artifactId>
            <version>2.7.0</version>
        </dependency>
定义API配置
@EnableSwagger2
@Configuration
public class SwaggerConfig {
public static final String VERSION = "1.0.0";
@Value("${swagger.enable}")
private boolean enabled;
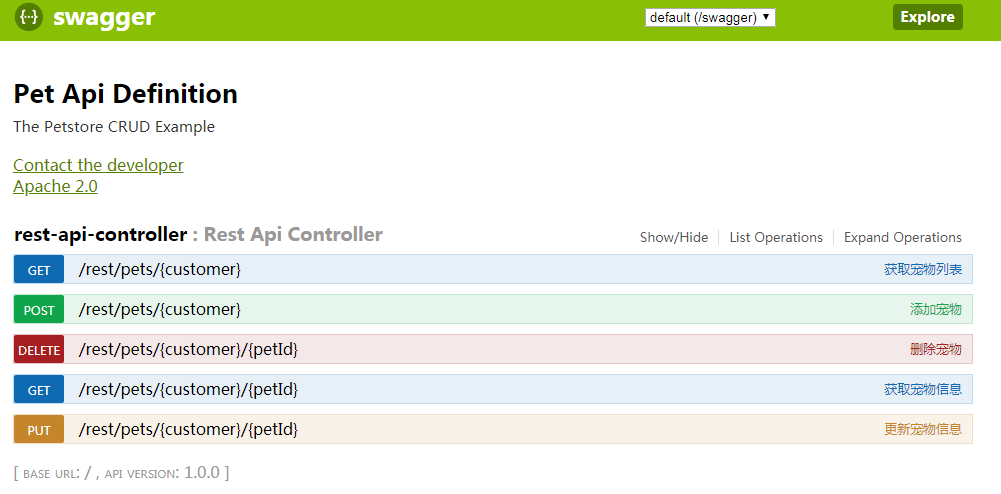
ApiInfo apiInfo() {
return new ApiInfoBuilder().
title("Pet Api Definition")
.description("The Petstore CRUD Example")
.license("Apache 2.0")
.licenseUrl("http://www.apache.org/licenses/LICENSE-2.0.html")
.termsOfServiceUrl("")
.version(VERSION)
.contact(new Contact("", "", "zalesfoo@163.com"))
.build();
}
@Bean
public Docket customImplementation() {
return new Docket(DocumentationType.SWAGGER_2).select()
.apis(RequestHandlerSelectors.withClassAnnotation(Api.class))
.build()
.enable(enabled)
.apiInfo(apiInfo());
}
}@EnableSwagger2声明了Swagger的启用,Docket的Bean定义是API配置的入口,
可以设置API名称、版本号,扫描范围等。
声明API描述
在原有的Controller 方法上添加关于API的声明,如下:
@Api(value = "Pet Restful api")
@RestController
@RequestMapping("/rest/pets/{customer}")
public class RestApiController {

    @ApiOperation("添加宠物")
    @ApiImplicitParams({
            @ApiImplicitParam(paramType = "path", name = "customer", dataType = "String", required = true, value = "客户名", defaultValue = ""),
            @ApiImplicitParam(paramType = "body", name = "pet", dataType = "Pet", required = true, value = "pet 请求", defaultValue = "") })
    @ApiResponses({
        @ApiResponse(code = 201, message = "添加成功"),
        @ApiResponse(code = 404, message = "资源不存在")
    })
    @PostMapping
    public ResponseEntity<Object> addPet(@PathVariable String customer, @RequestBody Pet pet) {
        ...
为了能描述返回对象的文档说明,为Pet类做API声明:
@ApiModel("宠物信息")
public class Pet {

    @ApiModelProperty(name="petId", value="宠物ID")
    private String petId;

    @ApiModelProperty(name="name", value="宠物名称")
    private String name;

    @ApiModelProperty(name="type", value="宠物类型")
    private String type;

    @ApiModelProperty(name="description", value="宠物描述")
    private String description;
相关的注解:
|注解 |描述 |
|-----|-----|
|@ApiModelProperty |用在出入参数对象的字段上 |
|@Api |用于controller类 |
|@ApiOperation |用于controller方法,描述操作 |
|@ApiResponses |用于controller方法,描述响应 |
|@ApiResponse |用于@ApiResponses内,描述单个响应结果 |
|@ApiImplicitParams |用于controller的方法,描述入参 |
|@ApiImplicitParam |用于@ApiImplicitParams内,描述单个入参 |
|@ApiModel |用于返回对象类 |
访问文档
最后,访问 http://localhost:8000/swagger_ui.html,可看到生成的文档界面:
参考文档
SpringBoot-tutorials-bookmarks
阮一峰-理解Restful架构
SprintBoot-使用Swagger发布API
swagger-2-documentation-for-spring-rest-api
欢迎继续关注"美码师的补习系列-springboot篇" ,期待更多精彩内容^-^