在activity的布局中,线性布局和表格布局是最简单的,这次分别从线性布局,表格布局以及线性布局和表格混合布局做了实验,实验中只需要编写 相应的xml的代码,java代码不需要更改,因为我们这里只是练习android的界面设计。参考的资料为mars老师的教程。
线性布局:
线性布局就是将各种控件按照行或者列依次进行排列。
其中本实验用到的各控件的属性解释如下:
android:layout_weight属性是指不同的控件在activity中占有体积大小的比例。
android:paddingLeft指内边距左的距离,即控件内文字离控件左边边界的距离。其它的类推。
android:gravity指控件内文字相对于控件本身的方向属性,长度为dip,与像素独立的长度。
android:background为控件内文字颜色的背景色,颜色采用rgb时前面需用”#”号.
android:textSize为文本的大小,单位为pt,即镑。
android:id为该控件的id,即在此处可以设置控件的id。
android:layout_width为控件本身的宽度属性,其它的类似。
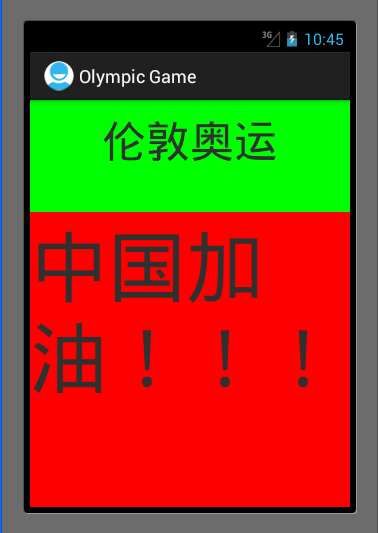
实验结果显示2行字,分别设置了不同的属性。
效果如下:

xml代码如下:
<LinearLayout xmlns:android="http://schemas.android.com/apk/res/android"
    xmlns:tools="http://schemas.android.com/tools" android:layout_width="match_parent" android:layout_height="match_parent" android:orientation="vertical" > <!-- 线性布局中 android:layout_weight属性是指不同的控件在activity中占有体积大小的比例。 android:paddingLeft指内边距左的距离,即控件内文字离控件左边边界的距离。其它的类推。 android:gravity指控件内文字相对于控件本身的方向属性,长度为dip,与像素独立的长度。 android:background为控件内文字颜色的背景色,颜色采用rgb时前面需用”#”号. android:textSize为文本的大小,单位为pt,即镑。 android:id为该控件的id,即在此处可以设置控件的id。 android:layout_width为控件本身的宽度属性,其它的类似。 --> <TextView android:id="@+id/London" android:layout_width="fill_parent" android:layout_height="wrap_content" android:text="伦敦奥运" android:textSize="20pt" android:background="#00ff00" android:gravity="center_horizontal" android:paddingLeft="10dip" android:paddingRight="10dip" android:paddingTop="10dip" android:paddingBottom="10dip" android:layout_weight="1" /> <TextView android:id="@+id/China" android:layout_width="fill_parent" android:layout_height="wrap_content" android:text="中国加油!!!" android:textSize="35pt" android:background="#ff0000" android:layout_weight="3" /> </LinearLayout>
表格布局:
表格布局有点类似表单的意思,可以在activity中建立多行,每一行又可以设置为多列,所以看起来横竖条理比较清晰,因此叫做表格布局。
表格布局各控件属性与线性布局类似,本实验用到的属性解释如下:
用TableRow来增加一行,然后该行内各列依次并排。
android:padding指的是内边距的4个方向都采用同样的间距。
android:stretchColumns属性表示当该行属性设置为填充屏幕时,指定将哪一列拉伸。
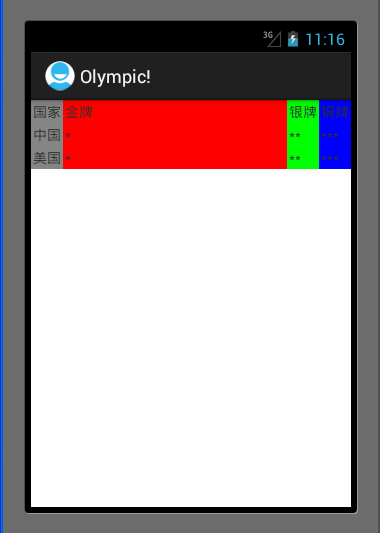
实验结果为显示2行,每一行又有4列。
效果如下:

xml代码如下:
<TableLayout xmlns:android="http://schemas.android.com/apk/res/android"
    xmlns:tools="http://schemas.android.com/tools" android:layout_width="match_parent" android:layout_height="match_parent" android:stretchColumns="1" > <TableRow> <TextView android:text="国家" android:background="#848484" android:padding="2dip" /> <TextView android:text="金牌" android:background="#ff0000" android:padding="2dip" /> <TextView android:text="银牌" android:background="#00ff00" android:padding="2dip" /> <TextView android:text="铜牌" android:background="#0000ff" android:padding="2dip" /> </TableRow> <TableRow > <TextView android:text="中国" android:background="#848484" android:padding="2dip" /> <TextView android:text="*" android:background="#ff0000" android:padding="2dip" /> <TextView android:text="**" android:background="#00ff00" android:padding="2dip" /> <TextView android:text="***" android:background="#0000ff" android:padding="2dip" /> </TableRow> <TableRow > <TextView android:text="美国" android:background="#848484" android:padding="2dip" /> <TextView android:text="*" android:background="#ff0000" android:padding="2dip" /> <TextView android:text="**" android:background="#00ff00" android:padding="2dip" /> <TextView android:text="***" android:background="#0000ff" android:padding="2dip" /> </TableRow> </TableLayout>
线性布局和表格布局混合:
混合布局原理类似,只是大的layout中嵌入小layout,且小layout中又可以嵌入不同的layout。
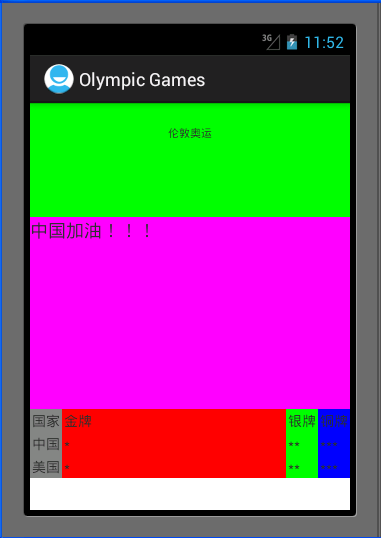
这次实验将上面的2个实验混合起来显示的,即总的布局为垂直方向上的线性布局,上面那个布局内部又为垂直方向的布局,下面那个布局为也是一个线性布局,不过里面嵌入了一个表格布局,所以总共有4个布局。
效果如下:

xml代码如下:
<LinearLayout xmlns:android="http://schemas.android.com/apk/res/android"
    xmlns:tools="http://schemas.android.com/tools" android:layout_width="match_parent" android:layout_height="match_parent" android:orientation="vertical"> <LinearLayout android:layout_width="fill_parent" android:layout_height="fill_parent" android:orientation="vertical" android:layout_weight="1" > <TextView android:id="@+id/London" android:layout_width="fill_parent" android:layout_height="wrap_content" android:text="伦敦奥运" android:textSize="5pt" android:background="#00ff00" android:gravity="center_horizontal" android:padding="10pt" android:layout_weight="1" /> <TextView android:id="@+id/China" android:layout_width="fill_parent" android:layout_height="wrap_content" android:text="中国加油!!!" android:textSize="8pt" android:background="#ff00ff" android:layout_weight="3" /> </LinearLayout> <LinearLayout android:layout_width="fill_parent" android:layout_height="fill_parent" android:layout_weight="3"> <TableLayout android:layout_width="match_parent" android:layout_height="match_parent" android:stretchColumns="1" > <TableRow> <TextView android:text="国家" android:background="#848484" android:padding="2dip" /> <TextView android:text="金牌" android:background="#ff0000" android:padding="2dip" /> <TextView android:text="银牌" android:background="#00ff00" android:padding="2dip" /> <TextView android:text="铜牌" android:background="#0000ff" android:padding="2dip" /> </TableRow> <TableRow > <TextView android:text="中国" android:background="#848484" android:padding="2dip" /> <TextView android:text="*" android:background="#ff0000" android:padding="2dip" /> <TextView android:text="**" android:background="#00ff00" android:padding="2dip" /> <TextView android:text="***" android:background="#0000ff" android:padding="2dip" /> </TableRow> <TableRow > <TextView android:text="美国" android:background="#848484" android:padding="2dip" /> <TextView android:text="*" android:background="#ff0000" android:padding="2dip" /> <TextView android:text="**" android:background="#00ff00" android:padding="2dip" /> <TextView android:text="***" android:background="#0000ff" android:padding="2dip" /> </TableRow> </TableLayout> </LinearLayout> </LinearLayout>
实验总结:
通过本次实验对activity的简单布局有了个初步的了解。
