很久以前的笔记了,翻出来整理下。
有用的资源
在Tomcat的webapps/examples/ 目录下有很多实用详细的jsp代码例子。
JSP的本质
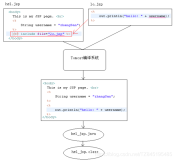
首先,JSP本质上是一个Servlet,jsp编绎器会把jsp文件编绎成一个对应的java类,而这个java类是实际上是一个servlet,从继承层次就可以看出来。
比如home.jsp,在tomcat下会生成一个home_jsp的类:
class home_jsp extends org.apache.jasper.runtime.HttpJspBase
class HttpJspBase extends javax.servlet.http.HttpServlet
Tomcat7生成为jsp对应的java代码在work目录下。如果是在eclipse里跑的tomcat,那么在eclipse的workspace/.metadata/.plugins/org.eclipse.wst.server.core/tmp1/work/Catalina/ 目录下。
一些JSP指令实际生成的代码
jsp:include指令:
<jsp:include page="xxx.jsp">
    <jsp:param name="age" value="20"/>
</jsp:include>org.apache.jasper.runtime.JspRuntimeLibrary.include(request, response, "xxx.jsp" + (("xxx.jsp").indexOf('?')>0? '&': '?') + org.apache.jasper.runtime.JspRuntimeLibrary.URLEncode("age", request.getCharacterEncoding())+ "=" + org.apache.jasper.runtime.JspRuntimeLibrary.URLEncode("20", request.getCharacterEncoding()), out, false);jsp:useBean,jsp:setProperty,jsp:getProperty 三个指令的本质:
<jsp:useBean id="s1" class="com.test.Student" scope="application"></jsp:useBean>
<jsp:setProperty name="s1" property="name" value="hello"/>pageContext = _jspxFactory.getPageContext(this, request, response,
null, true, 8192, true);
application = pageContext.getServletContext();
synchronized (application) {
s1 = (com.test.Student) _jspx_page_context.getAttribute("s1", PageContext.APPLICATION_SCOPE);
if (s1 == null){
s1 = new com.test.Student();
_jspx_page_context.setAttribute("s1", s1, PageContext.APPLICATION_SCOPE);
}
}
org.apache.jasper.runtime.JspRuntimeLibrary.introspecthelper(_jspx_page_context.findAttribute("s1"), "name", "hello", null, null, false);可见jsp:useBean实际上得到一个对象,并调用setAttribute函数设置为scope的一个属性。比如scope="application",则实际和下面的代码差不多:
com.test.Student s1 = application.getAttribute("s1");
synchronized (application) {
    if(s1 == null){
        s1 = new com.test.Student();
        application.setAttribute("s1", s1);
    }
}
值得注意的是PageContext,即application对象在setAttribute时,要加上sync同步,因为servlet不是线程安全的。但是实际上有很多人手写的代码都没有注意到这点。
Tomcat7中session的实现
Tomcat7中session是通过cookie来实现的。实际上只有当调用request.getSession()函数时,才会设置cookie来支持session。如:
HttpSession session = req.getSession();
resp.getWriter().println("session id:" + session.getId());
当设置浏览器禁止cookie时,可以发现每一次请求,打印的session id都是不一样的,即都会有一个新的cookie值。并且这时如果调用session.setAttribute函数设置一些属性,则会发现属性设置是无效的。
实际上通过查看Tomcat7的源代码可以发现,是用一个HashMap来保存session id和session的关系。如果请求中没有session id,则当调用getSession()函数时,会生成一个新的id和一个新的session。
Tomcat7源代码中相关部分如下:
//ManagerBase.java
protected Map<String, Session> sessions = new ConcurrentHashMap<String, Session>();

//Request.java
    protected Session doGetSession(boolean create) {

        // There cannot be a session if no context has been assigned yet
        if (context == null) {
            return (null);
        }

        // Return the current session if it exists and is valid
        if ((session != null) && !session.isValid()) {
            session = null;
        }
        if (session != null) {
            return (session);
        }

        // Return the requested session if it exists and is valid
        Manager manager = null;
        if (context != null) {
            manager = context.getManager();
        }
        if (manager == null)
         {
            return (null);      // Sessions are not supported
        }
        if (requestedSessionId != null) {
            try {
                session = manager.findSession(requestedSessionId);
            } catch (IOException e) {
                session = null;
            }
            if ((session != null) && !session.isValid()) {
                session = null;
            }
            if (session != null) {
                session.access();
                return (session);
            }
        }

        // Create a new session if requested and the response is not committed
        if (!create) {
            return (null);
        }
        if ((context != null) && (response != null) &&
            context.getServletContext().getEffectiveSessionTrackingModes().
                    contains(SessionTrackingMode.COOKIE) &&
            response.getResponse().isCommitted()) {
            throw new IllegalStateException
              (sm.getString("coyoteRequest.sessionCreateCommitted"));
        }

        // Attempt to reuse session id if one was submitted in a cookie
        // Do not reuse the session id if it is from a URL, to prevent possible
        // phishing attacks
        // Use the SSL session ID if one is present.
        if (("/".equals(context.getSessionCookiePath())
                && isRequestedSessionIdFromCookie()) || requestedSessionSSL ) {
            session = manager.createSession(getRequestedSessionId());
        } else {
            session = manager.createSession(null);
        }

        // Creating a new session cookie based on that session
        if ((session != null) && (getContext() != null)
               && getContext().getServletContext().
                       getEffectiveSessionTrackingModes().contains(
                               SessionTrackingMode.COOKIE)) {
            Cookie cookie =
                ApplicationSessionCookieConfig.createSessionCookie(
                        context, session.getIdInternal(), isSecure());

            response.addSessionCookieInternal(cookie);
        }

        if (session == null) {
            return null;
        }

        session.access();
        return session;
   }
Tomcat7的生成session id的算法
另外,还有一点很有意思的地方,Tomcat7的生成session id的算法:
可以看到里面的随机数用了SecureRandom。这个很多人都没有注意到这个,实际上很多安全相关的随机数生成器应该用SecureRandom,如果用Random,有可能会遭到攻击。
private void getRandomBytes(byte bytes[]) {

    SecureRandom random = randoms.poll();
    if (random == null) {
        random = createSecureRandom();
    }
    random.nextBytes(bytes);
    randoms.add(random);
}
/**
 * Generate and return a new session identifier.
 */
public String generateSessionId() {

    byte random[] = new byte[16];

    // Render the result as a String of hexadecimal digits
    StringBuilder buffer = new StringBuilder();

    int resultLenBytes = 0;

    while (resultLenBytes < sessionIdLength) {
        getRandomBytes(random);
        for (int j = 0;
        j < random.length && resultLenBytes < sessionIdLength;
        j++) {
            byte b1 = (byte) ((random[j] & 0xf0) >> 4);
            byte b2 = (byte) (random[j] & 0x0f);
            if (b1 < 10)
                buffer.append((char) ('0' + b1));
            else
                buffer.append((char) ('A' + (b1 - 10)));
            if (b2 < 10)
                buffer.append((char) ('0' + b2));
            else
                buffer.append((char) ('A' + (b2 - 10)));
            resultLenBytes++;
        }
    }

    if (jvmRoute != null && jvmRoute.length() > 0) {
        buffer.append('.').append(jvmRoute);
    }

    return buffer.toString();
}