预备知识: http://www.cnblogs.com/cgzl/p/7746496.html
第一部分: http://www.cnblogs.com/cgzl/p/7780559.html
第二部分: http://www.cnblogs.com/cgzl/p/7788636.html
上一部分简单的弄了个web api 并通过Client_Credentials和ResourceOwnerPassword两种方式获取token然后进行api请求.
这次讲一下Authentication 身份验证 (而Authorization是授权, 注意区分), 使用的是OpenIdConnect.
这次我们使用的是一个MVC客户端.
建立MVC客户端项目
在同一个解决方案建立一个名字叫MvcClient的asp.net core mvc 项目:
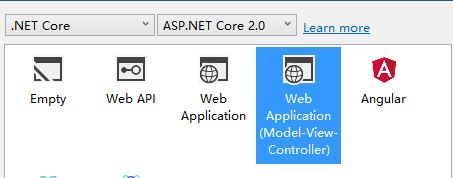
不要配置Authentication(身份验证), 应该是没有验证.
修改运行方式为控制台, 端口改为5002, 也就是修改launchSettings.json, 把IISExpress相关的去掉:
{
  "profiles": {
    "MvcClient": {
      "commandName": "Project",
      "launchBrowser": true,
      "environmentVariables": {
        "ASPNETCORE_ENVIRONMENT": "Development"
      },
      "applicationUrl": "http://localhost:5002/"
    }
  }
}
在HomeController的About方法上面添加Authorize属性:
        [Authorize]
        public IActionResult About()
        {
            ViewData["Message"] = "Your application description page.";

            return View();
        }
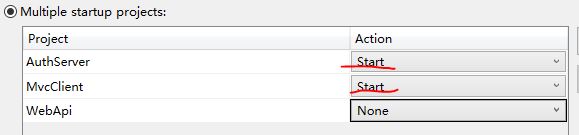
然后设置解决方案的启动项目为MvcClient和Authorization Server, 解决方案右键属性:
然后运行项目, 在http://localhost:5002 里点击About菜单:

就会出现以下异常 (500):

我们现在要做的就是, 用户点击About之后, 页面重定向到Authorization Server, 用户填写完信息之后登陆到Authorization Server之后再重定向回到该网站(MvcClient).
这也意味着用户是在Authorization Server使用用户名和密码, 而MvcClient不保存用户的用户名和密码.
下面就开始配置
添加OpenId Connect Authentication
在Startup的ConfigureServices里面添加:
public void ConfigureServices(IServiceCollection services)
        {
            services.AddMvc();

            JwtSecurityTokenHandler.DefaultInboundClaimTypeMap.Clear();
            services.AddAuthentication(options =>
            {
                options.DefaultScheme = "Cookies";
                options.DefaultChallengeScheme = "oidc";
            })
            .AddCookie("Cookies")
            .AddOpenIdConnect("oidc", options =>
            {
                options.SignInScheme = "Cookies";

                options.Authority = "http://localhost:5000";
                options.RequireHttpsMetadata = false;

                options.ClientId = "mvc_implicit";
                options.SaveTokens = true;
            });
        }
JwtSecurityTokenHandler.DefaultInboundClaimTypeMap.Clear(); 这句话是指, 我们关闭了JWT的Claim 类型映射, 以便允许well-known claims.
这样做, 就保证它不会修改任何从Authorization Server返回的Claims.
AddAuthentication()方法是像DI注册了该服务.
这里我们使用Cookie作为验证用户的首选方式: DefaultScheme = "Cookies".
而把DefaultChanllangeScheme设为"oidc"是因为, 当用户需要登陆的时候, 将使用的是OpenId Connect Scheme.
然后的AddCookie, 是表示添加了可以处理Cookie的处理器(handler).
最后AddOpenIdConnect是让上面的handler来执行OpenId Connect 协议.
其中的Authority是指信任的Identity Server ( Authorization Server).
ClientId是Client的识别标志. 目前Authorization Server还没有配置这个Client, 一会我们再弄.
Client名字也暗示了我们要使用的是implicit flow, 这个flow主要应用于客户端应用程序, 这里的客户端应用程序主要是指javascript应用程序. implicit flow是很简单的重定向flow, 它允许我们重定向到authorization server, 然后带着id token重定向回来, 这个 id token就是openid connect 用来识别用户是否已经登陆了. 同时也可以获得access token. 很明显, 我们不希望access token出现在那个重定向中. 这个一会再说.
一旦OpenId Connect协议完成, SignInScheme使用Cookie Handler来发布Cookie (中间件告诉我们已经重定向回到MvcClient了, 这时候有token了, 使用Cookie handler来处理).
SaveTokens为true表示要把从Authorization Server的Reponse中返回的token们持久化在cookie中.
注意正式生产环境要使用https, 这里就不用了.
接下来在Startup的Configure方法配置中间件, 以确保每次请求都执行authentication:
public void Configure(IApplicationBuilder app, IHostingEnvironment env)
        {
            if (env.IsDevelopment())
            {
                app.UseDeveloperExceptionPage();
                app.UseBrowserLink();
            }
            else
            {
                app.UseExceptionHandler("/Home/Error");
            }

            app.UseAuthentication();

            app.UseStaticFiles();
            app.UseMvc(routes =>
            {
                routes.MapRoute(
                    name: "default",
                    template: "{controller=Home}/{action=Index}/{id?}");
            });
        }
注意在管道配置的位置一定要在useMVC之前.
在Authorization Server添加Client
在Authorization Server的InMemoryConfiguration里面添加Client:
public static IEnumerable<Client> Clients()
        {
            return new[]
            {
                new Client
                {
                    ClientId = "socialnetwork",
                    ClientSecrets = new [] { new Secret("secret".Sha256()) },
                    AllowedGrantTypes = GrantTypes.ResourceOwnerPasswordAndClientCredentials,
                    AllowedScopes = new [] { "socialnetwork" }
                },
                new Client
                {
                    ClientId = "mvc_implicit",
                    ClientName = "MVC Client",
                    AllowedGrantTypes = GrantTypes.Implicit,
                    RedirectUris = { "http://localhost:5002/signin-oidc" },
                    PostLogoutRedirectUris = { "http://localhost:5002/signout-callback-oidc" },
                    AllowedScopes = new List<string>
                    {
                        IdentityServerConstants.StandardScopes.OpenId,
                        IdentityServerConstants.StandardScopes.Profile,
               "socialnetwork"
                    }
                }
            };
        }
ClientId要和MvcClient里面指定的名称一致.
OAuth是使用Scopes来划分Api的, 而OpenId Connect则使用Scopes来限制信息, 例如使用offline access时的Profile信息, 还有用户的其他细节信息.
这里GrantType要改为Implicit. 使用Implicit flow时, 首先会重定向到Authorization Server, 然后登陆, 然后Identity Server需要知道是否可以重定向回到网站, 如果不指定重定向返回的地址的话, 我们的Session有可能就会被劫持.
RedirectUris就是登陆成功之后重定向的网址, 这个网址(http://localhost:5002/signin-oidc)在MvcClient里, openid connect中间件使用这个地址就会知道如何处理从authorization server返回的response. 这个地址将会在openid connect 中间件设置合适的cookies, 以确保配置的正确性.
而PostLogoutRedirectUris是登出之后重定向的网址. 有可能发生的情况是, 你登出网站的时候, 会重定向到Authorization Server, 并允许从Authorization Server也进行登出动作.
最后还需要指定OpenId Connect使用的Scopes, 之前我们指定的socialnetwork是一个ApiResource. 而这里我们需要添加的是让我们能使用OpenId Connect的SCopes, 这里就要使用Identity Resources. Identity Server带了几个常量可以用来指定OpenId Connect预包装的Scopes. 上面的AllowedScopes设定的就是我们要用的scopes, 他们包括 openid Connect和用户的profile, 同时也包括我们之前写的api resource: "socialnetwork". 要注意区分, 这里有Api resources, 还有openId connect scopes(用来限定client可以访问哪些信息), 而为了使用这些openid connect scopes, 我们需要设置这些identity resoruces, 这和设置ApiResources差不多:
        public static IEnumerable<IdentityResource> GetIdentityResources()
        {
            return new List<IdentityResource>
            {
                new IdentityResources.OpenId(),
                new IdentityResources.Profile(),
            };
        }
然后我们需要配置Authorization Server来允许使用这些Identity Resources, Statup的:
public void ConfigureServices(IServiceCollection services)
        {
            services.AddIdentityServer()
                //.AddDeveloperSigningCredential()
                .AddSigningCredential(new X509Certificate2(@"D:\Projects\test\socialnetwork.pfx", "Bx@steel"))
                .AddInMemoryIdentityResources(InMemoryConfiguration.GetIdentityResources())
                .AddTestUsers(InMemoryConfiguration.Users().ToList())
                .AddInMemoryClients(InMemoryConfiguration.Clients())
                .AddInMemoryApiResources(InMemoryConfiguration.ApiResources());

            services.AddMvc();
        }
设置完了, 运行一下, 点击About菜单就会重定向到Authorization Server:
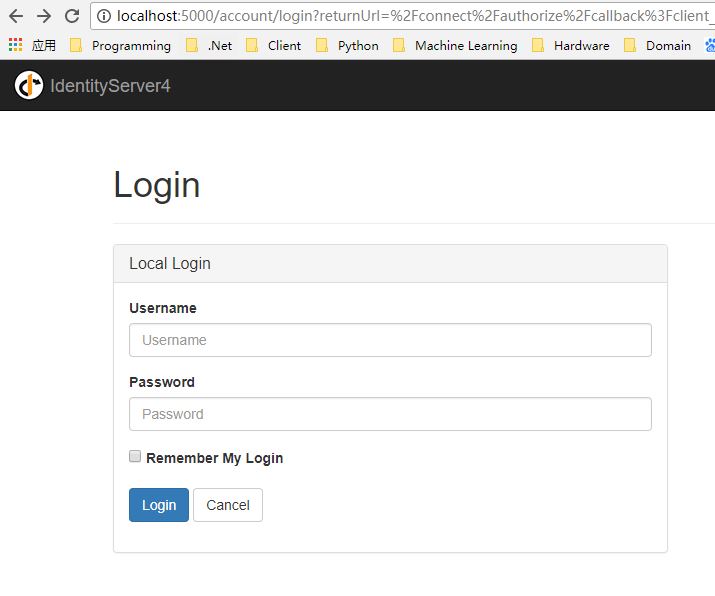
注意看URL, 我们确实是在Authorization Server.
然后输入用户名密码(TestUser的), 会看见一个请求允许的画面:
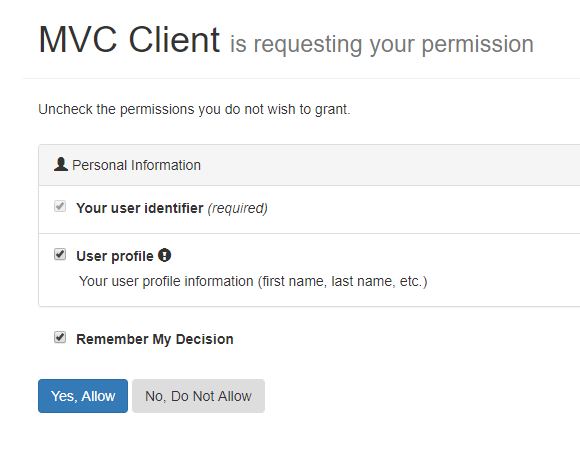
可以看到网站请求了Profile信息和User Identity.
这个时候看上面菜单处, 可以发现用户已经成功登陆了Authorization Server:
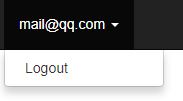
所以这就允许我们做SSO(Single Sign-On) 单点登录了. 这时候其他使用这个Authorization Server的Client应用, 由于用户已经登陆到Authorization Server了, 只需要请求用户的许可来访问用户的数据就行了.
然后点击同意 Yes Allow, 就会重定向返回MvcClient网站的About页面:

在View中显示Claims
打开MvcClient的About.cshtml:
<dl>
    @foreach (var claim in User.Claims)
    {
        <dt>@claim.Type</dt>
        <dd>@claim.Value</dd>
    }
</dl>
显示所有用户的Claims. Claims就是从Authorization Server返回的Payload里面的数据.
运行进入About页面:
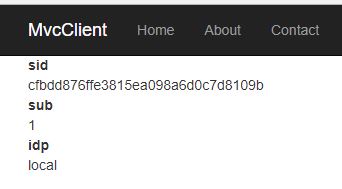
嗯当前用户有这些信息....
想要从MvcClient调用WebApi
我们现在想从MvcClient调用WebApi的api/Values节点, 这就需要使用从Authorization Server返回的token. 但是由于我们使用的是implicit flow, 而使用implicit flow, 一切数据都是被发送到Client的. 这就是说, 为了让MvcClient知道用户已经成功登陆了, Authorization Server将会告诉Client(Chrome浏览器)重定向回到MvcClient网站, 并附带着数据. 这意味着token和其他安全信息将会在浏览器里面被传递. 也就是说从Authorization Server发送access token的时候, 如果有人监听的话就会看见这些数据, 使用ssl能有效阻止监听到数据. 当然肯定有办法解决这个问题, 例如使用其他flow. 但是有时候还是必须要使用implicit flow 获取到access token. 我们需要做的就是告诉Authorization Server可以使用implicit flow来获取token.
首先我们把token显示出来:
@using Microsoft.AspNetCore.Authentication
<div>
    <strong>id_token</strong>
    <span>@await ViewContext.HttpContext.GetTokenAsync("id_token")</span>
</div>
<div>
    <strong>access_token</strong>
    <span>@await ViewContext.HttpContext.GetTokenAsync("access_token")</span>
</div>
<dl>
    @foreach (var claim in User.Claims)
    {
        <dt>@claim.Type</dt>
        <dd>@claim.Value</dd>
    }
</dl>
id_token是openid connect指定的, 你需要从authorization server获得它, 用来验证你的身份, 知道你已经登陆了. id_token不是你用来访问api的.
access_token是用来访问api的.
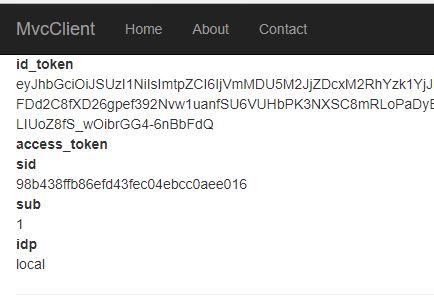
运行一下:
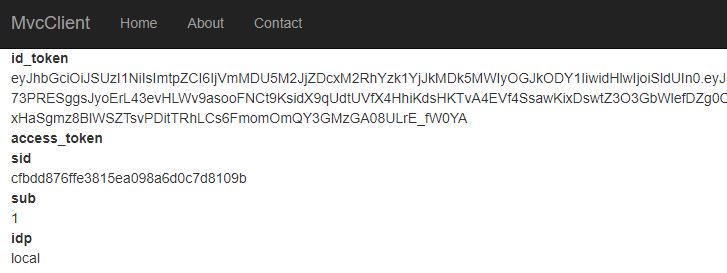
可以看到id_token有了, 而access_token没有, 这是因为我们还没有告诉Authorization Server在使用implicit flow时可以允许返回Access token.
修改Authorization Server的Client来允许返回Access Token
new Client
                {
                    ClientId = "mvc_implicit",
                    ClientName = "MVC Client",
                    AllowedGrantTypes = GrantTypes.Implicit,
                    RedirectUris = { "http://localhost:5002/signin-oidc" },
                    PostLogoutRedirectUris = { "http://localhost:5002/signout-callback-oidc" },
                    AllowedScopes = new List<string>
                    {
                        IdentityServerConstants.StandardScopes.OpenId,
                        IdentityServerConstants.StandardScopes.Profile,
                        "socialnetwork"
                    },
                    AllowAccessTokensViaBrowser = true
                }
在某种情况下还是不建议这么做.
然后在运行一下:
还是没有access token. 这是因为我们需要重新登陆来获取access token. 我们首先需要登出.
实现Logout 登出
在MvcClient的homeController添加方法:
        public async Task Logout()
        {
            await HttpContext.SignOutAsync("Cookies");
            await HttpContext.SignOutAsync("oidc");
        }
这里需要确保同时登出本地应用(MvcClient)的Cookies和OpenId Connect(去Identity Server清除单点登录的Session).
运行, 在浏览器输入地址: http://localhost:5002/Home/Logout
然后就会跳转到Identity Server的Logout了的页面:
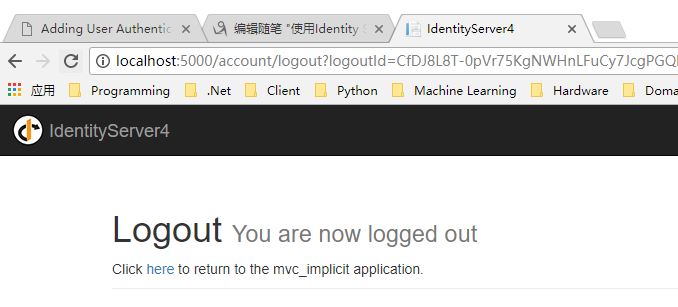
这写到, 点击here可以返回到mvcclient.
点击here, 回到mvcclient, 然后点击About, 重新登陆. 同意, 重定向回来:
还是没有access token.....
看看authorization server的控制台:
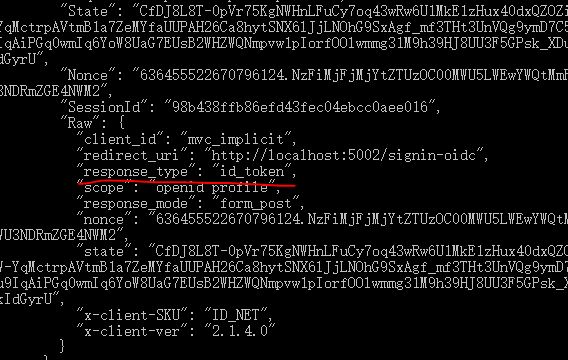
有个地方写到返回类型是id_token. 这表示我们要进行的是Authentication.
而我们想要的是既做Authentication又做Authorization. 也就是说我们既要id_token还要token本身.
这么做, 在MvcClient的CongifureServices:
public void ConfigureServices(IServiceCollection services)
        {
            services.AddMvc();

            JwtSecurityTokenHandler.DefaultInboundClaimTypeMap.Clear();
            services.AddAuthentication(options =>
            {
                options.DefaultScheme = "Cookies";
                options.DefaultChallengeScheme = "oidc";
            })
            .AddCookie("Cookies")
            .AddOpenIdConnect("oidc", options =>
            {
                options.SignInScheme = "Cookies";

                options.Authority = "http://localhost:5000";
                options.RequireHttpsMetadata = false;

                options.ClientId = "mvc_implicit";
                options.ResponseType = "id_token token";
                options.SaveTokens = true;
            });
        }
然后重新运行, 退出, 重登录:
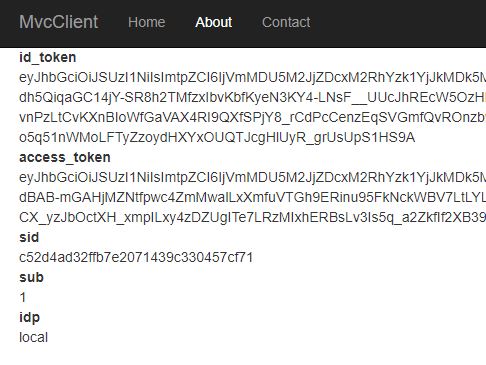
这次终于看到access_token了....
现在就可以使用access_token访问api了.
先写到这. 明后天继续.
下面是我的关于ASP.NET Core Web API相关技术的公众号--草根专栏: