By Hitesh Jethva, Alibaba Cloud Tech Share Author
Docker Swarm is a native clustering tool for Docker containers that can be used to manage a cluster of Docker nodes as a single virtual system. Docker Swarm allows you to add or subtract container iterations as computing demands change. Docker Swarm consists of two main components Manager node and Worker node. Manager node used for handling cluster management tasks such as, maintaining cluster state, scheduling services and serving swarm mode HTTP API endpoints. Worker node is a instance of Docker engine that can be used to execute container. The Swarm manager allows you to create a primary manager instance and multiple replica instances in case the primary instance fails. You can deploy manager and worker nodes at runtime in Docker engine's Swarm mode.
In this tutorial, we will go through the step by step instruction on configuring three node Docker Swarm cluster on CentOS 7.
Requirements
- Three Alibaba cloud instances with CentOS 7 installed. Out of which once server will act as a Manager node and two servers will act as Worker node.
- A static IP address is configured on all the instances. Here, we will use IP address 192.168.0.102 for Manager node, 192.168.0.103 for Worker node1 and 192.168.0.104 for Worker node2.
Launch Alibaba Cloud ECS Instance
First, Login to your https://ecs.console.aliyun.com/?spm=a3c0i.o25424en.a3.13.388d499ep38szx">Alibaba Cloud ECS Console. Create a new ECS instance, choosing CentOS 7 as the operating system with at least 2GB RAM. Connect to your ECS instance and log in as the root user.
Once you are logged into your CentOS 7 instance, run the following command to update your base system with the latest available packages.
yum update -y
Getting Started
Before starting, you will need to configure /etc/hosts file on each node, so each node can communicate with each other by hostname.
You can update the /etc/hosts file on each node as shown below:
nano /etc/hosts

192.168.0.102  managernode
192.168.0.103  workernode1
192.168.0.104  workernode2
Save and close the file when you are finished.
Next, you will need to configure hostname on each node as per /etc/hosts file.
You can do this by running the following command on each node one by one:
Manager node:
hostnamectl set-hostname managernode
Worker node1:
hostnamectl set-hostname workernode1
Worker node2
hostnamectl set-hostname workernode2
Install Docker Engine
Next, you will need to install Docker Community Edition on all the nodes. By default, the latest version of the Docker CE is not available in CentOS 7 repository. So you will need to add the Docker CE repository to your system.
You can do this by running the following command on all the nodes:
wget https://download.docker.com/linux/centos/docker-ce.repo -O /etc/yum.repos.d/docker.repo
Once the Docker repository is installed, run the following command to install Docker CE:
yum install docker-ce –y
Next, start Docker service and enable it to start on boot using the following command:
systemctl start docker
systemctl enable docker
Configure Firewall
Next, you will need to open ports 7946, 4789, 2376, 2377 and 80 on the firewall for a swarm cluster to work properly.
Run the following command on all the nodes:
firewall-cmd --permanent --add-port=2376/tcp
firewall-cmd --permanent --add-port=2377/tcp
firewall-cmd --permanent --add-port=7946/tcp
firewall-cmd --permanent --add-port=80/tcp
firewall-cmd --permanent --add-port=7946/udp
firewall-cmd --permanent --add-port=4789/udp
Finally, reload the firewall and Docker service to apply all the changes:
firewall-cmd --reload
systemctl restart docker
Create a Swarm
Next, you will need to initialize the swarm on the Manager node. You can do this by running docker swarm init command. This command will make your node as a manager node and advertising it's IP:
docker swarm init --advertise-addr 192.168.0.102
You should see the following output:
Swarm initialized: current node (viwovkb0bk0kxlk98r78apopo) is now a manager.

To add a worker to this swarm, run the following command:

    docker swarm join --token SWMTKN-1-3793hvb71g0a6ubkgq8zgk9w99hlusajtmj5aqr3n2wrhzzf8z-    1s38lymnir13hhso1qxt5pqru 192.168.0.102:2377

To add a manager to this swarm, run 'docker swarm join-token manager' and follow the instructions.
Note: Remember the token from the above output. This will be used to join worker nodes to the manager node later.
You can verify the status of Swarm cluster using the following command:
docker info
Output:
Containers: 0
 Running: 0
 Paused: 0
 Stopped: 0
Images: 0
Server Version: 17.12.0-ce
Storage Driver: devicemapper
 Pool Name: docker-253:0-618740-pool
 Pool Blocksize: 65.54kB
 Base Device Size: 10.74GB
 Backing Filesystem: xfs
 Udev Sync Supported: true
 Data file: /dev/loop0
 Metadata file: /dev/loop1
 Data loop file: /var/lib/docker/devicemapper/devicemapper/data
 Metadata loop file: /var/lib/docker/devicemapper/devicemapper/metadata
 Data Space Used: 11.8MB
 Data Space Total: 107.4GB
 Data Space Available: 3.817GB
 Metadata Space Used: 581.6kB
 Metadata Space Total: 2.147GB
 Metadata Space Available: 2.147GB
 Thin Pool Minimum Free Space: 10.74GB
 Deferred Removal Enabled: true
 Deferred Deletion Enabled: true
 Deferred Deleted Device Count: 0
 Library Version: 1.02.140-RHEL7 (2017-05-03)
Logging Driver: json-file
Cgroup Driver: cgroupfs
Plugins:
 Volume: local
 Network: bridge host macvlan null overlay
 Log: awslogs fluentd gcplogs gelf journald json-file logentries splunk syslog
Swarm: active
 NodeID: viwovkb0bk0kxlk98r78apopo
 Is Manager: true
 ClusterID: ttauawqrc8mmd0feluhcr1b0d
 Managers: 1
 Nodes: 1
 Orchestration:
  Task History Retention Limit: 5
 Raft:
  Snapshot Interval: 10000
  Number of Old Snapshots to Retain: 0
  Heartbeat Tick: 1
  Election Tick: 3
 Dispatcher:
  Heartbeat Period: 5 seconds
 CA Configuration:
  Expiry Duration: 3 months
  Force Rotate: 0
 Autolock Managers: false
 Root Rotation In Progress: false
 Node Address: 192.168.0.102
 Manager Addresses:
  192.168.0.102:2377
Runtimes: runc
Default Runtime: runc
Init Binary: docker-init
containerd version: 89623f28b87a6004d4b785663257362d1658a729
runc version: b2567b37d7b75eb4cf325b77297b140ea686ce8f
init version: 949e6fa
Security Options:
 seccomp
  Profile: default
Kernel Version: 3.10.0-693.11.1.el7.x86_64
Operating System: CentOS Linux 7 (Core)
OSType: linux
Architecture: x86_64
CPUs: 1
Total Memory: 1.102GiB
Name: centOS-7
ID: DN4N:BHHJ:6DJ7:SZPG:FJJC:XP6T:23R4:CESK:E5PO:SJ6B:BOST:HZQ5
Docker Root Dir: /var/lib/docker
Debug Mode (client): false
Debug Mode (server): false
Registry: https://index.docker.io/v1/
Labels:
Experimental: false
Insecure Registries:
 127.0.0.0/8
Live Restore Enabled: false
You can also see the list of nodes in your cluster with the following command:
docker node ls
Output:
ID                            HOSTNAME            STATUS              AVAILABILITY        MANAGER STATUS
viwovkb0bk0kxlk98r78apopo *   centOS-7            Ready               Active              Leader
Join the Worker nodes to the Manager node
Manager node is now ready. Next, you will need to add Worker node to the Manager node.
You can do this by running docker swarm join command on both Worker node as follows:
docker swarm join --token SWMTKN-1-3793hvb71g0a6ubkgq8zgk9w99hlusajtmj5aqr3n2wrhzzf8z-1s38lymnir13hhso1qxt5pqru 192.168.0.102:2377
Output:
This node joined a swarm as a worker.
On the manager node, run the following command to check the node status, whether the nodes are active or not:
docker node ls
If everything went fine, you should see the following output:
ID                            HOSTNAME            STATUS              AVAILABILITY        MANAGER STATUS
viwovkb0bk0kxlk98r78apopo *   managernode            Ready               Active              Leader
yf6nb2er69pydlp6drijdfmwd     workernode1            Ready               Active
yyavdslji7ovmw5fd3v7l62g8     workernode2            Ready               Active
If at any time, you lost your join token. You can be retrieved by running the following on Manager node:
docker swarm join-token manager -q
Deploy Service in Docker Swarm Mode
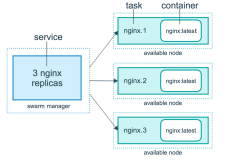
Docker Swarm cluster is now ready. It's time to deploy service in Swarm Mode. Here, we will deploy a webserver service with three containers in Docker Swarm Mode.
On the Manager node, run the following command to launch a webserver service:
docker service create -p 80:80 --name webservice --replicas 3 httpd
Output:
bky6uhg2agdxeqgc2b1a5tcsm
overall progress: 3 out of 3 tasks
1/3: running   [==================================================>]
2/3: running   [==================================================>]
3/3: running   [==================================================>]
verify: Service converged
The above command will create a service with name webservice and containers will be launched from docker image "httpd". containers are deployed across the cluster nodes such as, Managernode, Workernode1 and Workernode2.
Now, you can list and check the status of the service with the following command:
docker service ls
Output:
ID                  NAME                MODE                REPLICAS            IMAGE               PORTS
bky6uhg2agdx        webservice          replicated          3/3                 httpd:latest        *:80->80/tcp

docker service ps webservice
Output:
ID                  NAME                IMAGE               NODE                DESIRED STATE       CURRENT STATE       ERROR           PORTS
xsa5wb0eg2ln        webservice.1        httpd:latest        managernode            Running             Running about a minute ago
3sbscs7m9lnh        webservice.2        httpd:latest        workernode2            Running             Running about a minute ago
yao2m5wi54kz        webservice.3        httpd:latest        workernode2            Running             Running about a minute ago
Apache web service is now distributed across three node, you can access the web server by accessing any of Worker node and Manager node using your favorite web browser as follows:
http://192.168.0.102
http://192.168.0.103
http://192.168.0.104
Container Self-Healing
One of the important features of docker swarm mode is container self-healing. If any container goes down, it's automatically restarted on the same node or on a different node.
To test container self-healing feature, let's remove the container from workernode2 and see whether a new container is launched or not.
Before starting, you will need container ID in order to remove it. You can list out container ID by running the following command on Workernode2:
docker ps
Output:
CONTAINER ID        IMAGE               COMMAND              CREATED             STATUS              PORTS               NAMES
0dfc71537e18        httpd:latest        "httpd-foreground"   9 minutes ago       Up 9 minutes        80/tcp              webservice.3.yao2m5wi54kzs7iskefupuq6a
9b01b0a55cb7        httpd:latest        "httpd-foreground"   9 minutes ago       Up 9 minutes        80/tcp              webservice.1.xsa5wb0eg2ln5bud1sbjf9e9e
Now, remove container with ID 9b01b0a55cb7 by running the following command:
docker rm 9b01b0a55cb7 -f
Now verify the Service from Manager node and see whether a new container is started or not:
docker service ps webservice
You should see that one container is failed and another is started on workernode2 as shown below:
ID                  NAME                IMAGE               NODE                DESIRED STATE       CURRENT STATE              ERROR                              PORTS
z1spatkk1jj7        webservice.1        httpd:latest        workernode2            Running             Preparing 29 seconds ago
xsa5wb0eg2ln         \_ webservice.1    httpd:latest        workernode2            Shutdown            Failed 30 seconds ago      "task: non-zero exit (137)"
You can also scale up and down containers as per your requirements. For example, you can scale up the containers from 3 to 5 for the webservice using the following command on Manager node:
docker service create -p 80:80 --name webservice --replicas 5 httpd
You can check the status of the webservice with the following command on the Manager node:
docker service ps webservice
Output:
ID                  NAME                IMAGE               NODE                DESIRED STATE       CURRENT STATE       ERROR           PORTS
xsa5wb0eg2ln        webservice.1        httpd:latest        managernode            Running             Running about 10 minutes ago
3sbscs7m9lnh        webservice.2        httpd:latest        workernode2            Running             Running about 10 minutes ago
yao2m5wi54kz        webservice.3        httpd:latest        workernode2            Running             Running about 10 minutes ago
dfg2mswa52sf        webservice.4        httpd:latest        workernode1            Running             Running about 15 seconds ago
kah1j5hs14as        webservice.5        httpd:latest        workernode1            Running             Running about 15 seconds ago
In the above output, you should see that two new instances is started on workernode1.
Protecting Your Servers
After setting up your cluster of Docker nodes, it is a good idea to protect your servers by providing additional layers of security. A security solution consisting of both monitoring and firewall capabilities is a good place to start.
Alibaba Cloud Web Application Firewall (WAF) can be used to provide protection against web-based attacks, including SQL injections, Cross-site scripting (XSS), Malicious BOT, command execution vulnerabilities, and other common web attacks. WAF filters out a large number of malicious access attempts and alleviates the performance impact of Hypertext Transfer Protocol (HTTP)/HTTP Secure (HTTPS) flood attacks on servers.
CloudMonitor by Alibaba Cloud can be used to provide in-depth insights into your cloud deployments. CloudMonitor provides advanced analytics on critical metrics such as Central Processing Unit (CPU) utilization, latency and also lets you customize parameters specific to business requirements.