#################################
配置dns邮件服务
#################################
1.安装dns服务
yum install bind -y
2.配置dns服务
vim /etc/named.conf ###配置dns服务主配置文件
将11 17行注释 表示对外开放53端口并允许访问

vim /etc/named.rfc1912.zones
添加westos.com mmm.com域名的指向配置
编写westos及mmm的域名解析文件
cp -p /var/named/named.localhost westos.com.zone
cp -p /var/named/named.localhost mmm.com.zone
测试
##########################
postfix
##########################
1.概述
postfix提供smtp 协议用来投递邮件
默认端口25
/var/log/maillog ###服务日志
mail root@westos.com ###发送邮件给westos.com
Subject: dsaf
test
test
test
. ###"."表示结束录入并发送
mailq ###查看邮件队列
postqueue -f ###重新处理邮件队列
2.配置postfix
vim /etc/postfix/main.cf ###postfix服务主配置文件
76 myhostname = westos.com ###指定mta主机名称
83 mydomain = westos.com ###指定mta域名
99 myorigin = $mydomain ###指定邮件来源结尾
116 inet_interfaces = all ###25端口开启的网络接口
164 mydestination = myhostname,mydomain, localhost ###指定接受的邮件结尾
systemctl restart postfix.service
systemctl stop firewalld
测试
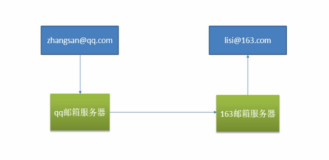
在westos.com端给mmm.com发邮件
在mmm.com端查看
3.邮件别名
在接受邮件的主机配置
vim /etc/aliasses
别名: 真名
别名: :include:filename ###邮件群发
vim filename
root
student
postalias /etc/aliases ###更新aliases文件
测试
在发送邮件端
在接收邮件端
4.通过远程主机发送邮件
[root@foundation78 kiosk]# telnet 172.25.254.216 25
Trying 172.25.254.216...
Connected to 172.25.254.216.
Escape character is '^]'.
220 westos.com ESMTP Postfix
mail from:root@westos.com
250 2.1.0 Ok
rcpt to:root@mmm.com
250 2.1.5 Ok
data
354 End data with <CR><LF>.<CR><LF>
1
1
1
.
250 2.0.0 Ok: queued as 3D21817E866
5.邮件客户端的访问控制
在mta上
postconf -e "smtpd_client_restrictions = check_client_access hash:/etc/postfix/access" ###添加访问控制功能
vim /etc/postfix/access ###添加拒绝访问名单
172.25.254.16 REJECT
postmap /etc/postfix/access ###刷新access
systemctl restart postfix.service ###重启postfix服务
测试
[root@foundation78 kiosk]# telnet 172.25.254.216 25
Trying 172.25.254.216...
Connected to 172.25.254.216.
Escape character is '^]'.
220 westos.com ESMTP Postfix
mail from:root@westos.com
250 2.1.0 Ok
rcpt to:root@mmm.com
554 5.7.1 <unknown[172.25.254.78]>: Client host rejected: Access denied
6.限制用户发送邮件
postconf -e "smtp_sender_restrictions = check_sender_access hash:/etc/postfix/sender"
vim /etc/postfix/sender
student@westos.com REJECT
postmap /etc/postfix/sender
systemctl restart postfix
测试
[root@foundation78 kiosk]# telnet 172.25.254.216 25
Trying 172.25.254.216...
Connected to 172.25.254.216.
Escape character is '^]'.
220 westos.com ESMTP Postfix
mail from:student@westos.com
250 2.1.0 Ok
rcpt to:root@mmm.com
554 5.7.1 <student@westos.com>: Sender address rejected: Access denied
7.限制用户接受邮件
postconf -e "smtpd_recipient_restritions = check_recipient_access hash:/etc/postfix/recip"
vim /etc/postfix/recip
studnet@westos.com REJECT
postmap /etc/postfix/recip
systemctl restart postfix
测试
[root@foundation78 kiosk]# telnet 172.25.254.216 25
Trying 172.25.254.216...
Connected to 172.25.254.216.
Escape character is '^]'.
220 westos.com ESMTP Postfix
mail from:root@westos.com
250 2.1.0 Ok
rcpt to:student@westos.com
554 5.7.1 <student@westos.com>: Recipient address rejected: Access denied
8.出站地址伪装
postconf -e "smtp_generic_maps = hash:/etc/postfix/generic"
vim /etc/postfix/generic
studnet@westos.com hello@world.com
postmap /etc/postfix/generic
systemctl restart postfix
测试
su - westos
mail root@qq.com
在mmm.com端查看邮件
9.入站地址转换
做world.com的dns解析
postconf -e "virtual_alias_maps = hash:/etc/postfix/virtual"
vim /etc/postfix/virtual
hello@world.com student@westos.com
postmap /etc/postfix/virtual
测试
mail hello@wrold.com
在westos.com端查看
mail -u studnet
####################################
#dovecot
####################################
1.
dovecot 用来提供收件协议
pop3 110
imap 143
pop3s 995
imaps 993
/etc/services ###所有服务的所有端口
2.安装devecot服务
yum install dovecot y
3.配置
vim /etc/dovecot/dovecot.conf
24 protocols = imap pop3 lmtp
48 login_trusted_networks = 0.0.0.0/0
49 disable_plaintext_auth = no
vim /etc/dovecot/conf.d/10-mail.conf
30 mail_location = mbox:~/mail:INBOX=/var/mail/%u
systemctl restart dovecot
mkdir /etc/skel/mail/.imap -p ###在用户骨架文件中建立所需目录及文件
touch /etc/skel/mail/.imap/INBOX
测试
yum install mutt -y
mutt -f pop://student@172.25.254.216
#########################
postfix + mariadb
#########################
准备工作
yum install httpd php php-mysql mariadb-server -y
config mariadb
mysql_secure_installation
create databs
create table
1.
vim /etc/postfix/mailuser.cf ##用户名称查询
host = localhost ##数据库所在主机
user = postuser ##登陆数据库的用户
password = 123 ##登陆数据库的密码
dbname = email ##postfix要查询的名称
table = emailuser ##postfix要查询的表的名称
select_field = username ##postfix要查询的字段
where_field = username ##用户给定postfix的查询条件
vim /etc/postfix/maildomain.cf ##用户域名查询
host = localhost
user = postuser
password = 123
dbname = email
table = emailuser
select_field = domain
where_field = domain
vim /etc/postfix/mailbox.cf ##用户邮箱位置查询
host = localhost
user = postuser
password = 123
dbname = email
table = emailuser
select_field = maildir
where_field = username
postmap -q "mmm@mmm.com" mysql:/etc/postfix/mailuser.cf
mmm@mmm.com
postmap -q "mmm.com" mysql:/etc/postfix/maildomain.cf
mmm.com
postmap -q "mmm@mmm.com" mysql:/etc/postfix/mailbox.cf
/mnt/mmm.com/mmm
配置postfix
groupadd -g 666 vmail
useradd -s /sbin/nologin -u 666 -g 666 vmail
postconf -e "virtual_mailbox_base = /home/vmail"##设定虚拟账户的邮件目录
postconf -e "virtual_uid_maps = static:666"##虚拟账户建立文件的uid
postconf -e "virtual_gid_maps = static:666"##虚拟用户建立文件的gid
postconf -e "virtual_alias_maps = mysql:/etc/postfix/mailuser.cf"
postconf -e "virtual_mailbox_domains = mysql:/etc/postfix/maildomain.cf"
postconf -e "virtual_mailbox_maps = mysql:/etc/postfix/mailbox.cf"
测试
mail mk@mk.com
查看mk@mk.com的收件情况
##############################
dovecot+mysql
##############################
1. 安装dovecot及插件
yum install dovecot dovecot-mysql -y
##dovecot-mysql devocot的插件,让devocot可以识别mysql
2.配置
vim /etc/dovecot/dovecot.conf
24 protocols = imap pop3 lmtp ##支持收件协议
48 login_trusted_networks = 0.0.0.0/0 ##信任网络
49 disable_plaintext_auth = no ##开启明文认证
vim /etc/dovecot/conf.d/10-auth.conf
123 !include auth-sql.conf.ext ##开启mysql的认证方式
##生成dovecot读取mysql的配置
cp /usr/share/doc/dovecot-2.2.10/example-config/dovecot-sql.conf.ext /etc/dovecot/dovecot-sql.conf.ext
vim /etc/dovecot/dovecot-sql.conf.ext
32 driver = mysql ##数据库类型
71 connect = host=localhost dbname=email user=postuser password=123
##查询时用到的 库,表,用户及秘密
78 default_pass_scheme = PLAIN ##默认认证方式为明文
107 password_query = \ ##查询密码匹配
108 SELECT username, domain, password \
109 FROM emailuser WHERE username = '%u' AND domain = '%d'
125 user_query = SELECT maildir, 666 AS uid, 666 AS gid FROM emailuser WHERE use rname = '%u'
vim /etc/dovecot/conf.d/10-mail.conf
30 mail_location = maildir:/home/vmail/%d/%n ##指定邮件位置
168 first_valid_uid = 666 ##邮件文件查询用户身份
175 first_valid_gid = 666
systemctl restart dovecot
测试
[root@foundation16 Desktop]# telnet 172.25.254.216 110
Trying 172.25.254.216...
Connected to 172.25.254.216.
Escape character is '^]'.
+OK [XCLIENT] Dovecot ready.
user mmm@mmm.com
+OK
pass 123
+OK Logged in.
本文转自Super_MONKEY 51CTO博客,原文链接:http://blog.51cto.com/supermk/1928772