MHA简介:
MHA,即MasterHigh Availability Manager and Toolsfor MySQL,是日本的一位MySQL专家采用Perl语言编写的一个脚本管理工具,该工具仅适用于MySQLReplication 环境,目的在于维持Master主库的高可用性。
MHA(Master High Availability)是自动的master故障转移和Slave提升的软件包.它是基于标准的MySQL复制(异步/半同步).
MHA组成部分:
MHA由两部分组成:
-
MHA Manager(管理节点)
-
MHA Node(数据节点)
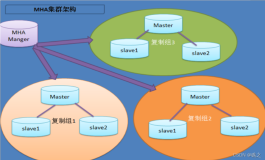
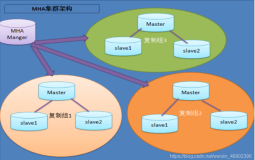
MHA部署解读:
MHA Manager可以单独部署在一台独立机器上管理多个master-slave集群,也可以部署在一台slave上.MHA Manager探测集群的node节点,当发现master出现故障的时候,它可以自动将具有最新数据的slave提升为新的master,然后将所有其它的slave导向新的master上.整个故障转移过程对应用程序是透明的。
MHA node运行在每台MySQL服务器上(master/slave/manager),它通过监控具备解析和清理logs功能的脚本来加快故障转移的。
MHA优缺点介绍:
优点:
1. 故障切换时,可以自行判断哪个从库与主库的数据最接近,就切换到上面,可以减少数据的丢失,保证数据的一致性
2. 支持 binlog server,可提高 binlog 传送效率,进一步减少数据丢失风险。
3. 可以配置 mysql 5.7 的增强半同步,来保证数据的时时同步
缺点:
1. 自动切换的脚本太简单了,而且比较老化,建议后期逐渐完善。
2. 搭建 MHA 架构,需要开启 linux 系统互信协议,所以对于系统安全性来说,是个不小的考验。
原理介绍:
MHA的目的在于维持MySQL Replication中Master库的高可用性,其最大特点是可以修复多个Slave之间的差异日志,最终使所有Slave保持数据一致,然后从中选择一个充当新的Master,并将其它Slave指向它。
当master出现故障时,可以通过对比slave之间I/O thread 读取主库binlog的position号,选取最接近的slave做为备选主库(备胎)。其它的从库可以通过与备选主库对比生成差异的中继日志。在备选主库上应用从原来master保存的binlog,同时将备选主库提升为master。最后在其它slave上应用相应的差异中继日志并开始从新的master开始复制。
MHA工具包功能介绍:
-
Manager工具:
|
1
2
3
4
5
6
7
|
#masterha_check_ssh : 检查MHA的SSH配置。
#masterha_check_repl : 检查MySQL复制。
#masterha_manager : 启动MHA。
#masterha_check_status : 检测当前MHA运行状态。
#masterha_master_monitor : 监测master是否宕机。
#masterha_master_switch : 控制故障转移(自动或手动)。
#masterha_conf_host : 添加或删除配置的server信息。
|
2. Node工具:
|
1
2
3
4
|
#save_binary_logs : 保存和复制master的二进制日志。
#apply_diff_relay_logs : 识别差异的中继日志事件并应用于其它slave。
#filter_mysqlbinlog : 去除不必要的ROLLBACK事件(MHA已不再使用这个工具)。
#purge_relay_logs : 清除中继日志(不会阻塞SQL线程)。
|
实战图表展示:

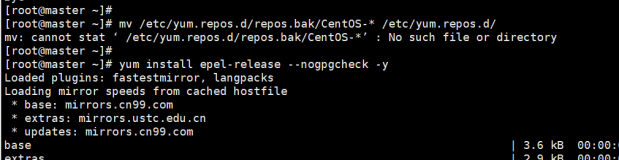
实战开始:
环境介绍:
|
1
2
3
4
|
192.168.56.100 master node
192.168.56.101 slave1 node
192.168.56.102 slave2(manager,node)
vip 192.168.56.123
|
第一步操作:生成ssh无密钥证书
主库(100)执行生成密钥操作:
|
1
2
3
4
|
ssh
-keygen -t dsa -P
''
-f id_dsa
Id_dsa.pub为公钥,id_dsa为私钥,紧接着将公钥文件复制成authorized_keys文件,
这个步骤是必须的,过程如下:
cat
id_dsa.pub >> authorized_keys
|
从库(101)执行生成密钥操作:
|
1
2
|
ssh
-keygen -t dsa -P
''
-f id_dsa
cat
id_dsa.pub >> authorized_keys
|
管理节点(102)生成密钥过程:
|
1
2
|
ssh
-keygen -t dsa -P
''
-f id_dsa
cat
id_dsa.pub >> authorized_keys
|
主库(100)执行接收密钥的过程:
|
1
2
|
scp
192.168.56.101:
/root/
.
ssh
/id_dsa
.pub .
/id_dsa
.pub.101
scp
192.168.56.102:
/root/
.
ssh
/id_dsa
.pub .
/id_dsa
.pub.102
|
|
1
2
3
|
合并密钥:
cat
id_dsa.pub.101 >> authorized_keys
cat
id_dsa.pub.102 >> authorized_keys
|
在主库上传送合成密钥:
|
1
2
|
scp
authorized_keys 192.168.56.101:
/root/
.
ssh
/
scp
authorized_keys 192.168.56.102:
/root/
.
ssh
/
|
在三台服务器上,编辑/etc/hosts文件,分别加入三台主机hostname
|
1
2
3
4
|
vim
/etc/hosts
node1 192.168.56.100
node2 192.168.56.101
node3 192.168.56.102
|
验证主机名登陆,密钥验证:
分别在三台机器上执行:
|
1
2
3
4
5
6
7
8
9
|
在192.168.56.100执行
ssh
node2
ssh
node3
在192.168.56.101执行
ssh
node1
ssh
node3
在192.168.56.102执行
ssh
node1
ssh
node2
|
搭建主从环境(一主两从架构,我这里是mysql 5.7版本)
在所有节点上都要执行
|
1
2
3
|
创建主从账号:
grant replication slave on *.* to
'repl'
@
'192.168.56.%'
identified by
'repl'
;
flush privileges;
|
|
1
2
3
|
创建管理账号:
grant all privileges on *.* to
'zs'
@
'192.168.56.%'
identified by
'123456'
;
flush privileges;
|
在Master(100)上面安装数据节点:
首先要先安装mysql依赖的perl环境
|
1
|
yum
install
perl-DBD-MySQL
|
解压数据节点的包
|
1
|
tar
-zxvf mha4mysql-node-0.57.
tar
.gz
|
安装perl-cpan软件包
|
1
2
3
4
|
cd
mha4mysql-node-0.57
yum -y
install
perl-CPAN*
perl Makefile.PL
make
&&
make
install
|
在从库(101)上面安装数据节点:
同主库一样的安装操作;
在manager管理节点(102)上面安装管理节点:
首先先要安装环境需要的介质包
|
1
2
3
4
5
|
yum
install
-y perl-DBD-MySQL*
rpm -ivh perl-Params-Validate-0.92-3.el6.x86_64.rpm
rpm -ivh perl-Config-Tiny-2.12-1.el6.rfx.noarch.rpm
rpm -ivh perl-Log-Dispatch-2.26-1.el6.rf.noarch.rpm
rpm -ivh perl-Parallel-ForkManager-0.7.5-2.2.el6.rf.noarch.rpm
|
再安装数据节点:
|
1
2
3
4
5
|
tar
-zxvf mha4mysql-node-0.57.
tar
.gz
cd
mha4mysql-node-0.57
yum -y
install
perl-CPAN*
perl Makefile.PL
make
&&
make
install
|
最后安装管理节点:
|
1
2
3
4
|
tar
-zxvf mha4mysql-manager-0.57.
tar
.gz
perl Makefile.PL
make
make
install
|
环境配置,基础安装操作完成。
下面来进行管理节点MHA配置:
创建mha家目录,编辑启动配置文件
|
1
2
|
mkdir
-p
/usr/local/mha
mkdir
-p
/etc/mhacd
/etc/mha/
|
|
1
2
3
4
5
6
7
8
9
10
11
12
13
14
|
编辑MHA配置文件
vim
/etc/mha/mha
.conf
[server default]
user=zs
password=123456
manager_workdir=
/usr/local/mha
manager_log=
/usr/local/mha/manager
.log
remote_workdir=
/usr/local/mha
ssh_user=root
repl_user=repl
repl_password=repl
ping_interval=1
master_ip_failover_script=
/usr/local/scripts/master_ip_failover
master_ip_online_change_script=
/usr/local/scripts/master_ip_online_change
|
|
1
2
3
4
5
6
|
[server1]
hostname
=192.168.56.100
ssh_port=22
master_binlog_dir=
/data/mysql
candidate_master=1
port=3306
|
|
1
2
3
4
5
6
|
[server2]
hostname
=192.168.56.101
ssh_port=22
master_binlog_dir=
/data/mysql
candidate_master=1
port=3306
|
|
1
2
3
4
5
6
|
[server3]
hostname
=192.168.56.102
ssh_port=22
master_binlog_dir=
/data/mysql
no_master=1
port=3306
|
创建failover,online 脚本的目录
|
1
|
mkdir
-p
/usr/local/scripts
|
编辑failover切换脚本:
|
1
2
3
4
5
6
7
8
9
10
11
12
13
14
15
16
17
18
19
20
21
22
23
24
25
26
27
28
29
|
vim master_ip_failover
#!/usr/bin/env perl
use strict;
use warnings FATAL =>
'all'
;
use Getopt::Long;
my (
$
command
, $ssh_user, $orig_master_host, $orig_master_ip,
$orig_master_port, $new_master_host, $new_master_ip, $new_master_port
);
my $vip =
'192.168.56.123/24'
;
my $key =
'0'
;
my $ssh_start_vip =
"/sbin/ifconfig eth0:$key $vip"
;
my $ssh_stop_vip =
"/sbin/ifconfig eth0:$key down"
;
GetOptions(
'command=s'
=> \$
command
,
'ssh_user=s'
=> \$ssh_user,
'orig_master_host=s'
=> \$orig_master_host,
'orig_master_ip=s'
=> \$orig_master_ip,
'orig_master_port=i'
=> \$orig_master_port,
'new_master_host=s'
=> \$new_master_host,
'new_master_ip=s'
=> \$new_master_ip,
'new_master_port=i'
=> \$new_master_port,
);
exit
&main();
|
|
1
2
3
4
5
6
7
8
9
10
11
12
13
14
15
16
17
18
19
20
21
22
23
24
25
26
27
28
29
30
31
32
33
34
35
36
37
38
39
40
41
|
sub main {
print
"\n\nIN SCRIPT TEST====$ssh_stop_vip==$ssh_start_vip===\n\n"
;
if
( $
command
eq
"stop"
|| $
command
eq
"stopssh"
) {
my $exit_code = 1;
eval
{
print
"Disabling the VIP on old master: $orig_master_host \n"
;
&stop_vip();
$exit_code = 0;
};
if
($@) {
warn
"Got Error: $@\n"
;
exit
$exit_code;
}
exit
$exit_code;
}
elsif ( $
command
eq
"start"
) {
my $exit_code = 10;
eval
{
print
"Enabling the VIP - $vip on the new master - $new_master_host \n"
;
&start_vip();
$exit_code = 0;
};
if
($@) {
warn $@;
exit
$exit_code;
}
exit
$exit_code;
}
elsif ( $
command
eq
"status"
) {
print
"Checking the Status of the script.. OK \n"
;
exit
0;
}
else
{
&usage();
exit
1;
}
}
|
|
1
2
3
4
5
6
7
8
9
10
11
12
13
|
sub start_vip() {
`
ssh
$ssh_user\@$new_master_host \" $ssh_start_vip \"`;
}
sub stop_vip() {
return
0 unless ($ssh_user);
`
ssh
$ssh_user\@$orig_master_host \" $ssh_stop_vip \"`;
}
sub usage {
print
"Usage: master_ip_failover --
command
=start|stop|stopssh|status --orig_master_host=host --orig_master_ip=ip
--orig_master_port=port --new_master_host=host --new_master_ip=ip --new_master_port=port\n";
}
|
编辑online_change的脚本:
cd /usr/local/scripts/
|
1
2
3
4
5
6
7
8
9
10
11
12
13
14
15
16
17
18
19
20
21
22
23
24
25
26
27
28
29
30
31
32
33
34
35
36
37
38
39
|
vim master_ip_online_change
#!/usr/bin/env perl
use strict;
use warnings FATAL =>
'all'
;
use Getopt::Long;
my $vip =
'192.168.1.123/24'
;
# Virtual IP
my $key =
"0"
;
my $ssh_start_vip =
"/sbin/ifconfig eth0:$key $vip"
;
my $ssh_stop_vip =
"/sbin/ifconfig eth0:$key down"
;
my $exit_code = 0;
my (
$
command
, $orig_master_is_new_slave, $orig_master_host,
$orig_master_ip, $orig_master_port, $orig_master_user,
$orig_master_password, $orig_master_ssh_user, $new_master_host,
$new_master_ip, $new_master_port, $new_master_user,
$new_master_password, $new_master_ssh_user,
);
GetOptions(
'command=s'
=> \$
command
,
'orig_master_is_new_slave'
=> \$orig_master_is_new_slave,
'orig_master_host=s'
=> \$orig_master_host,
'orig_master_ip=s'
=> \$orig_master_ip,
'orig_master_port=i'
=> \$orig_master_port,
'orig_master_user=s'
=> \$orig_master_user,
'orig_master_password=s'
=> \$orig_master_password,
'orig_master_ssh_user=s'
=> \$orig_master_ssh_user,
'new_master_host=s'
=> \$new_master_host,
'new_master_ip=s'
=> \$new_master_ip,
'new_master_port=i'
=> \$new_master_port,
'new_master_user=s'
=> \$new_master_user,
'new_master_password=s'
=> \$new_master_password,
'new_master_ssh_user=s'
=> \$new_master_ssh_user,
);
exit
&main();
|
|
1
2
3
4
5
6
7
8
9
10
11
12
13
14
15
16
17
18
19
20
21
22
23
24
25
26
27
28
29
30
31
32
33
34
35
36
37
38
39
40
41
42
43
|
sub main {
#print "\n\nIN SCRIPT TEST====$ssh_stop_vip==$ssh_start_vip===\n\n";
if
( $
command
eq
"stop"
|| $
command
eq
"stopssh"
) {
# $orig_master_host, $orig_master_ip, $orig_master_port are passed.
# If you manage master ip address at global catalog database,
# invalidate orig_master_ip here.
my $exit_code = 1;
eval
{
print
"\n\n\n***************************************************************\n"
;
print
"Disabling the VIP - $vip on old master: $orig_master_host\n"
;
print
"***************************************************************\n\n\n\n"
;
&stop_vip();
$exit_code = 0;
};
if
($@) {
warn
"Got Error: $@\n"
;
exit
$exit_code;
}
exit
$exit_code;
}
elsif ( $
command
eq
"start"
) {
# all arguments are passed.
# If you manage master ip address at global catalog database,
# activate new_master_ip here.
# You can also grant write access (create user, set read_only=0, etc) here.
my $exit_code = 10;
eval
{
print
"\n\n\n***************************************************************\n"
;
print
"Enabling the VIP - $vip on new master: $new_master_host \n"
;
print
"***************************************************************\n\n\n\n"
;
&start_vip();
$exit_code = 0;
};
if
($@) {
warn $@;
exit
$exit_code;
}
exit
$exit_code;
}
|
|
1
2
3
4
5
6
7
8
9
10
11
12
13
14
15
16
17
18
19
20
21
22
23
24
25
26
|
elsif ( $
command
eq
"status"
) {
print
"Checking the Status of the script.. OK \n"
;
`
ssh
$orig_master_ssh_user\@$orig_master_host \" $ssh_start_vip \"`;
exit
0;
}
else
{
&usage();
exit
1;
}
}
# A simple system call that enable the VIP on the new master
sub start_vip() {
`
ssh
$new_master_ssh_user\@$new_master_host \" $ssh_start_vip \"`;
}
# A simple system call that disable the VIP on the old_master
sub stop_vip() {
`
ssh
$orig_master_ssh_user\@$orig_master_host \" $ssh_stop_vip \"`;
}
sub usage {
print
"Usage: master_ip_failover –
command
=start|stop|stopssh|status –orig_master_host=host –orig_master_ip=ip –orig_master_port=po
rt –new_master_host=host –new_master_ip=ip –new_master_port=port\n";
}
|
创建完两个脚本,记得赋予执行权限
利用mha工具检测ssh
安装需要的环境包:
|
1
|
yum -y
install
perl-Time-HiRes
|
执行检测命令;
|
1
|
/usr/local/bin/masterha_check_ssh
--conf=
/etc/mha/mha
.conf
|
检测结果显示:都为OK,代表ssh检测成功
结果展示:
|
1
2
3
4
5
6
7
8
9
10
11
12
13
14
15
16
17
18
19
20
21
22
23
24
25
26
27
28
29
30
31
32
33
34
35
36
37
38
39
40
41
42
43
44
45
46
47
48
49
50
51
52
53
54
55
56
57
58
59
60
61
62
63
64
65
66
67
68
69
70
|
Sun Jul 23 09:39:09 2017 - [warning] Global configuration
file
/etc/masterha_default
.cnf not found. Skipping.
Sun Jul 23 09:39:09 2017 - [info] Reading application default configuration from
/etc/mha/mha
.conf..
Sun Jul 23 09:39:09 2017 - [info] Reading server configuration from
/etc/mha/mha
.conf..
Sun Jul 23 09:39:09 2017 - [info] Starting SSH connection tests..
Sun Jul 23 09:39:11 2017 - [debug]
Sun Jul 23 09:39:09 2017 - [debug] Connecting via SSH from root@192.168.56.100(192.168.56.100:22) to root@192.168.56.101(192.168.56.101:22)..
Sun Jul 23 09:39:10 2017 - [debug] ok.
Sun Jul 23 09:39:10 2017 - [debug] Connecting via SSH from root@192.168.56.100(192.168.56.100:22) to root@192.168.56.102(192.168.56.102:22)..
Sun Jul 23 09:39:11 2017 - [debug] ok.
Sun Jul 23 09:39:11 2017 - [debug]
Sun Jul 23 09:39:10 2017 - [debug] Connecting via SSH from root@192.168.56.101(192.168.56.101:22) to root@192.168.56.100(192.168.56.100:22)..
Sun Jul 23 09:39:10 2017 - [debug] ok.
Sun Jul 23 09:39:10 2017 - [debug] Connecting via SSH from root@192.168.56.101(192.168.56.101:22) to root@192.168.56.102(192.168.56.102:22)..
Sun Jul 23 09:39:11 2017 - [debug] ok.
Sun Jul 23 09:39:11 2017 - [debug]
Sun Jul 23 09:39:10 2017 - [debug] Connecting via SSH from root@192.168.56.102(192.168.56.102:22) to root@192.168.56.100(192.168.56.100:22)..
Warning: Permanently added
'192.168.56.102'
(RSA) to the list of known hosts.
Sun Jul 23 09:39:11 2017 - [debug] ok.
Sun Jul 23 09:39:11 2017 - [debug] Connecting via SSH from root@192.168.56.102(192.168.56.102:22) to root@192.168.56.101(192.168.56.101:22)..
Sun Jul 23 09:39:11 2017 - [debug] ok.
Sun Jul 23 09:39:11 2017 - [info] All SSH connection tests passed successfully.
检测masterha_check_repl --conf=
/etc/mha/mha
.conf
Sun Jul 23 10:14:11 2017 - [warning] Global configuration
file
/etc/masterha_default
.cnf not found. Skipping.
Sun Jul 23 10:14:11 2017 - [info] Reading application default configuration from
/etc/mha/mha
.conf..
Sun Jul 23 10:14:11 2017 - [info] Reading server configuration from
/etc/mha/mha
.conf..
Sun Jul 23 10:14:11 2017 - [info] MHA::MasterMonitor version 0.57.
Sun Jul 23 10:14:11 2017 - [info] Multi-master configuration is detected. Current primary(writable) master is 192.168.56.100(192.168.56.100:3306)
Sun Jul 23 10:14:11 2017 - [info] Master configurations are as below:
Master 192.168.56.100(192.168.56.100:3306), replicating from 192.168.56.101(192.168.56.101:3306)
Master 192.168.56.101(192.168.56.101:3306), replicating from 192.168.56.100(192.168.56.100:3306),
read
-only
Sun Jul 23 10:14:11 2017 - [info] GTID failover mode = 1
Sun Jul 23 10:14:11 2017 - [info] Dead Servers:
Sun Jul 23 10:14:11 2017 - [info] Alive Servers:
Sun Jul 23 10:14:11 2017 - [info] 192.168.56.100(192.168.56.100:3306)
Sun Jul 23 10:14:11 2017 - [info] 192.168.56.101(192.168.56.101:3306)
Sun Jul 23 10:14:11 2017 - [info] 192.168.56.102(192.168.56.102:3306)
Sun Jul 23 10:14:11 2017 - [info] Alive Slaves:
Sun Jul 23 10:14:11 2017 - [info] 192.168.56.101(192.168.56.101:3306) Version=5.7.14-log (oldest major version between slaves) log-bin:enabled
Sun Jul 23 10:14:11 2017 - [info] GTID ON
Sun Jul 23 10:14:11 2017 - [info] Replicating from 192.168.56.100(192.168.56.100:3306)
Sun Jul 23 10:14:11 2017 - [info] Primary candidate
for
the new Master (candidate_master is
set
)
Sun Jul 23 10:14:11 2017 - [info] 192.168.56.102(192.168.56.102:3306) Version=5.7.14-log (oldest major version between slaves) log-bin:enabled
Sun Jul 23 10:14:11 2017 - [info] GTID ON
Sun Jul 23 10:14:11 2017 - [info] Replicating from 192.168.56.100(192.168.56.100:3306)
Sun Jul 23 10:14:11 2017 - [info] Not candidate
for
the new Master (no_master is
set
)
Sun Jul 23 10:14:11 2017 - [info] Current Alive Master: 192.168.56.100(192.168.56.100:3306)
Sun Jul 23 10:14:11 2017 - [info] Checking slave configurations..
Sun Jul 23 10:14:11 2017 - [info] Checking replication filtering settings..
Sun Jul 23 10:14:11 2017 - [info] binlog_do_db= , binlog_ignore_db=
Sun Jul 23 10:14:11 2017 - [info] Replication filtering check ok.
Sun Jul 23 10:14:11 2017 - [info] GTID (with auto-pos) is supported. Skipping all SSH and Node package checking.
Sun Jul 23 10:14:11 2017 - [info] Checking SSH publickey authentication settings on the current master..
Sun Jul 23 10:14:11 2017 - [info] HealthCheck: SSH to 192.168.56.100 is reachable.
Sun Jul 23 10:14:11 2017 - [info]
192.168.56.100(192.168.56.100:3306) (current master)
+--192.168.56.101(192.168.56.101:3306)
+--192.168.56.102(192.168.56.102:3306)
Sun Jul 23 10:14:11 2017 - [info] Checking replication health on 192.168.56.101..
Sun Jul 23 10:14:11 2017 - [info] ok.
Sun
Jul 23 10:14:11 2017 - [info] Checking replication health on 192.168.56.102..
Sun Jul 23 10:14:11 2017 - [info] ok.
Sun Jul 23 10:14:11 2017 - [info] Checking master_ip_failover_script status:
Sun Jul 23 10:14:11 2017 - [info]
/usr/local/scripts/master_ip_failover
--
command
=status --ssh_user=root --orig_master_host=192.168.56.100 --orig_master_ip=192.168.56.100 --orig_master_port=3306
IN SCRIPT TEST====
/sbin/ifconfig
eth0:0 down==
/sbin/ifconfig
eth0:0 192.168.56.123
/24
===
Checking the Status of the script.. OK
Sun Jul 23 10:14:11 2017 - [info] OK.
Sun Jul 23 10:14:11 2017 - [warning] shutdown_script is not defined.
Sun Jul 23 10:14:11 2017 - [info] Got
exit
code 0 (Not master dead).
MySQL Replication Health is OK.
|
在主库(100)执行添加vip的过程:(第一次手动添加)
|
1
|
ip addr add 192.168.56.123 dev eth0
|
在管理节点(102)上,执行mha的启动
|
1
|
nohup
masterha_manager --conf=
/etc/mha/mha
.conf >
/tmp/mha_manager
.log <
/dev/null
2>&1 &
|
验证启动成功的命令:查看显示状态
|
1
|
masterha_check_status --conf=
/etc/mha/mha
.conf
|
模拟主库故障,查看是否自动切换:
在主库(100)上面执行停掉mysql操作。
|
1
2
|
mysqladmin -uroot -proot123
shutdown
从库192.168.56.101自动获取vip且转换为新的主库,192.168.56.102自动指向新的主库。
|
切换后,MHA进程会自动停止运行
在管理节点查看:
|
1
2
|
masterha_check_status --conf=
/etc/mha/mha
.conf
mha is stopped(2:NOT_RUNNING).
|
恢复操作:
把宕掉的主库192.168.56.100恢复起来;
|
1
|
/usr/local/mysql/bin/mysqld_safe
--defaults-
file
=
/etc/my
.cnf &
|
验证结果:重新指向现在的主库192.168.56.101
主从状态一切ok!