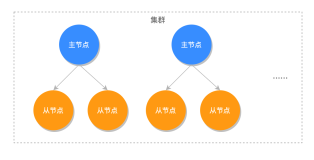
集群技术是构建高性能网站架构的重要手段,试想在网站承受高并发访问压力的同时,还需要从海量数据中查询出满足条件的数据,并快速响应,我们必然想到的是将数据进行切片,把数据根据某种规则放入多个不同的服务器节点,来降低单节点服务器的压力。上篇redis_主从我们讲到了 Redis 的主从复制技术,当实现了多节点的 master-slave 后,我们也可以把它叫做集群,但我们今天要讲的集群主要是利用切片技术来组建的集群。我们最后希望达到的是类似下图:

二、实现策略
因为从3.0开始以后官方已经支持了 redis cluster,http://redis.io/topics/cluster-tutorial
集群要实现的目的是要将不同的 key 分散放置到不同的 redis 节点,这里我们需要一个规则或者算法,通常的做法是获取 key 的哈希值,然后根据节点数来求模,但这种做法有其明显的弊端,当我们需要增加或减少一个节点时,会造成大量的 key 无法命中,这种比例是相当高的,所以就有人提出了一致性哈希的概念。
由于官方版本是基于哈希槽(hash slot)的概念来实现的,我们还是从其官方介绍中翻译解释一下:
Redis 集群中内置了 16384 个哈希槽,当需要在 Redis 集群中放置一个 key-value 时,redis 先对 key 使用 crc16 算法算出一个结果,然后把结果对 16384 求余数,这样每个 key 都会对应一个编号在 0-16383 之间的哈希槽,redis 会根据节点数量大致均等的将哈希槽映射到不同的节点。
使用哈希槽的好处就在于可以方便的添加或移除节点:
当需要增加节点时,只需要把其他节点的某些哈希槽挪到新节点就可以了;
当需要移除节点时,只需要把移除节点上的哈希槽挪到其他节点就行了;
集群模式下支持主从复制,但是在从服务器不支持读写操作,所有的读写操作都在主上完成,只有在对应的主发生故障不能对外提供服务时,从才会变成主,接替原来的主继续对外提供服务;
三、集群实现
对于我们来说,在新增或移除节点的能做到无缝(即不需要重启集群),这点它做到了。还是来看看具体的实现吧:
操作系统和软件环境:
|
1
2
3
4
5
6
7
8
9
10
11
12
|
[root@DB-SERVER ~]
# uname -a
Linux DB-SERVER 2.6.32-642.el6.x86_64
#1 SMP Tue May 10 17:27:01 UTC 2016 x86_64 x86_64 x86_64 GNU/Linux
[root@DB-SERVER ~]
# cat /etc/redhat-release
CentOS release 6.8 (Final)
[root@DB-SERVER ~]
#
[root@DB-SERVER ~]
# cd /opt/tools/
[root@DB-SERVER tools]
# ll
total 5
-rw-r--r-- 1 root root 1541401 Sep 18 10:28 redis-3.2.3.
tar
.gz
-rw-r--r-- 1 root root 92672 Jul 18 23:04 redis-3.3.1.gem
-rw-r--r-- 1 root root 730034 Sep 18 11:14 rubygems-2.6.6.tgz
[root@DB-SERVER tools]
#
|
新建redis_cluster文件夹下面新建6000、6001、6002三个文件夹。
|
1
2
3
4
5
6
7
8
|
[root@DB-SERVER tools]
# mkdir -p /application/redis_cluster/{6000,6001,6002}
[root@DB-SERVER tools]
# cd /application/redis_cluster/
[root@DB-SERVER redis_cluster]
# ll
total 5
drwxr-xr-x 2 root root 4096 Sep 18 16:29 6000
drwxr-xr-x 2 root root 4096 Sep 18 16:29 6001
drwxr-xr-x 2 root root 4096 Sep 18 16:29 6002
[root@DB-SERVER redis_cluster]
#
|
安装redis-3.2.3
|
1
2
3
4
5
6
7
8
9
10
11
12
13
14
15
16
17
18
19
20
21
22
23
24
25
26
27
28
29
30
31
32
33
34
35
36
|
[root@DB-SERVER tools]
# tar xf redis-3.2.3.tar.gz
[root@DB-SERVER tools]
# cd redis-3.2.3
[root@DB-SERVER redis-3.2.3]
# ll
total 196
-rw-rw-r-- 1 root root 75147 Aug 2 17:00 00-RELEASENOTES
-rw-rw-r-- 1 root root 53 Aug 2 17:00 BUGS
-rw-rw-r-- 1 root root 1805 Aug 2 17:00 CONTRIBUTING
-rw-rw-r-- 1 root root 1487 Aug 2 17:00 COPYING
drwxrwxr-x 7 root root 4096 Sep 18 2016 deps
-rw-rw-r-- 1 root root 11 Aug 2 17:00 INSTALL
-rw-rw-r-- 1 root root 151 Aug 2 17:00 Makefile
-rw-rw-r-- 1 root root 4223 Aug 2 17:00 MANIFESTO
-rw-rw-r-- 1 root root 6834 Aug 2 17:00 README.md
-rw-rw-r-- 1 root root 46695 Aug 2 17:00 redis.conf
-rwxrwxr-x 1 root root 271 Aug 2 17:00 runtest
-rwxrwxr-x 1 root root 280 Aug 2 17:00 runtest-cluster
-rwxrwxr-x 1 root root 281 Aug 2 17:00 runtest-sentinel
-rw-rw-r-- 1 root root 7109 Aug 2 17:00 sentinel.conf
drwxrwxr-x 2 root root 4096 Sep 18 2016 src
drwxrwxr-x 10 root root 4096 Aug 2 17:00 tests
drwxrwxr-x 7 root root 4096 Aug 2 17:00 utils
[root@DB-SERVER redis-3.2.3]
#MALLOC=jemalloc
[root@DB-SERVER redis-3.2.3]
#make PREFIX=/application/redis-3.2.3 install
[root@DB-SERVER redis-3.2.3]
#echo 'vm.overcommit_memory = 1' >>/etc/sysctl.conf
[root@DB-SERVER redis-3.2.3]
#sysctl -p
[root@DB-SERVER redis-3.2.3]
#echo "export PATH=/application/redis-3.2.3/bin:$PATH" >>/etc/profile
[root@DB-SERVER redis-3.2.3]
#source /etc/profile
[root@DB-SERVER redis-3.2.3]
#
[root@DB-SERVER redis-3.2.3]
#cp redis.conf /application/redis_cluster/6000
[root@DB-SERVER redis-3.2.3]
#cp redis.conf /application/redis_cluster/6001
[root@DB-SERVER redis-3.2.3]
#cp redis.conf /application/redis_cluster/6002
[root@DB-SERVER redis-3.2.3]
#cp src/redis-server /application/redis-3.2.3/bin
[root@DB-SERVER redis-3.2.3]
#
[root@DB-SERVER application]
# ll /application/redis-3.2.3/bin/redis-server
-rwxr-xr-x 1 root root 7822941 Sep 18 2016
/application/redis-3
.2.3
/bin/redis-server
[root@DB-SERVER application]
#
|
修改/application/redis_cluster/6000/redis.conf中的内容为:
|
1
2
3
4
5
6
7
8
9
10
11
12
13
14
15
16
17
18
19
20
21
22
23
24
25
26
27
28
29
30
31
32
33
34
35
36
37
38
39
40
41
42
43
44
45
46
47
48
49
50
51
52
53
54
55
56
57
|
[root@DB-SERVER redis-3.2.3]
# cat /application/redis_cluster/6000/redis.conf
bind 127.0.0.1
protected-mode
yes
port 6000
tcp-backlog 511
timeout 0
tcp-keepalive 300
daemonize
yes
supervised no
pidfile
/application/redis_cluster/6000/redis_6000
.pid
loglevel notice
logfile
""
databases 16
save 900 1
save 300 10
save 60 10000
stop-writes-on-bgsave-error
yes
rdbcompression
yes
rdbchecksum
yes
dbfilename dump.rdb
dir
/application/redis_cluster/6000/
slave-serve-stale-data
yes
slave-
read
-only
yes
repl-diskless-
sync
no
repl-diskless-
sync
-delay 5
repl-disable-tcp-nodelay no
slave-priority 100
appendonly
yes
appendfilename
"appendonly.aof"
appendfsync everysec
no-appendfsync-on-rewrite no
auto-aof-rewrite-percentage 100
auto-aof-rewrite-min-size 64mb
aof-load-truncated
yes
lua-
time
-limit 5000
cluster-enabled
yes
cluster-config-
file
nodes.conf
cluster-node-timeout 15000
slowlog-log-slower-than 10000
slowlog-max-len 128
latency-monitor-threshold 0
notify-keyspace-events
""
hash
-max-ziplist-entries 512
hash
-max-ziplist-value 64
list-max-ziplist-size -2
list-compress-depth 0
set
-max-intset-entries 512
zset-max-ziplist-entries 128
zset-max-ziplist-value 64
hll-sparse-max-bytes 3000
activerehashing
yes
client-output-buffer-limit normal 0 0 0
client-output-buffer-limit slave 256mb 64mb 60
client-output-buffer-limit pubsub 32mb 8mb 60
hz 10
aof-rewrite-incremental-fsync
yes
[root@DB-SERVER redis-3.2.3]
#
|
同样对以上的6001和6002中的redis.conf做同样的修改,不同的是上述红色部分
|
1
2
3
4
5
6
7
8
9
10
11
12
13
14
15
16
17
18
19
20
21
22
|
[root@DB-SERVER application]
# tree redis_cluster
redis_cluster
├── 6000
│ └── redis.conf
├── 6001
│ └── redis.conf
└── 6002
└── redis.conf
3 directories, 3 files
[root@DB-SERVER application]
#
[root@DB-SERVER application]
#/application/redis-3.2.3/bin/redis-server /application/redis_cluster/6000/redis.conf
[root@DB-SERVER application]
#/application/redis-3.2.3/bin/redis-server /application/redis_cluster/6001/redis.conf
[root@DB-SERVER application]
#/application/redis-3.2.3/bin/redis-server /application/redis_cluster/6002/redis.conf
[root@DB-SERVER application]
#
[root@DB-SERVER ~]
# netstat -lnupt|grep redis
tcp 0 0 127.0.0.1:16000 0.0.0.0:* LISTEN 2648
/redis-server
1
tcp 0 0 127.0.0.1:16001 0.0.0.0:* LISTEN 2650
/redis-server
1
tcp 0 0 127.0.0.1:16002 0.0.0.0:* LISTEN 2656
/redis-server
1
tcp 0 0 127.0.0.1:6000 0.0.0.0:* LISTEN 2648
/redis-server
1
tcp 0 0 127.0.0.1:6001 0.0.0.0:* LISTEN 2650
/redis-server
1
tcp 0 0 127.0.0.1:6002 0.0.0.0:* LISTEN 2656
/redis-server
1
[root@DB-SERVER ~]
#
|
安装ruby、rubygems、gem-redis及对应依赖包
|
1
2
3
4
5
6
7
8
9
10
11
12
|
[root@DB-SERVER ~]
# yum -y install ruby ruby-devel ruby-rdoc
[root@DB-SERVER ~]
#cd /opt/tools/
[root@DB-SERVER tools]
#tar xf rubygems-2.6.6.tgz
[root@DB-SERVER tools]
#cd rubygems-2.6.6
[root@DB-SERVER rubygems-2.6.6]
#ruby setup.rb
[root@DB-SERVER rubygems-2.6.6]
#cd ..
[root@DB-SERVER tools]
#gem install redis-3.3.1.gem --local
[root@DB-SERVER tools]
#cd redis-3.2.3
[root@DB-SERVER redis-3.2.3]
# cd src
[root@DB-SERVER src]
# ll redis-trib.rb
-rwxrwxr-x 1 root root 60578 Aug 2 17:00 redis-trib.rb
[root@DB-SERVER src]
# cp redis-trib.rb /application/redis-3.2.3/bin/
|
将启动的redis三个实例加入集群中:
|
1
2
3
4
5
6
7
8
9
10
11
12
13
14
15
16
17
18
19
20
21
22
23
24
25
26
27
28
29
30
|
[root@DB-SERVER ~]
# redis-trib.rb create --replicas 0 127.0.0.1:6000 127.0.0.1:6001 127.0.0.1:6002
>>> Creating cluster
>>> Performing
hash
slots allocation on 3 nodes...
Using 3 masters:
127.0.0.1:6000
127.0.0.1:6001
127.0.0.1:6002
M: 0a0b1e7fc91160fe0d0916d44f26c3ae4c094bac 127.0.0.1:6000
slots:0-5460 (5461 slots) master
M: 9a59aa20306cf70a47623acf1e96d1f2f2266823 127.0.0.1:6001
slots:5461-10922 (5462 slots) master
M: a91ba0a1ebde74ebf3867ade0b317a8ad7bb5c9b 127.0.0.1:6002
slots:10923-16383 (5461 slots) master
Can I
set
the above configuration? (
type
'yes'
to accept):
yes
>>> Nodes configuration updated
>>> Assign a different config epoch to each node
>>> Sending CLUSTER MEET messages to
join
the cluster
Waiting
for
the cluster to
join
.
>>> Performing Cluster Check (using node 127.0.0.1:6000)
M: 0a0b1e7fc91160fe0d0916d44f26c3ae4c094bac 127.0.0.1:6000
slots:0-5460 (5461 slots) master
M: 9a59aa20306cf70a47623acf1e96d1f2f2266823 127.0.0.1:6001
slots:5461-10922 (5462 slots) master
M: a91ba0a1ebde74ebf3867ade0b317a8ad7bb5c9b 127.0.0.1:6002
slots:10923-16383 (5461 slots) master
[OK] All nodes agree about slots configuration.
>>> Check
for
open
slots...
>>> Check slots coverage...
[OK] All 16384 slots covered.
[root@DB-SERVER ~]
#
|
来试试集群的效果吧:在6000端口实例上测试
|
1
2
3
4
5
6
7
8
9
10
11
12
13
14
15
16
17
18
19
20
21
22
|
[root@DB-SERVER ~]
# redis-cli -c -p 6000
127.0.0.1:6000> get name
-> Redirected to slot [5798] located at 127.0.0.1:6001
//
当前节点没有key的值,会重定向到集群中其他节点上找
(nil)
127.0.0.1:6001>
set
name wilson
//
在6001上设置name的值,然后查看
OK
127.0.0.1:6001> get name
"wilson"
127.0.0.1:6001>
127.0.0.1:6001>
exit
[root@DB-SERVER ~]
# redis-cli -c -p 6002
127.0.0.1:6002> get name
-> Redirected to slot [5798] located at 127.0.0.1:6001
//
在6002上找name,最终还是到6001上
"wilson"
127.0.0.1:6001>
exit
[root@DB-SERVER ~]
# redis-cli -c -p 6002
127.0.0.1:6002>
set
name poll
//
在6002上重置name的值,发现最终还是重定向到6001实例上更新name结果
-> Redirected to slot [5798] located at 127.0.0.1:6001
OK
127.0.0.1:6001> get name
"poll"
127.0.0.1:6001>
|
从上面的结果可以看出,集群中的节点是会进行通讯的,从而能找到不同的key在不同实例上,在机器固定的情况下,key唯一时后续对其的所有更新以及查询都会映射到这一台机器上面。
当然我们的集群的节点是不会一成不变的,我们随时有可能扩容、缩容那该怎么来实现呢?下面来讲讲集群节点的变化吧。
四、集群变更
我们先在上面的基础上试试添加端口为6003的实例,重复操作如上:
|
1
2
3
4
5
6
7
8
9
10
|
[root@DB-SERVER ~]
# cd /application/redis_cluster/
[root@DB-SERVER redis_cluster]
# mkdir 6003
[root@DB-SERVER redis_cluster]
# ll
total 16
drwxr-xr-x 2 root root 4096 Sep 18 16:55 6000
drwxr-xr-x 2 root root 4096 Sep 18 17:11 6001
drwxr-xr-x 2 root root 4096 Sep 18 16:55 6002
drwxr-xr-x 2 root root 4096 Sep 18 17:20 6003
[root@DB-SERVER redis_cluster]
# cp 6000/redis.conf 6003/
[root@DB-SERVER redis_cluster]
#
|
不要忘了修改redis.conf,具体配置如上文提到的。
|
1
2
3
4
5
6
7
8
9
10
11
12
|
[root@DB-SERVER 6003]
# cd
[root@DB-SERVER ~]
# /application/redis-3.2.3/bin/redis-server /application/redis_cluster/6003/redis.conf
[root@DB-SERVER ~]
# netstat -lnupt|grep redis
tcp 0 0 127.0.0.1:16000 0.0.0.0:* LISTEN 2648
/redis-server
1
tcp 0 0 127.0.0.1:16001 0.0.0.0:* LISTEN 2650
/redis-server
1
tcp 0 0 127.0.0.1:16002 0.0.0.0:* LISTEN 2656
/redis-server
1
tcp 0 0 127.0.0.1:16003 0.0.0.0:* LISTEN 2752
/redis-server
1
tcp 0 0 127.0.0.1:6000 0.0.0.0:* LISTEN 2648
/redis-server
1
tcp 0 0 127.0.0.1:6001 0.0.0.0:* LISTEN 2650
/redis-server
1
tcp 0 0 127.0.0.1:6002 0.0.0.0:* LISTEN 2656
/redis-server
1
tcp 0 0 127.0.0.1:6003 0.0.0.0:* LISTEN 2752
/redis-server
1
[root@DB-SERVER ~]
#
|
新的redis实例已经启动好了,然后需要把它加到已有的集群啦:
|
1
2
3
4
5
6
7
8
9
10
11
12
13
14
15
16
17
18
19
|
[root@DB-SERVER ~]
# /application/redis-3.2.3/bin/redis-trib.rb add-node 127.0.0.1:6003 127.0.0.1:6000
>>> Adding node 127.0.0.1:6003 to cluster 127.0.0.1:6000
>>> Performing Cluster Check (using node 127.0.0.1:6000)
M: 0a0b1e7fc91160fe0d0916d44f26c3ae4c094bac 127.0.0.1:6000
slots:0-5460 (5461 slots) master
0 additional replica(s)
M: a91ba0a1ebde74ebf3867ade0b317a8ad7bb5c9b 127.0.0.1:6002
slots:10923-16383 (5461 slots) master
0 additional replica(s)
M: 9a59aa20306cf70a47623acf1e96d1f2f2266823 127.0.0.1:6001
slots:5461-10922 (5462 slots) master
0 additional replica(s)
[OK] All nodes agree about slots configuration.
>>> Check
for
open
slots...
>>> Check slots coverage...
[OK] All 16384 slots covered.
>>> Send CLUSTER MEET to node 127.0.0.1:6003 to
make
it
join
the cluster.
[OK] New node added correctly.
[root@DB-SERVER ~]
#
|
查看集群各个节点状态:
|
1
2
3
4
5
6
7
|
[root@DB-SERVER ~]
# redis-cli -c -p 6000
127.0.0.1:6000> cluster nodes
a91ba0a1ebde74ebf3867ade0b317a8ad7bb5c9b 127.0.0.1:6002 master - 0 1474191183318 3 connected 10923-16383
2cf8fbb551b29215d08b151273836ccef0a0eb4d 127.0.0.1:6003 master - 0 1474191184330 0 connected
9a59aa20306cf70a47623acf1e96d1f2f2266823 127.0.0.1:6001 master - 0 1474191185341 2 connected 5461-10922
0a0b1e7fc91160fe0d0916d44f26c3ae4c094bac 127.0.0.1:6000 myself,master - 0 0 1 connected 0-5460
127.0.0.1:6000>
|
如上已经能查看到新的实例啦,为什么6003这个新的实例的connected后面没有分配hash槽呢,别慌我们还没有reshard, 执行如下命令:
/application/redis-3.2.3/bin/redis-trib.rb reshard 127.0.0.1:6003
我们想从6000节点中分配1000个hash槽位出来:

这样有hash槽了,当crc16(key) / 16384 的结果在该节点的所在区间时,数据就放在该节点上。
|
1
2
3
4
5
6
|
127.0.0.1:6000> cluster nodes
a91ba0a1ebde74ebf3867ade0b317a8ad7bb5c9b 127.0.0.1:6002 master - 0 1474191575714 3 connected 10923-16383
2cf8fbb551b29215d08b151273836ccef0a0eb4d 127.0.0.1:6003 master - 0 1474191573690 4 connected 0-999
9a59aa20306cf70a47623acf1e96d1f2f2266823 127.0.0.1:6001 master - 0 1474191576729 2 connected 5461-10922
0a0b1e7fc91160fe0d0916d44f26c3ae4c094bac 127.0.0.1:6000 myself,master - 0 0 1 connected 1000-5460
127.0.0.1:6000>
|
redis 采用的crc16算法详见:http://blog.csdn.net/guodongxiaren/article/details/44706613
五、如何为每一个主节点增加从节点呢?
好吧,先创建6400端口实例看看,具体新建文件夹以及配置和重启实例我就不再讲了,上面以及有了。执行如下命令:
|
1
2
3
4
5
6
7
8
9
10
11
12
13
14
15
16
17
18
19
20
21
22
23
24
25
26
27
28
29
30
31
32
33
34
35
36
37
38
39
40
41
42
43
44
45
46
47
48
49
50
51
52
53
54
55
56
57
58
59
60
61
62
63
64
65
66
67
68
69
|
[root@DB-SERVER redis_cluster]
# ll
total 16
drwxr-xr-x 2 root root 4096 Sep 18 16:55 6000
drwxr-xr-x 2 root root 4096 Sep 18 17:26 6001
drwxr-xr-x 2 root root 4096 Sep 18 16:55 6002
drwxr-xr-x 2 root root 4096 Sep 18 17:23 6003
[root@DB-SERVER redis_cluster]
# mkdir 6004
[root@DB-SERVER redis_cluster]
# cp 6003/redis.conf 6004/
[root@DB-SERVER redis_cluster]
# cd 6004/
[root@DB-SERVER 6004]
# vim redis.conf
[root@DB-SERVER 6004]
# /application/redis-3.2.3/bin/redis-server /application/redis_cluster/6004/redis.conf
[root@DB-SERVER 6004]
# netstat -lnupt|grep redis
tcp 0 0 127.0.0.1:16000 0.0.0.0:* LISTEN 2648
/redis-server
1
tcp 0 0 127.0.0.1:16001 0.0.0.0:* LISTEN 2650
/redis-server
1
tcp 0 0 127.0.0.1:16002 0.0.0.0:* LISTEN 2656
/redis-server
1
tcp 0 0 127.0.0.1:16003 0.0.0.0:* LISTEN 2752
/redis-server
1
tcp 0 0 127.0.0.1:16004 0.0.0.0:* LISTEN 2814
/redis-server
1
tcp 0 0 127.0.0.1:6000 0.0.0.0:* LISTEN 2648
/redis-server
1
tcp 0 0 127.0.0.1:6001 0.0.0.0:* LISTEN 2650
/redis-server
1
tcp 0 0 127.0.0.1:6002 0.0.0.0:* LISTEN 2656
/redis-server
1
tcp 0 0 127.0.0.1:6003 0.0.0.0:* LISTEN 2752
/redis-server
1
tcp 0 0 127.0.0.1:6004 0.0.0.0:* LISTEN 2814
/redis-server
1
[root@DB-SERVER 6004]
#
将实例6004作为6000的从添加到集群中
/application/redis-3
.2.3
/bin/redis-trib
.rb add-node --slave 127.0.0.1:6004 127.0.0.1:6000
[root@DB-SERVER 6004]
# /application/redis-3.2.3/bin/redis-trib.rb add-node --slave 127.0.0.1:6004 127.0.0.1:6000
>>> Adding node 127.0.0.1:6004 to cluster 127.0.0.1:6000
>>> Performing Cluster Check (using node 127.0.0.1:6000)
M: 0a0b1e7fc91160fe0d0916d44f26c3ae4c094bac 127.0.0.1:6000
slots:1000-5460 (4461 slots) master
0 additional replica(s)
M: a91ba0a1ebde74ebf3867ade0b317a8ad7bb5c9b 127.0.0.1:6002
slots:10923-16383 (5461 slots) master
0 additional replica(s)
M: 2cf8fbb551b29215d08b151273836ccef0a0eb4d 127.0.0.1:6003
slots:0-999 (1000 slots) master
0 additional replica(s)
M: 9a59aa20306cf70a47623acf1e96d1f2f2266823 127.0.0.1:6001
slots:5461-10922 (5462 slots) master
0 additional replica(s)
[OK] All nodes agree about slots configuration.
>>> Check
for
open
slots...
>>> Check slots coverage...
[OK] All 16384 slots covered.
Automatically selected master 127.0.0.1:6000
>>> Send CLUSTER MEET to node 127.0.0.1:6004 to
make
it
join
the cluster.
Waiting
for
the cluster to
join
....
>>> Configure node as replica of 127.0.0.1:6000.
[OK] New node added correctly.
[root@DB-SERVER 6004]
#
127.0.0.1:6000> cluster nodes
9a59aa20306cf70a47623acf1e96d1f2f2266823 127.0.0.1:6001 master - 0 1474191913446 2 connected 5461-10922
2cf8fbb551b29215d08b151273836ccef0a0eb4d 127.0.0.1:6003 master - 0 1474191909396 4 connected 0-999
b8028a898ab08be839a331e94728973c60a7f50c 127.0.0.1:6004 slave 0a0b1e7fc91160fe0d0916d44f26c3ae4c094bac 0 1474191911419 1 connected
a91ba0a1ebde74ebf3867ade0b317a8ad7bb5c9b 127.0.0.1:6002 master - 0 1474191912430 3 connected 10923-16383
0a0b1e7fc91160fe0d0916d44f26c3ae4c094bac 127.0.0.1:6000 myself,master - 0 0 1 connected 1000-5460
127.0.0.1:6000>
从以上输出发现6004已经成为了6000的从实例,我们现在试试在从节点6004上面做
set
操作:
[root@DB-SERVER 6004]
# redis-cli -c -p 6004
127.0.0.1:6004>
set
k1 v1
-> Redirected to slot [12706] located at 127.0.0.1:6002
OK
127.0.0.1:6002>
exit
[root@DB-SERVER 6004]
# redis-cli -c -p 6004
127.0.0.1:6004> get k1
-> Redirected to slot [12706] located at 127.0.0.1:6002
"v1"
127.0.0.1:6002>
exit
[root@DB-SERVER 6004]
#
|
很不幸,确实不能做set和get操作会报错,由此可以得出结论,该集群下的redis从实例不能对外提供读写服务
六、我们如何来删除一个节点呢?
|
1
2
3
4
5
6
7
8
9
10
11
12
13
14
15
16
17
18
19
20
21
22
23
24
25
26
27
28
29
30
31
32
33
34
35
36
37
38
39
40
41
42
43
44
45
46
47
48
49
50
51
52
53
|
[root@DB-SERVER ]
# redis-trib.rb del-node 127.0.0.1:6000 '0a0b1e7fc91160fe0d0916d44f26c3ae4c094bac'
>>> Removing node 0a0b1e7fc91160fe0d0916d44f26c3ae4c094bac from cluster 127.0.0.1:6000
[ERR] Node 127.0.0.1:6000 is not empty! Reshard data away and try again.
[root@DB-SERVER ]
#
我们发现删除6000端口的实例失败了,应该是上面还有一些数据如果直接删除就有数据丢失,我们应该把数据移到别的节点去:
[root@DB-SERVER ~]
# redis-trib.rb reshard 127.0.0.1:6000 //移除6000实例的数据
然后输出了很多信息,很多数值和ID都可以从这段信息中找到。
[OK] All nodes agree about slots configuration.
>>> Check
for
open
slots...
>>> Check slots coverage...
[OK] All 16384 slots covered.
How many slots
do
you want to move (from 1 to 16384)? 4461
What is the receiving node ID? 2cf8fbb551b29215d08b151273836ccef0a0eb4d
Please enter all the
source
node IDs.
Type
'all'
to use all the nodes as
source
nodes
for
the
hash
slots.
Type
'done'
once you entered all the
source
nodes IDs.
Source node
#1:0a0b1e7fc91160fe0d0916d44f26c3ae4c094bac
Source node
#2:done
...................................
Moving slot 5459 from 0a0b1e7fc91160fe0d0916d44f26c3ae4c094bac
Moving slot 5460 from 0a0b1e7fc91160fe0d0916d44f26c3ae4c094bac
Do you want to proceed with the proposed reshard plan (
yes
/no
)?
yes
//
之后,redis 列出了重新分片计划,最后问你
会问你要移动多少个哈希槽,我们把 6000上的所有哈希槽都移走,5461 这个数字可以从终端上看到,或许你的实际情况不是这个数字。
What is the receiving node ID? 2cf8fbb551b29215d08b151273836ccef0a0eb4d
//
选定移动到6300端口的实例上面,实例ID
Please enter all the
source
node IDs.
Type
'all'
to use all the nodes as
source
nodes
for
the
hash
slots.
Type
'done'
once you entered all the
source
nodes IDs.
Source node
#1:0a0b1e7fc91160fe0d0916d44f26c3ae4c094bac//选定移除掉6000端口的实例上面,实例ID
Source node
#2:done
之后,redis 列出了重新分片计划,最后问你
Do you want to proceed with the proposed reshard plan (
yes
/no
)?
yes
中间有一些重新分配的刷屏信息省略。
[mysql@localhost src]$ .
/redis-cli
-p 6003
127.0.0.1:6003> keys *
1)
"aaa"
127.0.0.1:6300>
数据移到6003实例上面啦,我们再来试试删除6000端口实例吧:
[root@DB-SERVER ~]
# /application/redis-3.2.3/bin/redis-trib.rb del-node 127.0.0.1:6000 '0a0b1e7fc91160fe0d0916d44f26c3ae4c094bac'
>>> Removing node 0a0b1e7fc91160fe0d0916d44f26c3ae4c094bac from cluster 127.0.0.1:6000
>>> Sending CLUSTER FORGET messages to the cluster...
>>> SHUTDOWN the node.
[root@DB-SERVER ~]
# redis-cli -c -p 6000
Could not connect to Redis at 127.0.0.1:6000: Connection refused
Could not connect to Redis at 127.0.0.1:6000: Connection refused
not connected>
not connected>
exit
[root@DB-SERVER ~]
# redis-cli -c -p 6003
127.0.0.1:6003> cluster nodes
b8028a898ab08be839a331e94728973c60a7f50c 127.0.0.1:6004 slave 2cf8fbb551b29215d08b151273836ccef0a0eb4d 0 1474193230135 4 connected
2cf8fbb551b29215d08b151273836ccef0a0eb4d 127.0.0.1:6003 myself,master - 0 0 4 connected 0-5460
a91ba0a1ebde74ebf3867ade0b317a8ad7bb5c9b 127.0.0.1:6002 master - 0 1474193228111 3 connected 10923-16383
9a59aa20306cf70a47623acf1e96d1f2f2266823 127.0.0.1:6001 master - 0 1474193229121 2 connected 5461-10922
127.0.0.1:6003>
|
最终我们还是删除成功啦!维护一个redis集群就是这么简单。
本文转自027ryan 51CTO博客,原文链接:http://blog.51cto.com/ucode/1853573,如需转载请自行联系原作者