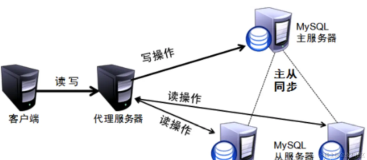
环境描述 :
系统版本:CentOS release 6.6 (Final) 2.6.32-504.el6.x86_64
mysql版本:5.5.32
192.168.0.149:test-A(mysql-proxy)
192.168.0.150:test-B(master)
192.168.0.151:test-C(slave)
注:主从同步已做好,请移步:http://linuxzkq.blog.51cto.com/9379412/1700094
准备工作(test-A:mysql-proxy):
useradd mysql-proxy -s /sbin/nologin -M
cd tools
wget http://mirrors.sohu.com/mysql/MySQL-Proxy/mysql-proxy-0.8.5-linux-glibc2.3-x86-64bit.tar.gz
tar xf mysql-proxy-0.8.5-linux-glibc2.3-x86-64bit.tar.gz
mv mysql-proxy-0.8.5-linux-glibc2.3-x86-64bit /application/mysql-proxy
echo "export PATH=/application/mysql-proxy/bin/:$PATH" >>/etc/profile
tail -1 /etc/profile
source /etc/profile
which mysql-proxy
cd /application
chown -R mysql-proxy.root mysql-proxy
mysql-proxy命令参数:
[root@test-A ~]# mysql-proxy --help
Usage:
mysql-proxy [OPTION...] - MySQL Proxy
--help-all Show all help options
--help-proxy Show options for the proxy-module
Application Options:
-V, --version Show version
--defaults-file=<file> configuration file
--verbose-shutdown Always log the exit code when shutting down
--daemon Start in daemon-mode
--user=<user> Run mysql-proxy as user
--basedir=<absolute path> Base directory to prepend to relative paths in the config
--pid-file=<file> PID file in case we are started as daemon
--plugin-dir=<path> path to the plugins
--plugins=<name> plugins to load
--log-level=(error|warning|info|message|debug) log all messages of level ... or higher
--log-file=<file> log all messages in a file
--log-use-syslog log all messages to syslog
--log-backtrace-on-crash try to invoke debugger on crash
--keepalive try to restart the proxy if it crashed
--max-open-files maximum number of open files (ulimit -n)
--event-threads number of event-handling threads (default: 1)
--lua-path=<...> set the LUA_PATH
--lua-cpath=<...> set the LUA_CPATH
master操作:
mysql> grant all on *.* to 'mysql-proxy'@'192.168.0.%' identified by '123456';
mysql> select user,host from mysql.user;
slave操作:
mysql> grant all on *.* to 'mysql-proxy'@'192.168.0.%' identified by '123456';
mysql> select user,host from mysql.user;
vi /etc/init.d/mysql-proxy #编辑mysql-proxy管理脚本(test-A:mysql-proxy)
#mysql-proxy.scripts,2015-11.25,linux
############################################
#!/bin/sh
export LUA_PATH=/application/mysql-proxy/share/doc/mysql-prox
y/?.lua:/applicaton/mysql-proxy/lib/mysql-proxy/lua/?.lua
mode=1if[−z"mode" ] ; then
mode="start"
fi
case mode in 'start') mysql-proxy --daemon \ --log-level=debug \ --user=mysql-proxy \ --keepalive \ --log-file=/var/log/mysql-proxy.log \ --plugins="proxy" \ #mysql-proxy.scripts mode="start" fi casemode in
'start')
mysql-proxy --daemon \
--log-level=debug \
--user=mysql-proxy \
--keepalive \
--log-file=/var/log/mysql-proxy.log \
--plugins="proxy" \
--proxy-backend-addresses=192.168.0.150:3306 \
--proxy-read-only-backend-addresses=192.168.0.151:3307 \
--plugins="admin" \
--admin-username="admin" \
--admin-password="admin" \
;;
'stop')
killall mysql-proxy
;;
'restart')
if 0stop;then0 start
else
echo "retart failed!!!"
exit 1
fi
;;
esac
exit 0
####################################################
chmod 700 /etc/init.d/mysql-proxy
/etc/init.d/mysql-proxy start
[root@test-A application]# netstat -tunlp|grep mysql-proxy
tcp 0 0 0.0.0.0:4040 0.0.0.0:* LISTEN 4022/mysql-proxy
tcp 0 0 0.0.0.0:4041 0.0.0.0:* LISTEN 4022/mysql-proxy
#4040是proxy端口;4041是admin端口,也就是管理
[root@test-C ~]# mysql -umysql-proxy -p -h 192.168.0.149 --port 4040
Enter password: #多开几个终端,测试连接
Welcome to the MySQL monitor. Commands end with ; or \g.
Your MySQL connection id is 32
Server version: 5.5.32-log MySQL Community Server (GPL)
Copyright (c) 2000, 2013, Oracle and/or its affiliates. All rights reserved.
Oracle is a registered trademark of Oracle Corporation and/or its
affiliates. Other names may be trademarks of their respective
owners.
Type 'help;' or '\h' for help. Type '\c' to clear the current input statement.
mysql> select user,host from mysql.user;
[root@test-C ~]# mysql -uadmin -p -h 192.168.0.149 --port 4041
Enter password:
Welcome to the MySQL monitor. Commands end with ; or \g.
Your MySQL connection id is 1
Server version: 5.0.99-agent-admin
Copyright (c) 2000, 2013, Oracle and/or its affiliates. All rights reserved.
Oracle is a registered trademark of Oracle Corporation and/or its
affiliates. Other names may be trademarks of their respective
owners.
Type 'help;' or '\h' for help. Type '\c' to clear the current input statement.
mysql> select * from backends;
+-------------+--------------------+---------+------+------+-------------------+
| backend_ndx | address | state | type | uuid | connected_clients |
+-------------+--------------------+---------+------+------+-------------------+
| 1 | 192.168.0.150:3306 | up | rw | NULL | 0 |
| 2 | 192.168.0.151:3307 | unknown | ro | NULL | 0 |
+-------------+--------------------+---------+------+------+-------------------+
2 rows in set (0.00 sec)
注意:因为rw-splitting.lua脚本默认有4个链接才启用分离;所以多开启几个终端;多测试几下;你也可以去修改里面的相关值
mysql> select * from backends;
+-------------+--------------------+-------+------+------+-------------------+
| backend_ndx | address | state | type | uuid | connected_clients |
+-------------+--------------------+-------+------+------+-------------------+
| 1 | 192.168.0.150:3306 | up | rw | NULL | 0 |
| 2 | 192.168.0.151:3307 | up | ro | NULL | 0 |
+-------------+--------------------+-------+------+------+-------------------+
2 rows in set (0.00 sec)
#出现两个up,代表读写分离成功。
[root@test-A ~]# lsof -i:4040
COMMAND PID USER FD TYPE DEVICE SIZE/OFF NODE NAME
mysql-pro 4062 mysql-proxy 10u IPv4 156977 0t0 TCP *:yo-main (LISTEN)
mysql-pro 4062 mysql-proxy 12u IPv4 160117 0t0 TCP test-A:yo-main->test-C:53173 (ESTABLISHED)
mysql-pro 4062 mysql-proxy 16u IPv4 160132 0t0 TCP test-A:yo-main->192.168.0.254:56915 (ESTABLISHED)
mysql-pro 4062 mysql-proxy 17u IPv4 160060 0t0 TCP test-A:yo-main->test-B:50068 (ESTABLISHED)
mysql-pro 4062 mysql-proxy 18u IPv4 160145 0t0 TCP test-A:yo-main->192.168.0.254:56916 (ESTABLISHED)
mysql-pro 4062 mysql-proxy 19u IPv4 159920 0t0 TCP test-A:yo-main->192.168.0.254:56914 (ESTABLISHED)
本文转自 linuxzkq 51CTO博客,原文链接:http://blog.51cto.com/linuxzkq/1716885