本文转自 羽丰1995 51CTO博客,原文链接:http://blog.51cto.com/13683137989/1878688
******************理论部分*****************
前言:
在数据为王的时代,日志管理是一个绕不开的话题,相应的开源软件有不少,比如热门的三件套:Logstash、ElasticSearch、Kibana,虽然功能强大,但是配置复杂。相比较而言,rsyslog更容易快速上手。
Rsyslog:
rsyslog是一款自由软件,GPL(General Public License)的lincesed增强的syslogd.功能强大,有开源web loganalyzer支持,同时可以将收集日志存在mysql中,方便分析、审计。具体功能可以查看官网.
日志:
历史日志
历史事件:时间,事件
日志级别:事件的关键性程度,loglevel.
系统日志服务:
syslog:(CentOS 5.x)
守护进程:
syslogd: system 记录系统日志
klogd: kernel 记录内核日志
rsyslog:(CentOS6以后)
守护进程:
syslogd
klogd
注:rsyslog是syslog的下一代版本.
Rsyslog的特性:
a.多线程;
b.使用的协议:UDP, TCP, SSL, TLS, RELP
c.可用于实现日志存储的数据库:MYSQL, PGSQL, ORACLE等;
d.强大的过滤器,可实现过滤日志信息中任何部分;
日志收集方:
facility: 设施,从功能或程序上对日志进行分类:
auth, authrive, cron, daemon, kern, lpr, mail, mark, news, security, user, uucp, local0-local7, syslog
priority:
info, debug, notice, warning, error,crit(critical), alert, emerg(pamic)
指定级别:
*:所有级别
none:没有级别
priority:此级别及更高级别的日志信息;
facility.priority /var/log/message
程序环境:
主程序:rsyslogd
配置文件:/etc/rsyslog.conf
服务脚本:/etc/rc.d/init.d/rsyslog
rsyslog.conf
RULES:
facility.priority target
target:
文件路径:记录于指定的日志文件中,通常应该在/var/log目录下; 文件路径前的“-”表示异步写入;
用户:将日志通知给指定用户
*:所有用户;
日志服务器:@host
host: 必须要监听在tcp或udp协议514端口上提供服务;
管道; |COMMAND
文件记录的日志格式:
事件产生的日期时间 主机 进程(pid): 事件内容
有些日志记录二进制格式: /var/log/wtmp, /var/log/btmp
/var/log/wtmp: 当前系统上成功登陆的日志;
last
/var/log/btmp:
lastb
lastlog命令: 显示当前系统每一个用户最近一次的登陆时间;
******************实操部分*****************
实验要求:
a.配置简单的rsyslog服务器,增加一台客户端机器,由rsyslog服务器收集客户端生成的日志信息;
b.配置rsyslog+loganalyzer+mysql组合型日志服务器,要求客户端生成的日志,由rsyslog服务器收集,并由mysql数据库记录rsyslog服务器的日志,最后由loganalyzer工具在前端界面展示出来.
实验环境:
系统:CentOS 6.7 x3
主机名及服务器作用:
CentOS 6.7:
7-200: rsyslog Server
7-201: Client
7-202: Mysql
1.1 安装rsyslog服务器:
|
1
2
|
[root@7-200 ~]
# rpm -qa rsyslog
rsyslog-5.8.10-10.el6_6.x86_64
|
1.2 打开rsyslog的指定模块,监听在指定套接字:
|
1
2
3
4
5
6
7
8
9
10
11
12
|
[root@7-200 ~]
# vim /etc/rsyslog.conf
...
12
# Provides UDP syslog reception
13 $ModLoad imudp
14 $UDPServerRun 514
15
16
# Provides TCP syslog reception
17 $ModLoad imtcp
18 $InputTCPServerRun 514
...
//13-14
行表示监听UDP协议,打开对UDP协议的收集日志的模块的支持,让它监听在UDP协议的514端口.
//17-18
行表示监听TCP协议,打开对TCP协议的收集日志的模块的支持,让它监听在TCP协议的514端口.
|
注:对于开启UDP协议和TCP协议的选择上,UDP更快,TCP在日志信息记录时更可靠,此处都打开.
1.3 启动rsyslogd服务,查看监听端口:
|
1
2
3
4
5
6
7
8
|
[root@7-200 ~]
# service rsyslog start
Starting system logger: [ OK ] 3059
/rsyslogd
[root@7-200 ~]
# netstat -tunlp |grep rsyslogd
tcp 0 0 0.0.0.0:514 0.0.0.0:* LISTEN 3059
/rsyslogd
tcp 0 0 :::514 :::* LISTEN 3059
/rsyslogd
udp 0 0 0.0.0.0:514 0.0.0.0:* 3059
/rsyslogd
udp 0 0 :::514 :::* 3059
/rsyslogd
[root@7-200 ~]
#
|
//可以看到514端口都已监听在TCP和UDP上,此时其他主机就可以往该日志服务器发日志了.
1.4 开启Client服务器7-201,往日志服务器7-200发送日志:
|
1
2
|
[root@7-201 ~]
# rpm -qa rsyslog
rsyslog-5.8.10-10.el6_6.x86_64
|
1.5 配置rsyslog.conf:
|
1
2
3
4
|
[root@7-201 ~]
# vim /etc/rsyslog.conf
42
#*.info;mail.none;authpriv.none;cron.none /var/log/messages
43 *.info;mail.none;authpriv.none;
cron
.none @10.68.7.200
//
备份第43行,修改日志服务器地址.
|
1.6 重启客户端日志服务器程序:
|
1
2
3
4
|
[root@7-201 ~]
# service rsyslog restart
Shutting down system logger: [ OK ]
Starting system logger: [ OK ]
[root@7-201 ~]
#
|
1.7 在7-201客户端服务器安装vsftp服务,然后在7-200服务器端/var/log/messages查看:
|
1
2
3
4
5
6
7
|
[root@7-201 ~]
# yum -y install vsftpd;date
...
Installed:
vsftpd.x86_64 0:2.2.2-14.el6
Complete!
Sun Aug 21 22:43:21 EDT 2016
|
|
1
2
|
[root@7-200 ~]
# tail /var/log/messages
Aug 21 22:43:21 7-201 yum[3187]: Installed: vsftpd-2.2.2-14.el6.x86_64
|
客户端日志在rsyslog服务端收集,保存在mysql 数据库中,然后通过前端页面展示工具展示出来:
2.1 在7-200服务端安装rsyslog-mysql软件:
|
1
2
3
4
5
6
|
[root@7-200 ~]
# yum -y install rsyslog-mysql
[root@7-200 ~]
# rpm -ql rsyslog-mysql
/lib64/rsyslog/ommysql
.so
/usr/share/doc/rsyslog-mysql-5
.8.10
/usr/share/doc/rsyslog-mysql-5
.8.10
/createDB
.sql
//
注意该文件.
[root@7-200 ~]
#
|
2.2 用二进制方式安装mariadb服务器并完成相关操作:
|
1
2
3
4
5
6
7
8
9
10
11
12
13
14
15
16
17
18
19
20
21
22
23
24
25
26
27
28
29
30
31
32
33
34
35
36
37
38
39
40
41
42
43
44
45
46
47
48
49
50
51
52
53
54
55
56
57
58
59
60
61
62
63
64
65
66
67
68
69
70
71
72
73
74
75
76
77
78
79
80
81
82
83
84
85
86
87
88
89
90
91
92
93
94
95
96
97
98
|
[root@7-202 ~]
# groupadd -r -g 306 mysql
[root@7-202 ~]
# useradd -r -g 306 -u 306 mysql
[root@7-202 ~]
# tar xf mariadb-5.5.46-linux-x86_64.tar.gz -C /usr/local
[root@7-202 ~]
# ln -sv /usr/local/mariadb-5.5.46-linux-x86_64/ /usr/local/mysql
`
/usr/local/mysql
' -> `/usr/local/mariadb-5.5.46-linux-x86_64/'
[root@7-202 ~]
# cd /usr/local/mysql
[root@7-202 mysql]
# chown -R root:mysql ./*
[root@7-202 mysql]
# scripts/mysql_install_db --datadir=/mydata/data --user=mysql
WARNING: The host
'7-202'
could not be looked up with resolveip.
This probably means that your libc libraries are not 100 % compatible
with this binary MariaDB version. The MariaDB daemon, mysqld, should work
normally with the exception that host name resolving will not work.
This means that you should use IP addresses instead of hostnames
when specifying MariaDB privileges !
Installing MariaDB
/MySQL
system tables
in
'/mydata/data'
...
160824 4:11:59 [Note] .
/bin/mysqld
(mysqld 5.5.46-MariaDB) starting as process 2538 ...
OK
Filling help tables...
160824 4:12:01 [Note] .
/bin/mysqld
(mysqld 5.5.46-MariaDB) starting as process 2547 ...
OK
To start mysqld at boot
time
you have to copy
support-files
/mysql
.server to the right place
for
your system
PLEASE REMEMBER TO SET A PASSWORD FOR THE MariaDB root USER !
To
do
so, start the server,
then
issue the following commands:
'./bin/mysqladmin'
-u root password
'new-password'
'./bin/mysqladmin'
-u root -h 7-202 password
'new-password'
Alternatively you can run:
'./bin/mysql_secure_installation'
which
will also give you the option of removing the
test
databases and anonymous user created by default. This is
strongly recommended
for
production servers.
See the MariaDB Knowledgebase at http:
//mariadb
.com
/kb
or the
MySQL manual
for
more
instructions.
You can start the MariaDB daemon with:
cd
'.'
; .
/bin/mysqld_safe
--datadir=
'/mydata/data'
You can
test
the MariaDB daemon with mysql-
test
-run.pl
cd
'./mysql-test'
; perl mysql-
test
-run.pl
Please report any problems at http:
//mariadb
.org
/jira
The latest information about MariaDB is available at http:
//mariadb
.org/.
You can
find
additional information about the MySQL part at:
http:
//dev
.mysql.com
Support MariaDB development by buying support
/new
features from MariaDB
Corporation Ab. You can contact us about this at sales@mariadb.com.
Alternatively consider joining our community based development effort:
http:
//mariadb
.com
/kb/en/contributing-to-the-mariadb-project/
[root@7-202 mysql]
# cp support-files/mysql.server /etc/rc.d/init.d/mysqld
[root@7-202 mysql]
# chkconfig --add mysqld
[root@7-202 mysql]
# chkconfig --list mysqld
mysqld 0:off 1:off 2:on 3:on 4:on 5:on 6:off
[root@7-202 mysql]
#
[root@7-202 mysql]
# mkdir /etc/mysql
[root@7-202 mysql]
# cp support-files/my-large.cnf /etc/mysql/my.cnf
[root@7-202 mysql]
# vim /etc/mysql/my.cnf
...
在thread_concurrency = 8 这一行下面添加如下三行
datadir =
/mydata/data
innodb_file_per_table = on
skip_name_resolve = on
...
[root@7-202 mysql]
# service mysqld start
Starting MySQL... SUCCESS!
[root@7-202 mysql]
# mysql
Welcome to the MySQL monitor. Commands end with ; or \g.
Your MySQL connection
id
is 2
Server version: 5.5.46-MariaDB-log MariaDB Server
Copyright (c) 2000, 2013, Oracle and
/or
its affiliates. All rights reserved.
Oracle is a registered trademark of Oracle Corporation and
/or
its
affiliates. Other names may be trademarks of their respective
owners.
Type
'help;'
or
'\h'
for
help. Type
'\c'
to
clear
the current input statement.
mysql>
mysql> GRANT all on Syslog.* to
'syslog'
@
'10.68.7.%'
Identified by
'syslog'
;
Query OK, 0 rows affected (0.00 sec)
mysql> flush privileges;
Query OK, 0 rows affected (0.00 sec)
mysql>
exit
Bye
[root@7-202 mysql]
#
[root@7-202 mysql]
# vim /etc/my.cnf
...添加如下两行:
skip_name_resolv = on
innodb_file_per_table = on
|
2.3 从rsyslog服务器上远程登录mysql服务器:
|
1
2
3
4
5
6
7
8
9
10
11
12
13
14
|
[root@7-200 ~]
# mysql -usyslog -h10.68.7.202 -psyslog
Welcome to the MySQL monitor. Commands end with ; or \g.
Your MySQL connection
id
is 8
Server version: 5.5.46-MariaDB-log MariaDB Server
Copyright (c) 2000, 2013, Oracle and
/or
its affiliates. All rights reserved.
Oracle is a registered trademark of Oracle Corporation and
/or
its
affiliates. Other names may be trademarks of their respective
owners.
Type
'help;'
or
'\h'
for
help. Type
'\c'
to
clear
the current input statement.
mysql>
|
2.4 将软件rsyslog-mysql生成的sql语句导入数据库:
|
1
2
3
4
5
6
7
|
[root@7-200 ~]
# rpm -ql rsyslog-mysql
/lib64/rsyslog/ommysql
.so
/usr/share/doc/rsyslog-mysql-5
.8.10
/usr/share/doc/rsyslog-mysql-5
.8.10
/createDB
.sql
[root@7-200 ~]
# mysql -usyslog -h10.68.7.202 -p </usr/share/doc/rsyslog-mysql-5.8.10/createDB.sql
Enter password:
[root@7-200 ~]
#
|
//此时,可以登录到数据库查看到Syslog库及对应的表.
2.5 配置rsyslog能使用mysql服务器:
|
1
2
3
4
|
...
20 $ModLoad ommysql
//
增加该项,添加到MonLoad区域附近.
42 *.info;mail.none;authpriv.none;
cron
.none :ommysql:10.68.7.202,Syslog,syslog,syslog
//
在第42行处添加,注意右边的格式
|
2.6 重启rsyslog服务:
|
1
2
3
4
|
[root@7-200 ~]
# service rsyslog restart
Shutting down system logger: [ OK ]
Starting system logger: [ OK ]
[root@7-200 ~]
#
|
2.7 然后在rsyslog服务器安装vsftpd服务,Client 7-201服务器安装samba服务,生成的日志在mysql数据库中查看:
|
1
2
3
4
5
6
7
8
9
10
|
[root@7-201 ~]
# yum -y install samba
...
Running Transaction
Installing : samba-3.6.23-20.el6.x86_64 1
/1
Verifying : samba-3.6.23-20.el6.x86_64 1
/1
Installed:
samba.x86_64 0:3.6.23-20.el6
Complete!
|
|
1
2
3
4
5
6
7
8
9
10
11
12
13
14
15
16
17
18
19
20
21
22
23
24
25
26
27
28
29
30
31
32
33
34
35
36
37
38
39
40
41
42
43
44
45
46
47
48
49
50
51
52
53
54
55
56
57
58
59
60
61
62
63
64
65
66
67
68
69
70
71
72
73
74
75
76
77
78
79
80
81
82
83
84
85
86
87
88
89
90
91
92
93
94
95
96
97
98
99
100
101
102
103
104
105
106
107
108
109
110
111
112
113
114
115
116
117
118
119
120
121
122
123
124
125
126
127
128
129
130
131
132
133
134
135
136
137
138
139
140
141
|
[root@7-200 ~]
# yum -y install vsftpd
...
Installed:
vsftpd.x86_64 0:2.2.2-14.el6
Complete!
[root@7-200 ~]
# mysql -usyslog -h10.68.7.202 -psyslog
Welcome to the MySQL monitor. Commands end with ; or \g.
Your MySQL connection
id
is 16
Server version: 5.5.46-MariaDB-log MariaDB Server
Copyright (c) 2000, 2013, Oracle and
/or
its affiliates. All rights reserved.
Oracle is a registered trademark of Oracle Corporation and
/or
its
affiliates. Other names may be trademarks of their respective
owners.
Type
'help;'
or
'\h'
for
help. Type
'\c'
to
clear
the current input statement.
mysql> use Syslog;
Reading table information
for
completion of table and column names
You can turn off this feature to get a quicker startup with -A
Database changed
mysql> show tables;
+------------------------+
| Tables_in_Syslog |
+------------------------+
| SystemEvents |
| SystemEventsProperties |
+------------------------+
2 rows
in
set
(0.00 sec)
mysql>
select
* from SystemEvents\G;
*************************** 1. row ***************************
ID: 1
CustomerID: NULL
ReceivedAt: 2016-08-24 04:26:53
DeviceReportedTime: 2016-08-24 04:26:53
Facility: 0
Priority: 6
FromHost: 7-200
Message: imklog 5.8.10, log
source
=
/proc/kmsg
started.
NTSeverity: NULL
Importance: NULL
EventSource: NULL
EventUser: NULL
EventCategory: NULL
EventID: NULL
EventBinaryData: NULL
MaxAvailable: NULL
CurrUsage: NULL
MinUsage: NULL
MaxUsage: NULL
InfoUnitID: 1
SysLogTag: kernel:
EventLogType: NULL
GenericFileName: NULL
SystemID: NULL
*************************** 2. row ***************************
ID: 2
CustomerID: NULL
ReceivedAt: 2016-08-24 04:26:53
DeviceReportedTime: 2016-08-24 04:26:53
Facility: 5
Priority: 6
FromHost: 7-200
Message: [origin software=
"rsyslogd"
swVersion=
"5.8.10"
x-pid=
"2367"
x-info=
"http://www.rsyslog.com"
] start
NTSeverity: NULL
Importance: NULL
EventSource: NULL
EventUser: NULL
EventCategory: NULL
EventID: NULL
EventBinaryData: NULL
MaxAvailable: NULL
CurrUsage: NULL
MinUsage: NULL
MaxUsage: NULL
InfoUnitID: 1
SysLogTag: rsyslogd:
EventLogType: NULL
GenericFileName: NULL
SystemID: NULL
*************************** 3. row ***************************
ID: 3
CustomerID: NULL
ReceivedAt: 2016-08-24 04:27:27
DeviceReportedTime: 2016-08-24 04:27:27
Facility: 1
Priority: 6
FromHost: 7-200
Message: Installed: vsftpd-2.2.2-14.el6.x86_64
NTSeverity: NULL
Importance: NULL
EventSource: NULL
EventUser: NULL
EventCategory: NULL
EventID: NULL
EventBinaryData: NULL
MaxAvailable: NULL
CurrUsage: NULL
MinUsage: NULL
MaxUsage: NULL
InfoUnitID: 1
SysLogTag: yum[2397]:
EventLogType: NULL
GenericFileName: NULL
SystemID: NULL
*************************** 4. row ***************************
ID: 4
CustomerID: NULL
ReceivedAt: 2016-08-24 04:30:03
DeviceReportedTime: 2016-08-24 04:30:03
Facility: 1
Priority: 6
FromHost: 7-201
Message: Installed: samba-3.6.23-20.el6.x86_64
NTSeverity: NULL
Importance: NULL
EventSource: NULL
EventUser: NULL
EventCategory: NULL
EventID: NULL
EventBinaryData: NULL
MaxAvailable: NULL
CurrUsage: NULL
MinUsage: NULL
MaxUsage: NULL
InfoUnitID: 1
SysLogTag: yum[4787]:
EventLogType: NULL
GenericFileName: NULL
SystemID: NULL
4 rows
in
set
(0.00 sec)
ERROR:
No query specified
mysql>
//
可以看到7-200主机安装的vsftpd服务日志和7-201主机安装的samba服务日志已经记录在mysql数据库中了.
|
3.1 配置rsyslog前端展示界面工具loganalyzer:
3.1.1 配置webserver,支持PHP
|
1
2
3
4
5
6
|
[root@7-200 ~]
# yum install httpd php php-mysql php-gd
[root@7-200 ~]
# service httpd start
[root@7-200 ~]
# vim /etc/httpd/conf/httpd.conf
...
402 DirectoryIndex index.php index.html index.html.var
//
此处添加index.php文件,使httpd服务支持php.
|
3.1.2 [root@7-200 ~]# vim /var/www/html/index.php
|
1
2
3
4
5
6
7
8
9
10
11
12
|
//
添加如下内容:
<?php
$conn=mysql_connect(
'10.68.7.202'
,
'syslog'
,
'syslog'
);
if
($conn)
echo
"OK"
;
else
echo
"Not OK"
;
phpinfo();
?>
:wq
|
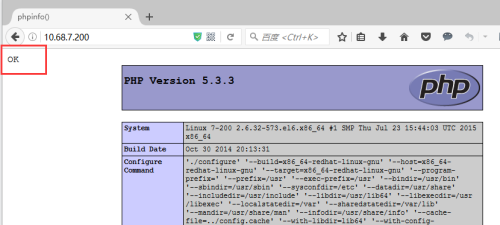
3.1.3 浏览器查看http与mysql、php的连接情况,即lamp环境:
//显示OK则说明http与mysql连接正常.
3.2 安装oganalyzer工具:
|
1
2
3
4
5
6
7
8
9
10
11
12
13
14
15
16
17
18
|
[root@7-200 ~]
# tar -zxvf loganalyzer-3.6.5.tar.gz -C /var/www/html/
[root@7-200 ~]
# cd /var/www/html/loganalyzer-3.6.5
[root@7-200 loganalyzer-3.6.5]
#
[root@7-200 loganalyzer-3.6.5]
# mv src/ ../loganalyzer
[root@7-200 loganalyzer-3.6.5]
# cp contrib/*.sh ../loganalyzer
[root@7-200 loganalyzer-3.6.5]
# cd ../loganalyzer
[root@7-200 loganalyzer]
# ls *.sh
configure.sh secure.sh
[root@7-200 loganalyzer]
# chmod +x *.sh
[root@7-200 loganalyzer]
# ./configure.sh
[root@7-200 loganalyzer]
# ./secure.sh
[root@7-200 loganalyzer]
# chmod 666 config.php
[root@7-200 loganalyzer]
# service httpd restart
Stopping httpd: [ OK ]
Starting httpd: httpd: apr_sockaddr_info_get() failed
for
7-200
httpd: Could not reliably determine the server's fully qualified domain name, using 127.0.0.1
for
ServerName
[ OK ]
[root@7-200 loganalyzer]
#
|
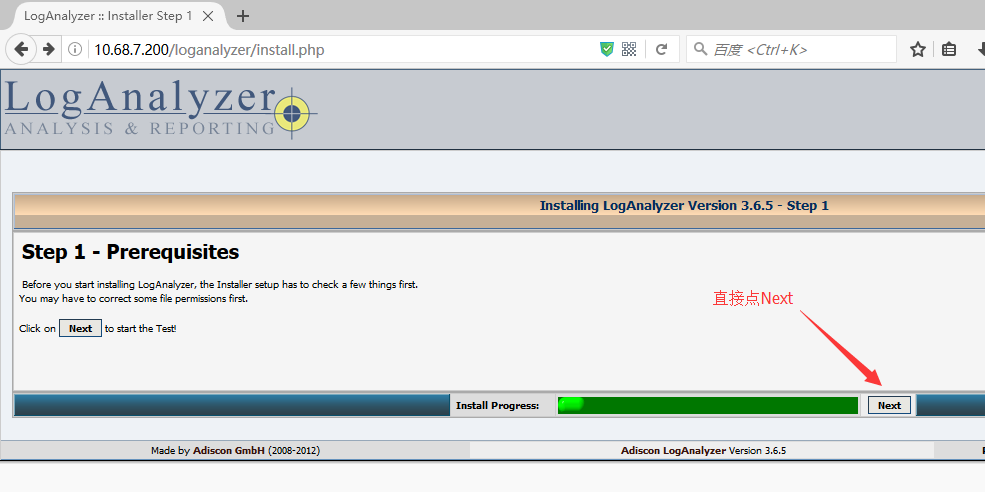
3.3 此时就可以在浏览器访问了,http://10.68.7.200/loganalyzer/install.php 第一次访问时需加install.php,之后就不用加了.
一直下一步:
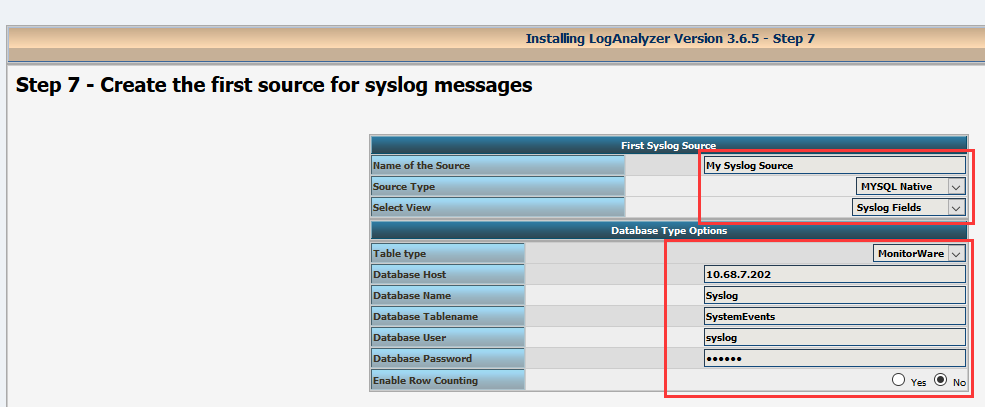
一直下一步:
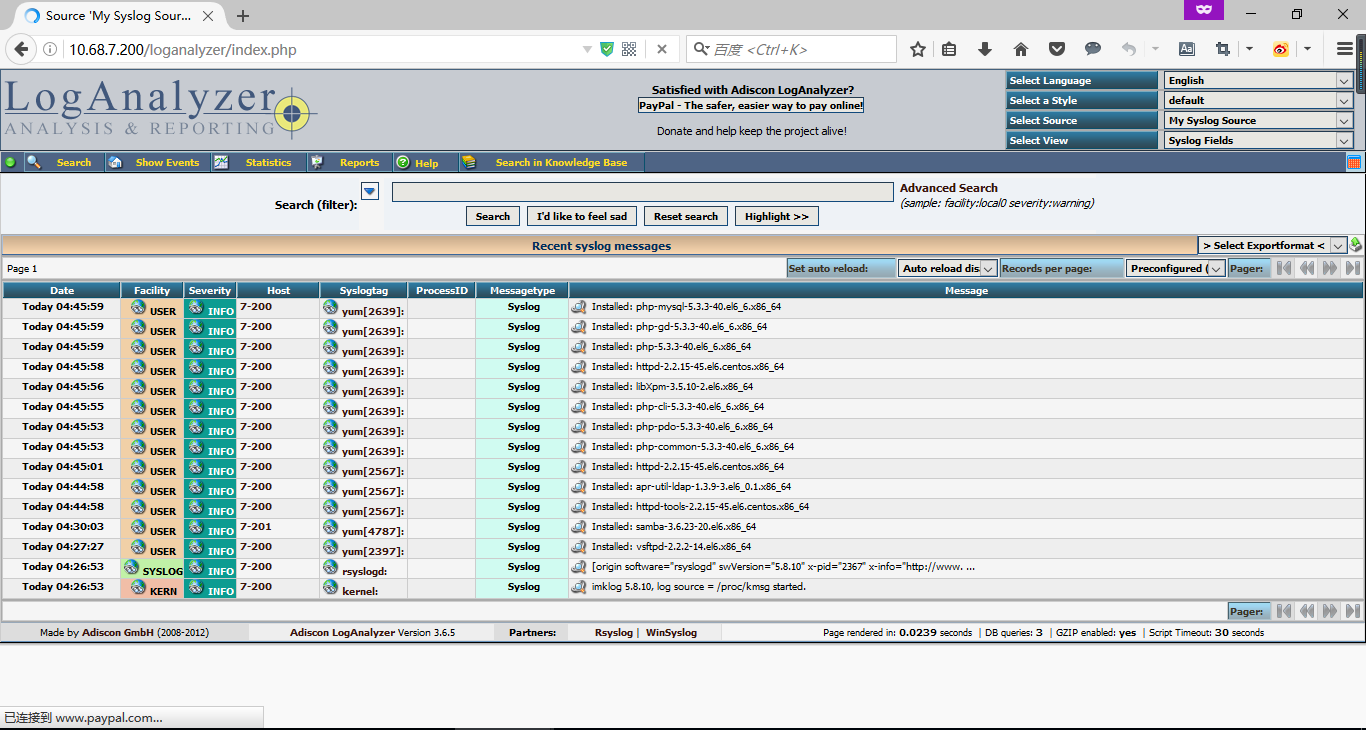
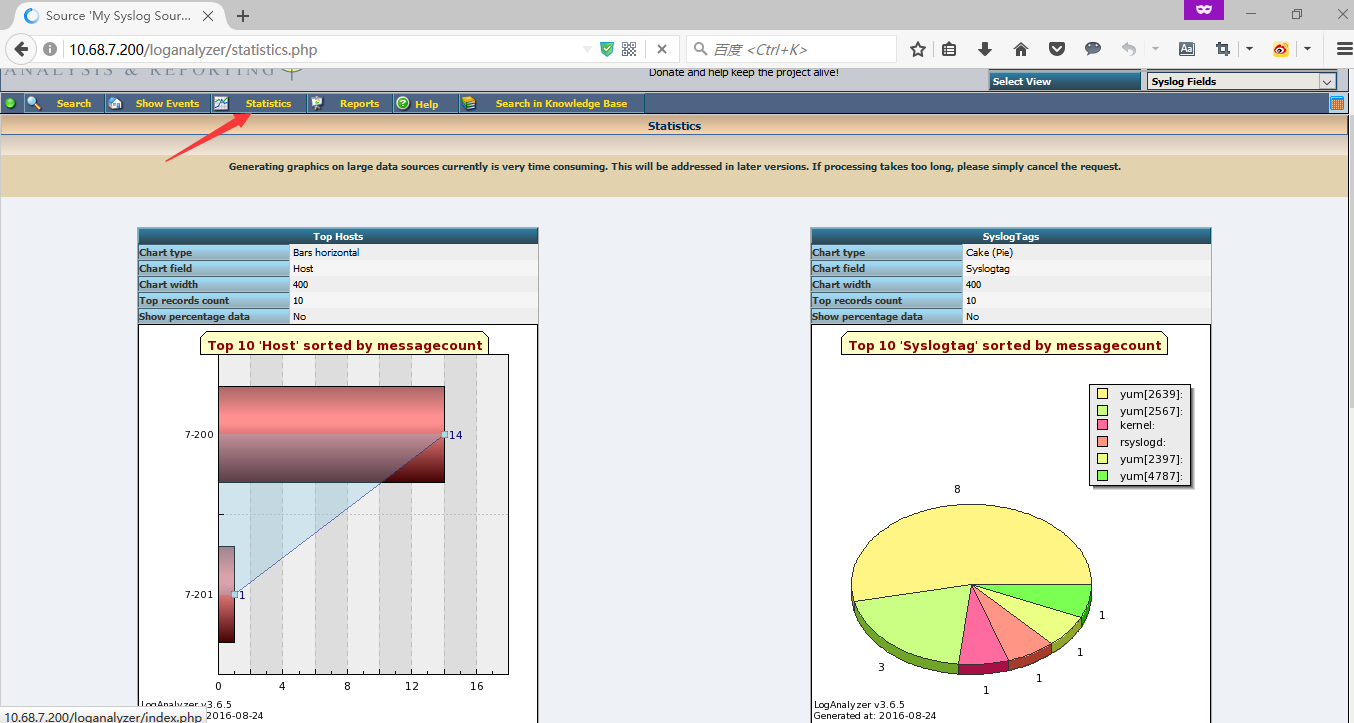
至此,rsyslog+loganalyzer+lamp组合型日志服务器安装成功,至于loganalyzer工具的更多功能,此处不再详述!
