【认识haproxy】
软件作用:负载均衡,可做4层也可做7层。
优点:
1 配置简单,软件使用简单
2 4、7层都可以做
3 有自动的监控检查功能
4 是一个专业反向代理软件
5 会话保持功能比较强大(ngixn的实现是通过ip hash,LVS 是通过-p)
6 几乎不需要优化,支持数以万计的并发连接。
常常用来对比LVS和NGINX对比
【常用环境】
1 邮件服务器代理
2 取代F5 等设备,或者作为其备份
3 代理web
【haporxy的简单搭建和简单使用实例--代理ssh】
目的:学习了解haproxy
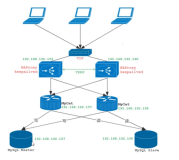
【系统的环境】
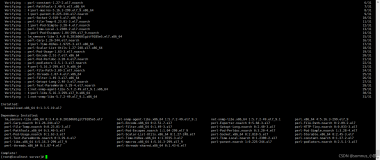
[root@master haproxy]# ifconfig |grep -A1 eth0
eth0 Link encap:Ethernet HWaddr 00:0C:29:65:14:0F
inet addr:192.168.100.10 Bcast:192.168.100.255 Mask:255.255.255.0
[root@master haproxy]# uname -r; uname -m
2.6.32-358.el6.x86_64
x86_64
[root@master haproxy]# cat /etc/issue
entOS release 6.4 (Final)
【软件准备】
[root@master haproxy]# ll -h /usr/local/src/haproxy-1.6.2.tar.gz
-rw-r--r-- 1 root root 1.5M Sep 4 18:52 /usr/local/src/haproxy-1.6.2.tar.gz
【安装】
|
1
2
3
4
5
|
cd
/usr/local/src
tar
xvf haproxy-1.6.2.
tar
.gz
cd
haproxy-1.6.2
make
TARGET=linux2628 ARCH=x86_64
make
install
PREFIX=
/usr/local/haproxy
|
【安装结果和一些常用目录创建】
默认只有三个目录
[root@master haproxy]# tree -d /usr/local/haproxy/
/usr/local/haproxy/
├── doc
│ └── haproxy
├── sbin
└── share
└── man
创建一些常用目录:
cd /usr/local/haproxy
mkdir -p etc var/run/ var/chroot logs #放置haproxy配置文的目录,var/run 放置pid等文件的目录
创建haproxy用户
[root@master etc]# useradd -s /sbin/nologin -M haproxy
[root@master etc]# id haproxy
uid=1002(haproxy) gid=1002(haproxy) groups=1002(haproxy)
【编写haproxy配置文件】
vim haproxy.cfg
#Global settings
global
log 127.0.0.1:514 local3 info ###[err warning info debug]
maxconn 20480
chroot /usr/local/haproxy/var/chroot
user haproxy #为haproxy 用户的uid ,haproxy用户需要自己手动创建
group haproxy
daemon #后台运行
quiet
nbproc 2
pidfile /usr/local/haproxy/var/run/haproxy.pid
##---------------------------------------------------------------------
## common defaults that all the 'listen' and 'backend' sections will
## use if not designated in their block
##---------------------------------------------------------------------
defaults
log global ####采用全局定义的日志
mode http ###默认的模式mode { tcp|http|health },tcp是4层,http是7层,health只会返回OK
maxconn 20480
option httplog
option httpclose
option forwardfor
option dontlognull ###不记录健康检查的日志信息
option redispatch ###serverId对应的服务器挂掉后,强制定向到其他健康的服务器
retries 3 #3次连接失败就认为服务不可用,也可以通过后面设置
balance roundrobin #采用轮训算法
contimeout 5000
clitimeout 50000
srvtimeout 50000
listen ssh_poll
bind 192.168.100.10:80
mode tcp
option httplog
option dontlognull
option logasap
option forwardfor
option httpclose
server host1 192.168.100.10:22 check inter 2000 rise 3 fall 3
server host2 192.168.100.13:22 check inter 2000 rise 3 fall 3
listen status
bind 192.168.100.10:8080
stats enable
stats uri /stats #管理地址
stats auth admin:123456 #管理用户和密码
[root@master etc]#
# 注意配置文件的balance轮询方法,常用 balance roundrobin 和 balance static-rr 两者的区别是。一个是动态一个是静态,静态的在运行的时候不生效。切动态的对后端服务的连接数有限制,最多为4128个连接。所以一般代理tcp 数据库的一般轮询方法是用 balance static-rr。
测试启动:
检查配置文件:
/usr/local/haproxy/sbin/haproxy -f /usr/local/haproxy/etc/haproxy.conf -c
-f 指定配置文件
-c check配置文件
后台启动
/usr/local/haproxy/sbin/haproxy -f /usr/local/haproxy/etc/haproxy.conf -D
检查是否启动1:
[root@master haproxy]# ps -ef |grep haproxy
haproxy 2394 1 0 22:22 ? 00:00:00 /usr/local/haproxy/sbin/haproxy -f /usr/local/haproxy/etc/haproxy.conf -D
haproxy 2395 1 0 22:22 ? 00:00:00 /usr/local/haproxy/sbin/haproxy -f /usr/local/haproxy/etc/haproxy.conf -D
root 2626 1707 0 22:27 pts/0 00:00:00 grep --color=auto haproxy
检查端口是否启动:
[root@master haproxy]# netstat -tulnp |grep 80
tcp 0 0 192.168.100.10:8080 0.0.0.0:* LISTEN 2394/haproxy
tcp 0 0 192.168.100.10:80 0.0.0.0:* LISTEN 2394/haproxy
【测试80-代理ssh端口】
[root@master haproxy]# ssh -p80 192.168.100.10
root@192.168.100.10's password:
Last login: Sun Sep 4 22:23:02 2016 from 192.168.100.10 #第一被代理轮循到了host1
[root@master ~]# logout
Connection to 192.168.100.10 closed.
[root@master haproxy]# ssh -p80 192.168.100.10
Last login: Sun Sep 4 22:23:05 2016 from 192.168.100.10 #第二被代理轮循到了host2
[root@slave ~]# Connection to 192.168.100.10 closed by remote host.
Connection to 192.168.100.10 closed.
【查看日志和配置日志的路径】
1 日志被定义到了local3 级别为info。 这是要开启/etc/init.d/rsyslogd 服务的(如何使用这个服务,百度)。
2 netstat -tulnp |grep 514 查看是否监听rsyslogd端口
默认日志写入/var/log/messages

如何修改日志的路径?
1 修改rsyslogd的配置(514监听端口一定要开启)
[root@master haproxy]# tail -1 /etc/rsyslog.conf
local3.* /usr/local/haproxy/logs/haproxy.log
2 重启rsyslogd服务
/etc/init.d/rsyslog restart
【编写haproxy的启动脚本】
脚本根据以下选项参数:
-c check mode : only check config files and exit
-D goes daemon ; -C changes to <dir> before loading files.
-V enters verbose mode (disables quiet mode)
-p writes pids of all children to this file
-sf/-st [pid ]* finishes/terminates old pids.
脚本--简单 使用。不使用系统自带函数/etc/init.d/functions
|
1
2
3
4
5
6
7
8
9
10
11
12
13
14
15
16
17
18
19
20
21
22
23
24
25
26
27
28
29
30
31
32
33
34
35
36
37
38
39
40
41
42
43
44
|
#!/bin/bash
#by andy at 20160905
BASE=
"/usr/local/haproxy"
PROG=
"$BASE/sbin/haproxy"
PIDFILE=
"$BASE/var/run/haproxy.pid"
CONFIG=
"$BASE/etc/haproxy.conf"
lockfile=
/var/lock/subsys/haproxy
case
"$1"
in
start)
$PROG -f $CONFIG -D
retval=$?
[ $retval -
eq
0 ] &&
echo
"start ok"
&&
touch
$lockfile
;;
stop)
kill
$(
cat
$PIDFILE)
retval=$?
[ $retval -
eq
0 ] &&
echo
"stop ok"
&&
rm
-f $lockfile
;;
status)
if
[ -f $lockfile ];
then
echo
"haproxy is running..."
else
echo
"haproxy is not running..."
fi
;;
restart)
kill
$(
cat
$PIDFILE)
echo
"stop ok"
$PROG -f $CONFIG -D
echo
"start ok"
;;
reload)
$PROG -f $CONFIG -D -sf $(
cat
$PIDFILE)
retval=$?
[ $retval -
eq
0 ] &&
echo
"reload ok"
;;
check)
$PROG -f $CONFIG -V -c
;;
*)
echo
"USAGE: $0 {start|stop|restart|status|reload|check}"
exit
1
;;
esac
|
【ha的自带status页面】
listen status
bind 192.168.100.10:8080
stats enable
stats uri /stats #管理地址
stats auth admin:123456 #管理用户和密码
即,绑定在8080端口,开启stats,uri 为stats 账号密码为admim/123456

【关于监控检查】
关于检查检查参数
基于tcp端口的健康检查
check port 80 inter 2000 rise 3 fall 3
1 port 检查的是RS端口80
2 inter 检查时间间隔是2s 默认2000
3 rise 恢复时候的一个参数,恢复前检查2次都Ok,认为其复活,加入群组。 默认是 2次
4 fall 3次检查失败后就摘除。默认值是3
区别以下:
server host1 192.168.100.10:8089 check port 80 inter 5000 rise 3 fall 3
监控检查端口192.168.100.10:80端口每隔5s一次3次失败则摘除,如果恢复3次检查Ok就就入集群
server host1 192.168.100.10:8089 check
==等于
server host1 192.168.100.10:8089 check port 8089 inter 5000 rise 3 fall 3
监控检查端口192.168.100.10:8089端口每隔3s一次3次失败则摘除,如果恢复2次检查Ok就就入集群
基于http IP url的检查方式 option httpchk <method> <uri> <version>
method :如果没有设定the "OPTIONS" method is used
uri : 如果没有设定 It defaults to " / "
version: is the optional HTTP version string. It defaults to "HTTP/1.0".but some servers might behave incorrectly in HTTP 1.0, so turning it to HTTP/1.1 may sometimes help.
如果是1.1的版本Host字段一定要加 after "\r\n" following the version string.
合适7层的检查优先于port检查
1)
HEAD方式- 这是一个高级一点的健康检查
如只检查访问码为200的则通过检查 相当要curl -I http://ip:port/check.html 的返回码要为200
option httpchk HEAD /check.html
==
option httpchk HEAD /check.html HTTP/1.0
server host1 192.168.100.10:8089 check inter 5000 rise 3 fall 3
server host2 192.168.100.13:80 check inter 5000 fall 3
也可以匹配host内容
option httpchk HEAD /check.html HTTP/1.0
2)
GET方式 知识一个method方法而已
option httpchk GET /check.html
【禁用一个RS】
server host1 192.168.100.10:8089 check inter 5000 rise 3 fall 3 disabled
此节点在haproxy启动时候,将RS节点处于维护状态,不停供服务。
【server 语句的常用功能参数】
1) 高可用 backup
功能参数介绍
1) 目的:高可用
backup
When "backup" is present on a server line, the server is only used in load
balancing when all other non-backup servers are unavailable.
其他非non-bakcup RS节点都挂了的时候,才启用backup提供服务。 让其他非backup节点,恢复后,backup又不被启用。
如:
server host1 192.168.100.10:8089 check inter 2000 rise 3 fall 3
server host2 192.168.100.13:80 check inter 2000 rise 3 fall 3
server host3 192.168.100.20:80 check inter 2000 rise 3 fall 3 backup
注意:只有host1 host2都被剔除后,host3才启用
2) option allbackups 语句
option allbackups
server host1 192.168.100.10:8089 check inter 2000 rise 3 fall 3
server ...
server ...
server host2 192.168.100.13:80 check inter 2000 rise 3 fall 3 backup
server host3 192.168.100.20:80 check inter 2000 rise 3 fall 3 backup
解释:
默认当所有非backup的节点都挂了的时候,只有第一个backup非接管所有的流量。但是有时又一个backup是承受不住了。所以需要allbackups开启,这样是多个backup会同时接管流量。
By default, the first operational backup server gets all traffic when normalservers are all down. Sometimes, it may be preferred to use multiple backups at once, because one will not be enough. When "option allbackups" is enabled,the load balancing will be performed among all backup servers when all normal ones are unavailable.
【RS客户端记录真实客户端IP问题】
1 让haproxy支持和功能,作为forward
option forwardfor
Enable insertion of the X-Forwarded-For header to requests sent to servers
可以放置在ay be used in sections : defaults | frontend | listen | backend区块中
2 RS端 apache 和nginx有响应的日志修改问题调整X-Forwarder-For
延伸,RS如何不记录ha因为健康检查访问的日志呢?
nginx中如下配置即可:
location = /check.html {
access_log off;
}
【ha的高可用】
1 可以使用keepalived
2 可以使用heartbeat
如keepalived的检测脚本(一定要控制好master 和backup的 优先级)
[root@slave ~]# cat /root/check_haproxy.sh
|
1
2
3
4
5
6
7
8
9
10
|
#!/bin/bash
A=`
ps
-C haproxy --no-header |
wc
-l`
if
[ $A -
eq
0 ];
then
/etc/init
.d
/haproxy
start
sleep
3
if
[ `
ps
-C haproxy --no-header |
wc
-l` -
eq
0 ];
then
#killall keepalived
exit
1
fi
fi
|
有一个问题: 1 当使用HA高可用的时候,VIP一定只会haproxy的一个主节点或者被节点,所以在启动haproxy的时候,肯定会出现报错。如下:
[root@slave etc]# /etc/init.d/haproxy start
[ALERT] 261/215509 (25575) : Starting proxy ssh_poll: cannot bind socket[192.168.100.14:80]
原因: 绑定IP或者端口失败。 绑定IP失败的原因是网卡现在没有这个VIP地址。如果是端口那就可能是其他程序占用。
解决没有IP也能绑定的启动haproxy的方法:
修改内核参数
|
1
2
|
echo
'net.ipv4.ip_nonlocal_bind = 1'
>>
/etc/sysctl
.conf
sysctl -p
|
【七层的应用】
基于host
基于请求的路径
基于user-agent
【基于host】
frontend www
bind 192.168.100.10:80
acl www_domain hdr(host) -i www.test.com
acl bbs_domain hdr(host) -i bbs.test.com
redirect prefix http://bbs.baidu.com code 301 if bbs_domain
use_backend www if www_domain
default_backend blog
.......
注意:匹配到bbs_domain这个acl名字的规则的,301重定向到bbs.baidu.com
匹配到www_doamain这个acl的规则的,使用backend blog。
【基于路径】
acl url_begin_static path_beg /static /images /img /css
acl url_end_static path_end .gif .png .jpg .css .js
【基于user-agent】
frontend ua_test
bind 192.168.100.10:80
acl ua_i hdr_reg(User-Agent) -i iphone android #匹配User-Agent类型
acl ua_w hdr_reg(User-Agent) -i window
redirect prefix http://www.apple.com code 301 if ua_i
redirect prefix http://www.microsoft.com/zh-cn code 301 if ua_w
default_backend www
注意:匹配到user-agent中有iphone或者android的acl都重定向到苹果的官网。
测试:
[root@slave haproxy]# curl -I -H "user-agent:iphone6" bbs.test.com
HTTP/1.1 301 Moved Permanently
Content-length: 0
Location: http://www.apple.com/
Connection: close
【访问出错时候的,优雅页面显示】
<code> is the HTTP status code. Currently, HAProxy is capable of
generating codes 200, 400, 403, 405, 408, 429, 500, 502, 503, and
504.
如:
errorfile 400 /etc/haproxy/errorfiles/400badreq.html
errorfile 403 /etc/haproxy/errorfiles/403forbid.html
errorfile 503 /etc/haproxy/errorfiles/503sorry.html
【use_backend 中if 语句的与 或 非实现】
acl an1 hdr_sub(host) -i www.test.com
acl an_anhouse.cn_443 hdr_beg(host) -i member gold hft hfb pay www bi tt oa ssl-static ssl-file
正常满足一个匹配条件的
use_backend an1 if an_anhouse.cn_443
与
use_backend an1 if an_anhouse.cn_443 an1
或
use_backend an1 if an_anhouse.cn_443 || an1
非
use_backend an1 if ! an_anhouse.cn_443
【 #强制跳转https的域名】
redirect scheme https code 301 if { hdr_beg(host) hfb bi tt fin pay oa } !{ ssl_fc }
注: ssl_fc 是一个默认布尔值
Returns true when the front connection was made via an SSL/TLS transport
layer and is locally deciphered. This means it has matched a socket declared
with a "bind" line having the "ssl" option.