介绍:
ansible是基于Python开发,集合了众多运维工具(puppet、cfengine、chef、func、fabric)的优点
具有批量系统配置、批量程序部署、批量运行命令等功能。
是基于模块工作的,本身没有批量部署的能力。真正具有批量部署的是ansible所运行的模块,ansible只是提供一种框架。
操作:
以下通过实际演练来更好的理解ansible的工作原理
使用三台机器组建ansible使用环境
注意:三台主机要网络同步时间,101主机作为ansible控制机,106和107主机作为普通服务器
yum -y install ansible
#安装ansible
基于密钥进行ssh认证
配置/etc/ansible/hosts
ssh-keygen -t rsa -P ''
for i in 106 107;do ssh-copy-id -i ~/.ssh/id_rsa.pub root@192.168.1.$i ;done
|
1
2
3
4
5
6
7
8
|
ansible -help
-m 指定调用的模块
-a 每个模块都有自己的专有的参数,指定此模块参数
-f 指定每批处理多少台主机,默认5台
#更多的参数可自行了解
eg:
ansible all --list-hosts
#列出当前处于同一模式的所有主机
ansible webservers --list-hosts
|
|
1
2
3
4
5
6
7
8
9
10
11
|
ping
模块:
ansible all -m
ping
#测试ansible到各个服务器的连通性
192.168.1.106 | SUCCESS => {
#状态是成功的,即连通性是没问题
"changed"
:
false
,
#修改状态是失败,说明我们未做任何修改操作
"ping"
:
"pong"
#ansible发出ping验证,对方返回pong告知连接正常
}
192.168.1.107 | SUCCESS => {
"changed"
:
false
,
"ping"
:
"pong"
}
|
|
1
2
3
4
|
ansible-doc -h
#查看ansible文档的帮助信息
ansible-doc -l
#列出ansible支持的所有模块信息,如上文只能中的ping模
ansible-doc -s
command
#查看指定模块的参数信息,command是一种常用的模块,默认不指定模块时就是使用command
|
command模块:
|
1
2
3
4
5
6
7
8
9
10
11
12
13
14
|
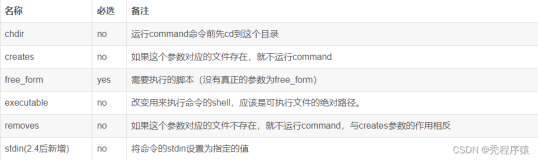
[root@node1 ~]
#ansible 192.168.1.106 -m command -a 'pwd chdir=/app'
#在执行命令pwd之前,先cd进入chdir指定的目录,所以结果显示目录是/app而不是root的家目录
#-m指定模块,-a指定参数(基本都是键值对),只是这里的参数实际上是两台命令一个是pwd,一个是chdir,而这两个命令又有先后之分
ansible 192.168.1.106 -m
command
-a
'mkdir dir chdir=/app creates=dir'
#创建目录dir,creates表示如果dir已经存在就不再执行mkdir操作,直接跳过。此过程实现幂等性
#幂等:执行一次和执行多次的结果都是一样的
#creates表示指定路径文件不存在才执行指令,而removes则相反,表示指定路径文件存在才执行指令
#creates和removes含义相反,注意区分,而且他们都是针对指定目录下的文件而不针对用户或进程操作
command
模块是不能是被shell语法的,所有在用到如
bash
类的shell时可以使用shell模块
ansible all -m shell -a
"echo centos| passwd --stdin user1"
#shell模块与command模块基本相同,只是此模块支持shell类型的语法
#如果换成command模块,则结果是echo后的内容全部作为字符串输出,即command是不识别管道和passwd等shell语言的
|
user和group模块:
|
1
2
3
4
5
6
7
8
9
10
11
12
13
14
15
16
17
18
19
20
21
22
23
24
25
26
27
28
29
|
group模块:
ansible webservers -m group -a
'name=group1 system=yes state=present'
#使用group组模块,向webservers中创建组gruop1,并且是系统组,present是创建此组的含义,absent是删除此组的意思
192.168.1.106 | SUCCESS => {
"changed"
:
true
,
"gid"
: 983,
"name"
:
"group1"
,
"state"
:
"present"
,
"system"
:
true
}
#组id、组名称、状态、系统组,操作成功
user模块:
ansible webservers -m user -a
"name=tomm groups=group1 state=present uid=20000 shell=/bin/csh"
#创建tomm用户,指定辅助组、uid和shell类型,创建present,
192.168.1.106 | SUCCESS => {
#上述操作成功
"changed"
:
true
,
"comment"
:
""
,
"createhome"
:
true
,
#创建家目录
"group"
: 20000,
#
"groups"
:
"group1"
,
"home"
:
"/home/tomm"
,
#未指定用户家目录,则采用默认
"name"
:
"tomm"
,
"shell"
:
"/bin/csh"
,
"state"
:
"present"
,
"system"
:
false
,
#表示不是系统用户
"uid"
: 20000
}
#此时webservers组内的成员都创建了用户tomm
|
copy模块:
|
1
2
3
4
5
6
7
8
9
10
11
12
13
14
15
16
17
18
19
20
21
22
23
|
将文件复制到远程位置
ansible webservers -m copy -a
'src=/root/aaa dest=/app/ owner=daemon group=nobody mode=664'
#使用copy模块,将本地的aaa文件复制到远程主机webservers组中,并修改用户/组和权限
192.168.1.106 | SUCCESS => {
"changed"
:
true
,
"checksum"
:
"7272fa0670a2f6d5cf0f5c1e6f31641fad625bf8"
,
"dest"
:
"/app/aaa"
,
"gid"
: 99,
"group"
:
"nobody"
,
"md5sum"
:
"890b22b2dc6ff3f00f2374dce5634526"
,
"mode"
:
"0664"
,
"owner"
:
"daemon"
,
"secontext"
:
"system_u:object_r:default_t:s0"
,
"size"
: 1493,
"src"
:
"/root/.ansible/tmp/ansible-tmp-1510928315.78-72588321449487/source"
,
#生成临时文件,而不是直接将源文件复制过去
"state"
:
"file"
,
"uid"
: 2
}
#此时对aaa文件进行修改后在执行此操作,会发现changed字段依然是true,原因是aaa修改后的hash值改变了
ansible webservers -m copy -a
"content='hello,ansible' dest=/app/bbb owner=daemon group=nobody mode=664"
#本机没有源文件而只是指定字符串,到目标webservers组,即远程主机上就会生成bbb文件,并设置成相应的所属用户权限等信息
#content只是修改文件内容,如果针对文件本身属性进行操作,可以使用file模块
|
file模块:
|
1
2
3
4
5
6
7
8
9
10
|
此模块仅设置文件属性,不改变文件内容
ansible webservers -m
file
-a
"path=/app/testdir state=directory owner=nobody mode=770"
#在远程主机上创建目录,state后可以指定目录、文件和软硬链接,并设置属性
ansible webservers -m
file
-a
"path=/app/testfile state=touch owner=nobody mode=666"
#state用法比较奇特,除了指定文件类型外还可以创建文件,即state为touch
ansible webservers -m
file
-a
"path=/app/filelink src=/app/testfile state=link"
#link表示符号链接,如果是hard表示硬链接
ansible webservers -m
file
-a
"path=/app/filelink state=absent"
#absent表示path指定文件删除文件
|
get_url模块:
从互联网获取文件到本节点,可通过http、https和ftp实现
|
1
2
|
ansible webservers -m get_url -a
"url=http://download.redis.io/releases/redis-4.0.2.tar.gz dest=/app/"
#url指定下载的资源路径,dest指定下载到指定的目录,此外还可以指定下载文件的属主信息以及校验信息如sha256sum
|
cron模块:
|
1
2
3
4
5
6
7
8
|
计划任务
ansible webservers -m
cron
-a
"name='timesync' job='/usr/sbin/ntpdate 172.18.0.1' minute='*/5'"
#创建热舞计划,name指定计划任务的名称,job指定任务计划的操作,minute表示执行的时间点即每五分钟执行一次同步时间操作
ansible webservers -m
cron
-a
"name='timesync' state=absent"
#删除计划任务
ansible webservers -m
cron
-a
"name='timesync' job='/usr/sbin/ntpdate 172.18.0.1' minute='*/5' disabled=true"
#disabled表示虽然创建计划任务但是不启用,要启用的话将true改为false
|
yum模块:
|
1
2
|
ansible webservers -m yum -a
"name=nginx state=latest"
#安装nginx,最新版本,安装过程中的信息会全部输出值屏幕端
|
service模块:
|
1
2
3
4
|
管理服务
ansible webservers -m service -a
"name=nginx enabled=true state=started"
#开启nginx服务,并设置成开机自启
|
git模块:
|
1
2
3
|
ansible webservers -m git -a
"repo=https://github.com/magro/memcached-session-manager.git dest=/app/git"
#repo指定git文件路径,dest指定git文件的存放位置,存放的目录不能有内容
#前提是远程主机需要提前安装git
|
本文转自 a_pan 51CTO博客,原文链接:http://blog.51cto.com/panpangao/1982922