在此向前辈们致敬:http://blog.csdn.net/shatty/article/details/9529463
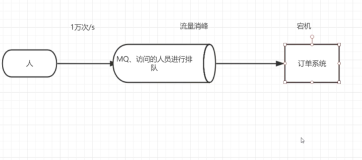
为什么要学rabbitMQ
在此之前,我们想来进行一个概念区分
threading queue :只能用于线程之间的消息传发
进程queue:可以用于进程(父进程与子进程或者同属于同一父进程之间的子进程交互)之间的消息传发
那么不同的语言之间,不同的机器之间怎么实现相互通信呢,这是一个问题吧
因此,我们的rabbitMq就起了很大的作用
接下来,我们对函数进行一一的相关介绍
connection = pika.BlockingConnection(pika.ConnectionParameters(
host='localhost'))#固定格式,创建一个类似于socket连接,,因为是在本地进行,所以可以直接用localhost
如果与其他电脑连接
pika.BlockingConnection(pika.ConnectionParameters('127.0.0.1',5672,'simple',credentials))
这样
我们来看一看关于这个函数的介绍
def get_connection_parameters (self ,host ,port ,vhost ,username ,password ,
                                  heartbeat_interval ):“”“返回一个pika连接的连接参数。

        :参数str主机:连接到的RabbitMQ主机
        :param int port:连接的端口
        :param str vhost:虚拟主机
        :参数str用户名:使用的用户名
        :参数str密码:使用的密码
        :param int heartbeat_interval:AMQP心跳间隔
        :rtype:pika。ConnectionParameters
        “””
第三步:channel = connection.channel() #在连接上创建一个频道
channel = connection.channel() #进行一个管道的声明
channel.queue_declare(queue='hello') #声明一个队列,进行消息的传送#客户端与服务端都需要这样
#注意以上都是套路,固定格式
接下来就是消息的发送呢
channel.basic_publish(exchange='',
routing_key='hello',#消息队列的名字
body='Hello World!')#消息的内容
connection.close() #当生产者发送完消息后,可选择关闭连接
我们再来看看消费者的写法
import pika
connection = pika.BlockingConnection(pika.ConnectionParameters(
'localhost'))
channel = connection.channel()
channel.queue_declare(queue='hello')#这个是防止不知道谁先运行而造成的错误
#上面的几行代码都是套路,服务端的时候已介绍,此处不做过解释
def callback(ch, method, properties, body):
print(" [x] Received %r" % body)
#下面代码是对消息的处理
channel.basic_consume(callback,#一旦接收到消息,就调用callback函数
queue='hello',
no_ack=True)
原理代码如下:生产者:
import pika
connection = pika.BlockingConnection(pika.ConnectionParameters('localhost'))
channel = connection.channel()
# 声明queue
channel.queue_declare(queue='hello')
# n RabbitMQ a message can never be sent directly to the queue, it always needs to go through an exchange.
channel.basic_publish(exchange='',
routing_key='hello',
body='Hello World!')
print(" [x] Sent 'Hello World!'")
connection.close()
消费者:
import pika
connection = pika.BlockingConnection(pika.ConnectionParameters(
'localhost'))
channel = connection.channel()
channel.queue_declare(queue='hello')
def callback(ch, method, properties, body):
print('--->',ch,method,properties,body)
print(" [x] Received %r" % body)
channel.basic_consume(callback,
queue='hello',
no_ack=True)
print(' [*] Waiting for messages. To exit press CTRL+C')
channel.start_consuming()
最后结果为:
C:\Python\Python36\python.exe C:/Users/Administrator/PycharmProjects/untitled3/python/day9/消费者.py
[*] Waiting for messages. To exit press CTRL+C
---> <BlockingChannel impl=<Channel number=1 OPEN conn=<SelectConnection OPEN socket=('::1', 58661, 0, 0)->('::1', 5672, 0, 0) params=<ConnectionParameters host=localhost port=5672 virtual_host=/ ssl=False>>>> #ch是我们刚声明的内存对象的地址<Basic.Deliver(['consumer_tag=ctag1.3ee0d6275e9f43288f95fe2ba2c83e1a', 'delivery_tag=1', 'exchange=', 'redelivered=False', 'routing_key=hello'])> #这个包含你要把消息发给哪个queue的信息<BasicProperties> b'Hello World!'
[x] Received b'Hello World!'
好了,我们可以同时开三个消费者,不断地接收消息,
那么生产者没有收到接收消息的确认怎么办呢
消费者:
import pika
connection = pika.BlockingConnection(pika.ConnectionParameters(
'localhost'))
channel = connection.channel()
channel.queue_declare(queue='hello')
def callback(ch, method, properties, body):
print('--->',ch,method,properties,body)
print(" [x] Received %r" % body)
channel.basic_consume(callback,
queue='hello',
#no_ack=True
)
print(' [*] Waiting for messages. To exit press CTRL+C')
channel.start_consuming()
生产者:
import pika
connection = pika.BlockingConnection(pika.ConnectionParameters('localhost'))
channel = connection.channel()
# 声明queue
channel.queue_declare(queue='hello')
# n RabbitMQ a message can never be sent directly to the queue, it always needs to go through an exchange.
channel.basic_publish(exchange='',
routing_key='hello',
body='Hello World!')
print(" [x] Sent 'Hello World!'")
connection.close()
结果是发现,生产者发送给一个消费者的消息传递给生产者了
(注由于rabbitmq消息持久化未保存为草稿,导致 许多东西丢失,此处只记重点)
rabbitmq方法总结
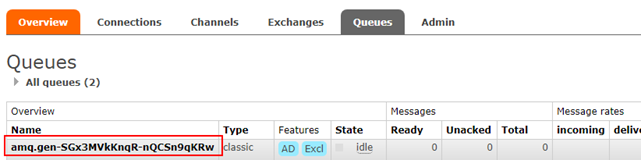
查看所有队列信息
# rabbitmqctl list_queues
关闭应用
# rabbitmqctl stop_app
启动应用,和上述关闭命令配合使用,达到清空队列的目的
# rabbitmqctl start_app
清除所有队列
# rabbitmqctl reset
更多用法及参数,可以执行如下命令查看
# rabbitmqctl
(1)首先关闭rabbitmq: rabbitmqctl stop_app
(2)还原: rabbitmqctl reset
(3)启动: rabbitmqctl start_app
(4)添加用户: rabbitmqctl add_user root root
(5)设置权限:rabbitmqctl set_permissions -p / root ".*" ".*" ".*"
(6)查看用户: rabbitmqctl list_users

生产者:
import pika
connection = pika.BlockingConnection(
pika.ConnectionParameters('localhost'))
channel = connection.channel()#先通过socket建立一个实例,创建一个新的频道
#channel.queue_delete(queue='hello3')
# 声明queue
channel.queue_declare(queue='hello3',durable=True)# 注意此处需要声明一个管道或者称之为队列,在此处出发消息 同时客户端与服务端都需要
# n RabbitMQ a message can never be sent directly to the queue, it always needs to go through an exchange.
channel.basic_publish(exchange='',
routing_key='hello3',#queue名字#路由键,写明将消息发往哪个队列,本例是将消息发往队列pikamq
body='Hello World!',
properties=pika.BasicProperties(
delivery_mode = 2, # make message persistent
)
)# 消息内容
print(" [x] Sent 'Hello World!'")# 当生产者发送完消息后,可选择关闭连接
connection.close()
消费者:
import pika
connection = pika.BlockingConnection(
pika.ConnectionParameters('localhost'))
channel = connection.channel()#先通过socket建立一个实例,创建一个新的频道
#channel.queue_delete(queue='hello3')
# 声明queue
channel.queue_declare(queue='hello3',durable=True)# 注意此处需要声明一个管道或者称之为队列,在此处出发消息 同时客户端与服务端都需要
# n RabbitMQ a message can never be sent directly to the queue, it always needs to go through an exchange.
channel.basic_publish(exchange='',
routing_key='hello3',#queue名字#路由键,写明将消息发往哪个队列,本例是将消息发往队列pikamq
body='Hello World!',
properties=pika.BasicProperties(
delivery_mode = 2, # make message persistent
)
)# 消息内容
print(" [x] Sent 'Hello World!'")# 当生产者发送完消息后,可选择关闭连接
connection.close()
很好,现在已经是初入门径了,我们接下来算是一个大头了,rabbitmq的广播模式
提一个引子,假设当前消息没处理完,就不会发消息,处理完了才发,怎样设置这个功能呢
channel.basic_qos(prefetch_count=1)
import pika,time
connection = pika.BlockingConnection(pika.ConnectionParameters('localhost'))
channel=connection.channel()
channel.queue_declare(queue='hello4',durable=True)
def callback(ch, method, properties, body):
print('--->',ch,method,properties)
#time.sleep(30)
print(" [x] Received %r"%body)
channel.basic_qos(prefetch_count=1)
channel.basic_consume(callback,
queue='hello4',
no_ack=True #no knowledgement
)
print(' [*] Waiting for messages. To exit press CTRL+C')
channel.start_consuming()
我们接下来怎么做一个就是所有的消费者都能接受到,而不是在同一个管道里,有如下三种方法
fanout: 所有bind到此exchange的queue都可以接收消息
direct: 通过routingKey和exchange决定的那个唯一的queue可以接收消息
topic:所有符合routingKey(此时可以是一个表达式)的routingKey所bind的queue可以接收消息
我们先来介绍第一种方法
fanout套路:所有的消费者都可以在同一时间接收消息
为了加深对此套路的理解,我们玩一个好玩儿的
将新的代码,与上面的代码进行对比
首先是生产者
-
fanout套路的初始化与上面套路差不多,都是得初始化
new:
import pika
import sys
connection=pika.BlockingConnection(pika.ConnectionParameters(host='localhost'))
channel=connection.channel()
old:
import pika
connection = pika.BlockingConnection(pika.ConnectionParameters('localhost',5672)) # 默认端口5672,可不写
channel = connection.channel();.
2,是否声明一个管道
new:不需要声明一个管道
old:需要声明一个管道
#声明一个queue
channel.queue_declare(queue='hello2',durable=True)
3,是否决定定义一个广播方法
new:需要
channel.exchange_declare(exchange='logs'#为什么是Exchange:消息交换机,它指定消息按什么规则,路由到哪个队列。没有固定格式,可以随便声明 exchange_type='fanout')
old:不需要
4,上面的准备工作结束了,我们再来看一看发送消息有何不同
new:
channel.basic_publish(exchange='logs',
routing_key='',
body=message)
print(" [x] Sent %r" % message)
connection.close()
old:
channel.basic_publish(
exchange='',
routing_key='hello2',
body='hello world',
properties=pika.BasicProperties(
delivery_mode=2, # make message persistent
)
)
上述是几个最大不同点,我们再来看一看消费者的不同
1,刚开始的套路与生产者一样,这里不做过多介绍
new:
import pika
connection = pika.BlockingConnection(pika.ConnectionParameters(
host='localhost'))
channel = connection.channel()
channel.exchange_declare(exchange='logs',
exchange_type='fanout')
old:
connection = pika.BlockingConnection(pika.ConnectionParameters(
'localhost'))
channel = connection.channel()
channel.queue_declare(queue='hello2', durable=True)
2,关键的是消息接收方面的区别许大
new:
result=channel.queue_declare(exclusive=True)#不指定queue的名字,rabbit会自动分配
queue_name=result.method.queue
channel.queue_bind(exchange='logs',
queue=queue_name)
print(' [*] Waiting for logs. To exit press CTRL+C')
def callback(ch, method, properties, body):
print(" [x] %r" % body)
channel.basic_consume(callback,
queue=queue_name,
no_ack=True)
channel.start_consuming()
old:
#声明一个queue
channel.queue_declare(queue='hello2',durable=True)
channel.basic_publish(
exchange='',
routing_key='hello2',
body='hello world',
properties=pika.BasicProperties(
delivery_mode=2, # make message persistent
)
)
print(" [x] Sent 'Hello World!'")
connection.close()
我们接下来看看实战操作

我们先来开三个消费者
随后开一个生产者

我们来看消息的接受情况

接下来是源代码
生产者:
import sys
connection=pika.BlockingConnection(pika.ConnectionParameters(host='localhost'))
channel=connection.channel()
channel.exchange_declare(exchange='logs',
exchange_type='fanout')
message = ' '.join(sys.argv[1:]) or "info: Hello World!"#将后面的因子连接起来
channel.basic_publish(exchange='logs',
routing_key='',
body=message)
print(" [x] Sent %r" % message)
connection.close()
消费者:
import pika
connection = pika.BlockingConnection(pika.ConnectionParameters(
host='localhost'))
channel = connection.channel()
channel.exchange_declare(exchange='logs',
exchange_type='fanout')
result=channel.queue_declare(exclusive=True)#不指定queue的名字,rabbit会自动分配
queue_name=result.method.queue
channel.queue_bind(exchange='logs',
queue=queue_name)
print(' [*] Waiting for logs. To exit press CTRL+C')
def callback(ch, method, properties, body):
print(" [x] %r" % body)
channel.basic_consume(callback,
queue=queue_name,
no_ack=True)
channel.start_consuming()
我们来看第二个方案
direct: 通过routingKey和exchange决定的那个唯一的queue可以接收消息
有选择的接收消息
生产者:
import pika,sys
connection=pika.BlockingConnection(pika.ConnectionParameters(host='localhost'))
channel=connection.channel()
channel.exchange_declare(exchange='direct_logs',
exchange_type='direct')
severity=sys.argv[1] if len(sys.argv)>1 else 'info'#判断输入的是什么,如果没有warning,info,error 则默认info
message=''.join(sys.argv[2:]) or 'Hello world'
channel.basic_publish(
exchange='direct_logs',
routing_key=severity,
body=message
)
print("[x] Sent %r:%r"%(severity,message))
connection.close()
消费者:
import pika
import sys
connection=pika.BlockingConnection(pika.ConnectionParameters(host='localhost'))
channel=connection.channel()
channel.exchange_declare(exchange='direct_logs',
exchange_type='direct')
result = channel.queue_declare(exclusive=True)
queue_name = result.method.queue
severities=sys.argv[1:]
if not severities:
sys.stderr.write("Usage: %s [info] [warning] [error]\n" % sys.argv[0])
sys.exit(1)
for severity in severities:
channel.queue_bind(exchange='direct_logs',
queue=queue_name,
routing_key=severity
)#抓取你所输入接受信息的标志 info warning,error
print(' [*] Waiting for logs. To exit press CTRL+C')
def callback(ch, method, properties, body):
print(" [x] %r:%r" % (method.routing_key, body))
channel.basic_consume(callback,
queue=queue_name,
no_ack=True)
channel.start_consuming()

我们接下来寻找第三个解决方案

生产者:
import pika
import sys
connection=pika.BlockingConnection(pika.ConnectionParameters(host='localhost'))
channel=connection.channel()
channel.exchange_declare(exchange='topic_logs',
exchange_type='topic')
routing_key=sys.argv[1]if len(sys.argv)>1 else 'anonymous.info'
message=''.join(sys.argv[2:]) or 'hello world'
channel.basic_publish(
exchange='topic_logs',
routing_key=routing_key,
body=message
)
print("[x]Sent %r,%r"%(routing_key,message))
connection.close()
消费者:
import pika
import sys
connection=pika.BlockingConnection(pika.ConnectionParameters(host='localhost'))
channel=connection.channel()
channel.exchange_declare(exchange='topic_logs',
exchange_type='topic')
result=channel.queue_declare(exclusive=True)
queue_name=result.method.queue
binding_keys=sys.argv[1:]
if not binding_keys:
sys.stderr.write("Usage:%s[binding_key]...\n"%sys.argv[0])
sys.exit(1)
for binding_key in binding_keys:
channel.queue_bind(exchange='topic_logs',
queue=queue_name,
routing_key=binding_key)
print(' [*] Waiting for logs. To exit press CTRL+C')
def callback(ch, method, properties, body):
print(" [x] %r:%r" % (method.routing_key, body))
channel.basic_consume(callback,
queue=queue_name,
no_ack=True)
channel.start_consuming()
rabbitMQ最后一个知识点
关于rpc详解:
rpc 是创建一个类通过这个类中的各种方法,来实现生产者和消费者之间的交流的
我们今天要介绍的是通过对消费者生产者中各个方法进行解析,来分析他的构造以及原理
我们先对客户端进行分析
-------------------------------------------------------------------------------------------------------------------------------------
def __init__(self):
self.connection = pika.BlockingConnection(pika.ConnectionParameters(
host='localhost'))
self.channel = self.connection.channel()
result = self.channel.queue_declare(exclusive=True)
self.callback_queue = result.method.queue #自动创建一个管道,用这个管道接受来自服务端的消息
self.channel.basic_consume(self.on_response, #收到消息就调用on_response
no_ack=True,
queue=self.callback_queue)#接受这个队列消息
-------------------------------------------------------------------------------------------------------------------------------------
old
-------------------------------------------------------------------------------------------------------------------------------------
import pika
connection = pika.BlockingConnection(pika.ConnectionParameters(
'localhost'))
channel = connection.channel()
channel.queue_declare(queue='hello')
channel.basic_consume(callback,#收到消息就调用callback
queue='hello',
no_ack=True)
-------------------------------------------------------------------------------------------------------------------------------------
这些都是固定套路
我们再来看一部分
客户端如何向服务端发送消息呢
再来看一个打call的方法;
-------------------------------------------------------------------------------------------------------------------------------------
def call(self, n):
self.response = None
self.corr_id = str(uuid.uuid4())#发消息之前创造一个id,生成id的原因在于确保消息的正确性。
self.channel.basic_publish(exchange='',#以后记住basic_publish就是发送消息的方法
routing_key='rpc_queue',
properties=pika.BasicProperties(
reply_to=self.callback_queue,
correlation_id=self.corr_id,#向对方发送消息
),
body=str(n))#发送消息的主体
while self.response is None:
self.connection.process_data_events()#一直等待服务段发来的消息
return int(self.response)
-------------------------------------------------------------------------------------------------------------------------------------
此处可能有同学有疑问:
properties=pika.BasicProperties(
delivery_mode=2, # make message persistent
)
不是为了防止消息中断的方法吗
为什么两者不一样呢,我们来看看他的具体方法含义
def __init__(self, content_type=None, content_encoding=None, headers=None, delivery_mode=None, priority=None, correlation_id=None, reply_to=None, expiration=None, message_id=None, timestamp=None, type=None, user_id=None, app_id=None, cluster_id=None)
如上所示,它可以接受如上参数
reply_to=self.callback_queue,
correlation_id=self.corr_id,#向对方发送消息
这两个参数是用来告知客户端的,一个是回消息的通道,自己创建的,另一个就是发送消息的id了
-------------------------------------------------------------------------------------------------------------------------------------
def on_response(self, ch, method, props, body):
#进行id的区分,如果收到的id与本机id相同,则返回的结果是我想要的结果
if self.corr_id == props.correlation_id:
self.response = body
-------------------------------------------------------------------------------------------------------------------------------------
ok
我们再来看一看客户端的方法
-------------------------------------------------------------------------------------------------------------------------------------
connection = pika.BlockingConnection(pika.ConnectionParameters(
host='localhost'))
channel = connection.channel()
channel.queue_declare(queue='rpc_queue')
-------------------------------------------------------------------------------------------------------------------------------------
这是老规矩,大家都懂是吧,不再强调了
-------------------------------------------------------------------------------------------------------------------------------------
def on_request(ch, method, props, body):
n = int(body)
print(" [.] fib(%s)" % n)
response = fib(n)
ch.basic_publish(exchange='',
routing_key=props.reply_to,
properties=pika.BasicProperties(correlation_id= \
props.correlation_id),
body=str(response))
ch.basic_ack(delivery_tag=method.delivery_tag)
-------------------------------------------------------------------------------------------------------------------------------------
回调函数
对从服务端发来的数据进行处理
channel.basic_qos(prefetch_count=1)#表示只能把这个数据处理完了,才能处理下一个数据
channel.basic_consume(on_request, queue='rpc_queue')
两个代码呈现:
服务端:
import pikaimport uuid
class FibonacciRpcClient(object):
def __init__(self):
self.connection = pika.BlockingConnection(pika.ConnectionParameters(
host='localhost'))
self.channel = self.connection.channel()
result = self.channel.queue_declare(exclusive=True)
self.callback_queue = result.method.queue #自动创建一个管道,用这个管道接受来自客户端的消息
self.channel.basic_consume(self.on_response, #收到消息就调用on_response
no_ack=True,
queue=self.callback_queue)#接受这个队列消息
def on_response(self, ch, method, props, body):
#进行id的区分,如果收到的id与本机id相同,则返回的结果是我想要的结果
if self.corr_id == props.correlation_id:
self.response = body
def call(self, n):
self.response = None
self.corr_id = str(uuid.uuid4())#发消息之前创造一个id
self.channel.basic_publish(exchange='',
routing_key='rpc_queue',
properties=pika.BasicProperties(
reply_to=self.callback_queue,
correlation_id=self.corr_id,#向对方发送消息
),
body=str(n))
while self.response is None:
self.connection.process_data_events()#一直等待服务段发来的消息
return int(self.response)
fibonacci_rpc = FibonacciRpcClient()
print(" [x] Requesting fib(30)")
response = fibonacci_rpc.call(30)
print(" [.] Got %r" % response)
客户端:
__author__ = 'Alex Li'import pika
import time
connection = pika.BlockingConnection(pika.ConnectionParameters(
host='localhost'))
channel = connection.channel()
channel.queue_declare(queue='rpc_queue')
def fib(n):
if n == 0:
return 0
elif n == 1:
return 1
else:
return fib(n - 1) + fib(n - 2)
def on_request(ch, method, props, body):
n = int(body)
print(" [.] fib(%s)" % n)
response = fib(n)
ch.basic_publish(exchange='',
routing_key=props.reply_to,
properties=pika.BasicProperties(correlation_id= \
props.correlation_id),
body=str(response))
ch.basic_ack(delivery_tag=method.delivery_tag)
channel.basic_qos(prefetch_count=1)
channel.basic_consume(on_request, queue='rpc_queue')
print(" [x] Awaiting RPC requests")
channel.start_consuming()
本文转自眉间雪 51CTO博客,原文链接:http://blog.51cto.com/13348847/2046277,如需转载请自行联系原作者