原创作品,允许转载,转载时请务必以超链接形式标明文章
原始出处 、作者信息和本声明。否则将追究法律责任。
http://dgd2010.blog.51cto.com/1539422/881922

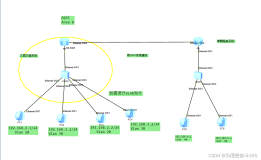
- ip route 192.168.10.0 255.255.255.0 112.237.228.1
- ip route 211.86.104.0 255.255.255.0 112.237.228.1
- ip route 10.0.0.0 255.0.0.0 112.237.228.244
- ip route 211.86.104.0 255.255.255.0 192.168.10.1
- ip route 112.237.228.0 255.255.255.0 192.168.10.2
- ip route 10.0.0.0 255.0.0.0 192.168.10.2
- Router>enable
- Router#configure terminal
- Enter configuration commands, one per line. End with CNTL/Z.
- Router(config)#hostname R1
- R1(config)#interface FastEthernet0/1
- R1(config-if)#ip address 10.0.0.1 255.0.0.0
- R1(config-if)#no shutdown
- %LINK-5-CHANGED: Interface FastEthernet0/1, changed state to up
- R1(config-if)#end
- R1#
- %SYS-5-CONFIG_I: Configured from console by console
- R1#conf t
- Enter configuration commands, one per line. End with CNTL/Z.
- R1(config)#int f0/0
- R1(config-if)#ip addr 112.237.228.244 255.255.255.0
- R1(config-if)#no shutdown
- %LINK-5-CHANGED: Interface FastEthernet0/0, changed state to up
- R1(config-if)#end
- R1#
- %SYS-5-CONFIG_I: Configured from console by console
- R1#conf t
- Enter configuration commands, one per line. End with CNTL/Z.
- R1(config)#ip route 192.168.10.0 255.255.255.0 112.237.228.1
- R1(config)#ip route 211.86.104.0 255.255.255.0 112.237.228.1
- R1(config)#end
- R1#
- %SYS-5-CONFIG_I: Configured from console by console
- R1#
- Router>enable
- Router#configure terminal
- Enter configuration commands, one per line. End with CNTL/Z.
- Router(config)#hostname R2
- R2(config)#
- R2(config)#interface FastEthernet0/1
- R2(config-if)#ip address 112.237.228.1 255.255.255.0
- R2(config-if)#no shutdown
- %LINK-5-CHANGED: Interface FastEthernet0/1, changed state to up
- R2(config-if)#
- R2(config-if)#exit
- R2(config)#interface FastEthernet0/0
- R2(config-if)#ip address 192.168.10.2 255.255.255.0
- R2(config-if)#no shutdown
- %LINK-5-CHANGED: Interface FastEthernet0/0, changed state to up
- R2(config-if)#end
- R2#conf t
- Enter configuration commands, one per line. End with CNTL/Z.
- R2(config)#ip route 10.0.0.0 255.0.0.0 112.237.228.244
- R2(config)#ip route 211.86.104.0 255.255.255.0 192.168.10.1
- R2(config)#end
- R2#
- %SYS-5-CONFIG_I: Configured from console by console
- R2#
- Router>enable
- Router#configure terminal
- Enter configuration commands, one per line. End with CNTL/Z.
- Router(config)#hostname R3
- R3(config)#
- R3(config)#interface FastEthernet0/1
- R3(config-if)#ip address 192.168.10.1 255.255.255.0
- R3(config-if)#no shutdown
- %LINK-5-CHANGED: Interface FastEthernet0/1, changed state to up
- R3(config-if)#
- R3(config-if)#exit
- R3(config)#interface FastEthernet0/0
- R3(config-if)#ip address 211.86.104.254 255.255.255.0
- R3(config-if)#no shutdown
- R3(config-if)#
- %LINK-5-CHANGED: Interface FastEthernet0/0, changed state to up
- R3>enable
- R3#conf t
- Enter configuration commands, one per line. End with CNTL/Z.
- R3(config)#ip route 112.237.228.0 255.255.255.0 192.168.10.2
- R3(config)#ip route 10.0.0.0 255.0.0.0 192.168.10.2
- R3(config)#end
- R3#
- %SYS-5-CONFIG_I: Configured from console by console
- R3#