一.PXE概述
PXE(preboot execute environment)预启动执行环境,工作于Client/Server的网络模式,支持工作站通过网络从远端服务器下载映像,并由此支持通过网络启动操作系统,在启动过程中,终端要求服务器分配IP地址,再用TFTP(trivial file transfer protocol)或MTFTP(multicast trivial file transfer protocol)协议下载一个启动软件包到本机内存中执行,由这个启动软件包完成终端(客户端)基本软件设置,从而引导预先安装在服务器中的终端操作系统。PXE可以引导多种操作系统。
二.PXE启动原理
当计算机引导时,BIOS把 PXE Client 调入内存中执行,然后由 PXE Client 将放置在远端的文件通过网络下载到本地运行。
三.PXE无盘工作站的启动过程分析如下
¨ 客户端个人电脑开机后, 在 TCP/IP Bootrom 获得控制权之前先做自我测试。
¨ Bootprom 送出DHCP 要求以取得 IP。
¨ 如果服务器收到个人电脑所送出的要求, 就会送回 DHCP 回应,内容包括
客户端的 IP 地址, 预设网关, 及开机镜像文件
¨ Bootprom 由 TFTP 通讯协议从服务器下载开机镜像文件。
¨ 个人电脑通过这个开机镜像文件开机, 这个开机文件可以只是单纯的开机程式也可以是操作系统。
¨ 开机映像文件将包含 kernel loader 及压缩过的 kernel,此 kernel 将支持NTFS root系统。
¨ 远程客户端根据下载的文件启动机器。
三.安装PXE所需的软件
根据以上的原理解释,知道启动linux系统需要网卡PXE bootrom程序(写入主板bios,如果网卡已有PXE bootrom则不需要),DHCP服务器软件,PXE服务软件,TFTP服务软件,工作站上传工具,还要有
Linux操作系统软件。
我筛选的软件:网卡写入主板的bootrom程序, DHCP Server, sys(包含TFTP服务与PXE服务等),下载软件(http),syslinux(syslinux是一个功能强大的引导加载程序,它的目的是简化首次安装Linux的时间,并建立修护或其它特殊用途的启动盘。它的安装很简单,一旦安装syslinux好之后,sysLinux启动盘就可以引导各种基于DOS的工具。
四.安装PXE所需要的工具
[root@foundation60 ~]# cd /var/www/html/rhel7.0 #切换到镜像文件中
[root@foundation60 rhel7.0]# ls
addons images Packages RPM-GPG-KEY-redhat-release
EFI isolinux release-notes TRANS.TBL
EULA LiveOS repodata
GPL media.repo RPM-GPG-KEY-redhat-beta
[root@foundation60 rhel7.0]# cd isolinux/
[root@foundation60 isolinux]# ls
boot.cat grub.conf isolinux.bin memtest TRANS.TBL vesamenu.c32
boot.msg initrd.img isolinux.cfg splash.png upgrade.img vmlinuz
[root@foundation60 isolinux]# vim isolinux.cfg #此文件中所写内容就是加载内核启>动初始化程序进入预安装环境
label linux
menu label ^Install Red Hat Enterprise Linux 7.0 #预安装环境的标题
kernel vmlinuz #内核文件
append initrd=initrd.img inst.stage2=hd:LABEL=RHEL-7.0\x20Server.x86_64 quiet #镜像
label check
menu label Test this ^media & install Red Hat Enterprise Linux 7.0 #预安装环>境的标题
menu default
kernel vmlinuz
append initrd=initrd.img inst.stage2=hd:LABEL=RHEL-7.0\x20Server.x86_64 rd.live.check quiet #镜像,quiet:安装时不显示过程
[root@server ~]# yum whatprovides */pxelinux.0
Filename : /usr/share/syslinux/pxelinux.0
[root@server ~]# rpm -ql syslinux
/usr/share/syslinux/pxelinux.0
/usr/share/doc/syslinux-4.05
[root@server syslinux-4.05]# less README #此文件中写了看如下文件
See the files in the doc directory for documentation about SYSLINUX:
syslinux.txt - Usage instructions; manual.
distrib.txt - For creators of Linux distributions.
pxelinux.txt - Documentation specific to PXELINUX.
isolinux.txt - Documentation specific to ISOLINUX.
extlinux.txt - Documentation specific to EXTLINUX.
menu.txt - About the menu systems.
usbkey.txt - About using SYSLINUX on USB keys.
comboot.txt - About the extension API.
memdisk.txt - Documentation about MEMDISK.
[root@server syslinux-4.05]# less pxelinux.txt #看此文件
n the TFTP server, create the directory "/tftpboot", and copy the
following files to it: #新建目录/tftpboot ,并且复制pxelinux.0 文件到/tftpboot>中
    pxelinux.0              - from the Syslinux distribution

    any kernel or initrd images you want to boot  #启动时加载内核启动初始化>程序pxelinux.0这个文件的内容
create the directory "/tftpboot/pxelinux.cfg". #创建/tftpboot/pxelinux.cfg目录
As an example, if the boot file name is /mybootdir/pxelinux.0, the
UUID is b8945908-d6a6-41a9-611d-74a6ab80b83d, the Ethernet MAC
address is 88:99:AA:BB:CC:DD and the IP address 192.0.2.91, it will
try:
/mybootdir/pxelinux.cfg/default #/mybootdir/pxelinux.0读取的是/mybootdir/pxelinux.cfg/default中的内容
++++ SETTING UP THE TFTP SERVER ++++
PXELINUX currently requires that the boot server has a TFTP server
which supports the "tsize" TFTP option (RFC 1784/RFC 2349). The
"tftp-hpa" TFTP server, which support options, is available at:
    http://www.kernel.org/pub/software/network/tftp/
    ftp://www.kernel.org/pub/software/network/tftp/
and on any kernel.org mirror (see http://www.kernel.org/mirrors/). #镜像安装>源指定为网络安装源
Another TFTP server which supports this is atftp by Jean-Pierre
Lefebvre:
ftp://ftp.mamalinux.com/pub/atftp/那么问题来了,系统怎么回去读取/tftpboot/pxelinux.0这个文件呢?
网络安装需要获取ip,当获取ip时让它读取此文件即可,因此需要动态网络dhcp,在此文件中写入该文件,获取ip后读取该文件,该文件内容中又写了让它加载内核文件,启动初始化程序,进入预安装环境,此时镜像文件源可以是http协议的也可以是vsftp协议的,将此镜像
源地址写入/tftpboot/pxelinux.cfg/default中,此时并不是全自动的需要手动选择分区等等内容,使用自动化安装时,可以写一个回答问题的脚本,也将他写入/tftpboot/pxelinux.cfg/default中,会自动读取,实现安装全自动。
五.安装PXE
1.(1)安装所需软件
[root@server ~]# yum install dhcp tftp-server httpd syslinux -y #需要安装这些软件
(2)打开端口
[root@server ~]# vim /etc/xinetd.d/tftp #守护进程打开
disable no

[root@server ~]# systemctl start xinetd.service
[root@server ~]# netstat -antlupe | grep 69 #查看xinetd端口是否打开
udp 0 0 0.0.0.0:69 0.0.0.0:* 0 94269 936/xinetd #打开
0 94269 936/xinetd
(3)安装所需的工具配置
[root@server ~]# cd /var/lib/tftpboot/ #切换到此目录
[root@server tftpboot]# cp /usr/share/syslinux/pxelinux.0 . #在pexlinux.text文件中已指出,建立文件/tftpboot,并把/usr/share/syslinux/pxelinux.0放到此目录中
[root@server tftpboot]# yum install lftp
[root@server tftpboot]# lftp 172.25.254.60
lftp 172.25.254.60:/pub> cd isolinux/ #安装需要的文件都在此目录
lftp 172.25.254.60:/pub/isolinux> mget *
74555827 bytes transferred in 1 second (57.48M/s)
Total 12 files transferred
lftp 172.25.254.60:/pub/isolinux> quit

[root@server tftpboot]# ls
boot.cat initrd.img memtest splash.png vesamenu.c32
boot.msg isolinux.bin pxelinux.0 TRANS.TBL vmlinuz
grub.conf isolinux.cfg pxelinux.cfg upgrade.img
[root@server tftpboot]# cp isolinux.cfg pxelinux.cfg/default
[root@server ~]# systemctl start httpd
[root@server ~]# systemctl stop firewalld.service
(4)配置dhcp
[root@server ~]# cp /usr/share/doc/dhcp-4.2.5/dhcpd.conf.example /etc/dhcp/dhcpd.conf
cp: overwrite ‘/etc/dhcp/dhcpd.conf’? y
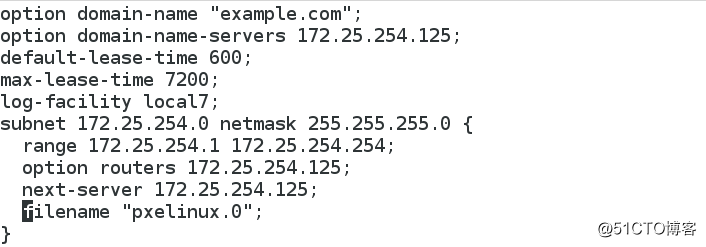
[root@server ~]# vim /etc/dhcp/dhcpd.conf #配置dhcp
1 option domain-name "example.com"; #域名
2 option domain-name-servers 172.25.254.125; #从哪台主机得到ip
3 default-lease-time 600;
4 max-lease-time 7200;
5 log-facility local7;
6 subnet 172.25.254.0 netmask 255.255.255.0 { #网段,子网掩码
7 range 172.25.254.1 172.25.254.254; #获取ip网段
8 option routers 172.25.254.125; #网关
9 next-server 172.25.254.125; #pxelinux.0这个文件在哪台主机上就时哪台主机ip
10 filename "pxelinux.0"; #读取此文件
11 }
[root@server ~]# systemctl restart dhcpd #重启
(5)启动预安装环境
安装系统:模拟安装虚拟机
从网卡启动
获取dhcp
读取pxelinux.0里面所写的内容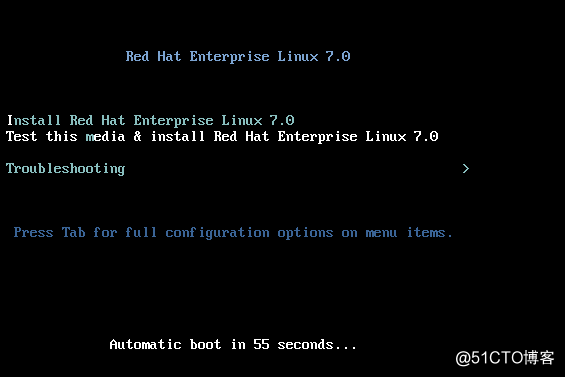
2.修改预安装环境的标题为HELLO
[root@server tftpboot]# vim pxelinux.cfg/default #预安装时读取文件
11 menu title HELLO #修改预安装环境的标题为HELLO

获取dhcp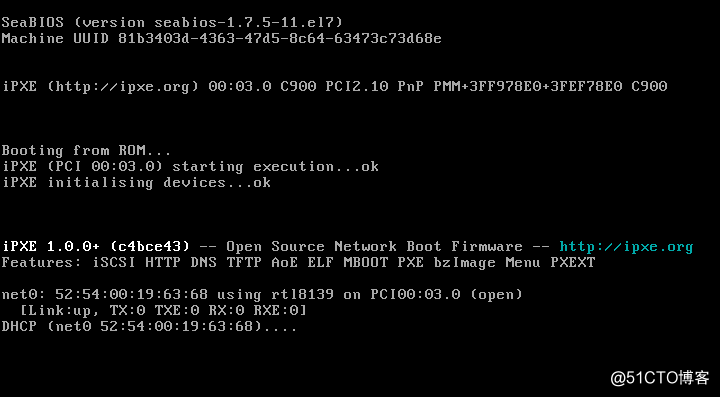
预安装环境的标题改为HELLO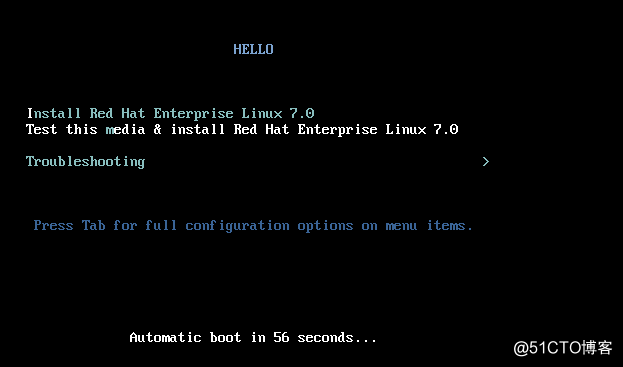
3.启动http服务得到镜像安装系统
[root@server tftpboot]# vim pxelinux.cfg/default
64 append initrd=initrd.img repo=http://172.25.254.60/rhel7.0 #镜像文件所在位置

安装过程:
(1)获取dhcp
(2)安装系统,手动调到第一个标题,默认是第二个标题
(3)安装过程显示
(4)回答问题页面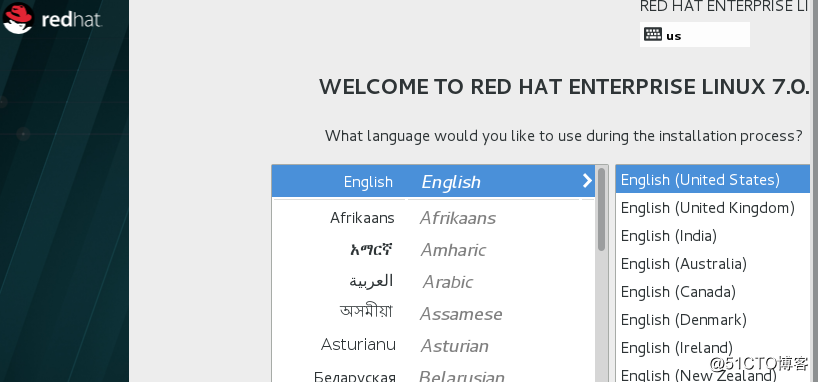
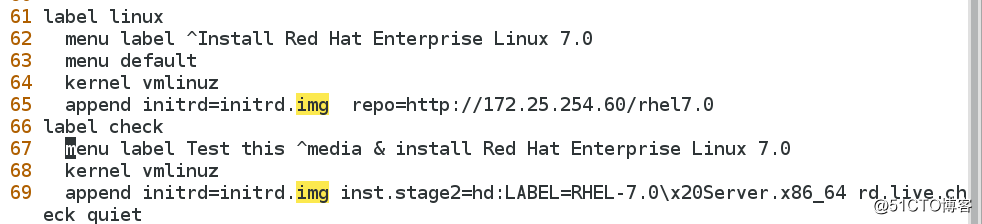
4.修改默认启动: 把menu default加到第一个标题下面,就从第一个标题启动
[root@server tftpboot]# vim pxelinux.cfg/default
61 label linux
62 menu label ^Install Red Hat Enterprise Linux 7.0
63 menu default #预安装环境中默认从第一个标题启动,原来默认从第二个标题启动
64 kernel vmlinuz
65 append initrd=initrd.img repo=http://172.25.254.60/rhel7.0
66 label check
67 menu label Test this ^media & install Red Hat Enterprise Linux 7.0
68 kernel vmlinuz
69 append initrd=initrd.img inst.stage2=hd:LABEL=RHEL-7.0\x20Server.x86_64 rd.live.ch eck quiet
5.修改预安装环境的等待时间
[root@server tftpboot]# vim pxelinux.cfg/default
2 timeout 200 #默认安装时等待60s,改为20s
[root@server tftpboot]# ls
boot.cat grub.conf isolinux.bin memtest pxelinux.cfg TRANS.TBL vesamenu.c32
boot.msg initrd.img isolinux.cfg pxelinux.0 splash.png upgrade.img vmlinuz

(1)获取dhcp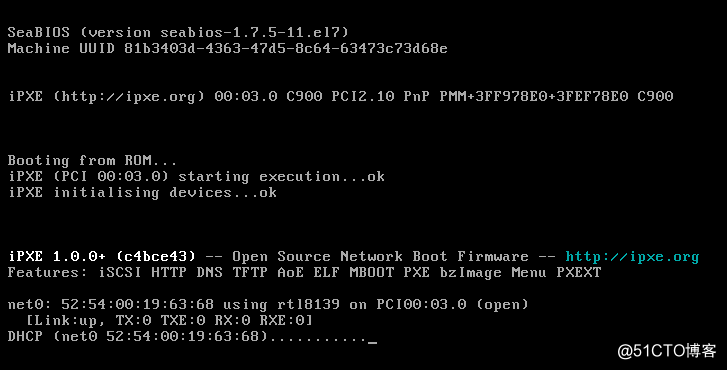
(2)启动预安装环境,时间变为20s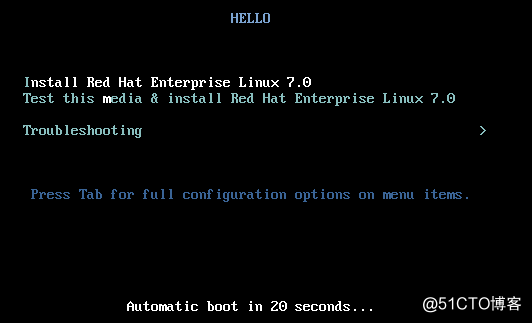
6.修改预安装环境的背景图片
ls
可以知道预安装环境的图片是
splash.png
[root@server tftpboot]# file splash.png #预安装环境使用的图片,此图片可作更改
splash.png: PNG image data, 640 x 480, 1-bit colormap, non-interlaced
[root@server tftpboot]# ls #得到一张图片westos.png
boot.cat initrd.img memtest splash.png vesamenu.c32
boot.msg isolinux.bin pxelinux.0 TRANS.TBL vmlinuz
grub.conf isolinux.cfg pxelinux.cfg upgrade.img westos.png
[root@server tftpboot]# file westos.png
westos.png: PNG image data, 558 x 646, 8-bit/color RGBA, non-interlaced #此图片像素与要求图片像素不符,需要进行裁剪,安装裁剪工具
[root@server tftpboot]# yum whatprovides */convert #查看软件
mageMagick-6.7.8.9-10.el7.x86_64 : An X application for displaying and manipulating
: images
Repo : rhel_dvd
Matched from:
Filename : /usr/bin/convert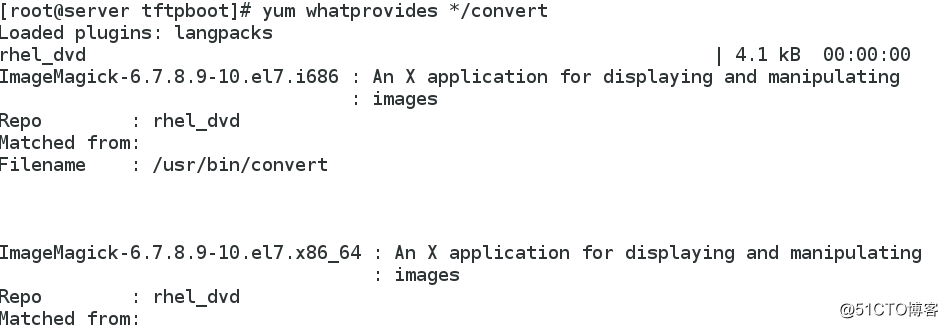
安装 :yum install mageMagick-6.7.8.9-10.el7.x86_64
[root@server tftpboot]# convert -resize 640x480! westos.png haha.png #裁剪成符合要求的图片大小,!表示强制裁剪成要求的大小
[root@server tftpboot]# vim pxelinux.cfg/default
10 menu background haha.png #更改安装环境图片为haha.png

(1)获取dhcp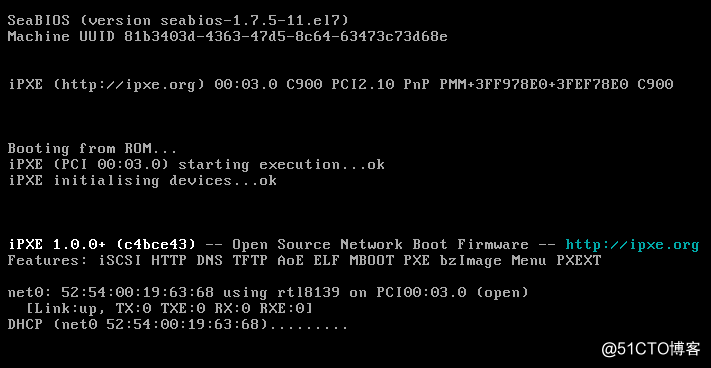
(2)启动预安装环境:图片更改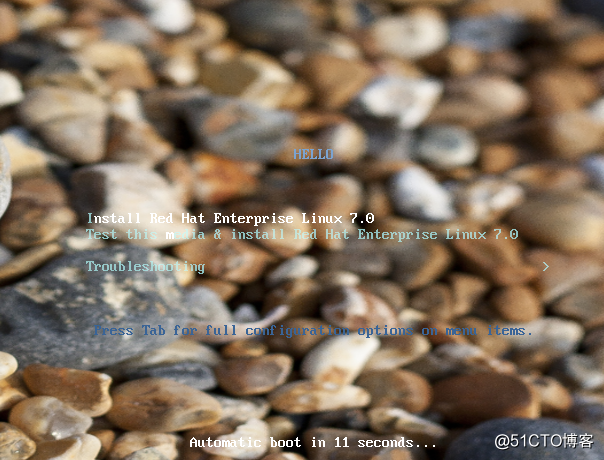
7.kickstart自动安装脚本
kickstart
使用 kickstart, 系统管理员可以创建一个包含安装期间所有常见问题的答案的文件,以自动安装 Red Hat Enterprise Linux Kickstart
手动编写kickstart脚本难度较大,采用系统自带软件包工具来制作
软件包system-config-kickstart
(1)安装软件
[root@server ~]# yum install system-config-kickstart #安装
(2)生成ks.cfg文件
[root@server ~]# system-config-kickstart #常见问题答案回答,问题的答案生成ks.cfg,保存在/var/www/html/目录中,安装时,使用http可以访问到
(1)基础设定
语言,时区,密码,是否安装图形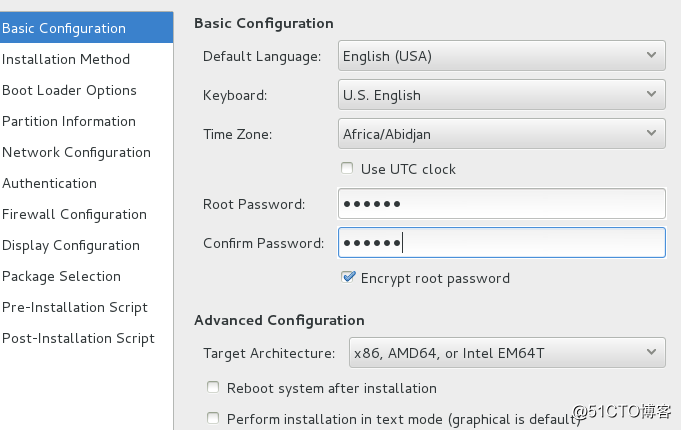
(2)安装方式
安装源位置
http://172.25.254.60/rhel7.0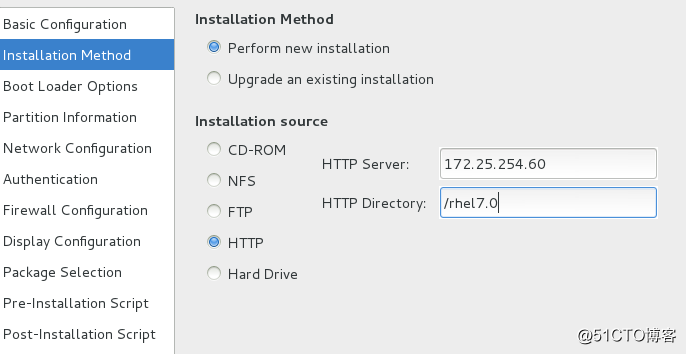
(3)启动方式选项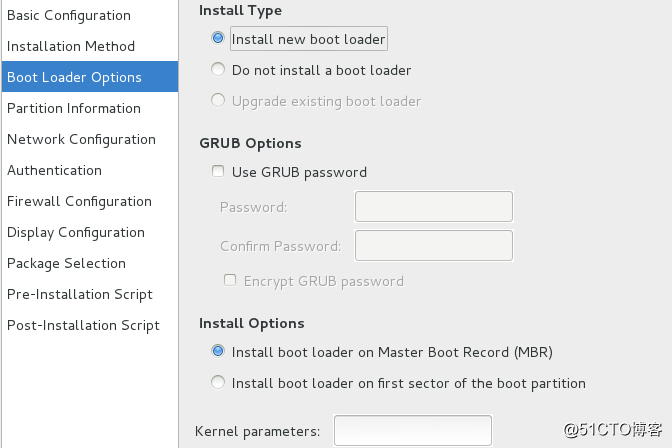
(4)自定义分区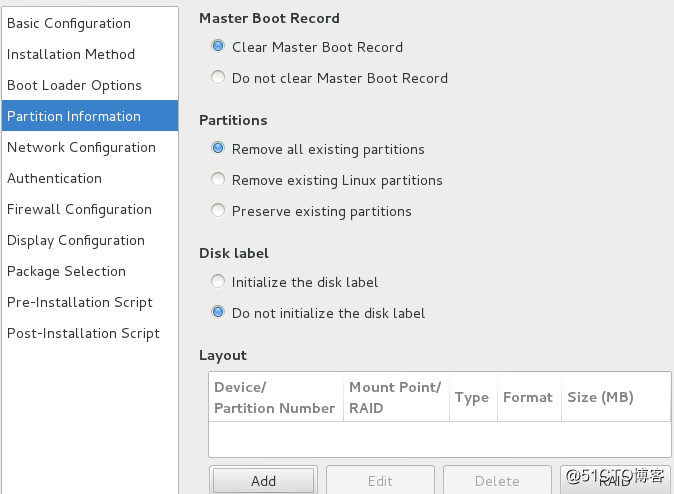
/boot分区:200M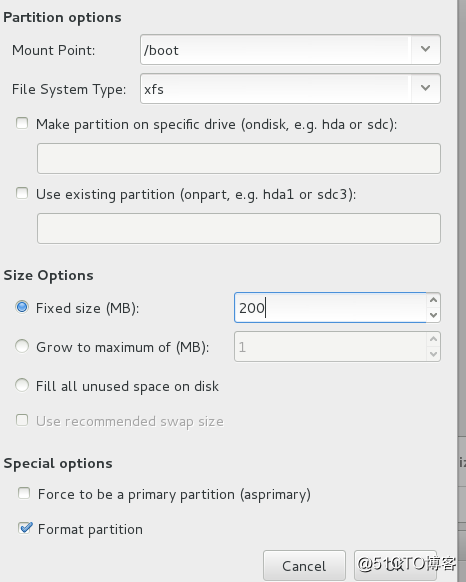
swap分区:500M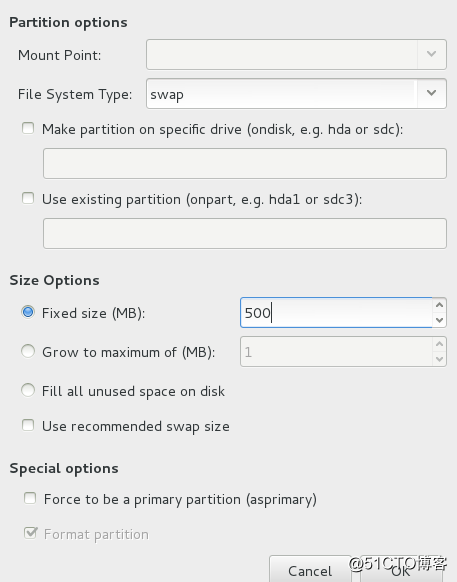
*/分区:剩下的所有空间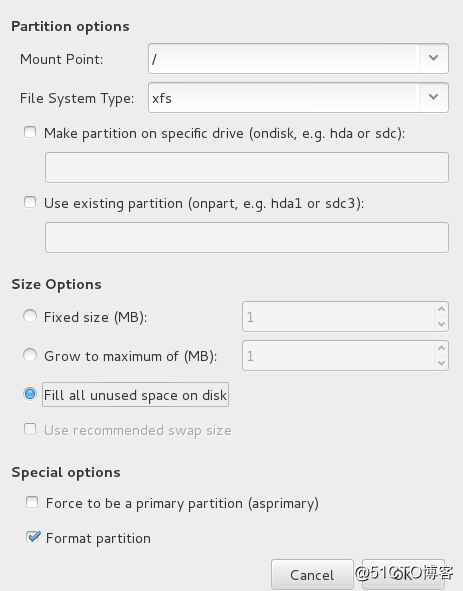
(5)安装是的网络配置
eth0,dhcp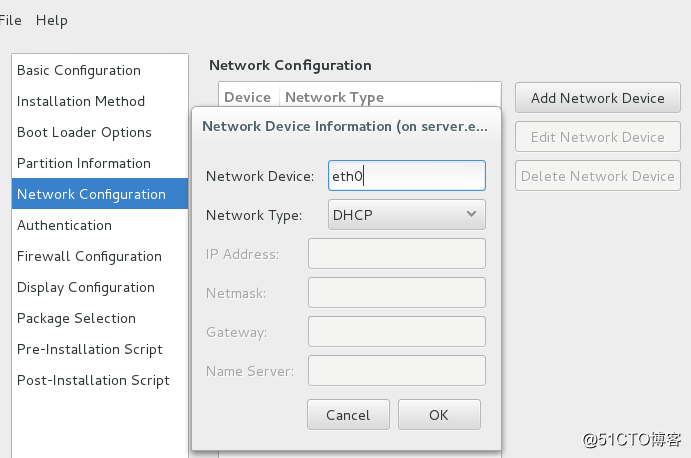
(6)火墙状态:选择关闭,selinux关闭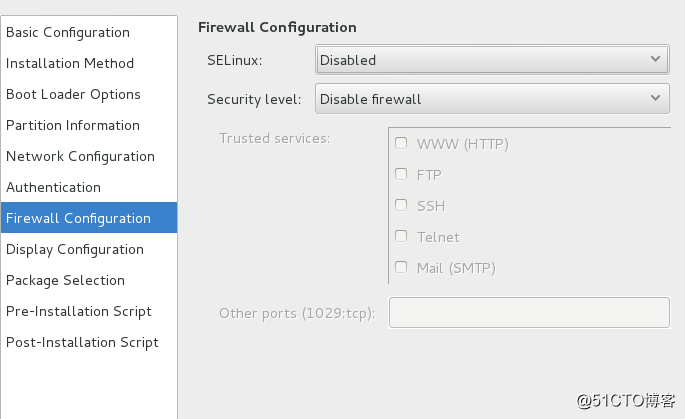
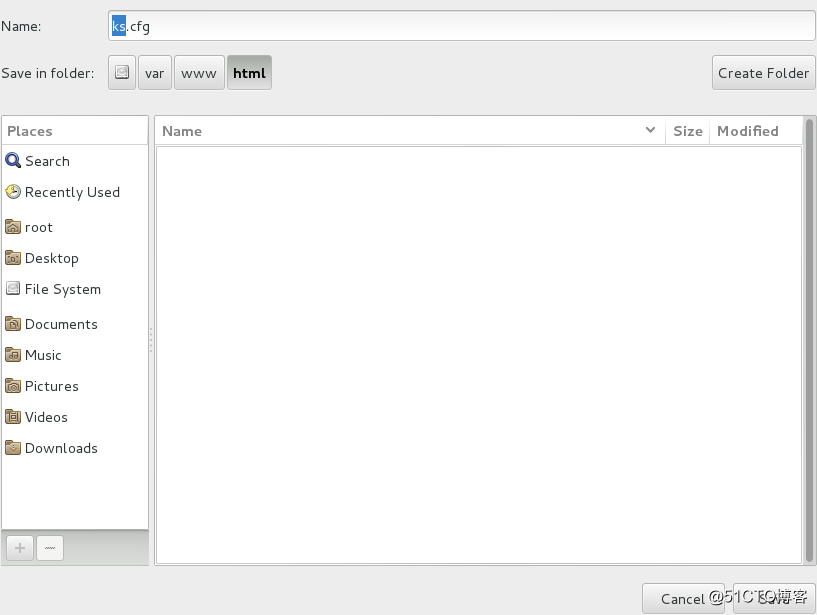
(7)保存
点击左上角的file选择save,在选择保存的位置,我将它保存在/var/www/html便于http访问
8.编辑生成的ks.cfg文件
安装一个新分区
[root@server ~]# cd /var/www/html/
[root@server html]# ls
ks.cfg
[root@server html]# vim ks.cfg #可以添加内容
1 #platform=x86, AMD64, or Intel EM64T
2 #version=DEVEL
3 # Install OS instead of upgrade
4 install #指定安装系统,还有升级系统选项
5 # Keyboard layouts
6 keyboard 'us' #keyboard指定键盘内型,keyboard us:美式键盘
7 # Halt after installation
8 halt #halt/reboot:安装完成后关机还是reboot,默认halt
9 # Root password
10 rootpw --iscrypted $1$bFQSWMpe$ZUyHLv0JV.IoM0HLarKfX1 #rootpw:root用户密码使用默认sha-512
11 #user:在系统中生成一个新用户
12 # System timezone
13 timezone Asia/Shanghai #时区
14 # Use network installation
15 url --url="http://172.25.254.60/rhel7.0" #安装源
16 # System language
17 lang en_US #lang指定安装过程使用的语言
18 # Firewall configuration
19 firewall --disabled #禁用防火墙
20 # Network information
21 network --bootproto=dhcp --device=eth0
22 # System authorization information
23 auth --useshadow --passalgo=sha512 #auth:验证选项,--useshadow:启用shadow文件来验证
System authorization information
24 # Use graphical install
25 graphical #在图形模式下根据kickstart执行安装,默认该选项.text:文本模式下根据kickstart执行
安装
26 firstboot --disable #--disable:安装后第一次启动默认会给出很多需要手动配置的界面,禁用它
27 # SELinux configuration
28 selinux --disabled
29 skipx:不安装图形工具
30 # System bootloader configuration
31 bootloader --location=mbr #bootloader:指定如何安装引导程序,要求必须已选择分区,已选择引
导程序,已选择软件包,如果没选择将会停止而不会询问。--location=mbr:指定引导程序的位置,默
认为mbr
32 # Clear the Master Boot Record
33 zerombr #清除磁盘的mbr
34 # Partition clearing information
35 clearpart --all --initlabel #在安装系统前清除分区,--all:清除所有分区,--linux:清除linux分
区,--none:不清除分区,--initlabel:创建标签,对于没有mbr和gpt的新硬盘,该选项是必须的,--dir vers=sdb:清除指定的分区
36 # Disk partitioning information
37 part /boot --fstype="xfs" --size=200
38 part swap --fstype="swap" --size=500
39 part / --fstype="xfs" --grow --size=1
#part:创建分区,--asprimary:强制指定为主分区,--grow:使用所有可用空间,即为其分配所有剩余> 空间。对于根分区至少需要3G空间(--grow,也要指定--size)
40 %packages #该段内容
41 @base
42 lftp
43 %end #结束
44
45 %post #安装结束做的事情
46 cat >> /etc/yum.repos.d/yum.repo <<EOF #配置yum源
47 [rhel7.0]
48 name=rhel7.0
49 baseurl=http://172.25.254.60/rhel7.0
50 gpgcheck=0
51 EOF
52 rm -fr /etc/sysconfig/network-scripts/ifcfg-eth0
53 cat >>/etc/sysconfig/network-scripts/ifcfg-eth0 <<EOF #配置动态网络
54 DEVICE=eth0
55 ONBOOT=yes
56 BOOTPROTO=none
57 IPADDR=172.25.254.225
58 PREFIX=24
59 EOF
60 systemctl restart network
61
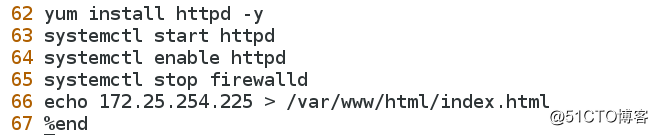
62 yum install httpd -y #安装http服务
63 systemctl start httpd #重启
64 systemctl enable httpd #开机自启
65 systemctl stop firewalld #关闭火墙
66 echo 172.25.254.225 > /var/www/html/index.html
67 %end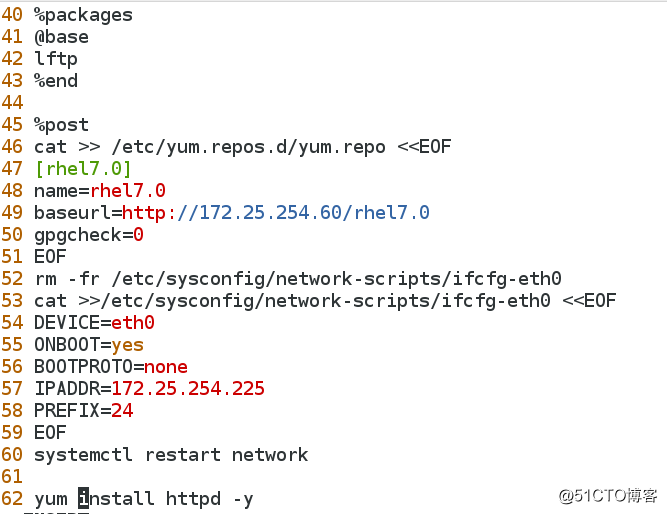
[root@server html]# ksvalidator ks.cfg #检测该脚本是否有语法错误
是否能被访问到
无语法错误后
http是否能访问到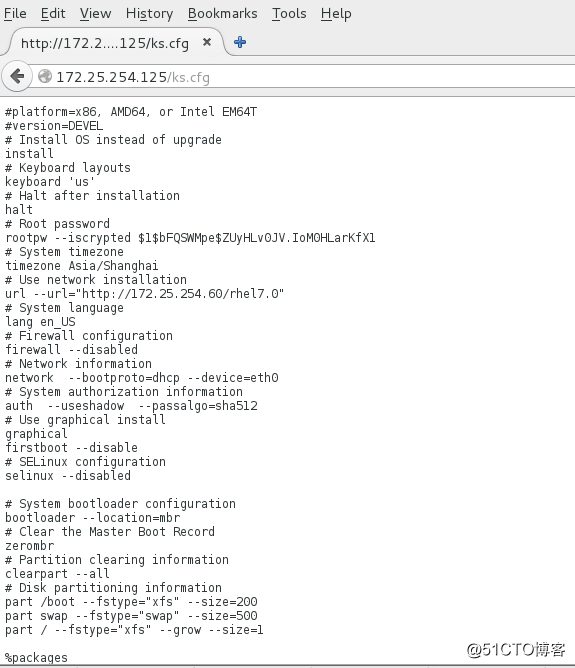
镜像文件是否能访问到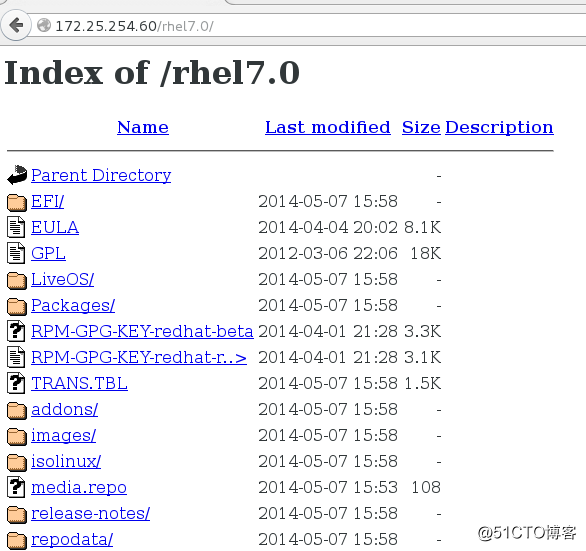
9.回答系统提出的问题,答案脚本写入文件
[root@server html]# cd /var/lib/tftpboot/
[root@server tftpboot]# vim pxelinux.cfg/default 
65 append initrd=initrd.img repo=http://172.25.254.60/rhel7.0 ks=http://172.25.254.125/ks. cfg
安装系统:
(1)获取dhcp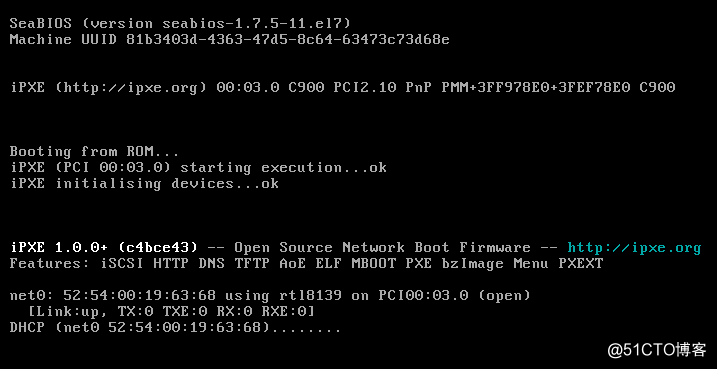
(2)进入预安装环境:读取内核文件启动初始化程序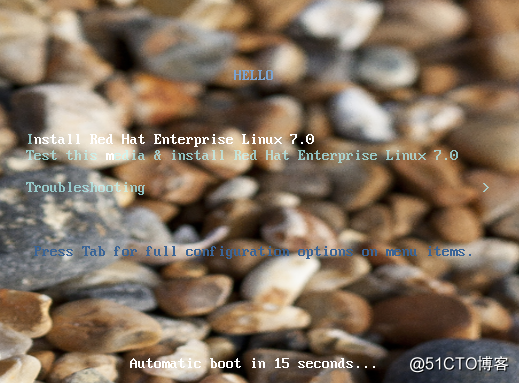
(3)读取镜像,进入安装环境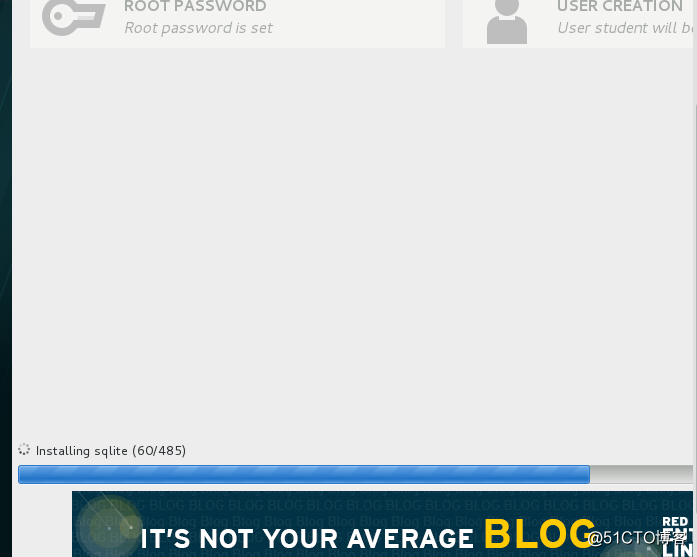
系统就安装完成啦
本文转自Uniqueh51CTO博客,原文链接:http://blog.51cto.com/13363488/2050165 ,如需转载请自行联系原作者