Led configuration
The Led configuration is located in system uci subsystem, and written in the /etc/config/system file.
Leds section
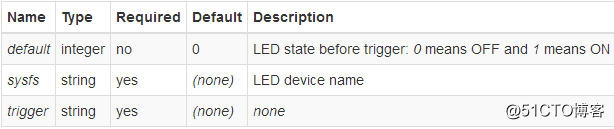
The leds section contains settings that apply to non-default leds
(default leds are usually “power connected” led, “system alive” led, leds showing ethernet port activity and leds showing wifi radio status. Their settings are defined somewhere else, see development guides)
This is an example of leds on a tp-link router with usb port.
root@lede:/# uci show system | grep "system.led"
system.led_usb=led
system.led_usb.name='USB'
system.led_usb.sysfs='tp-link:green:usb'
system.led_usb.trigger='usbdev'
system.led_usb.interval='50'
system.led_usb.dev='1-1'
system.led_wlan=led
system.led_wlan.name='WLAN'
system.led_wlan.sysfs='tp-link:green:wlan'
system.led_wlan.trigger='phy0tpt'root@lede:/# cat /etc/config/system
config led 'led_usb'
option name 'USB'
option sysfs 'tp-link:green:usb'
option trigger 'usbdev'
option interval '50'
option dev '1-1'
config led 'led_wlan'
option name 'WLAN'
option sysfs 'tp-link:green:wlan'
option trigger 'phy0tpt'How to add Leds to this section
All LEDs are represented by entries in the sys filesystem. You can check which LEDs are available in the /sys/class/leds directory.
The name of an entry typically consists of the name of the hardware providing the LED (the router model), the color of the LED, and it’s designation (usually the label on the case).
Some LEDs can show different colors. In this case, you will find one entry per color.
root@lede:/# ls /sys/class/leds/
tp-link:green:qss     tp-link:green:usb
tp-link:green:system  tp-link:green:wlan
The LED can be controlled by various events in the system, which is selected by the trigger option. Depending on the trigger, additional options must be specified. First of all, you need to know which triggers are available for a led, to do that simply look at the trigger file of that led. Example:
root@lede:/# cat /sys/class/leds/tp-link:green:qss/trigger
[none] switch0 timer default-on netdev usbdev phy0rx phy0tx phy0assoc phy0radio phy0tpt
If we wanted to (temporarily) assign a default-on trigger to the led, we would write
root@lede: echo "default-on" > /sys/class/leds/tp-link:green:qss/trigger
You can confirm that you changed this by using cat again, you will see it has changed and the selected trigger is highlighted.
root@lede:/# cat /sys/class/leds/tp-link:green:qss/trigger
none switch0 timer [default-on] netdev usbdev phy0rx phy0tx phy0assoc phy0radio phy0tpt
Now, this change will be lost on reboot, if you want to make a permanent change, you need to add the trigger in uci configuration.
If you have already a section in uci configuration that shows the led you want to set up, you just need to add the trigger.
For example, if you want change the trigger assigned to tp-link:green:wlan into “default-on” and you already have a block of options for it like this when you write uci show system | grep “system.led” (you can have more or less, it may also not have a trigger already assigned).
system.led_wlan=led
system.led_wlan.name='WLAN'
system.led_wlan.sysfs='tp-link:green:wlan'
system.led_wlan.trigger='phy0tpt'
then you can write
uci set system.led_wlan.trigger='default-on'
uci commit
If you don't have any configuration for it, you can add it and the trigger by editing the following example text (that sets wps led as “default-on” and then copy-pasting it whole in the terminal window.
rule_name=$(uci add system led_wps)
uci batch <<EOF set system.$rule_name.name='WPS'
set system.$rule_name.sysfs='tp-link:green:wps'
set system.$rule_name.trigger='default-on'
EOF
uci commit
Led triggers
Now we explain in detail what each trigger does.
None
The LED is always in default state. Unlisted LED are default OFF, so this is only useful to declare a LED to be always ON.
Timer
The LED blinks with the configured on/off frequency.
If not installed already, install it with:
root@lede:/# opkg install kmod-ledtrig-timer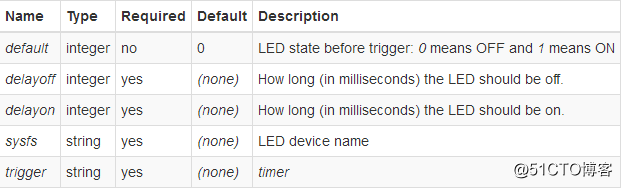
Default-on
The LED is ON. Deprecated, use default=1 trigger=none instead. If not installed already, install it with:
root@lede:/# opkg install kmod-ledtrig-default-on 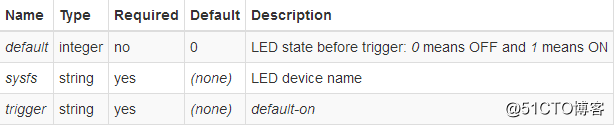
Heartbeat
The LED flashes to simulate actual heart beat thump-thump-pause. The frequency is in direct proportion to 1-minute average CPU load. If not installed already, install it with:
root@lede:/# opkg install kmod-ledtrig-heartbeat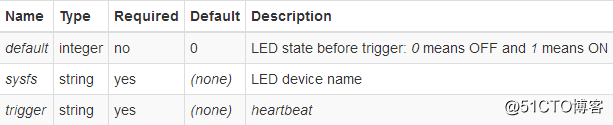
Flash Writes
The LED flashes as data is written to flash memory.
Network Activity
The LED flashes with link status and/or send and receive activity on the configured interface. If not installed already, install it with:
root@lede:/# opkg install kmod-ledtrig-netdev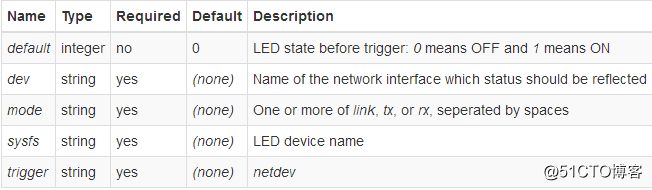
WiFi Activity triggers
The LED flashes on events triggered in physical interface, rather than in software network interface. Besides phy triggers have more events, it also provides possibility of static LED setup in case you want to monitor your 2.4 GHz radio (phy0 usually) and 5 GHz radio (phy1 usually) separately. netdev can’t guarantee this distinguishing since wlan0 may be referring to 2.4 GHz or 5 GHz radio based on current network setup.
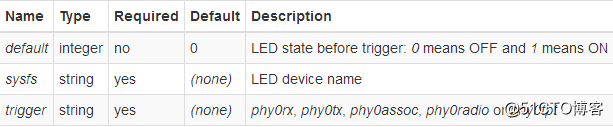
- phy0rx - flashes on reception.
- phy0tx - flashes on transmission.
- phy0assoc - flashes on client association.
- phy0radio - (unknown, this option did nothing on my tl-wr1043nd)
- phy0tpt - flashes slowly and steadily on network activity.in comparison to energetic flashes of tx and rx modes
USB Device
The LED turns ON if USB device is connected. If not installed already, install it with:
root@lede:/# opkg install kmod-ledtrig-usbdev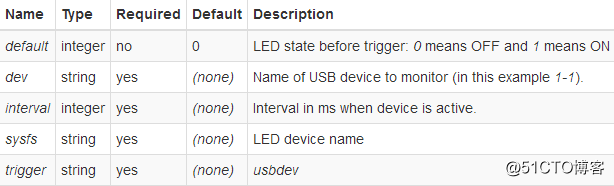
To find out device name use logread to search for it or list /sys/bus/usb/devices (for this example, there would be /sys/bus/usb/devices/1-1 device).
Morse Code
The LED signals a message using Morse code. If not installed already, install it with:
root@lede:/# opkg install kmod-ledtrig-morse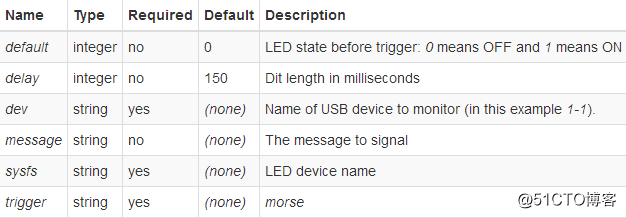
GPIO
Allows LEDs to be controlled by gpio events. If not installed already, install it with:
root@lede:/# opkg install kmod-ledtrig-gpio
Net filter
Flash LEDs when a particular packets passing through your machine. If not installed already, install it with:
root@lede:/# opkg install kmod-ipt-led
According to this, the package was named kmod-ledtrig-netfilter in older versions
For example to create an LED trigger for incoming SSH traffic:
root@lede:/# iptables -A INPUT -p tcp --dport 22 -j LED --led-trigger-id ssh --led-delay 1000
Then attach the new trigger to an LED on your system:
root@lede:/# echo netfilter-ssh > /sys/class/leds/<ledname>/trigger
Examples
Please remember to change the sysfs option to LEDs that are actually present on your router.
This can be done easily through LuCI. Following examples are from /etc/config/system file:
Heartbeat led
config 'led'
    option 'sysfs'      'wrt160nl:amber:wps'
    option 'trigger'     'heartbeat'
WLAN led
config 'led' 'wlan_led'
    option 'name'          'WLAN'
    option 'sysfs'           'tl-wr1043nd:green:wlan'
    option 'trigger'        'netdev'
    option 'dev'             'wlan0'
    option 'mode'         'link tx rx'
3G led
This led lights up when an USB-dongle properly registers with the 3G/EDGE/GPRS network.
config 'led'
    option 'name'         '3G'
    option 'sysfs'          'asus:blue:3g'
    option 'trigger'        'netdev'
    option 'dev'             '3g-wan'
    option 'mode'         'link'
Timer led - 500ms ON, 2000ms OFF
config 'led'
    option 'sysfs'        'wrt160nl:blue:wps'
    option 'trigger'      'timer'
    option 'delayon'      '500'
    option 'delayoff'      '2000'