代码如下:
agg::path_storage path;
for (int i = 100; i < 500; i=i+100)
{
path.move_to(i, 100);
path.line_to(i, 400);
}
for (int ii = 120; ii < 550; ii=ii+100)
{
path.move_to(ii+0.5, 100);
path.line_to(ii+0.5, 400);
}
agg::conv_stroke<agg::path_storage> stroke(path);
stroke.width(1.0);
ras.add_path(stroke);
agg::render_scanlines_aa_solid(ras,sl,renb,agg::rgba8(255,0,0));
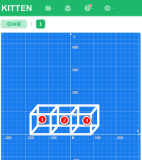
分析:不知道你有没有发现浮点坐标渲染的线段似乎更加细,然后似乎深些。可以继续替换
轮廓线宽为0.5,效果一样。当然完全局限于当前的显示屏的分辨率,这就是为什么需要专业
的电脑处理图像的原因。如果线宽设置为1.5,目前暂时没有发现什么不同。
从邮件中分析得出,为什么浮点型0.5渲染的线会颜色深些,这是由于像素实际上是在100和101之间,在这里我对于像素不做过多的定义,假设像素有50%在100点上,50%在101上,这个时候如果移动到100.5如果线宽刚好是1,实际上就是一个完整的像素点,一个完整的矩形,但是如果少了0.5实际上就是横跨两个像素点,这个情况下,实际上就引入了亚像素精度,将像素也就是坐标格子进行了划分,对于坐标格子实际上采用了透明色的处理,之所以没有锯齿,不是因为不存在,而是因为被透明处理了,设置了一定的透明度,使得我们并没有注意到,如果在高分辨率的显示器,还是可以看出来的。
邮件中提及到了,如果渲染横线或者竖线,实际上可以采用低级的渲染器,其中包括render_base,这种情况下,避免了引入亚像素精度,提高了性能,这种情况,在其他的章节会提及。
如下摘录,相关的讨论:
> Is the use of copy/blend hline/vline advised for efficiency or for
> better rendering?
Only for the sake of performance. And if you need subpixel positioning, you can
draw two adjacent horizontal/vertical lines calculating the intensity according
to the position (i.e, simulating the rasterizer for this simple case) - it will
be more efficient because of excluding some expensive operations.
Maxim> Actually, if you need to draw horizontal and vertical lines
Maxim> of exactly 1 pixel width, always aligned to pixels (say,
Maxim> coordinate grid), and if you are absolutely sure you won't
Maxim> need to transform them using AGG converters, it's better to
Maxim> use low level renderer_base::copy_hline(), copy_vline(),
Maxim> blend_hline(), blend_vline(), or, if you need to draw
Maxim> dashed/dotted lines, blend_solid_hspan(),
Maxim> blend_solid_vspan(). The latest require an array of
Maxim> "covers", that can be 0 for gaps and 255 for
Maxim> dashes. Intermediate values will be drawn with respective
Maxim> opacity.
Actually, I don't know that they will be exactly 1 pixel wide (but I
am drawing a coordinate grid so would like to align them to pixels).
I missed that the pixels were aligned to the 0.5 point rather than the
integer point.
Is the use of copy/blend hline/vline advised for efficiency or for
better rendering?
> That's just what I needed to know.
Actually, if you need to draw horizontal and vertical lines of exactly 1 pixel
width, always aligned to pixels (say, coordinate grid), and if you are
absolutely sure you won't need to transform them using AGG converters, it's
better to use low level renderer_base::copy_hline(), copy_vline(),
blend_hline(), blend_vline(), or, if you need to draw dashed/dotted lines,
blend_solid_hspan(), blend_solid_vspan(). The latest require an array of
"covers", that can be 0 for gaps and 255 for dashes. Intermediate values will
be drawn with respective opacity.
Pierre> Here you put the line centered exactly on the center of
Pierre> the pixels sitting between x=200 and x=201. When painting
Pierre> with 1.0 width, you will fill exactly one pixel (at
Pierre> x=200).
Pierre> So the matter here is not about AGG handling ints and
Pierre> floats in different ways, just that AGG accepts sub-pixel
Pierre> positioning, and its anti-aliasing machinery handles it
Pierre> quite well.
探讨:尝试修改浮点坐标为整型,+0.5替换为1,发现两根线完全没有什么分别
摘自:http://sourceforge.net/p/vector-agg/mailman/vector-agg-general/?viewmonth=200403
I am drawing some horizontal and vertical paths and notice that the
rasterized line width depends on whether I use an integer or float as
the x coordinate below. I know I can fix this by always passing and
integer (but this causes other complications), but am wondering if
this is the desired behavior, and if there is some bit of agg magic
that will display the lines with the same thickness even if the x
coords are sometimes integers, sometimes floats.
The critical bit is here (complete example below)
agg::path_storage path;
rb.clear(agg::rgba(1.0, 1.0, 1.0, 1.0));
path.move_to(100, 100);
path.line_to(100, 400);
path.move_to(200.5, 100);
path.line_to(200.5, 400);
agg::conv_stroke<agg::path_storage> stroke(path);
stroke.width(1.0);
ras.add_path(stroke);
And here is a complete example.
Thanks!
John Hunter
#include <fstream>
#include "agg_path_storage.h"
#include "agg_pixfmt_rgb24.h"
#include "agg_pixfmt_rgba32.h"
#include "agg_rasterizer_scanline_aa.h"
#include "agg_renderer_scanline.h"
#include "agg_rendering_buffer.h"
#include "agg_scanline_bin.h"
#include "agg_scanline_p32.h"
#include "agg_conv_stroke.h"
typedef agg::pixel_formats_rgba32<agg::order_rgba32> pixfmt;
typedef agg::renderer_base<pixfmt> renderer_base;
typedef agg::rasterizer_scanline_aa<> rasterizer;
// antialiased
//typedef agg::renderer_scanline_p_solid<renderer_base> renderer;
//typedef agg::scanline_p8 scanline;
// aliased
typedef agg::scanline_bin scanline;
typedef agg::renderer_scanline_bin_solid<renderer_base> renderer;
int main(int argc, char* argv[]) {
unsigned width(512), height(512);
unsigned stride(width*4);
size_t NUMBYTES(width*height*4);
agg::int8u buffer[NUMBYTES];
agg::rendering_buffer rbuf;
rbuf.attach(buffer, width, height, stride);
//draw_anti_aliased
pixfmt pixf(rbuf);
renderer_base rb(pixf);
renderer ren(rb);
rasterizer ras;
scanline sline;
agg::path_storage path;
rb.clear(agg::rgba(1.0, 1.0, 1.0, 1.0));
path.move_to(100, 100);
path.line_to(100, 400);
path.move_to(200.5, 100);
path.line_to(200.5, 400);
agg::conv_stroke<agg::path_storage> stroke(path);
//stroke.line_cap(cap);
//stroke.line_join(join);
stroke.width(1.0);
ras.add_path(stroke);
ren.color(agg::rgba(0.0, 0.0, 0.0, 1.0));
ras.render(sline, ren);
size_t i;
std::ofstream of2( "line_aa.raw", std::ios::binary|std::ios::out);
for (i=0; i<NUMBYTES; ++i)
of2.write((char*)&buffer[i], sizeof(char));
}
摘自:http://permalink.gmane.org/gmane.comp.graphics.agg/1428
问题:
Is it possible to draw non-anti-aliased dashed lines using a Bresenham-type algorithm in Antigrain? For instance, I'd like to draw a 45o dotted line, where every other pixel is solid.
I've tried several approaches, including using agg::renderer_outline_image with an image that defines the dashes (http://permalink.gmane.org/gmane.comp.graphics.agg/972) and using agg::conv_dash and setting gamma_threshold(0.5) (http://permalink.gmane.org/gmane.comp.graphics.agg/1428), but I can't seem to get a clean drawing for the 45o dotted case.
2/ I would like to render aliased lines. After some tests, I'm not able
> to render odd line width. If I try to render a line with a width = 3, I
> got a 4 pixel line. What do I need to do to ?
讨论:
That's not easy. In short words, the visual width of the horizontal or vertical
lines depends not only on the stroke width you have set, but also on the
subpixel position of that line. A common way to draw everything aliased is to
set AA gamma:
ras.gamma(agg::gamma_threshold(0.5));
Here you can use scanline_bin and renderer_scanline_bin_solid that work faster.
But the problem still persists; I wrote about it here:http://antigrain.com/tips/line_alignment/line_alignment.agdoc.htmlNow imagine that you draw aliased lines, and set pixel if the coverage value
exceeds a certain threshold.
In other words you can easily draw aliased lines of exactly 1 pixel width
(Bresenham-like algorithm). Everything wider leads to problems. But even
reguilar jagged lines of 1 pixel width have different visual thickness
depending on the tangent. A line of 45 degree steep has visual thickness of
1/sqrt(2)=0.7 pixels.