玩转 Nginx 之:使用 Lua 扩展 Nginx 功能

1、Nginx 简介
Nginx 作为一款面向性能设计的HTTP服务器,相较于Apache、lighttpd具有占有内存少,稳定性高等优势。其流行度越来越高,应用也越来越广泛,常见的应用有:网页服务器、反向代理服务器以及电子邮件(IMAP/POP3)代理服务器,高并发大流量站点常用来做接入层的负载均衡,还有非常常见的用法是作为日志采集服务器等。
Nginx 整体采用模块化设计,有丰富的模块库和第三方模块库,配置灵活。其中模块化设计是nginx的一大卖点,甚至http服务器核心功能也是一个模块。要注意的是:nginx的模块是静态的,添加和删除模块都要对nginx进行重新编译,这一点与Apache的动态模块完全不同。不过后来淘宝做了二次开发开源的 tengine 是支持 官方所有的 HTTP 模块动态加载而不必重新编译 Nginx,除非是第三方模块才需要重新编译。因此,在生产环境中,推荐用淘宝开源的 tengine,本文也以 tengine 作为示例。
虽然 Nginx 有如此强大的性能以及众多的三方模块支持,但每次重新编译以及寻找三方模块对生产环境来说还是不可接受的,幸运的是,Nginx 它是支持客户自己 Lua 脚本编程扩展相应的功能的,而且可以热加载,这就给生产环境带来了无限可能。比如我现在想要直接用Nginx + redis 做反爬虫和频率限制,Nginx + Kafka 做日志的实时流处理等等。
注:lvs 和 nginx 的负载均衡区别:
LVS:Linux Virtual Server,基于IP的负载均衡和反向代理技术,所以它几乎可以对所有应用做负载均衡,包括http、数据库、在线聊天室等等,LVS工作在4层,在Linux内核中作四层交换,只花128个字节记录一个连接信息,不涉及到文件句柄操作,故没有65535最大文件句柄数的限制。LVS性能很高,可以支持100~400万条并发连接。抗负载能力强、是工作在网络4层之上仅作分发之用,没有流量的产生,这个特点也决定了它在负载均衡软件里的性能最强的,对内存和cpu、IO资源消耗比较低。
Nginx:基于HTTP的负载均衡和反向代理服务器,Nginx工作在网络的7层,所以它可以针对http应用本身来做分流策略,比如针对域名、URL、目录结构等,相比之下LVS并不具备这样的功能,能够很好地支持虚拟主机,可配置性很强,大约能支持3~5万条并发连接。
2、Lua 简介
Lua 是一个简洁、轻量、可扩展的脚本语言,也是号称性能最高的脚本语言,用在很多需要性能的地方,比如:游戏脚本,nginx,wireshark的脚本,当你把他的源码下下来编译后,你会发现解释器居然不到200k,非常变态。。。很多应用程序使用Lua作为自己的嵌入式脚本语言,以此来实现可配置性、可扩展性。
Lua原生支持的数据类型非常之少,它只提供了nil、数字(缺省是双精度浮点数,可配置)、布尔量、字符串、表、子程序、协程(coroutine)以及用户自定义数据这8种。但是其处理表和字符串的效率非常之高,加上元表的支持,开发者可以高效的模拟出需要的复杂数据类型(比如集合、数组等)。Lua是一个动态弱类型语言,支持增量式垃圾收集策略。有内建的,与操作系统无关的协作式多线程(coroutine)支持。它还可以用于嵌入式硬件,不仅可以嵌入其他编程语言,而且可以嵌入微处理器中。
3、nginx执行步骤
nginx在处理每一个用户请求时,都是按照若干个不同的阶段依次处理的,与配置文件上的顺序没有关系,详细内容可以阅读《深入理解nginx:模块开发与架构解析》这本书,这里只做简单介绍;
(1)post-read
读取请求内容阶段,nginx读取并解析完请求头之后就立即开始运行;
(2)server-rewrite
server请求地址重写阶段;
(3)find-config
配置查找阶段,用来完成当前请求与location配重块之间的配对工作;
(4)rewrite
location请求地址重写阶段,当ngx_rewrite指令用于location中,就是再这个阶段运行的;
(5)post-rewrite
请求地址重写提交阶段,当nginx完成rewrite阶段所要求的内部跳转动作,如果rewrite阶段有这个要求的话;
(6)preaccess
访问权限检查准备阶段,ngx_limit_req和ngx_limit_zone在这个阶段运行,ngx_limit_req可以控制请求的访问频率,ngx_limit_zone可以控制访问的并发度;
(7)access
权限检查阶段,ngx_access在这个阶段运行,配置指令多是执行访问控制相关的任务,如检查用户的访问权限,检查用户的来源IP是否合法;
(8)post-access
访问权限检查提交阶段;
(9)try-files
配置项try_files处理阶段;
(10)content
内容产生阶段,是所有请求处理阶段中最为重要的阶段,因为这个阶段的指令通常是用来生成HTTP响应内容的;
(11)log
日志模块处理阶段;

图:Nginx 模块执行顺序与阶段
4、ngx_lua 运行指令
ngx_lua属于nginx的一部分,它的执行指令都包含在nginx的11个步骤之中了,相应的处理阶段可以做插入式处理,即可插拔式架构,不过ngx_lua并不是所有阶段都会运行的;另外指令可以在http、server、server if、location、location if几个范围进行配置:
| 指令 | 所处处理阶段 | 使用范围 | 解释 |
| init_by_lua init_by_lua_file |
loading-config | http | nginx Master进程加载配置时执行; 通常用于初始化全局配置/预加载Lua模块 |
| init_worker_by_lua init_worker_by_lua_file |
starting-worker | http | 每个Nginx Worker进程启动时调用的计时器,如果Master进程不允许则只会在init_by_lua之后调用; 通常用于定时拉取配置/数据,或者后端服务的健康检查 |
| set_by_lua set_by_lua_file |
rewrite | server,server if,location,location if | 设置nginx变量,可以实现复杂的赋值逻辑;此处是阻塞的,Lua代码要做到非常快; |
| rewrite_by_lua rewrite_by_lua_file |
rewrite tail | http,server,location,location if | rrewrite阶段处理,可以实现复杂的转发/重定向逻辑; |
| access_by_lua access_by_lua_file |
access tail | http,server,location,location if | 请求访问阶段处理,用于访问控制 |
| content_by_lua content_by_lua_file |
content | location,location if | 内容处理器,接收请求处理并输出响应 |
| header_filter_by_lua header_filter_by_lua_file |
output-header-filter | http,server,location,location if | 设置header和cookie |
| body_filter_by_lua body_filter_by_lua_file |
output-body-filter | http,server,location,location if | 对响应数据进行过滤,比如截断、替换。 |
| log_by_lua log_by_lua_file |
log | http,server,location,location if | log阶段处理,比如记录访问量/统计平均响应时间 |
关于这部分详细可以参考这篇:
Refer [4] nginx与lua的执行顺序和步骤说明
Refer [5] ngx_lua用例说明
5、安装 tengine 以及 Lua 扩展
(1)先安装Nginx需要的一些类库:
yum install gcc
yum install gcc-c++
注:此步骤只是在你的系统没有安装 gcc/gcc-c++ 的情况下才需要自行编译安装。
(2)编译安装库LuaJit-2.0.3:
./configure --prefix=/usr/local/luajit
make PREFIX=/usr/local/luajit
make install PREFIX=/usr/local/luajit
在/etc/profile文件中增加环境变量,并执行 source /etc/profile 使之生效(非必须):
export LUAJIT_LIB=/usr/install/luajit/lib
export LUAJIT_INC=/usr/install/luajit/include/luajit-2.0
注:此步骤只是在你的系统没有安装 LuaJIT 的情况下才需要自行编译安装。
(3)下载模块依赖 pcre-8.34、zlib-1.2.8、ngx_devel_kit 和 lua-nginx-module,最后编译Nginx:
完整的参数可能这样:
nginx -V
Tengine version: Tengine/2.1.0 (nginx/1.6.2)
built by gcc 4.4.7 20120313 (Red Hat 4.4.7-4) (GCC)
TLS SNI support enabled
configure arguments: --prefix=/etc/nginx/ --sbin-path=/usr/sbin/nginx --conf-path=/etc/nginx/nginx.conf --error-log-path=/var/log/nginx/error.log --http-log-path=/var/log/nginx/access.log --pid-path=/var/run/nginx.pid --lock-path=/var/run/nginx.lock --http-client-body-temp-path=/var/cache/nginx/client_temp --http-proxy-temp-path=/var/cache/nginx/proxy_temp --http-fastcgi-temp-path=/var/cache/nginx/fastcgi_temp --http-uwsgi-temp-path=/var/cache/nginx/uwsgi_temp --http-scgi-temp-path=/var/cache/nginx/scgi_temp --user=nginx --group=nginx --with-http_ssl_module --with-http_realip_module --with-http_addition_module --with-http_sub_module --with-http_dav_module --with-http_flv_module --with-http_mp4_module --with-http_gzip_static_module --with-http_random_index_module --with-http_secure_link_module --with-http_stub_status_module --with-mail --with-mail_ssl_module --with-file-aio --with-ipv6 --with-cc-opt='-O2 -g -m64 -mtune=generic' --with-pcre=../pcre-8.33 --with-zlib=../zlib-1.2.8 --with-openssl=../openssl-1.0.1l
先 ./configure 各种配置参数以及模块路径,但我这里只是用来测试就精简了不少参数:
./configure --prefix=/opt/soft/nginx --with-pcre=/root/soft/pcre-8.37 --with-zlib=/root/soft/zlib-1.2.8 --with-openssl=/root/soft/openssl-1.0.1p --add-module=/root/soft/lua-nginx-module-master --add-module=/root/soft/ngx_devel_kit-master --sbin-path=/usr/sbin/nginx --conf-path=/etc/nginx/nginx.conf --error-log-path=/var/log/nginx/error.log --http-log-path=/var/log/nginx/access.log --pid-path=/var/run/nginx.pid --lock-path=/var/run/nginx.lock --http-client-body-temp-path=/var/cache/nginx/client_temp --http-proxy-temp-path=/var/cache/nginx/proxy_temp --http-fastcgi-temp-path=/var/cache/nginx/fastcgi_temp --http-uwsgi-temp-path=/var/cache/nginx/uwsgi_temp --http-scgi-temp-path=/var/cache/nginx/scgi_temp然后 make、make install 即可。
(5)启动Nginx sbin/nginx,浏览器输入http://localhost测试
需要注意的是:
(1)--with-pcre=/root/soft/pcre-8.37 --with-zlib=/root/soft/zlib-1.2.8 指向的是源码路径,而非编译后的路径,否则 make 会报:
cd /usr/local/pcre \
&& if [ -f Makefile ]; then make distclean; fi \
&& CC="gcc" CFLAGS="-O2 -fomit-frame-pointer -pipe " \
./configure --disable-shared
/bin/sh: ./configure: No such file or directory
make[1]: *** [/usr/local/pcre/Makefile] Error 127
make[1]: Leaving directory `/software/nginx-0.8.53'
make: *** [build] Error 2
因为 ./configure --help 看一下帮助说明:
--with-pcre=DIR set path to PCRE library sources
set path to PCRE library sources 是让你设置到源码目录,而不是编译安装后的目录
(2)pcre、zlib、openssl 等系统库如果系统没有集成自带,一定要单独编译安装,而 lua-nginx-module、ngx_devel_kit 等插件模块只需要指源码路径给 nginx 一起编译即可,不需要单独编译。
6、一个 Nginx + Lua 测试的例子
user work work;
worker_processes  7;

error_log  /opt/data1/logs/nginx/error.log;
pid        /var/run/nginx.pid;
worker_rlimit_nofile 800000;

events {
    use epoll;
    worker_connections  65535;
}

http {

    server {
        listen	80;

        set $idTest "idTest_11111111111" ;
		log_format  tracklog '$idTest $msec $remote_addr - $remote_user [$time_local] $request '
						'"$status" resp_body:"$resp_body" --"$ref1"-- '
						'"$http_user_agent"';

		location ~ /gzip/(.*) {
			default_type "text/html";

			set $resp_body "";
			content_by_lua  '
			--zlib 解码 post gzip 数据
            local zlib = require "zlib"
            local encoding = ngx.req.get_headers()["Content-Encoding"]

            if encoding == "gzip" then
				ngx.req.read_body()
                local body = ngx.req.get_body_data()
				ngx.say("++++++++++++++++++++++++++++body data:")
                ngx.print(body)
                if body then
					--ngx.var.resp_body = "55555555555555"
                    local stream = zlib.inflate()
                    ngx.var.resp_body = stream(body)
                end
            end
		';

			access_log  on;
            access_log              /opt/data1/logs/nginx/pc/track/ooxx.com.access.log               tracklog;
		}

		location ~ /post/(.*) {
			default_type "text/html";
			lua_need_request_body on;
			set $resp_body "";
			content_by_lua  '
            ngx.var.resp_body = ngx.var.request_body
		';

			access_log  on;
            access_log              /opt/data1/logs/nginx/pc/track/ooxx.com.access.log               tracklog;
		}


        location ~ /lua/(.*) {
            default_type "text/html";
            set $ref1 "Hello,Nginx & Lua !";
            #设置nginx变量
            set $a $1;
            set $b $host;

        content_by_lua '
            --nginx变量
            local var = ngx.var
            ngx.say("ngx.var.a : ", var.a, "<br/>")
            ngx.say("ngx.var.b : ", var.b, "<br/>")
            ngx.say("ngx.var[2] : ", var[2], "<br/>")
            ngx.var.b = 2;
            ngx.say("<br/>")

            --请求头
           ngx.say(ngx.var.httpRef, "<br/>")
           local headers = ngx.req.get_headers()
           for k,v in pairs(headers) do
                if type(v) == "table" then
                    ngx.say(k, " : ", table.concat(v, ","), "<br/>")
                else
                    ngx.say(k, " : ", v, "<br/>")
                end
            end
            ngx.say("------------headers end-----------", "<br/><br/><br/>")

            --get请求uri参数
            ngx.say("uri args begin", "<br/>")
            local uri_args = ngx.req.get_uri_args()
            for k, v in pairs(uri_args) do
                if type(v) == "table" then
                    ngx.say(k, " : ", table.concat(v, ", "), "<br/>")
                else
                    ngx.say(k, ": ", v, "<br/>")
                end
            end
            ngx.say("uri args end", "<br/>")
            ngx.say("a: ",ngx.var.arg_a, "<br/>")
            ngx.say("b: ",ngx.var.arg_b, "<br/>")

            --未经解码的请求 uri
            local request_uri = headers["Host"] .. "/" .. ngx.var.request_uri;
            ngx.say("request_uri : ", request_uri, "<br/>");
            --解码后的 uri
            local decode_request_uri = headers["Host"] .. "/" .. ngx.unescape_uri(ngx.var.request_uri);
            ngx.var.ref1 = decode_request_uri;
            ngx.say("decode request_uri : ", decode_request_uri, "<br/>");
            --MD5
            ngx.say("ngx.md5 : ", ngx.md5("123"), "<br/>")
            --http time
            ngx.say("ngx.http_time : ", ngx.http_time(ngx.time()), "<br/>")
            --ngx.var.http_referer = "*********************"

            ';


			log_format  LogFormatv1 '$idTest@$msec@$remote_addr@-@$remote_user@[$time_local]@$request@'
						'"$status"@$body_bytes_sent@"$http_referer"@'
						'"$http_user_agent"';

			access_log  on;

            access_log              /opt/data1/logs/nginx/PCv1/track/ooxx.com.access.log               LogFormatv1;
        }

    }
}
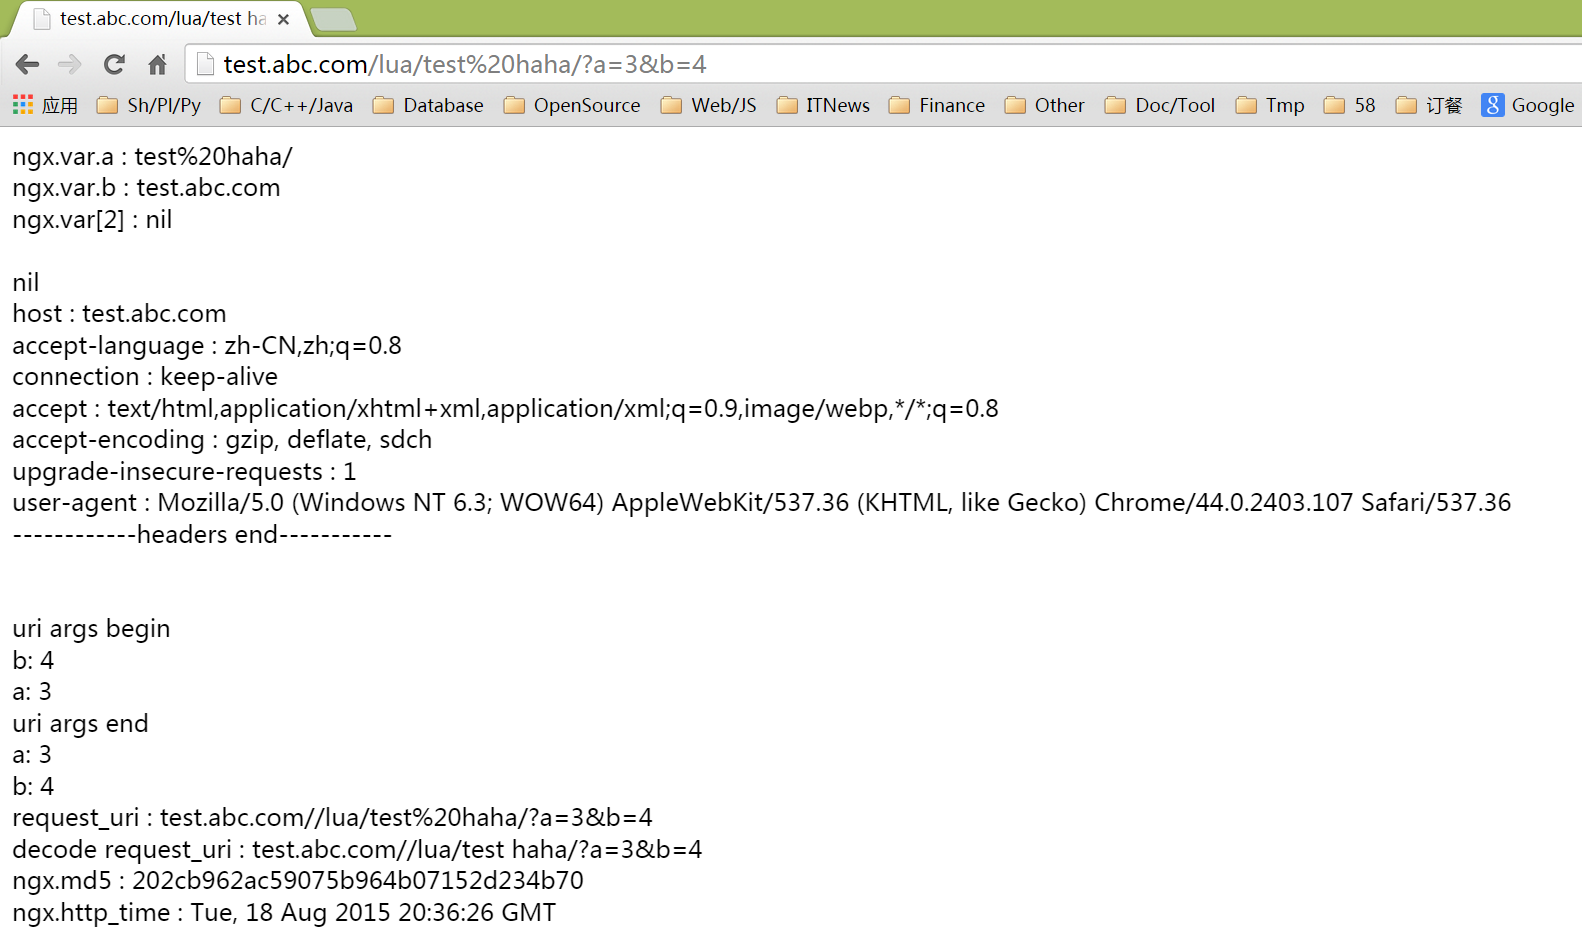
需要注意的是线上的 Nginx 可能面对的是高并发场景,对于自己的 Lua 代码最好做个压力测试,比如:
tcpcopy

或者

ab -c100 -n10000 'http://test.abc.com/lua/test%20haha/?a=3&b=4'
7、关于 64bit Cgywin 下编译安装 Tengine 的一些问题
(1)openSSL 库不支持 64bit Cygwin
cryptlib.c:1:0: 错误:您选择的 CPU 不支持 x86-64 指令集
 /* crypto/cryptlib.c */
 ^
cryptlib.c:1:0: 错误:您选择的 CPU 不支持 x86-64 指令集
<builtin>: recipe for target 'cryptlib.o' failed
make[3]: *** [cryptlib.o] Error 1
make[3]: Leaving directory '/home/Jun/softs/openssl-1.0.1r/crypto'
Makefile:281: recipe for target 'build_crypto' failed
这种要么自己去网上找补丁 patch,要么换成 Cygwin 32bit,还有一种解决方案就是自己在安装 Cygwin 包的时候把 openssl 也装上,也就是说选择安装包的时候尽量装全一点。省得后续自己装遇到各种问题。
这样如果你自己已经装了 openssl 那么可以在configure 的时候去掉openssl 相关的编译依赖选项:
./configure --with-openssl=/root/soft/openssl-1.0.1p (去掉该项)
(2)nginx 启动报错:
nginx: [emerg] the maximum number of files supported by select() is 64
毕竟 Cygwin 还是依赖 windows的,各种参数得针对 windows 优化,比如这个报错是说默认配置文件里的 worker_connections 不能超过 64 个,你改成 20 即可。
events {
    use epoll;
    worker_connections  65535;
}
比如我这里的编译配置参数是(注意有些目录可能需要提前自己创建):
./configure --prefix=/opt/soft/nginx --with-pcre=/home/Jun/softs/pcre-8.38 --with-zlib=/home/Jun/softs/zlib-1.2.8 --add-module=/home/Jun/softs/ngx_devel_kit-master --add-module=/home/Jun/softs/echo-nginx-module-master --add-module=/home/Jun/softs/form-input-nginx-module-master --add-module=/home/Jun/softs/set-misc-nginx-module-master --add-module=/home/Jun/softs/lua-nginx-module-master --sbin-path=/usr/sbin/nginx --conf-path=/etc/nginx/nginx.conf --error-log-path=/var/log/nginx/error.log --http-log-path=/var/log/nginx/access.log --pid-path=/var/run/nginx.pid --lock-path=/var/run/nginx.lock --http-client-body-temp-path=/var/cache/nginx/client_temp --http-proxy-temp-path=/var/cache/nginx/proxy_temp --http-fastcgi-temp-path=/var/cache/nginx/fastcgi_temp --http-uwsgi-temp-path=/var/cache/nginx/uwsgi_temp --http-scgi-temp-path=/var/cache/nginx/scgi_temp最后 nginx.conf 稍加修改如下(注意有些目录可能需要提前自己创建):
worker_processes  2;

#error_log  /var/log/nginx/error.log;
pid        /var/run/nginx.pid;

events {
    worker_connections  20;
}

http {

    server {
        listen                          80;

        set $idTest "idTest_11111111111" ;

        log_format  tracklog '$idTest $msec $remote_addr - $remote_user [$time_local] $request '
                      '"$status" $body_bytes_sent --"$ref1"-- '
                      '"$http_user_agent"';

        log_format  LogFormatv1 '$idTest@$msec@$remote_addr@-@$remote_user@[$time_local]@$request@'
                      '"$status"@$body_bytes_sent@"$http_referer"@'
                      '"$http_user_agent"';

        access_log  on;

        location ~ /lua/(.*) {
            default_type "text/html";
            set $ref1 "Hello,Nginx & Lua !";
            #设置nginx变量
            set $a $1;
            set $b $host;

        content_by_lua '
            --nginx变量
            local var = ngx.var
            ngx.say("ngx.var.a : ", var.a, "<br/>")
            ngx.say("ngx.var.b : ", var.b, "<br/>")
            ngx.say("ngx.var[2] : ", var[2], "<br/>")
            ngx.var.b = 2;
            ngx.say("<br/>")

            --请求头
           ngx.say(ngx.var.httpRef, "<br/>")
           local headers = ngx.req.get_headers()
           for k,v in pairs(headers) do
                if type(v) == "table" then
                    ngx.say(k, " : ", table.concat(v, ","), "<br/>")
                else
                    ngx.say(k, " : ", v, "<br/>")
                end
            end
            ngx.say("------------headers end-----------", "<br/><br/><br/>")

            --get请求uri参数
            ngx.say("uri args begin", "<br/>")
            local uri_args = ngx.req.get_uri_args()
            for k, v in pairs(uri_args) do
                if type(v) == "table" then
                    ngx.say(k, " : ", table.concat(v, ", "), "<br/>")
                else
                    ngx.say(k, ": ", v, "<br/>")
                end
            end
            ngx.say("uri args end", "<br/>")
            ngx.say("a: ",ngx.var.arg_a, "<br/>")
            ngx.say("b: ",ngx.var.arg_b, "<br/>")

            --未经解码的请求 uri
            local request_uri = headers["Host"] .. "/" .. ngx.var.request_uri;
            ngx.say("request_uri : ", request_uri, "<br/>");
            --解码后的 uri
            local decode_request_uri = headers["Host"] .. "/" .. ngx.unescape_uri(ngx.var.request_uri);
            ngx.var.ref1 = decode_request_uri;
            ngx.say("decode request_uri : ", decode_request_uri, "<br/>");
            --MD5
            ngx.say("ngx.md5 : ", ngx.md5("123"), "<br/>")
            --http time
            ngx.say("ngx.http_time : ", ngx.http_time(ngx.time()), "<br/>")
            --ngx.var.http_referer = "*********************"
            ';

            access_log              /var/log/nginx/ooxx.com.access.log               tracklog;
        }

    }
}
最后 nginx -s reload 效果如下,http://localhost/lua/?a=1&b=2 请求也正常,和 linux 下结果一致:

8、关于 nginx 正则说明
(1)location 匹配语法规则
Nginx location 的正则匹配语法与优先级容易让新同学迷惑。
~ #波浪线表示执行一个正则匹配,区分大小写
~* #表示执行一个正则匹配,不区分大小写
= #进行普通字符精确匹配,与location在配置文件中的顺序无关,= 精确匹配会第一个被处理
@ #"@" 定义一个命名的 location,使用在内部定向时,例如 error_page, try_files
^~ 标识符后面跟一个字符串。表示普通字符匹配,如果该选项匹配,只匹配该选项,不匹配别的选项,Nginx将在这个字符串匹配后停止进行正则表达式的匹配(location指令中正则表达式的匹配的结果优先使用),如:location ^~ /images/,你希望对/images/这个目录进行一些特别的操作,如增加expires头,防盗链等,但是你又想把除了这个目录的图片外的所有图片只进行增加expires头的操作,这个操作可能会用到另外一个location,例如:location ~* \.(gif|jpg|jpeg)$,这样,如果有请求/images/1.jpg,nginx如何决定去进行哪个location中的操作呢?结果取决于标识符^~,如果你这样写:location /images/,这样nginx会将1.jpg匹配到location ~* \.(gif|jpg|jpeg)$这个location中,这并不是你需要的结果,而增加了^~这个标识符后,它在匹配了/images/这个字符串后就停止搜索其它带正则的location。
例如:
location  = / {
  # 只匹配"/".
  [ configuration A ]
}
location  / {
  # 匹配任何请求,因为所有请求都是以"/"开始
  # 但是更长字符匹配或者正则表达式匹配会优先匹配
  [ configuration B ]
}
location ^~ /images/ {
  # 匹配任何以 /images/ 开始的请求,并停止匹配 其它location
  [ configuration C ]
}
location ~* \.(gif|jpg|jpeg)$ {
  # 匹配以 gif, jpg, or jpeg结尾的请求.
  # 但是所有 /images/ 目录的请求将由 [Configuration C]处理.
  [ configuration D ]
}
请求URI例子:
- / -> 符合configuration A
- /documents/document.html -> 符合configuration B
- /images/1.gif -> 符合configuration C
- /documents/1.jpg ->符合 configuration D
= 表示精确的查找地址,如location = /它只会匹配uri为/的请求,如果请求为/index.html,将查找另外的location,而不会匹配这个,当然可以写两个location,location = /和location /,这样/index.html将匹配到后者,如果你的站点对/的请求量较大,可以使用这个方法来加快请求的响应速度。
@ 表示为一个location进行命名,即自定义一个location,这个location不能被外界所访问,只能用于Nginx产生的子请求,主要为error_page和try_files。
(2)location 优先级官方文档
- =前缀的指令严格匹配这个查询。如果找到,停止搜索。
- 所有剩下的常规字符串,最长的匹配。如果这个匹配使用^〜前缀,搜索停止。
- 正则表达式,在配置文件中定义的顺序。
- 如果第3条规则产生匹配的话,结果被使用。否则,如同从第2条规则被使用。
(3)正则语法
~ 为区分大小写的匹配。
~* 不区分大小写的匹配(匹配firefox的正则同时匹配FireFox)。
!~ 不匹配的
!~* 不匹配的
. 匹配除换行符以外的任意字符
\w 匹配字母或数字或下划线或汉字
\s 匹配任意的空白符
\d 匹配数字
\b 匹配单词的开始或结束
^ 匹配字符串的开始
$ 匹配字符串的结束
\W 匹配任意不是字母,数字,下划线,汉字的字符
\S 匹配任意不是空白符的字符
\D 匹配任意非数字的字符
\B 匹配不是单词开头或结束的位置
捕获 (exp) 匹配exp,并捕获文本到自动命名的组里
(?<name>exp) 匹配exp,并捕获文本到名称为name的组里,也可以写成(?'name'exp)
(?:exp) 匹配exp,不捕获匹配的文本,也不给此分组分配组号
零宽断言 (?=exp) 匹配exp前面的位置
(?<=exp) 匹配exp后面的位置
(?!exp) 匹配后面跟的不是exp的位置
(?<!exp) 匹配前面不是exp的位置
注释 (?#comment) 这种类型的分组不对正则表达式的处理产生任何影响,用于提供注释让人阅读