4.1、openssh简介
传统的网络程序都是采用明文传输数据和密码,如telnet、ftp等,存在很大的安全漏洞,黑客只需要使用一些数据包截取工具就可以获得包括密码在内的重要数据。正因如此,后来才出现了SSH (Secure shell,安全命令壳)。SSH是由芬兰的一家公司所研发的加密通信协议,所有SSH传输的数据都是经过加密,可以有效防止数据的窃取以及'中间人'的攻击。SSH建立在应用层和传输层基础上的安全协议,监听tcp的22号端口,属于是文本协议。OpenSSH是SSH的替代软件,完全免费并且开放源代码。当前ssh协议版本主要有两种:
| sshv1是基于CRC-32做MAC,因此,不安全,建议勿用; sshv2基于双方主机协商选择最安全的MAC实现机制;加密机制及MAC机制是双方协商选定;基于DH实现密钥交换,基于RSA或DSA实现身份认证;客户通过检查服务端的主机密钥来判定是否与其进一步通信。 |
基于sshv2版本的通信方式主要如下图所示;

在Centos6中已经默认安装了openssh,可以使用如下命令查看安装情况:
[root@mylinux ~]# rpm -qa |grep ssh
openssh-clients-5.3p1-118.1.el6_8.x86_64     #openssh的客户端程序
libssh2-1.4.2-2.el6_7.1.x86_64               #openssh的协议实现模块
openssh-5.3p1-118.1.el6_8.x86_64             #openssh的主程序文件
openssh-server-5.3p1-118.1.el6_8.x86_64      #openssh的服务器程序
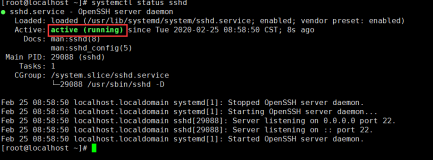
安装openssh后,会在系统中创建名为sshd的服务,用户可以通过该服务启动或关闭openssh。默认情况下,openssh会开机自动启动。
[root@mylinux ~]# chkconfig --list sshd
sshd            0:关闭  1:关闭  2:启用  3:启用  4:启用  5:启用  6:关闭
[root@mylinux ~]# chkconfig --level 2345 sshd off
[root@mylinux ~]# chkconfig --list sshd
sshd            0:关闭  1:关闭  2:关闭  3:关闭  4:关闭  5:关闭  6:关闭
[root@mylinux ~]# chkconfig --level 2345 sshd on
[root@mylinux ~]# service sshd start
[root@mylinux ~]# /etc/init.d/sshd stop
停止 sshd:                                                [确定]
[root@mylinux ~]# /etc/init.d/sshd start
正在启动 sshd:                                            [确定]
[root@mylinux ~]# /etc/init.d/sshd status
openssh-daemon (pid  19535) 正在运行...
4.2、openssh配置文件
-
openssh配置文件
openssh的主要配置文件有两个:/etc/ssh/ssh_config和/etc/ssh/sshd_config,它们分别用于配置openssh客户端以及服务器端。此外,/etc/ssh目录中还有一些其他的系统级配置文件,其中各配置文件的名称以及功能说明为:
moduli                 #配置用于构建安全传输层所必须的秘钥组
ssh_config             #系统级的SSH客户端配置文件
sshd_config            #sshd守护进程的配置文件
ssh_host_dsa_key       #sshd进程的DSA私钥
ssh_host_dsa_key.pub   #sshd进程的DSA公钥
ssh_host_key           #SSH1版本所使用的RSA私钥
ssh_host_key.pub       #SSH1版本所使用的RSA公钥
ssh_host_rsa_key       #SSH2版本所使用的RSA私钥
ssh_host_rsa_key.pub   #SSH2版本所使用的RSA公钥
服务器配置文件/etc/ssh/sshd_config
/etc/ssh/sshd_config是openssh服务器的配置文件,通过更改该文件中的配置可以改变sshd进行的运行属性。该文件中每一行都是用'选项 值'的格式,其中'选项'不区分大小写。
[root@promote ssh]# cat sshd_config
#       $OpenBSD: sshd_config,v 1.80 2008/07/02 02:24:18 djm Exp $
# This is the sshd server system-wide configuration file.  See
# sshd_config(5) for more information.
# This sshd was compiled with PATH=/usr/local/bin:/bin:/usr/bin
# The strategy used for options in the default sshd_config shipped with
# OpenSSH is to specify options with their default value where
# possible, but leave them commented.  Uncommented options change a
# default value.
#Port 22                                #sshd监听端口,默认为22
#AddressFamily any
#ListenAddress 0.0.0.0                  #sshd服务绑定的IP地址
#ListenAddress ::
# Disable legacy (protocol version 1) support in the server for new
# installations. In future the default will change to require explicit
# activation of protocol 1
Protocol 2                              #默认只用2.*版本的ssh协议
# HostKey for protocol version 1
#HostKey /etc/ssh/ssh_host_key          #ssh1版本的秘钥存放位置
# HostKeys for protocol version 2
#HostKey /etc/ssh/ssh_host_rsa_key      #ssh2版本的RSA秘钥存放位置
#HostKey /etc/ssh/ssh_host_dsa_key      #ssh2版本的DSA秘钥存放位置
# Lifetime and size of ephemeral version 1 server key
#KeyRegenerationInterval 1h             #秘钥每隔1小时生成一次
#ServerKeyBits 1024                     #ssh服务器秘钥的位数
# Logging
# obsoletes QuietMode and FascistLogging
#SyslogFacility AUTH                    #设置sshd发送到syslog所使用的日志类型
SyslogFacility AUTHPRIV                 #默认为AUTHPRIV
#LogLevel INFO                          #syslog日志等级
# Authentication:
#LoginGraceTime 2m
#PermitRootLogin yes                    #如果为yes则允许root用户使用ssh登录,no则不允许
#设置sshd在接受登录请求前是否检查用户的主目录以及rhost文件的权限和所有者等信息
#StrictModes yes
#MaxAuthTries 6                         #设置最多允许6次登录失败
#MaxSessions 10                         #设置最大连接数为10
#RSAAuthentication yes                  #是否允许RSA验证
#PubkeyAuthentication yes               #是否允许公钥验证
#AuthorizedKeysFile     .ssh/authorized_keys     #公钥文件的存放位置
#AuthorizedKeysCommand none
#AuthorizedKeysCommandRunAs nobody
# For this to work you will also need host keys in /etc/ssh/ssh_known_hosts
#RhostsRSAAuthentication no
# similar for protocol version 2
#HostbasedAuthentication no
# Change to yes if you don't trust ~/.ssh/known_hosts for
# RhostsRSAAuthentication and HostbasedAuthentication
#IgnoreUserKnownHosts no               #设置sshd在进行RhostsRSAAuthentication验证时是否信任用户的'~/.ssh/known_hosts'文件
# Don't read the user's ~/.rhosts and ~/.shosts files
#IgnoreRhosts yes                      #验证时是否使用'~/.rhosts 和 ~/.shosts'文件
# To disable tunneled clear text passwords, change to no here!
#PasswordAuthentication yes
#PermitEmptyPasswords no
PasswordAuthentication yes             #设置是否需要密码验证
# Change to no to disable s/key passwords
#ChallengeResponseAuthentication yes
ChallengeResponseAuthentication no
# Kerberos options                     #Kerberos 验证
#KerberosAuthentication no
#KerberosOrLocalPasswd yes
#KerberosTicketCleanup yes
#KerberosGetAFSToken no
#KerberosUseKuserok yes
# GSSAPI options                       #GSSAPI 验证
#GSSAPIAuthentication no
GSSAPIAuthentication yes
#GSSAPICleanupCredentials yes
GSSAPICleanupCredentials yes
#GSSAPIStrictAcceptorCheck yes
#GSSAPIKeyExchange no                  #清除验证信息
# Set this to 'yes' to enable PAM authentication, account processing,
# and session processing. If this is enabled, PAM authentication will
# be allowed through the ChallengeResponseAuthentication and
# PasswordAuthentication.  Depending on your PAM configuration,
# PAM authentication via ChallengeResponseAuthentication may bypass
# the setting of "PermitRootLogin without-password".
# If you just want the PAM account and session checks to run without
# PAM authentication, then enable this but set PasswordAuthentication
# and ChallengeResponseAuthentication to 'no'.
#UsePAM no
UsePAM yes                             #是否使用PAM验证
# Accept locale-related environment variables
AcceptEnv LANG LC_CTYPE LC_NUMERIC LC_TIME LC_COLLATE LC_MONETARY LC_MESSAGES
AcceptEnv LC_PAPER LC_NAME LC_ADDRESS LC_TELEPHONE LC_MEASUREMENT
AcceptEnv LC_IDENTIFICATION LC_ALL LANGUAGE
AcceptEnv XMODIFIERS
#AllowAgentForwarding yes              #是否允许TCP转发
#AllowTcpForwarding yes
#GatewayPorts no
#X11Forwarding no                      #设置sshd是否允许x11转发
X11Forwarding yes
#X11DisplayOffset 10
#X11UseLocalhost yes
#PrintMotd yes
#PrintLastLog yes
#TCPKeepAlive yes                      #TCP活动保持
#UseLogin no
#UsePrivilegeSeparation yes
#PermitUserEnvironment no
#Compression delayed
#ClientAliveInterval 0                 #客户端活动间隔时间
#ClientAliveCountMax 3                 #活动客户端的最大数量
#ShowPatchLevel no
#UseDNS yes
#PidFile /var/run/sshd.pid             #保存进程ID号的文件位置
#MaxStartups 10:30:100
#PermitTunnel no
#ChrootDirectory none
# no default banner path
#Banner none
# override default of no subsystems
Subsystem       sftp    /usr/libexec/openssh/sftp-server
# Example of overriding settings on a per-user basis
#Match User anoncvs
#       X11Forwarding no
#       AllowTcpForwarding no
#       ForceCommand cvs server
客户端配置文件/etc/ssh/ssh_config
[root@promote home]# cat /etc/ssh/ssh_config
#       $OpenBSD: ssh_config,v 1.25 2009/02/17 01:28:32 djm Exp $
# This is the ssh client system-wide configuration file.  See
# ssh_config(5) for more information.  This file provides defaults for
# users, and the values can be changed in per-user configuration files
# or on the command line.
# Configuration data is parsed as follows:     #配置选项生效的优先级
#  1. command line options                     #1表示命令行选项
#  2. user-specific file                       #2表示用户指定文件
#  3. system-wide file                         #3表示系统范围的文件
# Any configuration value is only changed the first time it is set.
# Thus, host-specific definitions should be at the beginning of the
# configuration file, and defaults at the end.
# Site-wide defaults for some commonly used options.  For a comprehensive
# list of available options, their meanings and defaults, please see the
# ssh_config(5) man page.
# Host *                                      #适用的计算机范围,'*'表示全部
#   ForwardAgent no                           #连接是否经过验证代理转发给远程计算机
#   ForwardX11 no                             #设置是否自动重定向x11连接
#   RhostsRSAAuthentication no                #设置是否使用RSA进行rhosts的安全验证
#   RSAAuthentication yes                     #设置是否使用RSA进行安全验证
#   PasswordAuthentication yes                #设置是否需要密码验证
#   HostbasedAuthentication no
#   GSSAPIAuthentication no
#   GSSAPIDelegateCredentials no
#   GSSAPIKeyExchange no
#   GSSAPITrustDNS no
#   BatchMode no                            #如果为yes,则禁止交互输入密码是的提示信息
#   CheckHostIP yes
#   AddressFamily any
#   ConnectTimeout 0
#   StrictHostKeyChecking ask
#   IdentityFile ~/.ssh/identity
#   IdentityFile ~/.ssh/id_rsa            #RSA安全验证文件的位置
#   IdentityFile ~/.ssh/id_dsa            #DSA安全验证文件的位置
#   Port 22                               #服务器端口
#   Protocol 2,1                          #使用的ssh协议
#   Cipher 3des                           #加密密码
#   Ciphers aes128-ctr,aes192-ctr,aes256-ctr,arcfour256,arcfour128,aes128-cbc,3des-cbc
#   MACs hmac-md5,hmac-sha1,umac-64@openssh.com,hmac-ripemd160
#   EscapeChar ~                          #设置EscapeChar字符
#   Tunnel no
#   TunnelDevice any:any
#   PermitLocalCommand no
#   VisualHostKey no
Host *
        GSSAPIAuthentication yes
# If this option is set to yes then remote X11 clients will have full access
# to the original X11 display. As virtually no X11 client supports the untrusted
# mode correctly we set this to yes.
        ForwardX11Trusted yes                    #是否允许转发x11会话
# Send locale-related environment variables      #局部环境变量
        SendEnv LANG LC_CTYPE LC_NUMERIC LC_TIME LC_COLLATE LC_MONETARY LC_MESSAGES
        SendEnv LC_PAPER LC_NAME LC_ADDRESS LC_TELEPHONE LC_MEASUREMENT
        SendEnv LC_IDENTIFICATION LC_ALL LANGUAGE
        SendEnv XMODIFIERS
4.3、ssh/scp相关命令的使用
-
SSH远程登录
SSH是openssh所提供的加密方式的远程登录程序,可以替代传统不安全的Telnet、rsh等程序。使用SSH登录Linux服务器后可以使用操作系统的所有功能,这与Telnet没有区别,但是SSH为客户端和服务器之间建立了加密的数据传送通道,更加安全和可靠。命令格式为:
ssh [-1246AaCfgKkMNnqsTtVvXxYy] [-b bind_address] [-c cipher_spec] [-D
         [bind_address:]port] [-e escape_char] [-F configfile] [-I pkcs11]
         [-i identity_file] [-L  [bind_address:]port:host:hostport]
         [-l login_name] [-m mac_spec] [-O ctl_cmd] [-o option] [-p port] [-R
         [bind_address:]port:host:hostport] [-S ctl_path] [-W host:port] [-w
         local_tun[:remote_tun]] [user@]hostname [command]
| 常用命令选项: -1:强制只使用SSH1版本协议 -2:强制只使用SSH2版本协议 -4:强制只是用IPv4地址 -6:强制只是用IPv6地址 -A:启用认证代理连接的转发 -a:禁止认证代理连接的转发 -b bind_address:使用bind_address作为连接的源地址 -C:压缩所有数据 -D [bind_address:]port:指定本地动态应用级别端口转发 -g:允许远程主机连接本地转发端口 -l login_name:指定SSH登录远程主机的用户 -p port:指定连接的端口 -q:安静模式,忽略所有的警告信息 -V:显示版本信息 -v:显示调试信息 -X:允许X11连接转发 -x:禁止X11连接转发 |
[root@promote home]# ifconfig    #查看当前主机IP
eth0      Link encap:Ethernet  HWaddr 00:0C:29:B7:AB:D0
          inet addr:192.168.191.128  Bcast:192.168.191.255  Mask:255.255.255.0
          inet6 addr: fe80::20c:29ff:feb7:abd0/64 Scope:Link
          UP BROADCAST RUNNING MULTICAST  MTU:1500  Metric:1
          RX packets:1002 errors:0 dropped:0 overruns:0 frame:0
          TX packets:669 errors:0 dropped:0 overruns:0 carrier:0
          collisions:0 txqueuelen:1000
          RX bytes:90190 (88.0 KiB)  TX bytes:89614 (87.5 KiB)
lo        Link encap:Local Loopback
          inet addr:127.0.0.1  Mask:255.0.0.0
          inet6 addr: ::1/128 Scope:Host
          UP LOOPBACK RUNNING  MTU:16436  Metric:1
          RX packets:113 errors:0 dropped:0 overruns:0 frame:0
          TX packets:113 errors:0 dropped:0 overruns:0 carrier:0
          collisions:0 txqueuelen:0
          RX bytes:18338 (17.9 KiB)  TX bytes:18338 (17.9 KiB)
[root@promote home]# ssh 192.168.191.129      #连接远程主机192.168.191.129
The authenticity of host '192.168.191.129 (192.168.191.129)' can't be established.
RSA key fingerprint is c6:4b:1c:ca:5b:fd:9f:6e:7f:0a:20:59:9d:79:94:3f.
Are you sure you want to continue connecting (yes/no)? yes
Warning: Permanently added '192.168.191.129' (RSA) to the list of known hosts.
reverse mapping checking getaddrinfo for promote.cache-dns.local [192.168.191.129] failed - POSSIBLE BREAK-IN ATTEMPT!
root@192.168.191.129's password:
Last login: Wed May 17 03:53:02 2017 from 192.168.191.1   #连接成功
[root@promote ~]# ifconfig                                #查看连接后的主机IP
eth0      Link encap:Ethernet  HWaddr 00:0C:29:F0:56:04
          inet addr:192.168.191.129  Bcast:192.168.191.255  Mask:255.255.255.0
          inet6 addr: fe80::20c:29ff:fef0:5604/64 Scope:Link
          UP BROADCAST RUNNING MULTICAST  MTU:1500  Metric:1
          RX packets:57 errors:0 dropped:0 overruns:0 frame:0
          TX packets:51 errors:0 dropped:0 overruns:0 carrier:0
          collisions:0 txqueuelen:1000
          RX bytes:7404 (7.2 KiB)  TX bytes:6924 (6.7 KiB)
lo        Link encap:Local Loopback
          inet addr:127.0.0.1  Mask:255.0.0.0
          inet6 addr: ::1/128 Scope:Host
          UP LOOPBACK RUNNING  MTU:16436  Metric:1
          RX packets:0 errors:0 dropped:0 overruns:0 frame:0
          TX packets:0 errors:0 dropped:0 overruns:0 carrier:0
          collisions:0 txqueuelen:0
          RX bytes:0 (0.0 b)  TX bytes:0 (0.0 b)
-
使用scp进行远程文件复制
scp的全称为secure copy(安全性复制),可以实现与rcp服务一样的远程文件复制功能。但由于scp是基于ssh协议,实现了数据的加密,所以它比传统的rcp更加安全可靠,其命令格式为:
scp [-1246BCpqrv] [-c cipher] [-F ssh_config] [-i identity_file] [-l limit]
         [-o ssh_option] [-P port] [-S program] [[user@]host1:]file1 ...
         [[user@]host2:]file2
| 常用命令选项: -1:强制只使用SSH1版本协议 -2:强制只使用SSH2版本协议 -4:强制只是用IPv4地址 -6:强制只是用IPv6地址 -C:压缩所有数据 -l:限制传输速率,单位为KB/秒 -P port:指定连接的端口 -r:递归方式复制目录所有内容 -v:调试方式,显示更多的输出信息 |
远程复制单个文件
[root@mylinux ~]# scp mbr.dmp root@192.168.191.129:/home
reverse mapping checking getaddrinfo for promote.cache-dns.local [192.168.191.129] failed - POSSIBLE BREAK-IN ATTEMPT!
root@192.168.191.129's password:
mbr.dmp                                                100%  512     0.5KB/s   00:00
远程复制整个目录
[root@mylinux ~]# scp -r /etc/yum.repos.d root@192.168.191.129:/home/
reverse mapping checking getaddrinfo for promote.cache-dns.local [192.168.191.129] failed - POSSIBLE BREAK-IN ATTEMPT!
root@192.168.191.129's password:
epel-testing.repo                                      100% 1056     1.0KB/s   00:00
CentOS-Media.repo                                      100%  630     0.6KB/s   00:00
epel.repo                                              100%  957     0.9KB/s   00:00
CentOS-Base.repo                                       100% 1926     1.9KB/s   00:00
CentOS-Debuginfo.repo                                  100%  638     0.6KB/s   00:00
CentOS-Vault.repo                                      100% 3664     3.6KB/s   00:00
使用通配符
[root@promote home]# scp -r /etc/httpd/* root@192.168.191.129:/home/
reverse mapping checking getaddrinfo for promote.cache-dns.local [192.168.191.129] failed - POSSIBLE BREAK-IN ATTEMPT!
root@192.168.191.129's password:
magic                                                  100%   13KB  12.8KB/s   00:00
httpd.conf                                             100%   34KB  33.6KB/s   00:00
php.conf                                               100%  674     0.7KB/s   00:00
README                                                 100%  392     0.4KB/s   00:00
welcome.conf                                           100%  299     0.3KB/s   00:00
access_log-20170512                                    100%   34KB  34.2KB/s   00:00
error_log-20170512                                     100% 3278     3.2KB/s   00:00
error_log                                              100%    0     0.0KB/s   00:00
access_log                                             100%    0     0.0KB/s   00:00
mod_proxy_ftp.so                                       100%   35KB  34.8KB/s   00:00
mod_setenvif.so                                        100%   14KB  14.2KB/s   00:00
mod_log_config.so                                      100%   31KB  30.5KB/s   00:00
mod_cgid.so                                            100%   39KB  39.0KB/s   00:00   ...
关于SSH的优化方式
1、Only Use SSH Protocol 2
2、Limit Users' SSH Access
AllowUsers 白名单 (二选一)
DenyUsers 黑名单
3、Configure Idle Log Out Timeout Interval
ClientAliveInterval 300
ClientAliveCountMax 0 设定空闲会话超时时长;
4、Firewall SSH Port #22 使用iptables设置ssh服务安全访问策略;
5、Change SSH Port and Limit IP Binding
Port 300勿使用默认22端口;
ListenAddress 192.168.1.5
ListenAddress 202.54.1.5
6、Use Strong SSH Passwords and Passphrase 使用足够长、足够复杂的密码,且定期更换
genpasswd() {
local l=$1
[ "$l" == "" ] && l=20
tr -dc A-Za-z0-9_ < /dev/urandom | head -c ${l} | xargs}
7、Use Public Key Based Authentication使用公钥认证
8、Disable Empty Passwords
9、Thwart SSH Crackers (Brute Force Attack)
google: ssh best practice
10、Rate-limit Incoming Port # 22 Connections 限制ssh访问频度;
11、Use Log Analyzer 记录好日志,经常做日志分析