在某些情况下为了实现Windows多台服务器负载均衡,需要使用共享来做图片及附件的上传空间。
这个时候就需要使用到Samba、IIS虚拟目录等相关技术
Web服务器使用upload作为上传的目录,现在需要使用2台服务器做负载均衡,后台使用一台Samba服务器作为文件共享存储
1.建立Samba文件服务器
卸载旧的samba组件,CentOS 6默认安装的是3.6的版本
|
1
|
for
a
in
`rpm -qa|
grep
samba`;
do
rpm -e --nodeps $a;
done
|
2.安装Samba 4
|
1
|
yum -y
install
samba4 samba4-common samba4-client
|
3.建立共享用户
说明:由于Windows在IIS中站点下是不能直接通过磁盘映射的方式作为站点路径,必须使用原始的\\192.168.10.2\sns\upload这样的目录,而此时访问共享的用户就是应用程序池的用户。
这个时候就可以2种选择:
a.samba使用匿名访问可读写
b.修改站点应用程序池用户为访问samba用户
第一种:使用匿名方式访问共享
为共享创建系统用户及组
groupadd -g 8800 smbgroup
useradd -g smbgroup -s /sbin/nologin -d /dev/null smbuser
创建共享目录
mkdir /data/share
chown -R smbuser.smbgroup /data/share
chmod -R 755 /data/share
4.配置Samba
/etc/samba/smb.conf
|
1
2
3
4
5
6
7
8
9
10
11
12
13
14
15
16
17
18
19
20
21
22
23
24
25
26
27
28
29
30
31
32
33
|
[global]
workgroup = WORKGROUP
server string = FileServer
#hosts allow = 127. 192.168.10
log
file
=
/var/log/samba/log
.%m
max log size = 50
security = user
passdb backend = tdbsam
map to guest = bad user
guest account = smbuser
create mask = 0775
force create mode = 0775
directory mask = 0775
force directory mode = 0775
unix charset = cp936
dos charset = cp936
use sendfile=
yes
write raw =
yes
read
raw =
yes
max xmit=65535
aio
read
size = 16384
aio write size = 16384
[upload]
comment = sns
path =
/var/www/html/upload
browseable = no
guest ok =
yes
writable =
yes
#valid users = @smbgroup
|
说明:在samba 4版本里面security这个值已经废弃了share,server。因此配置匿名访问就需要
|
1
2
|
security = user
map to guest = bad user
|
5.测试samba
|
1
2
3
4
5
6
7
8
9
10
11
12
13
14
15
16
17
18
19
20
21
22
23
24
25
26
27
28
29
30
31
32
33
34
35
|
[root@gz17img40 samba]
# testparm
Load smb config files from
/etc/samba/smb
.conf
Processing section
"[upload]"
Loaded services
file
OK.
Server role: ROLE_STANDALONE
Press enter to see a dump of your service definitions
# Global parameters
[global]
dos charset = cp936
unix charset = cp936
server string = FileServer
security = USER
map to guest = Bad User
guest account = smbuser
log
file
=
/var/log/samba/log
.%m
max log size = 50
max xmit = 65535
idmap config * : backend = tdb
create mask = 0775
force create mode = 0775
directory mask = 0775
force directory mode = 0775
aio
read
size = 16384
aio write size = 16384
use sendfile = Yes
[upload]
comment = sns
path =
/var/www/html/upload
read
only = No
guest ok = Yes
browseable = No
|
6.设置启动服务及开机启动
|
1
2
3
4
|
/etc/init
.d
/nmb
start
/etc/init
.d
/smb
start
chkconfig nmb on
chkconfig smb on
|
第二部分:Windows IIS使用共享作为路径
举例:
我需要在站点的SignPDF路径下建立PDF虚拟路径
1.点击“站点”--》对应的SignPDF目录,右击“SignPDF”,选择“建立虚拟目录”

2.输入别名,我们这里输入“PDF”,然后选择对应的物理路径。

| 注意:
|
第二种:采用用户名和密码的方式访问共享
为共享创建系统用户及组
groupadd -g 8800 smbgroup
useradd -g smbgroup -s /sbin/nologin -d /dev/null smbuser
创建共享目录
mkdir /data/share
chown -R smbuser.smbgroup /data/share
chmod -R 755 smbuser.smbgroup /data/share
创建smb访问账号及密码,smb账号要在系统中有同名账号,否则创建失败
smbpasswd -a smbuser
输入密码123456
4.配置Samba
/etc/samba/smb.conf
|
1
2
3
4
5
6
7
8
9
10
11
12
13
14
15
16
17
18
19
20
21
22
23
24
25
26
27
28
29
30
31
32
33
|
[global]
workgroup = WORKGROUP
server string = FileServer
#hosts allow = 127. 192.168.10
log
file
=
/var/log/samba/log
.%m
max log size = 50
security = user
passdb backend = tdbsam
#map to guest = bad user
#guest account = smbuser
create mask = 0775
force create mode = 0775
directory mask = 0775
force directory mode = 0775
unix charset = cp936
dos charset = cp936
use sendfile=
yes
write raw =
yes
read
raw =
yes
max xmit=65535
aio
read
size = 16384
aio write size = 16384
[upload]
comment = sns
path =
/var/www/html/upload
browseable = no
#guest ok = yes
writable =
yes
valid
users
= @smbgroup
|
这里对比上面匿名访问的注释了
|
1
2
3
4
5
6
|
#map to guest = bad user
#guest account = smbuser
在共享的时候修改了
#guest ok = yes
valid
users
= @smbgroup
|
5.测试samba
|
1
2
3
4
5
6
7
8
9
10
11
12
13
14
15
16
17
18
19
20
21
22
23
24
25
26
27
28
29
30
31
32
33
|
[root@gz17img40 samba]
# testparm
Load smb config files from
/etc/samba/smb
.conf
Processing section
"[upload]"
Loaded services
file
OK.
Server role: ROLE_STANDALONE
Press enter to see a dump of your service definitions
# Global parameters
[global]
dos charset = cp936
unix charset = cp936
server string = FileServer
security = USER
log
file
=
/var/log/samba/log
.%m
max log size = 50
max xmit = 65535
idmap config * : backend = tdb
create mask = 0775
force create mode = 0775
directory mask = 0775
force directory mode = 0775
aio
read
size = 16384
aio write size = 16384
use sendfile = Yes
[upload]
comment = sns
path =
/var/www/html/upload
read
only = No
browseable = No
valid
users
= @smbgroup
|
这个时候就可以通过访问\\192.168.10.20\upload,输入用户名密码smbuser,123456
6.设置启动服务及开机启动
|
1
2
3
4
|
/etc/init
.d
/nmb
start
/etc/init
.d
/smb
start
chkconfig nmb on
chkconfig smb on
|
第二部分:Windows IIS使用共享作为路径
举例:
我需要在站点的SignPDF路径下建立PDF虚拟路径
1.在系统中创建smbuser,密码一定要与上面创建的smbuser的密码一致也为123456
2.点击“站点”--》对应的SignPDF目录,右击“SignPDF”,选择“建立虚拟目录”
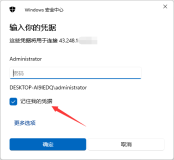
3.输入别名,我们这里输入“PDF”,然后选择对应的物理路径,并点击“连接为”,输入账号smbuser密码123456

4.现在就可以正常访问共享里的文件及内容了,但是你会发现无法上传。这是因为需要在web.config中定义用户名密码,在<system.web>下增加
|
1
|
<identity impersonate=
"true"
userName=
"smbuser"
password=
"123456"
/>
|
现在就可以正常上传图片了
问题:
1.在配置Samba后发现在A节点建立的目录,B节点无法写入,这是因为2个用户是一致的但是用户的组不一致。比如A服务器主机名为ServerA,B服务器的主机名为ServerB,因此在Samba中的A节点对应的权限就是ServerA\smbuser,B服务器对应的权限就是ServerB\smbuser,这就是造成2台服务器权限不一致的问题。
在smb.conf中添加
|
1
2
3
4
|
create mask = 0775
force create mode = 0775
directory mask = 0775
force directory mode = 0775
|
再重启服务即可
2.根据上面处理后仍然无法写入,就可能是对.NET临时目录没有设置写入权限
将上面的smbuser给下列目录
|
1
2
|
C:\Windows\Microsoft.NET\Framework64\v4.0.30319\Temporary ASP.NET Files
C:\Windows\Microsoft.NET\Framework64\v2.0.50727\Temporary ASP.NET Files
|
写入权限即可
本文转自 rong341233 51CTO博客,原文链接http://blog.51cto.com/fengwan/1843034: