一、前言
前面我们主要讲解了写什么,讲解通过ini文件加载,自定义realm源(ishi加密),对用户认证和权限授权。这一章开始,我们开始整合shrio到web项目中,当然还是与我们之前的springmvc与mybatis整合。这里的mybatis不强求,如果你整合的时候也可以用hibernate,只不过是另一个数据框架。
二、整合spring
2.1 基础框架
2.2jar包导入
  <!--======================================shrio=================================================-->
    <dependency>
        <groupId>org.apache.shiro</groupId>
        <artifactId>shiro-core</artifactId>
        <version>1.2.4</version>
    </dependency>
    <dependency>
        <groupId>org.apache.shiro</groupId>
        <artifactId>shiro-web</artifactId>
        <version>1.2.4</version>
    </dependency>
    <dependency>
        <groupId>org.apache.shiro</groupId>
        <artifactId>shiro-spring</artifactId>
        <version>1.2.4</version>
    </dependency>
    <dependency>
        <groupId>org.apache.shiro</groupId>
        <artifactId>shiro-ehcache</artifactId>
        <version>1.2.4</version>
    </dependency>
    <dependency>
        <groupId>org.apache.shiro</groupId>
        <artifactId>shiro-quartz</artifactId>
        <version>1.2.4</version>
    </dependency>
2.3在web.xml配置filter
<!--===============================================shiro过虑器================================================-->
    <!-- shiro过虑器,DelegatingFilterProx会从spring容器中找shiroFilter代理模式(律师模式) -->
    <filter>
        <filter-name>shiroFilter</filter-name>
        <filter-class>org.springframework.web.filter.DelegatingFilterProxy</filter-class>
        <!--设置为true有servlet容器控制filter声明周期-->
        <init-param>
            <param-name>targetFilterLifecycle</param-name>
            <param-value>true</param-value>
        </init-param>
    </filter>
    <filter-mapping>
        <filter-name>shiroFilter</filter-name>
        <url-pattern>/*</url-pattern>
    </filter-mapping>
2.4在spring中配置filter
<beans xmlns="http://www.springframework.org/schema/beans"
xmlns:xsi="http://www.w3.org/2001/XMLSchema-instance" xmlns:mvc="http://www.springframework.org/schema/mvc"
xmlns:context="http://www.springframework.org/schema/context"
xmlns:aop="http://www.springframework.org/schema/aop" xmlns:tx="http://www.springframework.org/schema/tx"
xsi:schemaLocation="http://www.springframework.org/schema/beans
http://www.springframework.org/schema/beans/spring-beans-4.0.xsd
http://www.springframework.org/schema/mvc
http://www.springframework.org/schema/mvc/spring-mvc-4.0.xsd
http://www.springframework.org/schema/context
http://www.springframework.org/schema/context/spring-context-4.0.xsd
http://www.springframework.org/schema/aop
http://www.springframework.org/schema/aop/spring-aop-4.0.xsd
http://www.springframework.org/schema/tx
http://www.springframework.org/schema/tx/spring-tx-4.0.xsd ">
<!-- Shiro 的Web过滤器 -->
<!--1、与web.xml对应的bean-->
<bean id="shiroFilter" class="org.apache.shiro.spring.web.ShiroFilterFactoryBean">
<property name="securityManager" ref="securityManager" />
<!-- 如果没有认证将要跳转的登陆地址,http可访问的url,如果不在表单认证过虑器FormAuthenticationFilter中指定此地址就为身份认证地址 -->
<property name="loginUrl" value="/login.action" />
<!-- 没有权限跳转的地址 -->
<property name="unauthorizedUrl" value="/pages/jsp/refuse.jsp" />
<!--过滤定义,从上而下,蒋匿名的anon放最下面-->
<property name="filterChainDefinitions">
<value>
/** anon
</value>
</property>
</bean>
<!-- 2、安全管理器 -->
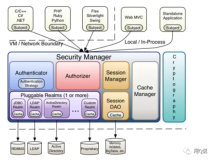
<bean id="securityManager" class="org.apache.shiro.web.mgt.DefaultWebSecurityManager">
<property name="realm" ref="userRealm" />
</bean>
<!--3、realm-->
<bean id="userRealm" class="com.ycy.shiro.CustomRealm"/>
</beans>
2.4.1 shrio过滤器
| 过滤器简称 |
对应的java类 |
| anon |
org.apache.shiro.web.filter.authc.AnonymousFilter |
| authc |
org.apache.shiro.web.filter.authc.FormAuthenticationFilter |
| authcBasic |
org.apache.shiro.web.filter.authc.BasicHttpAuthenticationFilter |
| perms |
org.apache.shiro.web.filter.authz.PermissionsAuthorizationFilter |
| port |
org.apache.shiro.web.filter.authz.PortFilter |
| rest |
org.apache.shiro.web.filter.authz.HttpMethodPermissionFilter |
| roles |
org.apache.shiro.web.filter.authz.RolesAuthorizationFilter |
| ssl |
org.apache.shiro.web.filter.authz.SslFilter |
| user |
org.apache.shiro.web.filter.authc.UserFilter |
| logout |
org.apache.shiro.web.filter.authc.LogoutFilter |
- Shiro-1.2.2内置的FilterChain
- =========================================================================================================================
- 1)Shiro验证URL时,URL匹配成功便不再继续匹配查找(所以要注意配置文件中的URL顺序,尤其在使用通配符时)
- 故filterChainDefinitions的配置顺序为自上而下,以最上面的为准
- 2)当运行一个Web应用程序时,Shiro将会创建一些有用的默认Filter实例,并自动地在[main]项中将它们置为可用
- 自动地可用的默认的Filter实例是被DefaultFilter枚举类定义的,枚举的名称字段就是可供配置的名称
- anon---------------org.apache.shiro.web.filter.authc.AnonymousFilter
- authc--------------org.apache.shiro.web.filter.authc.FormAuthenticationFilter
- authcBasic---------org.apache.shiro.web.filter.authc.BasicHttpAuthenticationFilter
- logout-------------org.apache.shiro.web.filter.authc.LogoutFilter
- noSessionCreation--org.apache.shiro.web.filter.session.NoSessionCreationFilter
- perms--------------org.apache.shiro.web.filter.authz.PermissionAuthorizationFilter
- port---------------org.apache.shiro.web.filter.authz.PortFilter
- rest---------------org.apache.shiro.web.filter.authz.HttpMethodPermissionFilter
- roles--------------org.apache.shiro.web.filter.authz.RolesAuthorizationFilter
- ssl----------------org.apache.shiro.web.filter.authz.SslFilter
- user---------------org.apache.shiro.web.filter.authz.UserFilter
- =========================================================================================================================
- 3)通常可将这些过滤器分为两组
- anon,authc,authcBasic,user是第一组认证过滤器
- perms,port,rest,roles,ssl是第二组授权过滤器
- 注意user和authc不同:当应用开启了rememberMe时,用户下次访问时可以是一个user,但绝不会是authc,因为authc是需要重新认证的
- user表示用户不一定已通过认证,只要曾被Shiro记住过登录状态的用户就可以正常发起请求,比如rememberMe
- 说白了,以前的一个用户登录时开启了rememberMe,然后他关闭浏览器,下次再访问时他就是一个user,而不会authc
- =========================================================================================================================
- 4)举几个例子
- /admin=authc,roles[admin] 表示用户必需已通过认证,并拥有admin角色才可以正常发起'/admin'请求
- /edit=authc,perms[admin:edit] 表示用户必需已通过认证,并拥有admin:edit权限才可以正常发起'/edit'请求
- /home=user 表示用户不一定需要已经通过认证,只需要曾经被Shiro记住过登录状态就可以正常发起'/home'请求
- =========================================================================================================================
- 5)各默认过滤器常用如下(注意URL Pattern里用到的是两颗星,这样才能实现任意层次的全匹配)
- /admins/**=anon 无参,表示可匿名使用,可以理解为匿名用户或游客
- /admins/user/**=authc 无参,表示需认证才能使用
- /admins/user/**=authcBasic 无参,表示httpBasic认证
- /admins/user/**=user 无参,表示必须存在用户,当登入操作时不做检查
- /admins/user/**=ssl 无参,表示安全的URL请求,协议为https
- /admins/user/**=perms[user:add:*]
- 参数可写多个,多参时必须加上引号,且参数之间用逗号分割,如/admins/user/**=perms["user:add:*,user:modify:*"]
- 当有多个参数时必须每个参数都通过才算通过,相当于isPermitedAll()方法
- /admins/user/**=port[8081]
- 当请求的URL端口不是8081时,跳转到schemal://serverName:8081?queryString
- 其中schmal是协议http或https等,serverName是你访问的Host,8081是Port端口,queryString是你访问的URL里的?后面的参数
- /admins/user/**=rest[user]
- 根据请求的方法,相当于/admins/user/**=perms[user:method],其中method为post,get,delete等
- /admins/user/**=roles[admin]
- 参数可写多个,多个时必须加上引号,且参数之间用逗号分割,如/admins/user/**=roles["admin,guest"]
- 当有多个参数时必须每个参数都通过才算通过,相当于hasAllRoles()方法
2.5自定义realm的编写
realm从数据库查询用户信息,将用户菜单、usercode、username等设置在SimpleAuthenticationInfo中。
package com.ycy.shiro;

import java.util.ArrayList;
import java.util.List;

import com.ycy.model.ActiveUser;
import com.ycy.model.SysPermission;
import com.ycy.model.SysUser;
import com.ycy.service.SysService;
import org.apache.shiro.SecurityUtils;
import org.apache.shiro.authc.AuthenticationException;
import org.apache.shiro.authc.AuthenticationInfo;
import org.apache.shiro.authc.AuthenticationToken;
import org.apache.shiro.authc.SimpleAuthenticationInfo;
import org.apache.shiro.authz.AuthorizationInfo;
import org.apache.shiro.authz.SimpleAuthorizationInfo;
import org.apache.shiro.realm.AuthorizingRealm;
import org.apache.shiro.subject.PrincipalCollection;
import org.apache.shiro.util.ByteSource;
import org.springframework.beans.factory.annotation.Autowired;
import org.springframework.stereotype.Component;
import org.springframework.stereotype.Service;


/**
 *
 * <p>
 * Title: CustomRealm
 * </p>
 * <p>
 * Description:自定义realm
 * </p>
 */
public class CustomRealm extends AuthorizingRealm {

	//注入service
	@Autowired
	private SysService sysService;

	// 设置realm的名称
	@Override
	public void setName(String name) {
		super.setName("customRealm");
	}

	// 用于认证
	//realm的认证方法,从数据库查询用户信息
	@Override
	protected AuthenticationInfo doGetAuthenticationInfo(
			AuthenticationToken token) throws AuthenticationException {

		// token是用户输入的用户名和密码
		// 第一步从token中取出用户名
		String userCode = (String) token.getPrincipal();

		// 第二步:根据用户输入的userCode从数据库查询
		SysUser sysUser = null;
		try {
			sysUser = sysService.findSysUserByUserCode(userCode);
		} catch (Exception e1) {
			e1.printStackTrace();
		}

		// 如果查询不到返回null
		if(sysUser==null){//
			return null;
		}
		// 从数据库查询到密码
		String password = sysUser.getPassword();

		//盐
		String salt = sysUser.getSalt();

		// 如果查询到返回认证信息AuthenticationInfo

		//activeUser就是用户身份信息
		ActiveUser activeUser = new ActiveUser();

		activeUser.setUserid(sysUser.getId());
		activeUser.setUsercode(sysUser.getUsercode());
		activeUser.setUsername(sysUser.getUsername());
		//..

		//根据用户id取出菜单
		List<SysPermission> menus  = null;
		try {
			//通过service取出菜单
			menus = sysService.findMenuListByUserId(sysUser.getId());
		} catch (Exception e) {
			e.printStackTrace();
		}
		//将用户菜单 设置到activeUser
		activeUser.setMenus(menus);

		//将activeUser设置simpleAuthenticationInfo
		SimpleAuthenticationInfo simpleAuthenticationInfo = new SimpleAuthenticationInfo(
				activeUser, password,ByteSource.Util.bytes(salt), this.getName());

		return simpleAuthenticationInfo;
	}


	// 用于授权
	@Override
	protected AuthorizationInfo doGetAuthorizationInfo(
			PrincipalCollection principals) {

		//从 principals获取主身份信息
		//将getPrimaryPrincipal方法返回值转为真实身份类型(在上边的doGetAuthenticationInfo认证通过填充到SimpleAuthenticationInfo中身份类型),
		ActiveUser activeUser =  (ActiveUser) principals.getPrimaryPrincipal();

		//根据身份信息获取权限信息
		//从数据库获取到权限数据
		List<SysPermission> permissionList = null;
		try {
			permissionList = sysService.findMenuListByUserId(activeUser.getUserid());
		} catch (Exception e) {
			e.printStackTrace();
		}
		//单独定一个集合对象
		List<String> permissions = new ArrayList<String>();
		if(permissionList!=null){
			for(SysPermission sysPermission:permissionList){
				//将数据库中的权限标签 符放入集合
				permissions.add(sysPermission.getPercode());
			}
		}

		//查到权限数据,返回授权信息(要包括 上边的permissions)
		SimpleAuthorizationInfo simpleAuthorizationInfo = new SimpleAuthorizationInfo();
		//将上边查询到授权信息填充到simpleAuthorizationInfo对象中
		simpleAuthorizationInfo.addStringPermissions(permissions);

		return simpleAuthorizationInfo;
	}

	//清除缓存
	public void clearCached() {
		PrincipalCollection principals = SecurityUtils.getSubject().getPrincipals();
		super.clearCache(principals);
	}


}
<span style="font-size:10px;"><param-value>classpath:spring/applicationContext-*.xml</param-value></span>配置
<span style="font-size:10px;"> <context:component-scan base-package="com.ycy"/></span>到这个applicationContext-*.xml中里面,因为这个是第一加载顺序。
三、shrio实现登录退出实例
3.1登录
使用FormAuthenticationFilter过虑器实现 ,原理如下:
将用户没有认证时,请求loginurl进行认证,用户身份和用户密码提交数据到loginurl
FormAuthenticationFilter拦截住取出request中的username和password(两个参数名称是可以配置的)
FormAuthenticationFilter调用realm传入一个token(username和password)
realm认证时根据username查询用户信息(在Activeuser中存储,包括 userid、usercode、username、menus)。
如果查询不到,realm返回null,FormAuthenticationFilter向request域中填充一个参数(记录了异常信息)
3.1.1 LoginController
<pre style="font-family: Consolas; background-color: rgb(255, 255, 255);"><span style="font-size:12px;"></span><pre name="code" class="html"><span style="font-size:12px;">package com.ycy.controller;

import com.ycy.Exception.CustomException;
import com.ycy.model.ActiveUser;
import com.ycy.service.SysService;
import org.apache.shiro.authc.IncorrectCredentialsException;
import org.apache.shiro.authc.UnknownAccountException;
import org.springframework.beans.factory.annotation.Autowired;
import org.springframework.stereotype.Controller;
import org.springframework.web.bind.annotation.RequestMapping;

import javax.servlet.http.HttpServletRequest;
import javax.servlet.http.HttpSession;

/**
 *
 * <p>Title: LoginController</p>
 * <p>Description: 登陆和退出</p>
 */
@Controller
public class LoginController {

	@Autowired
	private SysService sysService;
	//用户登陆提交方法
	/*@RequestMapping("/login")
	public String login(HttpSession session,String usercode,String password,String randomcode)throws Exception{

		//校验验证码
		//从session获取正确的验证码
		String validateCode = (String)session.getAttribute("validateCode");
		if(!randomcode.equals(validateCode)){
			//抛出异常:验证码错误
			throw new CustomException("验证码 错误 !");
		}
		//用户身份认证
		ActiveUser activeUser = sysService.authenticat(usercode, password);
		//记录session
		session.setAttribute("activeUser", activeUser);
		//重定向到商品查询页面
		return "redirect:/first";
	}

	//用户退出
	@RequestMapping("/logout")
	public String logout(HttpSession session)throws Exception{
		//session失效
		session.invalidate();
		//重定向到商品查询页面
		return "redirect:/items/queryItems";

	}*/
	@RequestMapping("/login")
	public  String login(HttpServletRequest request)throws Exception{
		//如果登录失败从request中获取认证异常信息,shrioLoginFailure就是shiro异常类的全限定名
		String exceptionClassName = (String) request.getAttribute("shiroLoginFailure");
		//根据shrio返回的异常路径判断,抛出指定异常信息
		if (exceptionClassName!=null){
			if(UnknownAccountException.class.getName().equals(exceptionClassName)){
				//抛出异常
				throw new CustomException("账户不存在");
			}else if(IncorrectCredentialsException.class.getName().equals(exceptionClassName)){
				throw new CustomException("用户名/密码错误");
			} else {
				throw new Exception("未知错误");
			}
		}
		return "login";
	}


}
</span>
3.1.2 配置applicationContext-shiro.xml
package com.ycy.controller;

import com.ycy.Exception.CustomException;
import com.ycy.model.ActiveUser;
import com.ycy.service.SysService;
import org.apache.shiro.authc.IncorrectCredentialsException;
import org.apache.shiro.authc.UnknownAccountException;
import org.springframework.beans.factory.annotation.Autowired;
import org.springframework.stereotype.Controller;
import org.springframework.web.bind.annotation.RequestMapping;

import javax.servlet.http.HttpServletRequest;
import javax.servlet.http.HttpSession;

/**
 *
 * <p>Title: LoginController</p>
 * <p>Description: 登陆和退出</p>
 */
@Controller
public class LoginController {

	@Autowired
	private SysService sysService;
	//用户登陆提交方法
	/*@RequestMapping("/login")
	public String login(HttpSession session,String usercode,String password,String randomcode)throws Exception{

		//校验验证码
		//从session获取正确的验证码
		String validateCode = (String)session.getAttribute("validateCode");
		if(!randomcode.equals(validateCode)){
			//抛出异常:验证码错误
			throw new CustomException("验证码 错误 !");
		}
		//用户身份认证
		ActiveUser activeUser = sysService.authenticat(usercode, password);
		//记录session
		session.setAttribute("activeUser", activeUser);
		//重定向到商品查询页面
		return "redirect:/first";
	}

	//用户退出
	@RequestMapping("/logout")
	public String logout(HttpSession session)throws Exception{
		//session失效
		session.invalidate();
		//重定向到商品查询页面
		return "redirect:/items/queryItems";

	}*/
	@RequestMapping("/login")
	public  String login(HttpServletRequest request)throws Exception{
		//如果登录失败从request中获取认证异常信息,shrioLoginFailure就是shiro异常类的全限定名
		String exceptionClassName=(String)request.getAttribute("shiroLoginFailure");
		//根据shrio返回的异常路径判断,抛出指定异常信息
		if (exceptionClassName!=null){
			if(UnknownAccountException.class.getName().equals(exceptionClassName)){
				//抛出异常
				throw new CustomException("账户不存在");
			}
		}else if(IncorrectCredentialsException.class.getName().equals(exceptionClassName)){
				throw new CustomException("用户名/密码错误");
		}
		return "login";
	}


}
3.1.3 加入首页数据
	//系统首页
	@RequestMapping("/first")
	public String first(Model model)throws Exception{
		//从shiro的session中取出activeUser
		Subject subject= SecurityUtils.getSubject();
		ActiveUser activeUser=(ActiveUser)subject.getPrincipal();
		//通过model传送到页面
		model.addAttribute("activeUser",activeUser);
		return "first";
	}
3.2 退出
      <!--请求logout,shrio擦除sssion-->
                /logout=logout