-
启动彩蛋修改:
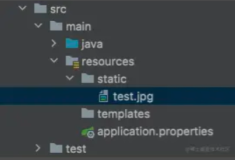
项目resources目录下建立banner.txt文件就可替换原来的菜单
字符画生成的网站http://www.network-science.de/ascii/ http://patorjk.com/software/taag/
-
切换不同环境配置
在idea 启动配置program arguments加上–spring.profiles.active={profile},或在dos行加上–spring.profiles.active={profile};
或配置文件spring.profiles.active={profile}
各个环境公共的配置写在application.properties中
各个模块独有的配置配置在自己的application-{xxx}.properties文件中
程序读取的时候优先读取application.properties中选中的profile的配置,若读不到才会从application.properties去读
-
读取配置
必须先@Component 然后参数@Value("${cusvar}"
@Value("${app.name}")
private String cusvar ; 将${app.name}值赋予cusvar
name= HowieLi
age= 18
content= "name: ${name}, age: ${age}"
代码中直接调用content就可以了,访问启动的应用显示name: HowieLi, age: 18。
-
@RestController该注解是Spring4之后新加的注解,等同于@Controller和@ResponseBody的组合。
@RequestMapping(value = "/hello", method = RequestMethod.GET)== @GetMapping("/hello")
@RequestMapping(value = {"/hello", "/hi"}, method = RequestMethod.GET)访问/hello和/hi是一样的效果
@GetMapping(value = "/say/{id}")
public String helloGet(@PathVariable("id") int id, @RequestParam("name") String name) {return "id: " + id + ",name:" + name;}访问http://localhost:8080/say/5?name=howieli
-
    import org.springframework.boot.context.properties.ConfigurationProperties;
import org.springframework.stereotype.Component;

import lombok.Data;

/**
 * Created by  on 2017/07/01.
 */

@Data

@Component    //将Person类交由Spring容器管理
@ConfigurationProperties(prefix = "person")   //填写配置文件中的前缀
public class Person {
	private String name;
	private int age;
//
//	public String getName() {
//		return name;
//	}
//	public void setName(String name) {
//		this.name = name;
//	}
//	public int getAge() {
//		return age;
//	}
//	public void setAge(int age) {
//		this.age = age;
//	}
	@Override
	public String toString() {
		return "Person [name=" + name + ", age=" + age + "]";
	}
}

     @Autowired
	private Person person;
	@RequestMapping("/hellTask")
	public String hellTask(){
		logger.info("访问hellTask");
		return person.toString();
	}
获得配置文件值
-
Preferences -> Editor -> General -> Appearance, uncheck "Show Spring Boot metadata panel"解决Spring Boot Configuration Annotation Processor not found in classpath
-
Usage of API documented as @since 1.6+ This inspection finds all usages of methods that have @since tag in their documentation. This may be useful when development is performed under newer SDK version as the target platform for production解决方法
File ->Project Structure->Project Settings -> Modules -> 你的Module名字 -> Sources -> Language Level->选个默认的就行。
-
1.5不支持diamond运算符,请使用source 7或更高版本以启用diamond运算符,怎么办?
<properties>加上
<maven.compiler.source>1.8</maven.compiler.source>
<maven.compiler.target>1.8</maven.compiler.target>或
<build>
<plugins>
<plugin>
<groupId>org.apache.maven.plugins</groupId>
<artifactId>maven-compiler-plugin</artifactId>
<version>3.6.1</version>
<configuration>
<source>1.8</source>
<target>1.8</target>
</configuration>
</plugin>
</plugins>
</build>
-
** WARNING ** : Your ApplicationContext is unlikely to start due to a @ComponentScan of the default package. 因为application.java 文件不能直接放在main/java文件夹下,必须要建一个包把他放进去
-
热部署参看http://www.cnblogs.com/java-zhao/p/5502398.html
http://blog.csdn.net/jsshaojinjie/article/details/64125458
<!-- 用于将应用打成可直接运行的jar(该jar就是用于生产环境中的jar) 值得注意的是,如果没有引用spring-boot-starter-parent做parent, 且采用了上述的第二种方式,这里也要做出相应的改动 -->
<plugin>
<groupId>org.springframework.boot</groupId>
<artifactId>spring-boot-maven-plugin</artifactId>
<configuration>
<fork>true</fork><!-- 如果没有该项配置,肯呢个devtools不会起作用,即应用不会restart -->
</configuration>
</plugin>
<!-- devtools可以实现页面热部署(即页面修改后会立即生效,这个可以直接在application.properties文件中配置spring.thymeleaf.cache=false来实现),实现类文件热部署(类文件修改后不会立即生效),实现对属性文件的热部署。即devtools会监听classpath下的文件变动,并且会立即重启应用(发生在保存时机),注意:因为其采用的虚拟机机制,该项重启是很快的-->
<dependency>
<groupId>org.springframework.boot</groupId>
<artifactId>spring-boot-devtools</artifactId>
<optional>true</optional><!-- optional=true,依赖不会传递,该项目依赖devtools;之后依赖myboot项目的项目如果想要使用devtools,需要重新引入 -->
</dependency>
CTRL + alt + s --> 查找make project automatically --> 选中
ctrl+shift+alt+/ --> 查找Registry --> 找到并勾选compiler.automake.allow.when.app.running
关闭热部署spring.devtools.restart.enabled 属性为false
System.setProperty("spring.devtools.restart.enabled","false");
-
public static void main(String[] args) throws IOException {
Properties properties= new Properties();
//System.out.println(System.getProperty("user.dir"));
//自己设置文件位置
//InputStream in = new FileInputStream(System.getProperty("user.dir")
//+"/isoft-manager/isoft-manager-pojo/app.properties");
//Resources位置
InputStream in=Application.class.getClassLoader().getResourceAsStream("app"
+ ".properties");
properties.load(in);
SpringApplication app=new SpringApplication(Application.class);
app.setDefaultProperties(properties);
app.run(args);
}使用自己的启动设置
-
使用fastjson
@Bean public HttpMessageConverters fastJsonHttpMessageConverters(){ //1.需要定义一个convert转换消息的对象; FastJsonHttpMessageConverter fastJsonHttpMessageConverter = new FastJsonHttpMessageConverter(); //2:添加fastJson的配置信息; FastJsonConfig fastJsonConfig = new FastJsonConfig(); fastJsonConfig.setSerializerFeatures(SerializerFeature.PrettyFormat); //3处理中文乱码问题 List<MediaType> fastMediaTypes = new ArrayList<MediaType>(); fastMediaTypes.add(MediaType.APPLICATION_JSON_UTF8); //4.在convert中添加配置信息. fastJsonHttpMessageConverter.setSupportedMediaTypes(fastMediaTypes); fastJsonHttpMessageConverter.setFastJsonConfig(fastJsonConfig); HttpMessageConverter<?> converter = fastJsonHttpMessageConverter; return new HttpMessageConverters(converter);} -
http://blog.csdn.net/xiaoyu411502/article/details/48049099application.properties配置说明
SpringBoot自学汇总
2017-11-08
1290
版权
版权声明:
本文内容由阿里云实名注册用户自发贡献,版权归原作者所有,阿里云开发者社区不拥有其著作权,亦不承担相应法律责任。具体规则请查看《
阿里云开发者社区用户服务协议》和
《阿里云开发者社区知识产权保护指引》。如果您发现本社区中有涉嫌抄袭的内容,填写
侵权投诉表单进行举报,一经查实,本社区将立刻删除涉嫌侵权内容。
简介:
本文转自whshurk 51CTO博客,原文链接:http://blog.51cto.com/shurk/1943959,如需转载请自行联系原作者

目录
相关文章
|
7月前
|
安全
Java
API
|
4月前
|
缓存
Java
数据库
|
6月前
|
开发框架
Java
Maven
|
7月前
|
前端开发
Java
中间件
|
7月前
|
监控
Java
应用服务中间件
|
7月前
|
Java
数据库
|
9月前
|
XML
前端开发
JavaScript
|
9月前
|
前端开发
JavaScript
Java
|
11月前
|
XML
监控
Java
手把手初认Springboot2
Spring Boot是由Pivotal团队提供的全新框架,其设计目的是用来简化新Spring应用的初始搭建以及开发过程。该框架使用了特定的方式来进行配置,从而使开发人员不再需要定义样板化的配置。通过这种方式,Spring Boot致力于在蓬勃发展的快速应用开发领域(rapid application development)成为领导者。
54
0
0
|
XML
Java
应用服务中间件
热门文章
最新文章
1
随机生成UserAgent的python库(fake-useragent库)
2
使用zxing识别一幅包含多个二维码的图片
3
阿里云的SLB,植入cookie和重写cookie有什么区别?
4
基于Flink的实时日志分析系统实践
5
如何在服务器上跑python程序
6
电池技术多年没有较大发展,成为移动设备最大制约
7
Spread for WinRT 7新功能使用指南
8
codeforces Soldier and Number Game(dp+素数筛选)
9
九度oj-1001-Java
10
Android:随笔——对页面的View进行截图
1
分解商业周期时间序列:线性滤波器、HP滤波器、Baxter滤波器、Beveridge Nelson分解等去趋势2
9
2
分解商业周期时间序列:线性滤波器、HP滤波器、Baxter滤波器、Beveridge Nelson分解等去趋势法1
9
3
灰色关联分析(Grey Relation Analysis,GRA)中国经济社会发展指标
9
4
极值分析:分块极大值BLOCK-MAXIMA、阈值超额法、广义帕累托分布GPD拟合降雨数据时间序列
9
5
GARCH-DCC模型和DCC(MVT)建模估计
8
6
ARIMA、ARIMAX、 动态回归和OLS 回归预测多元时间序列
10
7
R语言预测期货波动率的实现:ARCH与HAR-RV与GARCH,ARFIMA模型比较
10
8
spss modeler用决策树神经网络预测ST的股票
9
9
K-means和层次聚类分析癌细胞系微阵列数据和树状图可视化比较
8
10
matlab中使用VMD(变分模态分解)对信号去噪
8


