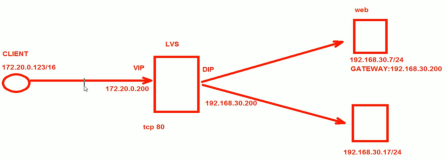
使用LVS的dr模型负载均衡两台web服务器。
条件:
只有一个公网地址。172.10.0.9
RIP使用私有地址
如下图所示:

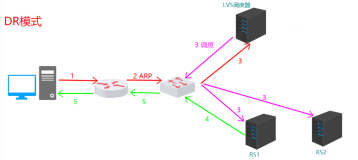
路由器处理数据报文的流程:
用户访问集群服务的数据报文到达路由器后,通过路由决策发现从路由器的 eth1 网卡可以到达:172.10.0.0/16网络,(eth1 网卡配置有地址:172.10.0.1)路由器发现是本地网络的通讯(基于MAC地址通信的),于是路由器向172.10.0.0/16网络发送ARP地址解析广播请求:请求172.10.0.9对应的MAC地址,在172.10.0.0/16网络的所有主机都可以收到ARP地址解析请求。如果该网络的某台主机配置有路由器请求解析的IP地址,就把MAC地址告诉,路由器。路由器就会使用该MAC地址把数据报文发送给该主机。
LVS负载均衡原理:
访问集群服务的请求都要先到达Director,由Director根据调度算法。把访问集群服务的请求均衡到后端的RealServer.
根据上述分析,要做下述一些配置:
1、请求报文流入
因为,我们的 Directory、Realserver1、Realserver2 都配置有VIP地址,所以基于本地通讯的原理
和LVS负载均衡的工作原理考虑:
目的:要控制路由器把用户请求访问集群服务的数据报文只送到Director,
不会把数据报文送到 RealServer.
手段:通过控制无论任何时候路由器的ARP缓存中:VIP对应的MAC地址都是Director的VIP地址所在的
网卡的MAC地址。这样保证路由器一定会把数据报文送到Director
方法:
|
1
2
3
4
|
A)、在路由器做静态地址绑定:
B)、aprtables,阻止路由器发送的ARP地址解析请求(请求VIP对应的MAC)进入RealServer
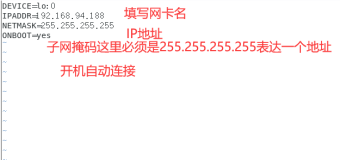
C)、修改ReserServer主机的内核参数,将RS上的VIP配置在lo接口的别名上,并限制其不能响应
对VIP地址解析请求,也不能把MAC地址通告出去。
|
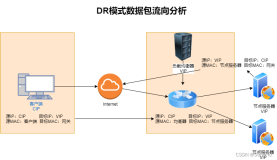
LVS的dr模型,Director通过修改请求访问集群服务的报文的MAC地址实现把数据报文分发到后端的RealServer.
所以,要保证Director能够基于MAC地址与后端的RealServer进行通信。
方法:Director与RealServer在同一个物理网络。
2、响应报文流出
当RealServer 构建完响应报文之后,直接把报文送给客户端。
因为,客户端请求的是VIP,所以,RealServer 构建的响应的数据报文的源IP是CIP(10.10.0.1)目标IP是VIP(172.10.0.9),客户端才会接收。
所以,在RealServer中通过主机路由指定使用配置在lo:0的VIP对响应的数据报文进行封装。再通过eth0把响应的数据报文送达客户端。
由于RealServer的RIP是私有网络,不能把数据报文送达客户端。所以给RealServer指定一个默认网关,RealServer把不属于本网络的数据报文发给默认网关由默认网关把数据报文送达客户端。
LVS工作流程如下图:

一、配置路由:
1、配置通往 172.10.0.0/16 网络路由
在路由器配置到达172.10.0.0/16网终的出口
|
1
2
3
4
5
6
|
[root@route ~]
# ifconfig eth1 172.10.0.1 up
[root@route ~]
# route -n
Kernel IP routing table
Destination Gateway Genmask Flags Metric Ref Use Iface
172.10.0.0 0.0.0.0 255.255.0.0 U 0 0 0 eth1
10.0.0.0 0.0.0.0 255.0.0.0 U 0 0 0 eth0
|
添加一条网络路由
到达 172.10.0.0/16 网络从路由器的 eth1 接口172.10.0.1 出去。
也就是说,172.10.0.1 是与该网络直接相连的(基于MAC地址通讯)。
|
1
|
[root@route ~]
# route add -net 172.10.0.0/16 gw 172.10.0.1 eth1
|
查看配置网络路由后
|
1
2
3
4
5
6
|
[root@route ~]
# route -n
Kernel IP routing table
Destination Gateway Genmask Flags Metric Ref Use Iface
172.10.0.0 172.10.0.1 255.255.0.0 UG 0 0 0 eth1 ------> 网络路由。数据报文通过eth1接口可以到这172.10.0.0
/16
网络
172.10.0.0 0.0.0.0 255.255.0.0 U 0 0 0 eth1 -------> Gateway 网关是0.0.0.0 这是本地网络,
10.0.0.0 0.0.0.0 255.0.0.0 U 0 0 0 eth0
|
2、再添加一条 RIP能够到达10.10.0.1 的路由(Reral Server 通够把响应的数据报文送达客户端的路由)
在路由器配置到达192.168.60.0/24网络的出口
|
1
|
[root@route ~]
# ifconfig eth1:0 192.168.60.1 up
|
配置前
|
1
2
3
4
5
6
7
|
[root@route ~]
# route -n
Kernel IP routing table
Destination Gateway Genmask Flags Metric Ref Use Iface
192.168.60.0 0.0.0.0 255.255.255.0 U 0 0 0 eth1
172.10.0.0 172.10.0.1 255.255.0.0 UG 0 0 0 eth1
172.10.0.0 0.0.0.0 255.255.0.0 U 0 0 0 eth1
10.0.0.0 0.0.0.0 255.0.0.0 U 0 0 0 eth0
|
增加到达192.168.60.0/24网络的路由
|
1
|
[root@route ~]
# route add -net 192.168.60.0/24 gw 192.168.60.1 eth1:0
|
配置后
|
1
2
3
4
5
6
7
8
|
[root@route ~]
# route -n
Kernel IP routing table
Destination Gateway Genmask Flags Metric Ref Use Iface
192.168.60.0 192.168.60.1 255.255.255.0 UG 0 0 0 eth1
192.168.60.0 0.0.0.0 255.255.255.0 U 0 0 0 eth1
172.10.0.0 172.10.0.1 255.255.0.0 UG 0 0 0 eth1
172.10.0.0 0.0.0.0 255.255.0.0 U 0 0 0 eth1
10.0.0.0 0.0.0.0 255.0.0.0 U 0 0 0 eth0
|
说明:
Gateway 网关是0.0.0.0 这是本地网络,
Destination 为: 0.0.0.0 说明这是默认网关。
路由器的地址配置如下:
|
1
2
3
4
5
6
7
8
9
10
11
12
|
[root@route ~]
# ifconfig | grep -B 1 "[[:space:]]*inet[[:space:]]"
eth0 Link encap:Ethernet HWaddr 00:0C:29:79:15:5C
inet addr:10.10.0.88 Bcast:10.255.255.255 Mask:255.0.0.0
--
eth1 Link encap:Ethernet HWaddr 00:0C:29:79:15:66
inet addr:172.10.0.1 Bcast:172.10.255.255 Mask:255.255.0.0
--
eth1:0 Link encap:Ethernet HWaddr 00:0C:29:79:15:66
inet addr:192.168.60.1 Bcast:192.168.60.255 Mask:255.255.255.0
--
lo Link encap:Local Loopback
inet addr:127.0.0.1 Mask:255.0.0.0
|
3、打开linux主机的转发功能
|
1
|
[root@route ~]
# echo 1 > /proc/sys/net/ipv4/ip_forward
|
二、配置Director
1、配置DIR地址
|
1
|
[root@director ~]
# ifconfig eth0 192.168.60.4 up
|
2、配置VIP地址
|
1
|
[root@director ~]
# ifconfig eth0:0 172.10.0.9 up
|
查看Director地IP地址配置情况
|
1
2
3
4
5
6
7
8
9
|
[root@director ~]
# ifconfig | grep -B 1 "[[:space:]]*inet[[:space:]]"
eth0 Link encap:Ethernet HWaddr 00:0C:29:1B:03:49
inet addr:192.168.60.4 Bcast:192.168.60.255 Mask:255.255.255.0
--
eth0:0 Link encap:Ethernet HWaddr 00:0C:29:1B:03:49
inet addr:172.10.0.9 Bcast:172.10.255.255 Mask:255.255.0.0
--
lo Link encap:Local Loopback
inet addr:127.0.0.1 Mask:255.0.0.0
|
由于后端RealServer构建响应的数据报文没有经过Director,所以,Director无需配置任何路由条目。
|
1
2
3
4
5
|
[root@director ~]
# route -n
Kernel IP routing table
Destination Gateway Genmask Flags Metric Ref Use Iface
192.168.60.0 0.0.0.0 255.255.255.0 U 0 0 0 eth0
172.10.0.0 0.0.0.0 255.255.0.0 U 0 0 0 eth0
|
查看在路由器的arp 表
|
1
2
3
4
5
6
|
[root@route ~]
# arp -e
Address HWtype HWaddress Flags Mask Iface
10.10.0.1 ether 00:50:56:C0:00:01 C eth0
192.168.60.9 ether 00:0C:29:FC:C7:44 C eth1
192.168.60.4 ether 00:0C:29:1B:03:49 C eth1
172.10.0.9 ether 00:0C:29:1B:03:49 C eth1
|
说明:
当一台主机加入一个网络时,它会向该网络发出ARP通告。所以在路由器使用【arp -e】命令会查看到刚才配置的地址对应的MAC地址。
三、配置 RealServer
通过在后端的每个RealServer配置内核参数的方式,保证路由器的ARP缓冲中只有Director的VIP的MAC对应条目。
ARP有两种工作方式:
|
1
2
3
4
5
6
7
8
|
(A)、ARP广播解析请求,向网络中发送ARP广播请求解析IP地址对应的MAC地址,
从而实现数据报文的传输的。
arp_ignore = 1 请求解析的IP地址,恰好是配置在ARP广播报文进来的网卡接口,
就响应ARP解析请求。
(B)、一个主机加入一个网络,该主机会发出ARP通告。自己的IP地址是什么,自己的MAC地
址是什么.由于在linux系统中IP地址属于内核的,默认会把该主机的所有IP地址都通
告出去的。
arp_announce = 2 仅通告与网络直连的接口的地址(IP地址与MAC地址),
|
这样就实现了,RealServer不能向外通告配置在lo:0的VIP地址,也不会响应对VIP的ARP地址解析请求。
1、配置 real2 server
(1)、配置RIP地址
|
1
|
[root@real2 ~]
# ifconfig eth0 192.168.60.9 up
|
(2)、配置内核参数,限制网卡对ARP协议的行为。
|
1
2
3
4
|
[root@real2 ~]
# echo 2 > /proc/sys/net/ipv4/conf/all/arp_announce
[root@real2 ~]
# echo 2 > /proc/sys/net/ipv4/conf/lo/arp_announce
[root@real2 ~]
# echo 1 > /proc/sys/net/ipv4/conf/lo/arp_ignore
[root@real2 ~]
# echo 1 > /proc/sys/net/ipv4/conf/all/arp_ignore
|
(3)、配置VIP
|
1
|
[root@real2 ~]
# ifconfig lo:0 172.10.0.9 netmask 255.255.255.255 broadcast 172.10.0.9 up
|
(4)、查看resl2的VIP是否向外通告了?
|
1
2
3
4
5
6
7
|
[root@route ~]
# ping -c 1 172.10.0.9
PING 172.10.0.9 (172.10.0.9) 56(84) bytes of data.
64 bytes from 172.10.0.9: icmp_seq=1 ttl=64
time
=0.227 ms
--- 172.10.0.9
ping
statistics ---
1 packets transmitted, 1 received, 0% packet loss,
time
0ms
rtt min
/avg/max/mdev
= 0.227
/0
.227
/0
.227
/0
.000 ms
|
|
1
2
3
4
5
6
|
[root@route ~]
# arp -e
Address HWtype HWaddress Flags Mask Iface
10.10.0.1 ether 00:50:56:C0:00:01 C eth0
192.168.60.9 ether 00:0C:29:FC:C7:44 C eth1
192.168.60.4 ether 00:0C:29:1B:03:49 C eth1
172.10.0.9 ether 00:0C:29:1B:03:49 C eth1
|
从上面结果可以看出,没有向外通告。
(5)、配置主机路由,使得RealServer构建响应报文使用配置在lo:0 的VIP地址作为源地址封装数据报文。在linux中,数据报文从那块网卡出去,数据报文的源地址就是该网卡的IP地址
|
1
2
3
4
|
[root@real2 ~]
# route -n
Kernel IP routing table
Destination Gateway Genmask Flags Metric Ref Use Iface
192.168.60.0 0.0.0.0 255.255.255.0 U 0 0 0 eth0
|
配置主机路由
|
1
|
[root@real2 ~]# route add -host 10.10.0.9 dev lo:0
|
配置后
|
1
2
3
4
5
|
[root@real2 ~]
# route -n
Kernel IP routing table
Destination Gateway Genmask Flags Metric Ref Use Iface
10.10.0.9 0.0.0.0 255.255.255.255 UH 0 0 0 lo
192.168.60.0 0.0.0.0 255.255.255.0 U 0 0 0 eth0
|
(6)、添置默认路由,让RealServer能够把数据包送到路由器,再由路由器送给客户端。
|
1
2
3
4
5
6
7
|
[root@real2 ~]
# route add default gw 192.168.60.1
[root@real2 ~]
# route -n
Kernel IP routing table
Destination Gateway Genmask Flags Metric Ref Use Iface
10.10.0.9 0.0.0.0 255.255.255.255 UH 0 0 0 lo
192.168.60.0 0.0.0.0 255.255.255.0 U 0 0 0 eth0
0.0.0.0 192.168.60.1 0.0.0.0 UG 0 0 0 eth0
|
(7)、测试是不能够PING通网关
|
1
2
3
4
5
6
7
|
[root@real2 ~]
# ping -c 1 192.168.60.1
PING 192.168.60.1 (192.168.60.1) 56(84) bytes of data.
64 bytes from 192.168.60.1: icmp_seq=1 ttl=64
time
=0.177 ms
--- 192.168.60.1
ping
statistics ---
1 packets transmitted, 1 received, 0% packet loss,
time
0ms
rtt min
/avg/max/mdev
= 0.177
/0
.177
/0
.177
/0
.000 ms
|
(8)、在RealServer的配置
|
1
2
3
4
5
6
7
8
9
|
[root@real2 ~]
# ifconfig | grep -B 1 "[[:space:]]*inet[[:space:]]"
eth0 Link encap:Ethernet HWaddr 00:0C:29:FC:C7:44
inet addr:192.168.60.9 Bcast:192.168.60.255 Mask:255.255.255.0
--
lo Link encap:Local Loopback
inet addr:127.0.0.1 Mask:255.0.0.0
--
lo:0 Link encap:Local Loopback
inet addr:172.10.0.9 Mask:255.255.255.255
|
(9)、查看路由器的arp缓存,是否有RealServer的VIP---MAC条目
|
1
2
3
4
5
6
7
|
[root@route ~]
# arp -e
Address HWtype HWaddress Flags Mask Iface
10.10.0.1 ether 00:50:56:C0:00:01 C eth0
192.168.60.8 ether 00:0C:29:20:12:03 C eth1
192.168.60.9 ether 00:0C:29:FC:C7:44 C eth1
192.168.60.4 ether 00:0C:29:1B:03:49 C eth1
172.10.0.9 ether 00:0C:29:1B:03:49 C eth1
|
2、配置 real1 server
(1)、配置RIP地址
|
1
|
[root@real1 ~]
# ifconfig eth0 192.168.60.8 up
|
(2)、配置内核参数,限制网卡对ARP协议的行为。
|
1
2
3
4
|
[root@real1 ~]
# echo 2 > /proc/sys/net/ipv4/conf/all/arp_announce
[root@real1 ~]
# echo 2 > /proc/sys/net/ipv4/conf/lo/arp_announce
[root@real1 ~]
# echo 1 > /proc/sys/net/ipv4/conf/lo/arp_ignore
[root@real1 ~]
# echo 1 > /proc/sys/net/ipv4/conf/all/arp_ignore
|
(3)、配置VIP
|
1
|
[root@real1 ~]
# ifconfig lo:0 172.10.0.9 netmask 255.255.255.255 broadcast 172.10.0.9 up
|
(4)、查看resl2的VIP是否向外通告了?
|
1
2
3
4
5
6
7
|
[root@route ~]
# ping -c 1 172.10.0.9
PING 172.10.0.9 (172.10.0.9) 56(84) bytes of data.
64 bytes from 172.10.0.9: icmp_seq=1 ttl=64
time
=0.298 ms
--- 172.10.0.9
ping
statistics ---
1 packets transmitted, 1 received, 0% packet loss,
time
0ms
rtt min
/avg/max/mdev
= 0.298
/0
.298
/0
.298
/0
.000 ms
|
|
1
2
3
4
5
6
|
[root@route ~]
# arp -e
Address HWtype HWaddress Flags Mask Iface
10.10.0.1 ether 00:50:56:C0:00:01 C eth0
192.168.60.8 ether 00:0C:29:20:12:03 C eth1
192.168.60.9 ether 00:0C:29:FC:C7:44 C eth1
172.10.0.9 ether 00:0C:29:1B:03:49 C eth1
|
从上面看出,real1没有把VIP向通告
(5)、配置主机路由,使得RealServer构建响应报文使用配置在lo:0 的VIP地址作为源地址封装数据报文。在linux中,数据报文从那块网卡出去,数据报文的源地址就是该网卡的IP地址
|
1
2
3
4
|
[root@real1 ~]
# route -n
Kernel IP routing table
Destination Gateway Genmask Flags Metric Ref Use Iface
192.168.60.0 0.0.0.0 255.255.255.0 U 0 0 0 eth0
|
添加主机路由,封装响应报文
|
1
2
3
4
5
6
|
[root@real1 ~]
# route add -host 172.10.0.9 dev lo:0
[root@real1 ~]
# route -n
Kernel IP routing table
Destination Gateway Genmask Flags Metric Ref Use Iface
172.10.0.9 0.0.0.0 255.255.255.255 UH 0 0 0 lo
192.168.60.0 0.0.0.0 255.255.255.0 U 0 0 0 eth0
|
(6)、添置默认路由,让RealServer能够把数据包送到路由器,再由路由器送给客户端CIP
|
1
2
3
4
5
6
7
|
[root@real1 ~]
# route add default gw 192.168.60.1
[root@real1 ~]
# route -n
Kernel IP routing table
Destination Gateway Genmask Flags Metric Ref Use Iface
0.0.0.0 192.168.60.1 0.0.0.0 UG 0 0 0 eth0
172.10.0.9 0.0.0.0 255.255.255.255 UH 0 0 0 lo
192.168.60.0 0.0.0.0 255.255.255.0 U 0 0 0 eth0
|
(7)、测试能够PING通网关
|
1
2
3
4
5
6
7
|
[root@real1 ~]
# ping -c 1 192.168.60.1
PING 192.168.60.1 (192.168.60.1) 56(84) bytes of data.
64 bytes from 192.168.60.1: icmp_seq=1 ttl=64
time
=0.281 ms
--- 192.168.60.1
ping
statistics ---
1 packets transmitted, 1 received, 0% packet loss,
time
0ms
rtt min
/avg/max/mdev
= 0.281
/0
.281
/0
.281
/0
.000 ms
|
(8)、在RealServer的配置
|
1
2
3
4
5
6
7
8
9
|
[root@real1 ~]
# ifconfig | grep -B 1 "[[:space:]]*inet[[:space:]]"
eth0 Link encap:Ethernet HWaddr 00:0C:29:20:12:03
inet addr:192.168.60.8 Bcast:192.168.60.255 Mask:255.255.255.0
--
lo Link encap:Local Loopback
inet addr:127.0.0.1 Mask:255.0.0.0
--
lo:0 Link encap:Local Loopback
inet addr:172.10.0.9 Mask:255.255.255.255
|
四、启动RealServer的httpd服务
1、启动real2
|
1
2
3
|
[root@real2 httpd-2.4.1]
# ./bin/apachectl start
[root@real2 httpd-2.4.1]
# netstat -apntl | grep httpd
tcp 0 0 :::80 :::* LISTEN 2238
/httpd
|
2、启动real1
|
1
2
3
|
[root@real1 httpd-2.4.1]
# ./bin/apachectl start
[root@real1 httpd-2.4.1]
# netstat -anptl | grep "httpd"
tcp 0 0 :::80 :::* LISTEN 2138
/httpd
|
五、配置lvs
1、定义集群服务
|
1
|
[root@director ~]
# ipvsadm -A -t 172.10.0.9:80 -s rr
|
2、向集群服务添加RealServer
|
1
2
|
[root@director ~]
# ipvsadm -a -t 172.10.0.9:80 -r 192.168.60.9:80 -g -w 1
[root@director ~]
# ipvsadm -a -t 172.10.0.9:80 -r 192.168.60.8:80 -g -w 1
|
3、查看ipvs规则
|
1
2
3
4
5
6
7
|
[root@director ~]
# ipvsadm -L -n
IP Virtual Server version 1.2.1 (size=4096)
Prot LocalAddress:Port Scheduler Flags
-> RemoteAddress:Port Forward Weight ActiveConn InActConn
TCP 172.10.0.9:80 rr
-> 192.168.60.8:80 Route 1 0 0
-> 192.168.60.9:80 Route 1 0 0
|
六、访问测试

从上面访问结果可以看出,LVS已经做访问集群调度了
一直刷新,查看LVS的状态如下图:

从lvs的调度状态可以看出,LVS的dr模型已经可以完成调度了。
OK!!!
本文转自成长的小虫 51CTO博客,原文链接:http://blog.51cto.com/9528du/1554905,如需转载请自行联系原作者