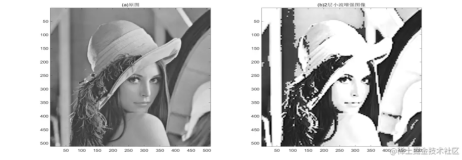
基于像素的皮肤检测技术
介绍一种基于颜色空间的皮肤检测技术,可以检测亚洲人种与白人的皮肤,皮肤检测
人脸识别的基础,也是很多人像识别技术的基础操作,在实际应用中还是非常有用的。
基于像素的皮肤检测主要是寻找正确的颜色空间几何,图像处理中,常见的颜色空间
有如下几种
1. RGB色彩空间 – R代表单色红,G代表单色绿,B代表单色蓝
2. HSV色彩空间 – H 代表色彩, S代表饱和度,V代表强度值
3. YCbCr色彩空间 – 是数字电视的色彩空间
RGB转换为HSV的Java代码如下:
- public static float[] rgbToHSV(int tr, int tg, int tb) {
- float min, max, delta;
- float hue, satur, value;
- min = Math.min(tr, Math.min(tg, tb));
- max = Math.max(tr, Math.max(tg, tb));
- value = max;
- delta = max - min;
- if(max != 0) {
- satur = delta/max;
- } else {
- satur = 0;
- hue = -1;
- }
- if(tr == max) {
- hue = (tg - tb)/delta;
- }
- else if(tg == max) {
- hue = 2 + (tb-tr)/delta;
- } else {
- hue = 4 + (tr-tg)/delta;
- }
- hue = hue * 60.0f;
- if(hue < 0) {
- hue = hue + 360;
- }
- return new float[]{hue, satur, value};
- }
RGB转换为YCbCr的Java代码如下:
- public static int[] rgbToYcrCb(int tr, int tg, int tb) {
- double sum = tr + tg + tb;
- double r = ((double)tr)/sum;
- double g = ((double)tg)/sum;
- double b = ((double)tb)/sum;
- double y = 65.481 * r + 128.553 * g + 24.966 * b + 16.0d;
- double Cr = -37.7745 * r - 74.1592 * g + 111.9337 * b + 128.0d;
- double Cb = 111.9581 * r -93.7509 * g -18.2072 * b + 128.0d;
- return new int[]{(int)y, (int)Cr, (int)Cb};
- }
(R, G, B) is classified as skin if
R > 95 and G > 40 and B > 20and max{R, G, B} – min{R, G, B} > 15 and |R-G| > 15
and R > G and R > B
实现代码如下:
- public boolean isSkin(int tr, int tg, int tb) {
- int max = Math.max(tr, Math.max(tg, tb));
- int min = Math.min(tr, Math.min(tg, tb));
- int rg = Math.abs(tr - tg);
- if(tr > 95 && tg > 40 && tb > 20 && rg > 15 &&
- (max - min) > 15 && tr > tg && tr > tb) {
- return true;
- } else {
- return false;
- }
- }
一个简单的基于HSV颜色空间的皮肤算法如下:
(H, S, V) will be classified as skin if
H > 0 and H < 50 and S > 0.23 andS < 0.68
实现代码如下:
- public boolean isSkin(int tr, int tg, int tb) {
- float[] HSV = ColorUtil.rgbToHSV(tr, tg, tb);
- if((HSV[0] > 0.0f && HSV[0] < 50.0f ) && (HSV[1] > 0.23f && HSV[1] < 0.68f)){
- return true;
- } else {
- return false;
- }
- }
一个简单的基于YCbCr颜色空间的皮肤算法如下:
(Y, Cb, Cr) will be classified as skin if:
Y > 80 and 85<Cb < 135 and 135 <Cr < 180, and (Y,Cb,Cr)= [0,255]
对于的Java代码如下:
- public boolean isSkin(int tr, int tg, int tb) {
- int y = (int)(tr * 0.299 + tg * 0.587 + tb * 0.114);
- int Cr = tr - y;
- int Cb = tb - y;
- if(y> 80 && y < 255 && Cr > 133 && Cr < 173 && 77 < Cb && Cb < 127) {
- return true;
- }
- return false;
- }

皮肤检测滤镜的源代码如下:
- package com.process.blur.study;
- import java.awt.Color;
- import java.awt.image.BufferedImage;
- import com.gloomyfish.skin.dection.DefaultSkinDetection;
- import com.gloomyfish.skin.dection.FastSkinDetection;
- import com.gloomyfish.skin.dection.GaussianSkinDetection;
- import com.gloomyfish.skin.dection.HSVSkinDetection;
- import com.gloomyfish.skin.dection.ISkinDetection;
- public class SkinFilter extends AbstractBufferedImageOp {
- private ISkinDetection skinDetector;
- public SkinFilter(int type) {
- if(type == 2) {
- skinDetector = new FastSkinDetection();
- } else if(type == 4) {
- skinDetector = new HSVSkinDetection();
- } else if(type == 8) {
- skinDetector = new GaussianSkinDetection();
- } else {
- skinDetector = new DefaultSkinDetection();
- }
- }
- @Override
- public BufferedImage filter(BufferedImage src, BufferedImage dst) {
- int width = src.getWidth();
- int height = src.getHeight();
- if ( dst == null )
- dst = createCompatibleDestImage( src, null );
- int[] inPixels = new int[width*height];
- int[] outPixels = new int[width*height];
- getRGB( src, 0, 0, width, height, inPixels );
- if(skinDetector instanceof GaussianSkinDetection) {
- ((GaussianSkinDetection)skinDetector).setDispSample(getDispersion(src));
- }
- int index = 0;
- for(int row=0; row<height; row++) {
- int ta = 0, tr = 0, tg = 0, tb = 0;
- for(int col=0; col<width; col++) {
- index = row * width + col;
- ta = (inPixels[index] >> 24) & 0xff;
- tr = (inPixels[index] >> 16) & 0xff;
- tg = (inPixels[index] >> 8) & 0xff;
- tb = inPixels[index] & 0xff;
- if(skinDetector.isSkin(tr, tg, tb)) {
- outPixels[index] = (ta << 24) | (tr << 16) | (tg << 8) | tb;
- } else {
- tr = tg = tb = 0;
- outPixels[index] = (ta << 24) | (tr << 16) | (tg << 8) | tb;
- }
- }
- }
- setRGB( dst, 0, 0, width, height, outPixels );
- return dst;
- }
- public Color getDispersion(BufferedImage image) {
- // calculate means of pixel
- int index = 0;
- int height = image.getHeight();
- int width = image.getWidth();
- int[] inPixels = new int[width*height];
- getRGB(image, 0, 0, width, height, inPixels );
- double redSum = 0, greenSum = 0, blueSum = 0;
- Color meanColor = getMean(image);
- double redmeans = meanColor.getRed();
- double greenmeans = meanColor.getGreen();
- double bluemeans = meanColor.getBlue();
- double total = height * width;
- for(int row=0; row<height; row++) {
- int ta = 0, tr = 0, tg = 0, tb = 0;
- for(int col=0; col<width; col++) {
- index = row * width + col;
- ta = (inPixels[index] >> 24) & 0xff;
- tr = (inPixels[index] >> 16) & 0xff;
- tg = (inPixels[index] >> 8) & 0xff;
- tb = inPixels[index] & 0xff;
- double rd = (tr - redmeans);
- double gd = (tg - greenmeans);
- double bd = (tb - bluemeans);
- redSum += rd * rd;
- greenSum += gd * gd;
- blueSum += bd * bd;
- }
- }
- int reddiff = (int)Math.sqrt((redSum / total));
- int greendiff = (int)Math.sqrt((greenSum / total));
- int bluediff = (int)Math.sqrt(blueSum / total);
- System.out.println(" red dispersion value = " + reddiff);
- System.out.println(" green dispersion value = " + greendiff);
- System.out.println(" blue dispersion value = " + bluediff);
- return new Color(reddiff, greendiff, bluediff);
- }
- public Color getMean(BufferedImage image) {
- // calculate means of pixel
- int index = 0;
- int height = image.getHeight();
- int width = image.getWidth();
- int[] inPixels = new int[width*height];
- getRGB(image, 0, 0, width, height, inPixels );
- double redSum = 0, greenSum = 0, blueSum = 0;
- double total = height * width;
- for(int row=0; row<height; row++) {
- int ta = 0, tr = 0, tg = 0, tb = 0;
- for(int col=0; col<width; col++) {
- index = row * width + col;
- ta = (inPixels[index] >> 24) & 0xff;
- tr = (inPixels[index] >> 16) & 0xff;
- tg = (inPixels[index] >> 8) & 0xff;
- tb = inPixels[index] & 0xff;
- redSum += tr;
- greenSum += tg;
- blueSum +=tb;
- }
- }
- int redmeans = (int)(redSum / total);
- int greenmeans = (int)(greenSum / total);
- int bluemeans = (int)(blueSum / total);
- System.out.println(" red average value = " + redmeans);
- System.out.println(" green average value = " + greenmeans);
- System.out.println(" blue average value = " + bluemeans);
- return new Color(redmeans, greenmeans, bluemeans);
- }
- }
讨论:
皮肤检测中的后续处理非常重要,可以除去噪声,平滑图像,是皮肤检测的结果
更加的准确,输出的更容易接受。