关于CAS很多的原理和基础的配置启动,网上是很多的,我更多是结合我的实践和心得。需要了解CAS的原理,认证协议,认证流程,可以参考以下文章。
背景
单点登录(SSO)是企业开发的重要问题,在我的毕设项目中,由于要和系统其他开发模块共用用户认证模块,方便共享用户资源,所以需要一个好的SSO解决方案。
一般SSO的实现机制有两种:基于session的和基于cookie的。WebLogic通过Session共享认证信息。Session是一种服务器端机制,当客户端访问服务器时,服务器为客户端创建一个惟一的SessionID,以使在整个交互过程中始终保持状态,而交互的信息则可由应用自行指定,因此用Session方式实现SSO,不能在多个浏览器之间实现单点登录,但却可以跨域;WebSphere通过Cookie记录认证信息。Cookie是一种客户端机制,它存储的内容主要包括: 名字、值、过期时间、路径和域,路径与域合在一起就构成了Cookie的作用范围,因此用Cookie方式可实现SSO,但域名必须相同。对应这两者,开源的SSO实现分别是OAuth和CAS。
OAuth更多的是解决第三方去访问服务提供方的用户的资源,我认为更适用于不同的系统,比如大的平台都会提供OAuth的认证机制(新浪微博,google)。而CAS更贴近我的需求,就是解决同一系统下不同服务间的用户认证工作,可以无缝连接。
关于CAS
<?xml version="1.0" encoding="UTF-8"?>
<!--
	| deployerConfigContext.xml centralizes into one file some of the declarative configuration that
	| all CAS deployers will need to modify.
	|
	| This file declares some of the Spring-managed JavaBeans that make up a CAS deployment.
	| The beans declared in this file are instantiated at context initialization time by the Spring
	| ContextLoaderListener declared in web.xml.  It finds this file because this
	| file is among those declared in the context parameter "contextConfigLocation".
	|
	| By far the most common change you will need to make in this file is to change the last bean
	| declaration to replace the default SimpleTestUsernamePasswordAuthenticationHandler with
	| one implementing your approach for authenticating usernames and passwords.
	+-->
<beans xmlns="http://www.springframework.org/schema/beans"
       xmlns:xsi="http://www.w3.org/2001/XMLSchema-instance"
       xmlns:p="http://www.springframework.org/schema/p"
       xmlns:sec="http://www.springframework.org/schema/security"
       xsi:schemaLocation="http://www.springframework.org/schema/beans http://www.springframework.org/schema/beans/spring-beans-3.0.xsd
       http://www.springframework.org/schema/security http://www.springframework.org/schema/security/spring-security-3.0.xsd">
	<!--
		| This bean declares our AuthenticationManager.  The CentralAuthenticationService service bean
		| declared in applicationContext.xml picks up this AuthenticationManager by reference to its id,
		| "authenticationManager".  Most deployers will be able to use the default AuthenticationManager
		| implementation and so do not need to change the class of this bean.  We include the whole
		| AuthenticationManager here in the userConfigContext.xml so that you can see the things you will
		| need to change in context.
		+-->
	<bean id="authenticationManager"
		class="org.jasig.cas.authentication.AuthenticationManagerImpl">
		<!--
			| This is the List of CredentialToPrincipalResolvers that identify what Principal is trying to authenticate.
			| The AuthenticationManagerImpl considers them in order, finding a CredentialToPrincipalResolver which
			| supports the presented credentials.
			|
			| AuthenticationManagerImpl uses these resolvers for two purposes.  First, it uses them to identify the Principal
			| attempting to authenticate to CAS /login .  In the default configuration, it is the DefaultCredentialsToPrincipalResolver
			| that fills this role.  If you are using some other kind of credentials than UsernamePasswordCredentials, you will need to replace
			| DefaultCredentialsToPrincipalResolver with a CredentialsToPrincipalResolver that supports the credentials you are
			| using.
			|
			| Second, AuthenticationManagerImpl uses these resolvers to identify a service requesting a proxy granting ticket.
			| In the default configuration, it is the HttpBasedServiceCredentialsToPrincipalResolver that serves this purpose.
			| You will need to change this list if you are identifying services by something more or other than their callback URL.
			+-->
		<property name="credentialsToPrincipalResolvers">
			<list>
				<!--
					| UsernamePasswordCredentialsToPrincipalResolver supports the UsernamePasswordCredentials that we use for /login
					| by default and produces SimplePrincipal instances conveying the username from the credentials.
					|
					| If you've changed your LoginFormAction to use credentials other than UsernamePasswordCredentials then you will also
					| need to change this bean declaration (or add additional declarations) to declare a CredentialsToPrincipalResolver that supports the
					| Credentials you are using.
					+-->
				<bean
					class="org.jasig.cas.authentication.principal.UsernamePasswordCredentialsToPrincipalResolver" >
					<property name="attributeRepository" ref="attributeRepository" />
				</bean>
				<!--
					| HttpBasedServiceCredentialsToPrincipalResolver supports HttpBasedCredentials.  It supports the CAS 2.0 approach of
					| authenticating services by SSL callback, extracting the callback URL from the Credentials and representing it as a
					| SimpleService identified by that callback URL.
					|
					| If you are representing services by something more or other than an HTTPS URL whereat they are able to
					| receive a proxy callback, you will need to change this bean declaration (or add additional declarations).
					+-->
				<bean
					class="org.jasig.cas.authentication.principal.HttpBasedServiceCredentialsToPrincipalResolver" />
			</list>
		</property>

		<!--
			| Whereas CredentialsToPrincipalResolvers identify who it is some Credentials might authenticate,
			| AuthenticationHandlers actually authenticate credentials.  Here we declare the AuthenticationHandlers that
			| authenticate the Principals that the CredentialsToPrincipalResolvers identified.  CAS will try these handlers in turn
			| until it finds one that both supports the Credentials presented and succeeds in authenticating.
			+-->
		<property name="authenticationHandlers">
			<list>
				<!--
					| This is the authentication handler that authenticates services by means of callback via SSL, thereby validating
					| a server side SSL certificate.
					+-->
				<bean class="org.jasig.cas.authentication.handler.support.HttpBasedServiceCredentialsAuthenticationHandler"
					p:httpClient-ref="httpClient" p:requireSecure="false" />
				<!--
					| This is the authentication handler declaration that every CAS deployer will need to change before deploying CAS
					| into production.  The default SimpleTestUsernamePasswordAuthenticationHandler authenticates UsernamePasswordCredentials
					| where the username equals the password.  You will need to replace this with an AuthenticationHandler that implements your
					| local authentication strategy.  You might accomplish this by coding a new such handler and declaring
					| edu.someschool.its.cas.MySpecialHandler here, or you might use one of the handlers provided in the adaptors modules.
					+-->
				<!--
				<bean
					class="org.jasig.cas.authentication.handler.support.SimpleTestUsernamePasswordAuthenticationHandler" />
				-->

				<bean class="org.jasig.cas.adaptors.jdbc.QueryDatabaseAuthenticationHandler">
    				<property name="dataSource" ref="dataSource"></property>
    				<property name="sql" value="select password from academic_user where username=?"></property>
    				<!--
    				<property name="passwordEncoder" ref="MD5PasswordEncoder"></property>
    				-->
				</bean>

			</list>
		</property>
	</bean>

	<bean id="dataSource" class="org.springframework.jdbc.datasource.DriverManagerDataSource">
   		<property name="driverClassName"><value>com.mysql.jdbc.Driver</value></property>
   		<property name="url"><value>jdbc:mysql://localhost:3307/academic</value></property>
   		<property name="username"><value>root</value></property>
   		<property name="password"><value></value></property>
	</bean>
 <!--
	<bean id="MD5PasswordEncoder" class="org.jasig.cas.authentication.handler.DefaultPasswordEncoder">
    	<constructor-arg index="0">
        	<value>MD5</value>
    	</constructor-arg>
	</bean>
-->


	<!--
	This bean defines the security roles for the Services Management application.  Simple deployments can use the in-memory version.
	More robust deployments will want to use another option, such as the Jdbc version.

	The name of this should remain "userDetailsService" in order for Spring Security to find it.
	 -->
    <!-- <sec:user name="@@THIS SHOULD BE REPLACED@@" password="notused" authorities="ROLE_ADMIN" />-->

    <sec:user-service id="userDetailsService">
        <sec:user name="@@THIS SHOULD BE REPLACED@@" password="notused" authorities="ROLE_ADMIN" />
    </sec:user-service>

	<!--
	Bean that defines the attributes that a service may return.  This example uses the Stub/Mock version.  A real implementation
	may go against a database or LDAP server.  The id should remain "attributeRepository" though.
	 -->
	<bean id="attributeRepository"
		class="org.jasig.services.persondir.support.jdbc.SingleRowJdbcPersonAttributeDao">
		<constructor-arg index="0" ref="dataSource"/>
		<constructor-arg index="1" value="select * from academic_user where {0}"/>
		<property name="queryAttributeMapping">
			<map>
				<entry key="username" value="username" />
			</map>
		</property>
		<property name="resultAttributeMapping">
			<map>
				<entry key="username" value="username"/>
				<entry key="name" value="name"/>
				<entry key="email" value="email"/>
			</map>
		</property>
	</bean>

	<!--
	Sample, in-memory data store for the ServiceRegistry. A real implementation
	would probably want to replace this with the JPA-backed ServiceRegistry DAO
	The name of this bean should remain "serviceRegistryDao".
	 -->
	<bean
		id="serviceRegistryDao"
        class="org.jasig.cas.services.InMemoryServiceRegistryDaoImpl">
        <!--
            <property name="registeredServices">
                <list>
                    <bean class="org.jasig.cas.services.RegisteredServiceImpl">
                        <property name="id" value="0" />
                        <property name="name" value="HTTP" />
                        <property name="description" value="Only Allows HTTP Urls" />
                        <property name="serviceId" value="http://**" />
                    </bean>

                    <bean class="org.jasig.cas.services.RegisteredServiceImpl">
                        <property name="id" value="1" />
                        <property name="name" value="HTTPS" />
                        <property name="description" value="Only Allows HTTPS Urls" />
                        <property name="serviceId" value="https://**" />
                    </bean>

                    <bean class="org.jasig.cas.services.RegisteredServiceImpl">
                        <property name="id" value="2" />
                        <property name="name" value="IMAPS" />
                        <property name="description" value="Only Allows HTTPS Urls" />
                        <property name="serviceId" value="imaps://**" />
                    </bean>

                    <bean class="org.jasig.cas.services.RegisteredServiceImpl">
                        <property name="id" value="3" />
                        <property name="name" value="IMAP" />
                        <property name="description" value="Only Allows IMAP Urls" />
                        <property name="serviceId" value="imap://**" />
                    </bean>
                </list>
            </property>
            -->
        </bean>

    <bean id="auditTrailManager" class="com.github.inspektr.audit.support.Slf4jLoggingAuditTrailManager" />
</beans>
注意上面一些我注释掉的地方和添加的地方,我就不一一指出了,有什么问题可以私下再问我。
在客户端使用cas的时候,需要把cas-client的包导入web project/WEB-INF/lib里,需要什么包就用maven去打包特定的包。最关键的是web.xml文件里对于filter的一些设定。在这些设定里包括了cas的login和logout这俩最基础的功能,还有一个很重要的是cas的validation。如果validation成功,cas会在session里返回用户名,而我在上面的xml里还加入了别的用户信息,这些东西会在validation成功之后写入session里,以xml的形式放着,我们可以用自己写的AutoSetUserAdapterFilter来得到。下面是web.xml的配置,
<?xml version="1.0" encoding="UTF-8"?>
<web-app xmlns:xsi="http://www.w3.org/2001/XMLSchema-instance"
	xmlns="http://java.sun.com/xml/ns/javaee" xmlns:web="http://java.sun.com/xml/ns/javaee/web-app_2_5.xsd"
	xsi:schemaLocation="http://java.sun.com/xml/ns/javaee http://java.sun.com/xml/ns/javaee/web-app_2_5.xsd"
	id="WebApp_ID" version="2.5">
	<display-name>AcademicSearchEngine</display-name>
	<welcome-file-list>
		<welcome-file>home.jsp</welcome-file>
	</welcome-file-list>

	<filter>
		<filter-name>struts2</filter-name>
		<filter-class>org.apache.struts2.dispatcher.ng.filter.StrutsPrepareAndExecuteFilter</filter-class>
	</filter>

	<filter-mapping>
		<filter-name>struts2</filter-name>
		<url-pattern>/*</url-pattern>
	</filter-mapping>

	<!-- 用于单点退出,该过滤器用于实现单点登出功能,可选配置 -->
	<listener>
		<listener-class>org.jasig.cas.client.session.SingleSignOutHttpSessionListener</listener-class>
	</listener>

	<!-- 该过滤器用于实现单点登出功能,可选配置。 -->
	<filter>
		<filter-name>CAS Single Sign Out Filter</filter-name>
		<filter-class>org.jasig.cas.client.session.SingleSignOutFilter</filter-class>
	</filter>
	<filter-mapping>
		<filter-name>CAS Single Sign Out Filter</filter-name>
		<url-pattern>/share.jsp</url-pattern>
	</filter-mapping>

	<!-- 该过滤器负责用户的认证工作,必须启用它 -->
	<filter>
		<filter-name>CAS Authentication Filter</filter-name>
		<filter-class>org.jasig.cas.client.authentication.AuthenticationFilter</filter-class>
		<init-param>
			<param-name>casServerLoginUrl</param-name>
			<param-value>http://dcd.academic:8443/cas/login</param-value>
		</init-param>
		<init-param>
			<!--这里的server是服务端的IP -->
			<param-name>serverName</param-name>
			<param-value>http://dcd.academic:8080</param-value>
		</init-param>
		<init-param>
			<param-name>renew</param-name>
			<param-value>false</param-value>
		</init-param>
		<init-param>
			<param-name>gateway</param-name>
			<param-value>false</param-value>
		</init-param>
	</filter>
	<filter-mapping>
		<filter-name>CAS Authentication Filter</filter-name>
		<url-pattern>/share.jsp</url-pattern>
	</filter-mapping>


	<filter>
		<filter-name>CAS Validation Filter</filter-name>
		<filter-class>
			org.jasig.cas.client.validation.Cas20ProxyReceivingTicketValidationFilter
		</filter-class>
		<init-param>
			<param-name>casServerUrlPrefix</param-name>
			<param-value>http://dcd.academic:8443/cas</param-value>
		</init-param>
		<init-param>
			<param-name>serverName</param-name>
			<param-value>http://dcd.academic:8080</param-value>
		</init-param>
		<init-param>
			<param-name>useSession</param-name>
			<param-value>true</param-value>
		</init-param>
		<init-param>
			<param-name>redirectAfterValidation</param-name>
			<param-value>true</param-value>
		</init-param>
	</filter>
	<filter-mapping>
		<filter-name>CAS Validation Filter</filter-name>
		<url-pattern>/share.jsp</url-pattern>
	</filter-mapping>

	<!-- 该过滤器负责实现HttpServletRequest请求的包裹, 比如允许开发者通过HttpServletRequest 的 getRemoteUser()方法获得SSO登录用户的登录名,可选配置。 -->
	<filter>
		<filter-name>CAS HttpServletRequest Wrapper Filter</filter-name>
		<filter-class>
			org.jasig.cas.client.util.HttpServletRequestWrapperFilter</filter-class>
	</filter>
	<filter-mapping>
		<filter-name>CAS HttpServletRequest Wrapper Filter</filter-name>
		<url-pattern>/share.jsp</url-pattern>
	</filter-mapping>

	<!-- 该过滤器使得开发者可以通过org.jasig.cas.client.util.AssertionHolder来获取用户的登录名。 比如AssertionHolder.getAssertion().getPrincipal().getName()。 -->
	<filter>
		<filter-name>CAS Assertion Thread Local Filter</filter-name>
		<filter-class>org.jasig.cas.client.util.AssertionThreadLocalFilter</filter-class>
	</filter>
	<filter-mapping>
		<filter-name>CAS Assertion Thread Local Filter</filter-name>
		<url-pattern>/share.jsp</url-pattern>
	</filter-mapping>

	<!-- 自动根据单点登录的结果设置本系统的用户信息 -->
	<filter>
		<display-name>AutoSetUserAdapterFilter</display-name>
		<filter-name>AutoSetUserAdapterFilter</filter-name>
		<filter-class>dcd.academic.cas.AutoSetUserAdapterFilter</filter-class>
	</filter>
	<filter-mapping>
		<filter-name>AutoSetUserAdapterFilter</filter-name>
		<url-pattern>/share.jsp</url-pattern>
	</filter-mapping>
</web-app>
每一个都很重要,我把https关掉了,所以serverName里写http就行。自己写的AutoSetUserAdapterFilter来获取session里的用户信息的代码:
package dcd.academic.cas;

import java.io.IOException;
import java.util.Map;

import javax.servlet.Filter;
import javax.servlet.FilterChain;
import javax.servlet.FilterConfig;
import javax.servlet.ServletException;
import javax.servlet.ServletRequest;
import javax.servlet.ServletResponse;
import javax.servlet.http.HttpServletRequest;

import org.jasig.cas.client.util.AssertionHolder;
import org.jasig.cas.client.validation.Assertion;

import dcd.academic.DAO.DAOfactory;
import dcd.academic.DAO.UserDAO;
import dcd.academic.model.User;
import dcd.academic.util.StdOutUtil;

/**
 * CAS单点登陆的过滤器功能类,该类用来自动生成子应用的登陆Session
 *
 */
public class AutoSetUserAdapterFilter implements Filter {

	/**
	 * Default constructor.
	 */
	public AutoSetUserAdapterFilter() {
		StdOutUtil.out("[AutoSetUserAdapterFilter]");
	}


	/**
	 * @see Filter#destroy()
	 */
	public void destroy() {
	}

	public void doFilter(ServletRequest request, ServletResponse response,
			FilterChain chain) throws IOException, ServletException {
		HttpServletRequest httpRequest = (HttpServletRequest) request;

		// _const_cas_assertion_是CAS中存放登录用户名的session标志
		Object object = httpRequest.getSession().getAttribute(
				"_const_cas_assertion_");

		if (object != null) {
			Assertion assertion = (Assertion) object;
			String loginName = assertion.getPrincipal().getName();
			StdOutUtil.out("[loginname]: " + loginName);

			Map<String, Object> map = assertion.getPrincipal().getAttributes();
			String email = (String) map.get("email");
			String name = (String) map.get("name");
			String username = (String) map.get("username");
			StdOutUtil.out("[email]: " + email);
			StdOutUtil.out("[name]: " + name);
			StdOutUtil.out("[username]: " + username);
		}
		chain.doFilter(request, response);
	}

	/**
	 * @see Filter#init(FilterConfig)
	 */
	public void init(FilterConfig fConfig) throws ServletException {
	}

}
还有一点,就是在validation success的返回jsp里,要新添加一些内容,在目录cas\WEB-INF\view\jsp\protocol\2.0的casServiceValidationSuccess.jsp
<%@ page session="false" %><%@ taglib prefix="c" uri="http://java.sun.com/jsp/jstl/core" %><%@ taglib uri="http://java.sun.com/jsp/jstl/functions" prefix="fn" %>
<cas:serviceResponse xmlns:cas='http://www.yale.edu/tp/cas'>
	<cas:authenticationSuccess>
		<cas:user>${fn:escapeXml(assertion.chainedAuthentications[fn:length(assertion.chainedAuthentications)-1].principal.id)}</cas:user>
		<c:if test="${not empty pgtIou}">
			<cas:proxyGrantingTicket>${pgtIou}</cas:proxyGrantingTicket>
		</c:if>
		<c:if test="${fn:length(assertion.chainedAuthentications) > 1}">
			<cas:proxies>
				<c:forEach var="proxy" items="${assertion.chainedAuthentications}" varStatus="loopStatus" begin="0" end="${fn:length(assertion.chainedAuthentications)-2}" step="1">
					<cas:proxy>${fn:escapeXml(proxy.principal.id)}</cas:proxy>
				</c:forEach>
			</cas:proxies>
		</c:if>

		<c:if test="${fn:length(assertion.chainedAuthentications[fn:length(assertion.chainedAuthentications)-1].principal.attributes) > 0}">
            <cas:attributes>
                <c:forEach var="attr" items="${assertion.chainedAuthentications[fn:length(assertion.chainedAuthentications)-1].principal.attributes}">
                    <cas:${fn:escapeXml(attr.key)}>${fn:escapeXml(attr.value)}</cas:${fn:escapeXml(attr.key)}>
                </c:forEach>
            </cas:attributes>
        </c:if>
	</cas:authenticationSuccess>
</cas:serviceResponse>
其实本质上这些都是servlet的处理。因为cas也是一个servlet写成的war,说简单也简单。所以cas自己的登录界面我们都是自己自己定制的。
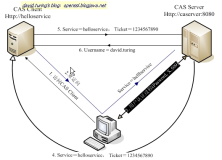
我们在使用的时候,需要改动的项目代码很少。在需要登录或者认证的地方,把链接跳转到server:8443/cas/login上,登录成功后让cas的登录成功界面跳转回原service的url即可,这时候cas是通过service和service ticket生成了新的ticket grant ticket,然后在session里存了东西让客户端去读取的。在安全方面,这步是在SSL的基础上做的,所以我直接访问如server:8443/cas/serviceValidation是会出SSL证书错误的。
还是稍微说一下cas的协议机制吧。这张图也是别人文章里的图,为了方便大家理解,还是帖一下。

总结
总结cas的话,我们可以单独给一个tomcat来做用户认证模块,并且认证之后,客户端是可以得到session里的用户信息的。可以认为这样就把单点登录问题解决了。至于这个cas服务器怎么配置,怎么认证,需要传递什么的,就去tomcat/webapps/cas的许许多多jsp和xml里去配置。话说这些jsp和xml真的很多。
像这样的开源企业级解决方案,说简单也简单,说难也难,就和solr一样。配置这件事,要进阶使用的话需要很大力气花在源码阅读上,这样你才可以很好的进行定制和扩展。不然我们无法知道他给你写好的简单配置和复杂配置是怎么实现的,我们应该使用哪些写好的handler,需要什么params。