上一篇博文记录了单纯的socket client和socket server 进行通信的过程, client发送一个数据到服务端,服务端加以处理返回给客户端,基于这种简单demo的方式,这一次我尝试了一下silverlight客户端跟socket服务端之间的通信。
首先我们建立一个监听tcp端口的socket服务,这个服务会一直持续的监听服务并将收到的数据加以包装返回给silverlight客户端,这里需要说明的是由于silverlight客户端最终还是web形式的,如果想与socket进行异步通信,服务端为了安全起见必然要验证一下策略文件并且只提供了4502-4534的端口范围。请求策略时,Silverlight会自己发送一个字符串<policy-file-request/>到服务器的943端口,然后你必须在服务器程序里接收该请求,分析是否是策略请求后,发送一个策略文件的字符串给客户端,客户端接收到策略文件后自己分析完后再发送程序员自己写的数据请求。
Socket Server

首先需要在服务端放一个策略文件,然后建立一个类,这个类是我在网络上找的
 代码
代码
using System.Collections.Generic;
using System.Text;
using System.Net;
using System.Net.Sockets;
using System.IO;
using System.Threading;
using System.Reflection;
using System.Configuration;
namespace SLSocket
{
public class PolicySocketServer
{
TcpListener _Listener = null ;
TcpClient _Client = null ;
static ManualResetEvent _TcpClientConnected = new ManualResetEvent( false );
const string _PolicyRequestString = " <policy-file-request/> " ;
int _ReceivedLength = 0 ;
byte [] _Policy = null ;
byte [] _ReceiveBuffer = null ;
private void InitializeData()
{
string policyFile = " SocketClientAccessPolicy.xml " ;
using (FileStream fs = new FileStream(policyFile, FileMode.Open))
{
_Policy = new byte [fs.Length];
fs.Read(_Policy, 0 , _Policy.Length);
}
_ReceiveBuffer = new byte [_PolicyRequestString.Length];
}
public void StartSocketServer()
{
InitializeData();
try
{
_Listener = new TcpListener(IPAddress.Any, 943 );
_Listener.Start();
while ( true )
{
_TcpClientConnected.Reset();
_Listener.BeginAcceptTcpClient( new AsyncCallback(OnBeginAccept), null );
_TcpClientConnected.WaitOne();
}
}
catch (Exception)
{
}
}
private void OnBeginAccept(IAsyncResult ar)
{
_Client = _Listener.EndAcceptTcpClient(ar);
_Client.Client.BeginReceive(_ReceiveBuffer, 0 , _PolicyRequestString.Length, SocketFlags.None,
new AsyncCallback(OnReceiveComplete), null );
}
private void OnReceiveComplete(IAsyncResult ar)
{
try
{
_ReceivedLength += _Client.Client.EndReceive(ar);
if (_ReceivedLength < _PolicyRequestString.Length)
{
_Client.Client.BeginReceive(_ReceiveBuffer, _ReceivedLength,
_PolicyRequestString.Length - _ReceivedLength,
SocketFlags.None, new AsyncCallback(OnReceiveComplete), null );
return ;
}
string request = System.Text.Encoding.UTF8.GetString(_ReceiveBuffer, 0 , _ReceivedLength);
if (StringComparer.InvariantCultureIgnoreCase.Compare(request, _PolicyRequestString) != 0 )
{
_Client.Client.Close();
return ;
}
_Client.Client.BeginSend(_Policy, 0 , _Policy.Length, SocketFlags.None,
new AsyncCallback(OnSendComplete), null );
}
catch (Exception)
{
_Client.Client.Close();
}
_ReceivedLength = 0 ;
_TcpClientConnected.Set(); // Allow waiting thread to proceed
}
private void OnSendComplete(IAsyncResult ar)
{
try
{
_Client.Client.EndSendFile(ar);
}
catch (Exception)
{
}
finally
{
_Client.Client.Close();
}
}
}
}
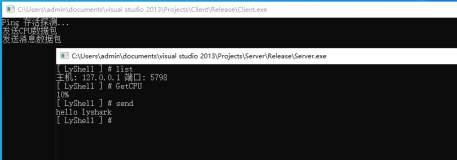
socket 服务的形式是控制台程序,由于正在做一个聊天的工具,所以原理是这样的,AB都会向服务器发出请求,后发请求的那个会接收到先发请求人的IP和端口,以方便进行后续通信的建立。其中代码如下:
代码
using System.Collections.Generic;
using System.Linq;
using System.Text;
using System.Net.Sockets;
using System.Threading;
using System.Collections;
using System.IO;
using System.Net;
using System.Data;
using System.ComponentModel;
namespace SLSocket
{
public class UserSocket
{
public string Address { set ; get ; }
public int Port { set ; get ; }
public string UserName { set ; get ; }
public DateTime StoreTime { set ; get ; }
}
class Program
{
static List < UserSocket > listUserSocket = new List < UserSocket > ();
private const string SERVER_IP = " 127.0.0.1 " ;
private const int SERVER_PORT = 4530 ; // 注意监听端口在4502-4534之间
static void Main( string [] args)
{
try
{
#region Start The Policy Server 验证策略文件
PolicySocketServer StartPolicyServer = new PolicySocketServer();
Thread th = new Thread( new ThreadStart(StartPolicyServer.StartSocketServer));
th.IsBackground = true ;
th.Start();
#endregion
IPEndPoint localEndPoint = new IPEndPoint(IPAddress.Parse(SERVER_IP), SERVER_PORT);
Socket listener = new Socket(AddressFamily.InterNetwork, SocketType.Stream, ProtocolType.Tcp);
listener.Bind(localEndPoint);
listener.Listen( - 1 );
Console.WriteLine( " 等待客户端连接... " );
while ( true )
{
Socket clientSocket = listener.Accept();
if (clientSocket.Connected)
{
EndPoint remoteEp = clientSocket.RemoteEndPoint;
IPEndPoint ip = (IPEndPoint)remoteEp;
Console.WriteLine(ip.Address + " : " + ip.Port.ToString() + " 已经连接到服务器 " );
Thread myThread = new Thread( new ParameterizedThreadStart(SocketThread));
myThread.Start(clientSocket);
}
}
}
catch
{ }
}
static void SocketThread( object clientSocket) // 处理接收到的socket请求
{
try
{
Socket client = (Socket)clientSocket;
IPEndPoint address = (IPEndPoint)client.RemoteEndPoint;
byte [] bytData = new byte [ 1024 ];
int receivedLength = client.Receive(bytData);
string strUserAndPartner = System.Text.Encoding.UTF8.GetString(bytData, 0 , receivedLength);
string strUserName = strUserAndPartner.Split( ' - ' )[ 0 ];
string strPartnerName = strUserAndPartner.Split( ' - ' )[ 1 ];
listUserSocket.Add( new UserSocket() { Address = address.Address.ToString(), Port = address.Port, UserName = strUserName });
Console.WriteLine( " 存储了【 " + strUserName + " 】的地址【 " + address.Address.ToString() + " : " + address.Port.ToString() + " 】 " );
Console.WriteLine( " 当前的存储的客户端标识数量 " + listUserSocket.Count.ToString());
UserSocket userSocket = listUserSocket.Where(m => m.UserName == strPartnerName).FirstOrDefault();
if (userSocket != null )
{
Socket rev = new Socket(AddressFamily.InterNetwork, SocketType.Stream, ProtocolType.Tcp);
rev.Connect( new IPEndPoint(IPAddress.Parse(address.Address.ToString()), 4530 ));
rev.Send(System.Text.Encoding.UTF8.GetBytes(userSocket.Address + " - " + userSocket.Port.ToString()));
rev.Close();
Console.WriteLine( " 向客户端发送了聊天对象【 " + userSocket.UserName + " 】的地址:【 " + userSocket.Address + " : " + userSocket.Port.ToString() + " 】 " );
}
}
catch
{ }
}
}
}
这样一个服务端就建立完成了,作用是接收请求并返回聊天对象的IP和端口。

Silverlight客户端
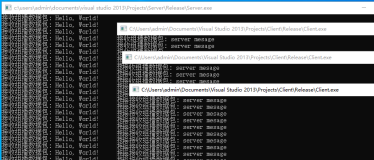
客户端的功能就是利用silverlight中提供的socket类来请求服务器,并接收到服务器返回的数据,
代码
using System.Collections.Generic;
using System.Linq;
using System.Net;
using System.Windows;
using System.Windows.Controls;
using System.Windows.Documents;
using System.Windows.Input;
using System.Windows.Media;
using System.Windows.Media.Animation;
using System.Windows.Shapes;
using System.IO.IsolatedStorage;
using System.Net.Sockets;
using System.Text;
using System.Threading;
namespace silverlight
{
public partial class MainPage : UserControl
{
private static string USERNAME = "" ;
private static string PARTNERNAME = "" ;
private Socket clientSocket = null ;
private Socket listener = null ;
private const string SERVER_IP = " 127.0.0.1 " ;
private const int SERVER_PORT = 4530 ;
public MainPage()
{
InitializeComponent();
this .button1.Click += new RoutedEventHandler(button1_Click);
}
void button1_Click( object sender, RoutedEventArgs e)
{
USERNAME = this .txtUser.Text;
PARTNERNAME = this .txtPartner.Text;
// 初始化
clientSocket = new Socket(AddressFamily.InterNetwork, SocketType.Stream, ProtocolType.Tcp);
SocketAsyncEventArgs socketEventArg = new SocketAsyncEventArgs()
{
RemoteEndPoint = new IPEndPoint(IPAddress.Parse(SERVER_IP), SERVER_PORT)
};
socketEventArg.Completed += new EventHandler < SocketAsyncEventArgs > (socketEventArg_Completed);
clientSocket.ConnectAsync(socketEventArg);
AddText( " 连接服务器... " );
}
// 连接成功后 开始发送
void socketEventArg_Completed( object sender, SocketAsyncEventArgs e)
{
if (e.SocketError == SocketError.Success)
{
AddText( " 已连接服务器! " );
string strSend = USERNAME + " - " + PARTNERNAME;
byte [] bytSend = Encoding.UTF8.GetBytes(strSend);
SocketAsyncEventArgs socketArg = new SocketAsyncEventArgs();
socketArg.Completed += new EventHandler < SocketAsyncEventArgs > (socketArg_Completed);
socketArg.SetBuffer(bytSend, 0 , bytSend.Length);
clientSocket.SendAsync(socketArg);
AddText( " 向服务器发送信息... " );
}
}
void socketArg_Completed( object sender, SocketAsyncEventArgs e)
{
// 发送成功
if (e.SocketError == SocketError.Success)
{
AddText( " 已经将自己的IP和聊天对象发送到服务器 " );
}
// 监听服务器回传的信息
Thread thread = new System.Threading.Thread( new System.Threading.ThreadStart(listenSocket));
thread.Start();
}
// 监听服务端发来的消息
void listenSocket()
{
AddText( " 开始监听服务器回传消息... " );
listener = new Socket(AddressFamily.InterNetwork, SocketType.Stream, ProtocolType.Tcp);
SocketAsyncEventArgs socketEventArg = new SocketAsyncEventArgs();
socketEventArg.Completed += new EventHandler < SocketAsyncEventArgs > (socketConnectEventArg_Completed);
clientSocket.ConnectAsync(socketEventArg);
}
void socketConnectEventArg_Completed( object sender, SocketAsyncEventArgs e)
{
SocketAsyncEventArgs listenerSocketAsyncEventArgs = new SocketAsyncEventArgs();
listenerSocketAsyncEventArgs.RemoteEndPoint = new IPEndPoint(IPAddress.Parse(SERVER_IP), SERVER_PORT);
byte [] byteReceive = new byte [ 12000 ];
listenerSocketAsyncEventArgs.Completed += new EventHandler < SocketAsyncEventArgs > (listenerSocketAsyncEventArgs_Completed);
listenerSocketAsyncEventArgs.SetBuffer(byteReceive, 0 , byteReceive.Length);
listener.ReceiveAsync(listenerSocketAsyncEventArgs);
}
void listenerSocketAsyncEventArgs_Completed( object sender, SocketAsyncEventArgs e)
{
if (e.SocketError == SocketError.Success)
{
byte [] byteReceive = e.Buffer;
string strText = System.Text.Encoding.UTF8.GetString(byteReceive, 0 , byteReceive.Length);
AddText( " 成功接收到服务器回传的消息 " + strText);
}
}
void AddText( string strText)
{
if ( this .textBox1.Dispatcher.CheckAccess())
{
this .textBox1.Text += strText + Environment.NewLine;
}
else
{
this .textBox1.Dispatcher.BeginInvoke(() => { this .textBox1.Text += strText + Environment.NewLine; });
}
}
}
}


最近在做 Silverlight p2p方面的开发,正在研究能不能这么做,因为网上搜到的silverlight做P2P唯一的一个例子是借助于windows Live Message 做的,而这个不太现实呵呵,但是目前看silverlight中提供的socket类,仅仅只是接收和发送的类,并没有socket服务端的方法,所以也许短期内 在silverlight上做端到端的视频对话,是不可能了,下一步将会把之前利用服务端进行视频聊天的一个demo做完善,希望在这方面有研究的朋友共同交流。
本文转自wengyuli 51CTO博客,原文链接:http://blog.51cto.com/wengyuli/587583,如需转载请自行联系原作者