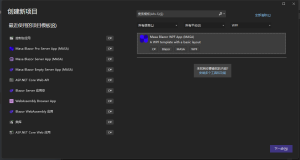
在本文将以MVVM Light Toolkit为例讲解MVVM框架在现实中的使用入门,首先我们在http://mvvmlight.codeplex.com/下载它的MVVM框架下来。也可以通过 http://files.cnblogs.com/chengxingliang/GalaSoft.MvvmLight.V3.rar 下载MVVM Light Toolkit。然后我们安装这个安装包,然后重新打开VS2010,新建一个项目,如下图所示:

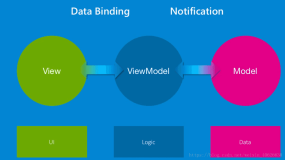
Tip:MVVM分为Model、ViewMode、View三层。
•Model是实体类层,它存放所有需要用到的实体类。
•ViewMode层是逻辑层,操作所有Model层和View界面层的逻辑运算并且作为一个大的实体类,提供属性绑定到View层上面去。
•View层是界面显示层,只需要它的Xaml代码去绑定相应的ViewMode层的属性即可。
下面我们来看新建成功的项目结构如下:

一、在这里我们先来看MainPage.xaml中的代码,在这里绑定的MainPage.xaml是View层,它绑定上了ViewModel层,也就是MainViewModel.cs类
- <UserControl x:Class="MvvmLight1.MainPage"
- xmlns="http://schemas.microsoft.com/winfx/2006/xaml/presentation"
- xmlns:x="http://schemas.microsoft.com/winfx/2006/xaml"
- xmlns:d="http://schemas.microsoft.com/expression/blend/2008"
- xmlns:mc="http://schemas.openxmlformats.org/markup-compatibility/2006"
- mc:Ignorable="d"
- Height="300"
- Width="300"
- DataContext="{Binding Main, Source={StaticResource Locator}}">
- <!--在这里绑定App.xaml中的静态资源,以连接MainViewModel类(ViewMode层) MainPage.xaml代码为View层-->
- <UserControl.Resources>
- <ResourceDictionary>
- <ResourceDictionary.MergedDictionaries>
- <ResourceDictionary Source="Skins/MainSkin.xaml" />
- </ResourceDictionary.MergedDictionaries>
- </ResourceDictionary>
- </UserControl.Resources>
- <Grid x:Name="LayoutRoot">
- <TextBlock FontSize="36"
- FontWeight="Bold"
- Foreground="Purple"
- Text="{Binding Welcome}"
- VerticalAlignment="Center"
- HorizontalAlignment="Center"
- TextWrapping="Wrap" Margin="12,25,20,171" />
- <Button Content="{Binding BtnContent}" Height="23" HorizontalAlignment="Left" Margin="12,178,0,0"
- Command="{Binding ShowMessage}" Name="button1" VerticalAlignment="Top" Width="75" />
- <Button Content="点我改变文字" Height="23" HorizontalAlignment="Left" Command="{Binding ChangeText}"
- Margin="187,178,0,0" Name="button2" VerticalAlignment="Top" Width="75" />
- </Grid>
- </UserControl>
二、然后我们看ViewModel层,在这里我们申明了一些string属性以绑定到View层得显示内容上,然后对于鼠标的点击事件采用Command 命令传递事件和处理方法,并且设置绑定。这样我们可以直接将前台的点击事件等和后台分离,并且我们可以继承INotifyPropertyChanged 接口,以让ViewModel层的属性被改变的时候,也反映到View层,在Command方法中改变ViewModel层的属性即可改变View层的前 台显示。其具体的详解在下面的代码中已经给出。
- using GalaSoft.MvvmLight;
- using System.Windows.Input;
- using GalaSoft.MvvmLight.Command;
- using System.Windows;
- using System.ComponentModel;
- namespace MvvmLight1.ViewModel
- {
- /// <summary>
- /// This class contains properties that the main View can data bind to.
- /// <para>
- /// Use the <strong>mvvminpc</strong> snippet to add bindable properties to this ViewModel.
- /// </para>
- /// <para>
- /// You can also use Blend to data bind with the tool's support.
- /// </para>
- /// <para>
- /// See http://www.galasoft.ch/mvvm/getstarted
- /// </para>
- /// </summary>
- public class MainViewModel : ViewModelBase, INotifyPropertyChanged
- {
- public string Welcome
- {
- get
- {
- return "欢迎使用MVVM Light! ";
- }
- }
- /// <summary>
- /// 类初始化
- /// </summary>
- public MainViewModel()
- {
- _btnContent = "点击我";
- RegistCommand();
- }
- //A.对于属性的绑定
- private string _btnContent;
- public string BtnContent
- {
- set
- {
- _btnContent = value;
- NotifyPropertyChanged("BtnContent");
- }
- get
- {
- return _btnContent;
- }
- }
- //B.1申明对于点击事件的绑定
- public RelayCommand ShowMessage { get; set; }
- //使用C步骤的注册,将Command和需要运行的方法联系起来。
- private void showmsg()
- {
- MessageBox.Show("你成功的将命令绑定到界面层!");
- }
- //B.2改变界面上的控件显示文字
- public RelayCommand ChangeText { get; set; }
- //执行改变文字操作
- private void changeTxt()
- {
- BtnContent = "我已经被改变了";
- }
- //是否可以改变文字
- private bool canchangeTxt()
- {
- if (BtnContent == "点击我")
- {
- return true;
- }
- else
- {
- return false;
- }
- }
- //C.对于所有的事件进行注册
- private void RegistCommand()
- {
- //C.1指定需要执行的函数showmsg()
- ShowMessage = new RelayCommand(() => showmsg());
- //先执行canchangeTxt()函数,验证是否可以改变文字,如果可以改变则执行changeTxt()函数
- ChangeText = new RelayCommand(() => changeTxt(), () => canchangeTxt());
- }
- public event PropertyChangedEventHandler PropertyChanged;
- public void NotifyPropertyChanged(string propertyName)
- {
- if (PropertyChanged != null)
- {
- PropertyChanged(this, new PropertyChangedEventArgs(propertyName));
- }
- }
- }
- }
三、在这里我们没有使用到Model层,它用于构造实体集合以绑定诸如DataGrid之类的控件。
最后我们来看实例的运行效果如下,如需源码请点击 MvvmLight1.rar 下载。

本文转自程兴亮 51CTO博客,原文链接:http://blog.51cto.com/chengxingliang/826890