1 环境
1.1 主机网络
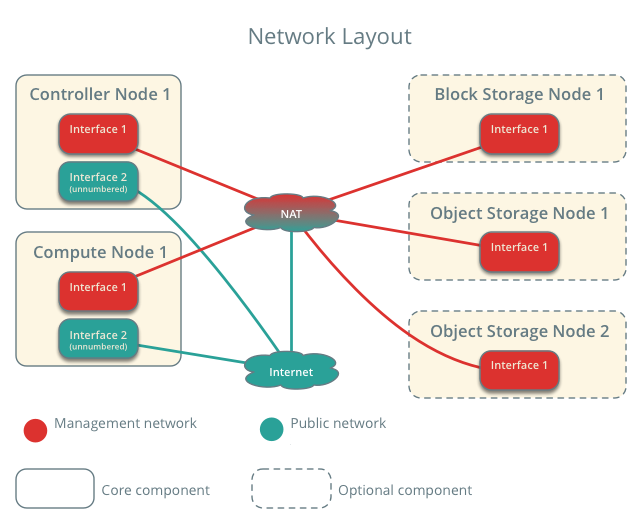
1.1.1 系统的架构
1)节点分为控制节点、计算节点、块存储节点、对象存储节点
2)所有管理网络(10.168.0.0/24)和虚拟网络都使用私网地址连接共有网络(互联网203.0.113.x/8)
3)物理网络与虚拟网络(非10.168.0.0/24段)应当处于不同的网段
4)本架构NAT中的网关地址为10.168.0.1
5)物理节点使用NAT保持时间同步
1.1.2 部署信息
1)控制节点
hostname=rodm.cmdschool.org
ip address=10.168.0.125
OS=CentOS 6.8
2)计算节点
hostname=rod0[1-2].cmdschool.org
ip address=10.168.0.[126-127]
OS=CentOS 6.8
1.1.3 名称服务(可选)
|
1
|
vim
/etc/hosts
|
输入如下信息:
|
1
2
3
|
10.168.0.125 rodm.cmdschool.org
10.168.0.126 rod01.cmdschool.org
10.168.0.127 rod02.cmdschool.org
|
1.2 安全
1.2.1 安装涉及如下密码
| Password name | Description |
| Database password (no variable used) | Root password for the database |
| ADMIN_PASS | Password of user admin |
| CEILOMETER_DBPASS |
Database password for the Telemetry service |
| CEILOMETER_PASS |
Password of Telemetry service user ceilometer |
| CINDER_DBPASS |
Database password for the Block Storage service |
| CINDER_PASS |
Password of Block Storage service user cinder |
| DASH_DBPASS |
Database password for the dashboard |
| DEMO_PASS |
Password of user demo |
| GLANCE_DBPASS |
Database password for Image service |
| GLANCE_PASS |
Password of Image service user glance |
| HEAT_DBPASS |
Database password for the Orchestration service |
| HEAT_DOMAIN_PASS |
Password of Orchestration domain |
| HEAT_PASS |
Password of Orchestration service user heat |
| KEYSTONE_DBPASS |
Database password of Identity service |
| NEUTRON_DBPASS |
Database password for the Networking service |
| NEUTRON_PASS |
Password of Networking service user neutron |
| NOVA_DBPASS |
Database password for Compute service |
| NOVA_PASS |
Password of Compute service user nova |
| RABBIT_PASS |
Password of user guest of RabbitMQ |
| SWIFT_PASS | Password of Object Storage service user swift |
1.2.2 使用随机密码部署
|
1
|
openssl rand -hex 10
|
注:以上命令可生成2.1表所需的随机密码
1.3 网络时间协议
1.3.1 控制节点
1)yum安装chrony服务
|
1
|
yum
install
-y chrony
|
2)配置chrony服务
|
1
|
vim
/etc/chrony
.conf
|
修改同步ntp地址
|
1
|
server ntp 10.168.0.x iburst
|
注:内网的NTP服务器或外网NTP服务器(其实默认亦可)
3)允许非控制节点访问ntp服务
|
1
2
3
|
vim
/etc/chrony
.conf
修改同步ntp地址
allow 10.168.0.0
/24
|
4)启动NTP服务
|
1
2
|
chkconfig chronyd on
/etc/init
.d
/chronyd
start
|
1.3.2 其他节点
1)yum安装chrony服务
|
1
|
yum
install
-y chrony
|
2)配置chrony服务
|
1
|
vim
/etc/chrony
.conf
|
修改如下:
|
1
2
3
4
5
|
#server 0.rhel.pool.ntp.org iburst
#server 1.rhel.pool.ntp.org iburst
#server 2.rhel.pool.ntp.org iburst
#server 3.rhel.pool.ntp.org iburst
server 10.168.0.125 iburst
|
3)启动NTP服务
centos6:
|
1
2
|
chkconfig chronyd on
/etc/init
.d
/chronyd
start
|
centos7:
|
1
2
|
systemctl
enable
chronyd.service
systemctl start chronyd.service
|
1.3.3 验证操作
1)控制节点
|
1
|
chronyc sources
|
显示如下:
|
1
2
3
4
5
6
7
|
210 Number of sources = 4
MS Name
/IP
address Stratum Poll Reach LastRx Last sample
===============================================================================
^- 59.46.44.253 2 8 377 159 -3305us[-3305us] +
/-
66ms
^+ dns1.synet.edu.cn 2 8 377 165 -1231us[ -951us] +
/-
31ms
^* time5.aliyun.com 2 8 377 160 -30us[ +250us] +
/-
27ms
^+ time7.aliyun.com 2 8 377 162 +1348us[+1628us] +
/-
35ms
|
2)其他节点
|
1
|
chronyc sources
|
显示如下:
|
1
2
3
4
|
210 Number of sources = 1
MS Name
/IP
address Stratum Poll Reach LastRx Last sample
===============================================================================
^? 10.168.0.125 0 7 0 10y +0ns[ +0ns] +
/-
0ns
|
1.4 配置OpenStack包
1.4.1 启用OpenStack库
|
1
|
yum
install
-y centos-release-openstack.noarch
|
1.4.2 完成安装
1)更新系统
|
1
|
yum -y upgrade
|
2)安装OpenStack客户端
|
1
|
yum
install
-y python-openstackclient
|
1.5 关系型数据库的安装
1.5.1 配置MariaDB的yum源(可选)
|
1
|
vim
/etc/yum
.repos.d
/MariaDB
.repo
|
输入内容如下:
|
1
2
3
4
5
|
[MariaDB]
name=MariaDB
baseurl=http:
//yum
.mariadb.org
/10
.0
/centos6-amd64/
gpgcheck=1
gpgkey=http:
//yum
.mariadb.org
/RPM-GPG-KEY-MariaDB
|
1.5.2 安装MariaDB
|
1
|
yum
install
-y MariaDB-client MariaDB-server MySQL-python
|
1.5.3 配置MariaDB
|
1
|
vim
/etc/my
.cnf.d
/mariadb_openstack
.cnf
|
加入如下内容:
|
1
2
3
4
5
6
7
8
9
|
[mysqld]
bind-address = 10.168.0.125
default-storage-engine = innodb
innodb_file_per_table
collation-server = utf8_general_ci
init-connect =
'SET NAMES utf8'
character-
set
-server = utf8
|
1.5.4 完成安装
1)启动服务并配置默认启动
|
1
2
|
/etc/init
.d
/mysql
start
chkconfig mysql on
|
2)初始化数据库
|
1
|
mysql_secure_installation
|
配置向导如下:
|
1
2
3
4
5
6
7
8
9
10
11
12
13
14
15
16
17
18
19
20
21
22
23
24
25
|
[...]
Set root password? [Y
/n
] y
New password:
Re-enter new password:
Password updated successfully!
Reloading privilege tables..
... Success!
[...]
Remove anonymous
users
? [Y
/n
] y
... Success!
[...]
Disallow root login remotely? [Y
/n
] n
... skipping.
[...]
Remove
test
database and access to it? [Y
/n
] y
- Dropping
test
database...
... Success!
- Removing privileges on
test
database...
... Success!
[...]
Reload privilege tables now? [Y
/n
] y
... Success!
Cleaning up...
[...]
|
1.6 非关系型数据库的安装
1.6.1 配置MongoDB的yum源
|
1
|
vim
/etc/yum
.repos.d
/MongoDB
.repo
|
输入如下内容:
|
1
2
3
4
|
[MongoDB]
name=MongoDB
baseurl=http:
//downloads-distro
.mongodb.org
/repo/redhat/os/x86_64/
gpgcheck=0
|
1.6.2 安装MongoDB
|
1
|
yum
install
-y mongodb-org mongodb-org-server
|
1.6.3 配置MongoDB
1)配置管理地址
|
1
|
vim
/etc/mongod
.conf
|
修改如下参数
|
1
|
bind_ip=10.168.0.125
|
2)限制日志文件大小
|
1
|
vim
/etc/mongod
.conf
|
修改如下参数
|
1
|
smallfiles =
true
|
1.6.4 完成安装
|
1
2
|
/etc/init
.d
/mongod
start
chkconfig mongod on
|
1.7 安装消息队列服务
1.7.1 配置yum源
1)配置ERLang的yum源
|
1
|
vim erlang-solutions.repo
|
输入如下内容:
|
1
2
3
4
5
6
|
[erlang-solutions]
name=Centos $releasever - $basearch - Erlang Solutions
baseurl=https:
//packages
.erlang-solutions.com
/rpm/centos/
$releasever/$basearch
gpgcheck=1
gpgkey=https:
//packages
.erlang-solutions.com
/rpm/erlang_solutions
.asc
enabled=1
|
2)解决SOCat的源问题
|
1
2
|
wget http:
//pkgs
.repoforge.org
/rpmforge-release/rpmforge-release-0
.5.3-1.el6.rf.x86_64.rpm
rpm -ivh rpmforge-release-0.5.3-1.el6.rf.x86_64.rpm
|
1.7.2 安装RabbitMQ
|
1
|
yum
install
-y http:
//www
.rabbitmq.com
/releases/rabbitmq-server/v3
.6.2
/rabbitmq-server-3
.6.2-1.noarch.rpm
|
1.7.3 启动并配置服务开机自启动
|
1
2
|
/etc/init
.d
/rabbitmq-server
start
chkconfig rabbitmq-server on
|
1.7.4 增加OpenStack用户
|
1
|
rabbitmqctl add_user openstack RABBIT_PASS
|
显示如下:
|
1
|
Creating user
"openstack"
...
|
1.7.5 允许配置和读写访问权限
|
1
|
rabbitmqctl set_permissions openstack
".*"
".*"
".*"
|
显示如下:
|
1
|
Setting permissions
for
user
"openstack"
in
vhost
"/"
...
|
注:文章为项目的安装测试文档,可能会根据后面的章节修改,如果有兴趣请持续关注。


