About EJBCA
EJBCA is an enterprise class PKI Certificate Authority built on J2EE
technology. It is a robust, high performance, platform independent, flexible,
and component based CA to be used stand-alone or integrated in other J2EE
applications.
EJBCA is an enterprise class PKI, meaning that you can use EJBCA to build a
complete PKI infrastructure for your organization. If you only want to issue a
few single certificates for testing, there are probably options that will get
you started quicker, but if you want a serious PKI we recommend EJBCA.
How to install EJBCA
Firstly, you have to download those tools:
1.JDK
Here I use JDK1.6.0_06
2.JCE
of course, this version should fit to JDK
3.JBOSS
Jboss is a default Ejbca application server, so here i use JBoss-5.0.1.GA-
jdk6.zip
4.Ant
Ant is a java-based build tool, ejbca is devloped in java so you should use it,
4.Ant
Ant is a java-based build tool, ejbca is devloped in java so you should use it,
here i use apache-ant-1.7.1-bin.zip
5.Mysql
Of course, mysql is one of databse chooses, you can use others. Here i use
5.Mysql
Of course, mysql is one of databse chooses, you can use others. Here i use
Mysql 5
6.EJBCA
In EJBCA.org, the latest version is 3.8.2, but it not fit to current tools, so
6.EJBCA
In EJBCA.org, the latest version is 3.8.2, but it not fit to current tools, so
i use ejbca_3_8_1.zip
Note:
The version about i just say must be deal, you'd better not change for you can
The version about i just say must be deal, you'd better not change for you can
follow and get a success!
Second, let's install them.
before install them, you should prepare a directory to contain them, for
before install them, you should prepare a directory to contain them, for
example, i set path to E:\Java_dev.
1.install JDK1.6
Install it to E:\Java_dev\JDK1.6.0
2.install JCE
Copy this zip's jar to E:\Java_dev\JDK1.6.0\jre\lib\security and c:\program
1.install JDK1.6
Install it to E:\Java_dev\JDK1.6.0
2.install JCE
Copy this zip's jar to E:\Java_dev\JDK1.6.0\jre\lib\security and c:\program
Files\Java\jre6\lib\security.
3.install mysql
if you download an unintall mysql.zip, ok you just have to unzip it to
3.install mysql
if you download an unintall mysql.zip, ok you just have to unzip it to
E:\Java_dev\mysql-5.1.32-win32, after that, make sure you have create a
database named ejbca successfully.
4.install jboss, ant and ejbca
Unzip them to independent directory, such as E:\Java_dev\jboss-5.0.1.GA,
4.install jboss, ant and ejbca
Unzip them to independent directory, such as E:\Java_dev\jboss-5.0.1.GA,
E:\Java_dev\apache-ant-1.7.1 and E:\Java_dev\ejbca_3_8_1
Note:
After you unzip jboss, you have to copy mysql5's jar(mysql-connector-java-
After you unzip jboss, you have to copy mysql5's jar(mysql-connector-java-
5.1.7-bin.jar) to E:\Java_dev\jboss-5.0.1.GA\server\default\lib.
Third step is set environment variables
1.JAVA_HOME
JAVA_HOME=E:\Java_dev\JDK1.6.0;
2.JBOSS_HOME
JBOSS_HOME=E:\Java_dev\jboss-5.0.1.GA
3.ANT_HOME
ANT_HOME=E:\Java_dev\apache-ant-1.7.1
4.ANT_OPTS
ANT_OPTS = -Xmx640m
5.PATH
PATH = %JAVA_HOME%\BIN;%JBOSS_HOME%\BIN;%ANT_HOME%\bin;
6.CLASSPATH
CLASSPATH= %JAVA_HOME%\lib\dt.jar;%JAVA_HOME%\lib\tools.jar;%JAVA_HOME%\lib;
Fourth, set some setting of EJBCA
1.In effect ejbca properties
Enter directory %EJBCA_HOME%\conf\, change ejbca.properties.sample to
1.In effect ejbca properties
Enter directory %EJBCA_HOME%\conf\, change ejbca.properties.sample to
ejbca.properties, web.properties.sample to web.properties and
database.properties.sample to database.properties
2.In effect database type to ejbca
Open file database.properties, set some setting of database to mysql, detail
2.In effect database type to ejbca
Open file database.properties, set some setting of database to mysql, detail
like this:
database.name=mysql
datasource.mapping=mySQL
database.url=jdbc:mysql://127.0.0.1:3306/ejbca?characterEncoding=UTF-8
database.driver=com.mysql.jdbc.Driver
database.username=root
database.password=1234
database.name=mysql
datasource.mapping=mySQL
database.url=jdbc:mysql://127.0.0.1:3306/ejbca?characterEncoding=UTF-8
database.driver=com.mysql.jdbc.Driver
database.username=root
database.password=1234
Note:
If your mysql
If your mysql
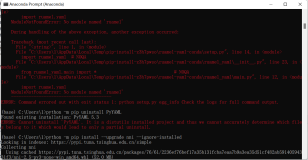
Five, compile and install ejbca
'CMD' enter command line, enter your ejbca_home, here is
'CMD' enter command line, enter your ejbca_home, here is
E:\Java_dev\ejbca_3_8_1
1.compile ejbca
enter 'ant bootstrap'
2.start jboss
enter 'run.bat'
3.intall ejbca
enter 'ant install'
4.stop jboos
close jboss window.
5.deploy ejbca
enter 'ant deploy'
1.compile ejbca
enter 'ant bootstrap'
2.start jboss
enter 'run.bat'
3.intall ejbca
enter 'ant install'
4.stop jboos
close jboss window.
5.deploy ejbca
enter 'ant deploy'
Note:
If failed, please check your 'path' is ok? Or your version are fit each other?
If failed, please check your 'path' is ok? Or your version are fit each other?
Six, install CA
If those setp is pass, ok, congratulation!
Enter %EJBCA_HOME%\p12 directory, double click the file named 'superadmin.p12',
If those setp is pass, ok, congratulation!
Enter %EJBCA_HOME%\p12 directory, double click the file named 'superadmin.p12',
the password is 'ejbca', enter it then you will be ok.
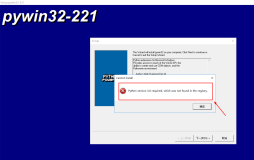
Seven, Check your install success or not
1.'CMD' enter command line, start jboss with 'run.bat'
2.Open IE7 or some others, enter [url]https://localhost:8443/ejbca/adminweb[/url], go!
1.'CMD' enter command line, start jboss with 'run.bat'
2.Open IE7 or some others, enter [url]https://localhost:8443/ejbca/adminweb[/url], go!
when you meet the pop-up message-box, choose ok then go on, soon you will see
the EJBCA Management Page. And it's mean you have install EJBCA_3_8_1 success!
Ok, let's do it by yourself, good luck!
If you have any question, please contact me by MSN:danni-505@hotmail.com,
If you have any question, please contact me by MSN:danni-505@hotmail.com,
thanks for your reading.
本文转自danni505 51CTO博客,原文链接:http://blog.51cto.com/danni505/146948,如需转载请自行联系原作者