图像处理之图像内插值与外插值
两张图像混合时通过内插与外插值方法可以实现图像亮度、对比度、饱和度、填色、锐化等常见的图像处理操作。在两张图像混合时最常见是线性插值方法,使用的混合权重公式如下:

这个就是两张图像最常见的混合公式,其实我们很少考虑到值大于1的情况,当这个时候得到的效果跟在值属于[0,1]之间相反,我们称之为两张图像混合的外插值方法,而常见的值属于[0,1]之间称之为内插值方法。外插值可以用来生成跟内插值效果相反的图像,比如内插值模糊图像,通过外插值可以去模糊,外插值可以调节饱和度,可以实现图像一些列的处理比如亮度、饱和度、对比度、锐化调整。
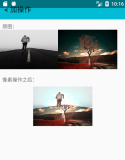
一:改变亮度
创建一张跟输入图像大小一致的黑色图像,对图像混合时使用内插值方法,我们可以得到一个比较暗的版本图像,通过混合时候使用外插值方法,得到一个亮度更高的版本图像。效果如下:

代码如下:
package com.gloomyfish.ii.demo;

import java.awt.image.BufferedImage;
import java.util.Arrays;

public class AdjustBrightness extends AbstractImageOptionFilter {

	private float alpha;
	public AdjustBrightness() {
		alpha = 0.5f;
	}

	public float getAlpha() {
		return alpha;
	}

	public void setAlpha(float alpha) {
		this.alpha = alpha;
	}

	@Override
	public BufferedImage process(BufferedImage image) {
		int width = image.getWidth();
		int height = image.getHeight();

		// create black image
		BufferedImage bimage = new BufferedImage(width, height, BufferedImage.TYPE_INT_ARGB);
		int r = 0, g = 0, b = 0;
		int pixel = (0xff << 24) | (r << 16) | (g << 8) | b;
		int[] values = new int[width * height];
		Arrays.fill(values, pixel);
		setRGB(bimage, 0, 0, width, height, values);

		// adjust contrast
		int[] pixels = new int[width * height];
		int[] outPixels = new int[width * height];
		getRGB(image, 0, 0, width, height, pixels);
		int index = 0;
		for (int row = 0; row < height; row++) {
			for (int col = 0; col < width; col++) {
				index = row*width + col;
				// black image
				int r1 = (values[index]&0xff0000)>>16;
				int g1 = (values[index]&0xff00)>>8;
				int b1 = values[index]&0xff;

				// target image
				int r2 = (pixels[index]&0xff0000)>>16;
				int g2 = (pixels[index]&0xff00)>>8;
				int b2 = pixels[index]&0xff;

				r = clamp((int)(r1*(1.0 - alpha) + r2*alpha));
				g = clamp((int)(g1*(1.0 - alpha) + g2*alpha));
				b = clamp((int)(b1*(1.0 - alpha) + b2*alpha));

				outPixels[index] = (0xff << 24) | (r << 16) | (g << 8) | b;
			}
		}

		BufferedImage dest = new BufferedImage(width, height, BufferedImage.TYPE_INT_ARGB);
		setRGB(dest, 0, 0, width, height, outPixels);
		return dest;
	}

}
二:调整对比度
计算当前输入图像的平均亮度得到一张常量亮度的图像,用该图像跟原图像进行权重混合当alpha值在0到1之间是内插值得到对比度降低的图片,当值大于1时候是外插值得到对比度提高图片。效果如下:

代码如下:
package com.gloomyfish.ii.demo;

import java.awt.image.BufferedImage;
import java.util.Arrays;

public class AdjustContrast extends AbstractImageOptionFilter {

	private float alpha;

	public AdjustContrast() {
		alpha = 0.5f;
	}

	public float getAlpha() {
		return alpha;
	}

	public void setAlpha(float alpha) {
		this.alpha = alpha;
	}

	@Override
	public BufferedImage process(BufferedImage image) {
		int width = image.getWidth();
		int height = image.getHeight();
		int[] pixels = new int[width * height];
		int[] outPixels = new int[width * height];
		getRGB(image, 0, 0, width, height, pixels);

		// the average luminance image
		int[] values = createLuminanceImage(width, height, pixels);
		int r=0, g=0, b=0;

		// adjust contrast
		int index = 0;
		for (int row = 0; row < height; row++) {
			for (int col = 0; col < width; col++) {
				index = row*width + col;
				// constant means image
				int r1 = (values[index]&0xff0000)>>16;
				int g1 = (values[index]&0xff00)>>8;
				int b1 = values[index]&0xff;

				// target image
				int r2 = (pixels[index]&0xff0000)>>16;
				int g2 = (pixels[index]&0xff00)>>8;
				int b2 = pixels[index]&0xff;

				r = clamp((int)(r1*(1.0 - alpha) + r2*alpha));
				g = clamp((int)(g1*(1.0 - alpha) + g2*alpha));
				b = clamp((int)(b1*(1.0 - alpha) + b2*alpha));

				outPixels[index] = (0xff << 24) | (r << 16) | (g << 8) | b;
			}
		}

		BufferedImage dest = new BufferedImage(width, height, BufferedImage.TYPE_INT_ARGB);
		setRGB(dest, 0, 0, width, height, outPixels);
		return dest;
	}

	private int[] createLuminanceImage(int width, int height, int[] pixels) {
		int r = 0, g = 0, b = 0;
		int index = 0;
		double sumr = 0, sumg = 0, sumb = 0;
		for(int row=0; row<height; row++) {
			for(int col=0; col<width; col++) {
				r = (pixels[index]&0xff0000)>>16;
				g = (pixels[index]&0xff00)>>8;
				b = pixels[index]&0xff;

				sumr += r;
				sumg += g;
				sumb += b;

				// double gray = (0.2126 * r + 0.7152 * g + 0.0722 * b);
			}
		}

		int tp = width * height;
		r= (int)(sumr / tp);
		g= (int)(sumg / tp);
		b= (int)(sumb / tp);
		int pixel = (0xff << 24) | (r << 16) | (g << 8) | b;
		int[] values = new int[width * height];
		Arrays.fill(values, pixel);
		return values;
	}

}
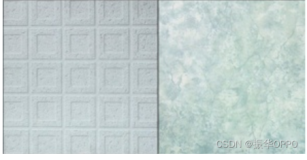
三:模糊与锐化
对输入图像进行模糊得到一张模糊版本的图像跟原图像进行混合当alpha值在0~1之间时内插值得到轻微模糊图像,当值大于1时候得到反模糊的锐化效果图像。效果显示如下:

代码显示如下:
package com.gloomyfish.ii.demo;

import java.awt.image.BufferedImage;

public class AdjustBlurAndSharpen extends AbstractImageOptionFilter {

	private float alpha;
	private BufferedImage blurImage;

	public AdjustBlurAndSharpen() {
		alpha = 0.5f;
	}

	public float getAlpha() {
		return alpha;
	}

	public void setAlpha(float alpha) {
		this.alpha = alpha;
	}

	public BufferedImage getBlurImage() {
		return blurImage;
	}

	public void setBlurImage(BufferedImage blurImage) {
		this.blurImage = blurImage;
	}

	@Override
	public BufferedImage process(BufferedImage image) {
		int width = image.getWidth();
		int height = image.getHeight();

		// read blur image
		int r=0, g=0, b=0;
		int[] values = new int[width * height];
		getRGB(blurImage, 0, 0, width, height, values);

		// adjust contrast
		int[] pixels = new int[width * height];
		int[] outPixels = new int[width * height];
		getRGB(image, 0, 0, width, height, pixels);
		int index = 0;
		for (int row = 0; row < height; row++) {
			for (int col = 0; col < width; col++) {
				index = row * width + col;
				// blur image
				int r1 = (values[index] & 0xff0000) >> 16;
				int g1 = (values[index] & 0xff00) >> 8;
				int b1 = values[index] & 0xff;

				// original image
				int r2 = (pixels[index] & 0xff0000) >> 16;
				int g2 = (pixels[index] & 0xff00) >> 8;
				int b2 = pixels[index] & 0xff;

				// final result
				r = clamp((int) (r1 * (1.0 - alpha) + r2 * alpha));
				g = clamp((int) (g1 * (1.0 - alpha) + g2 * alpha));
				b = clamp((int) (b1 * (1.0 - alpha) + b2 * alpha));

				outPixels[index] = (0xff << 24) | (r << 16) | (g << 8) | b;
			}
		}

		BufferedImage dest = new BufferedImage(width, height, BufferedImage.TYPE_INT_ARGB);
		setRGB(dest, 0, 0, width, height, outPixels);
		return dest;
	}

}
内插值与外插值通过两张图像的权重混合巧妙的实现了常见的图像亮度、对比度、模糊与锐化操作,这样的操作简单直观,避免了亮度调整时候色彩空间转换和锐化时候需要掩膜计算的问题。是一种新的调整图像对比度、亮度、模糊与锐化的手段。
本篇文章也是本人第100篇图像处理文章,分享有用知识,各位支持是我坚持下来的最大动力